【深度学习】基于PyTorch搭建ResNet18、ResNet34、ResNet50、ResNet101、ResNet152网络_resnet34 resnet101-程序员宅基地
技术标签: resnet 深度学习 pytorch resnet18 34 resnet 101 152
一、使用PyTorch搭建ResNet18网络并使用CIFAR10数据集训练测试
1. ResNet18网络结构
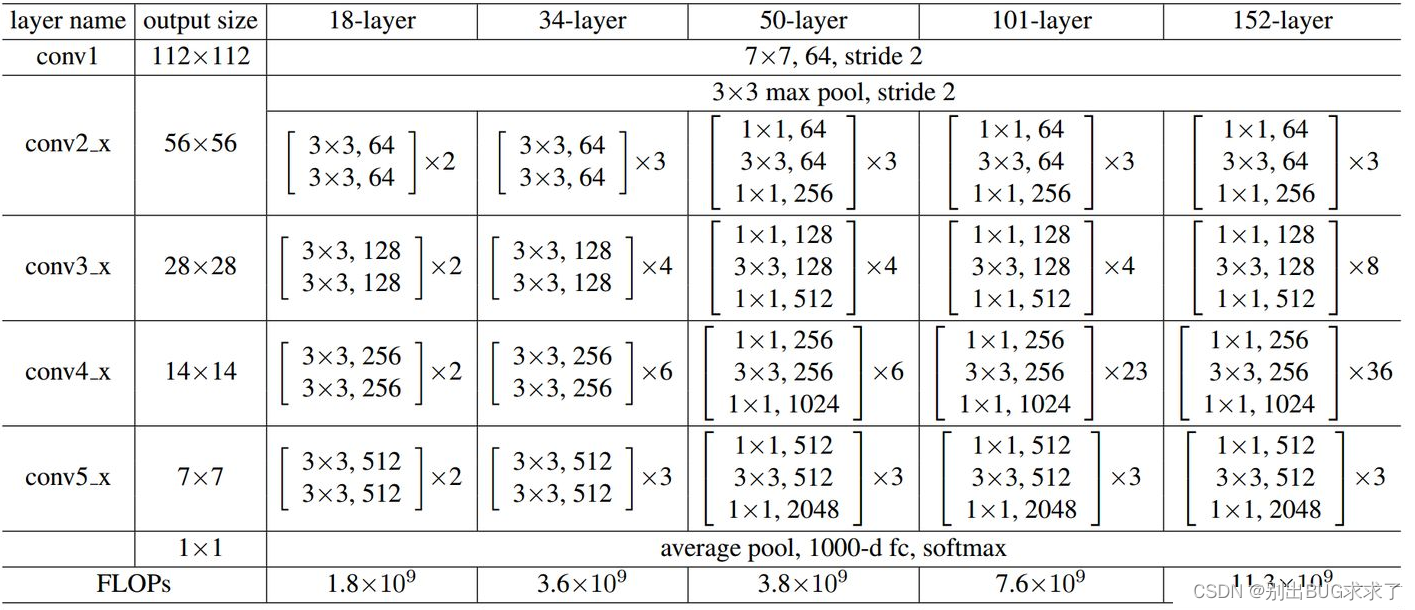
所有不同层数的ResNet:
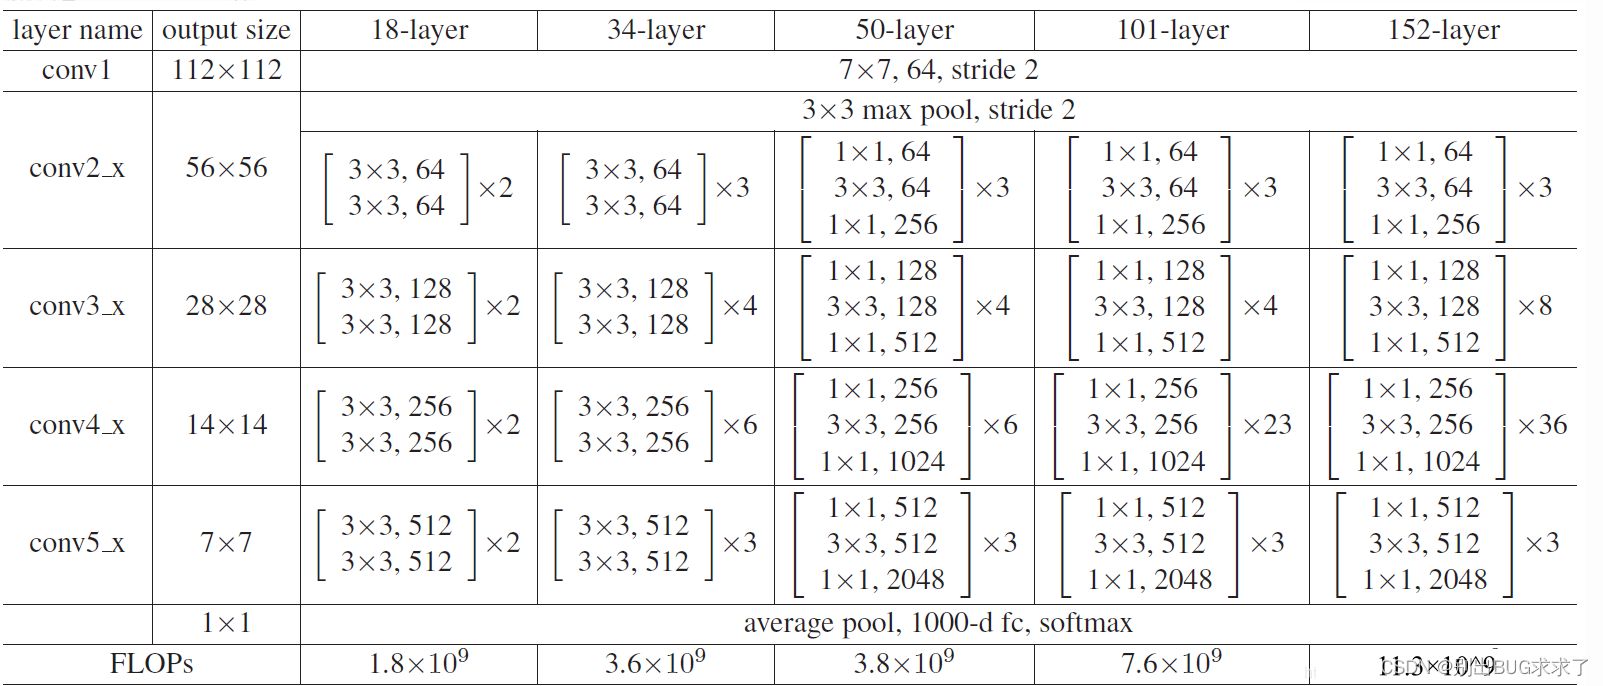
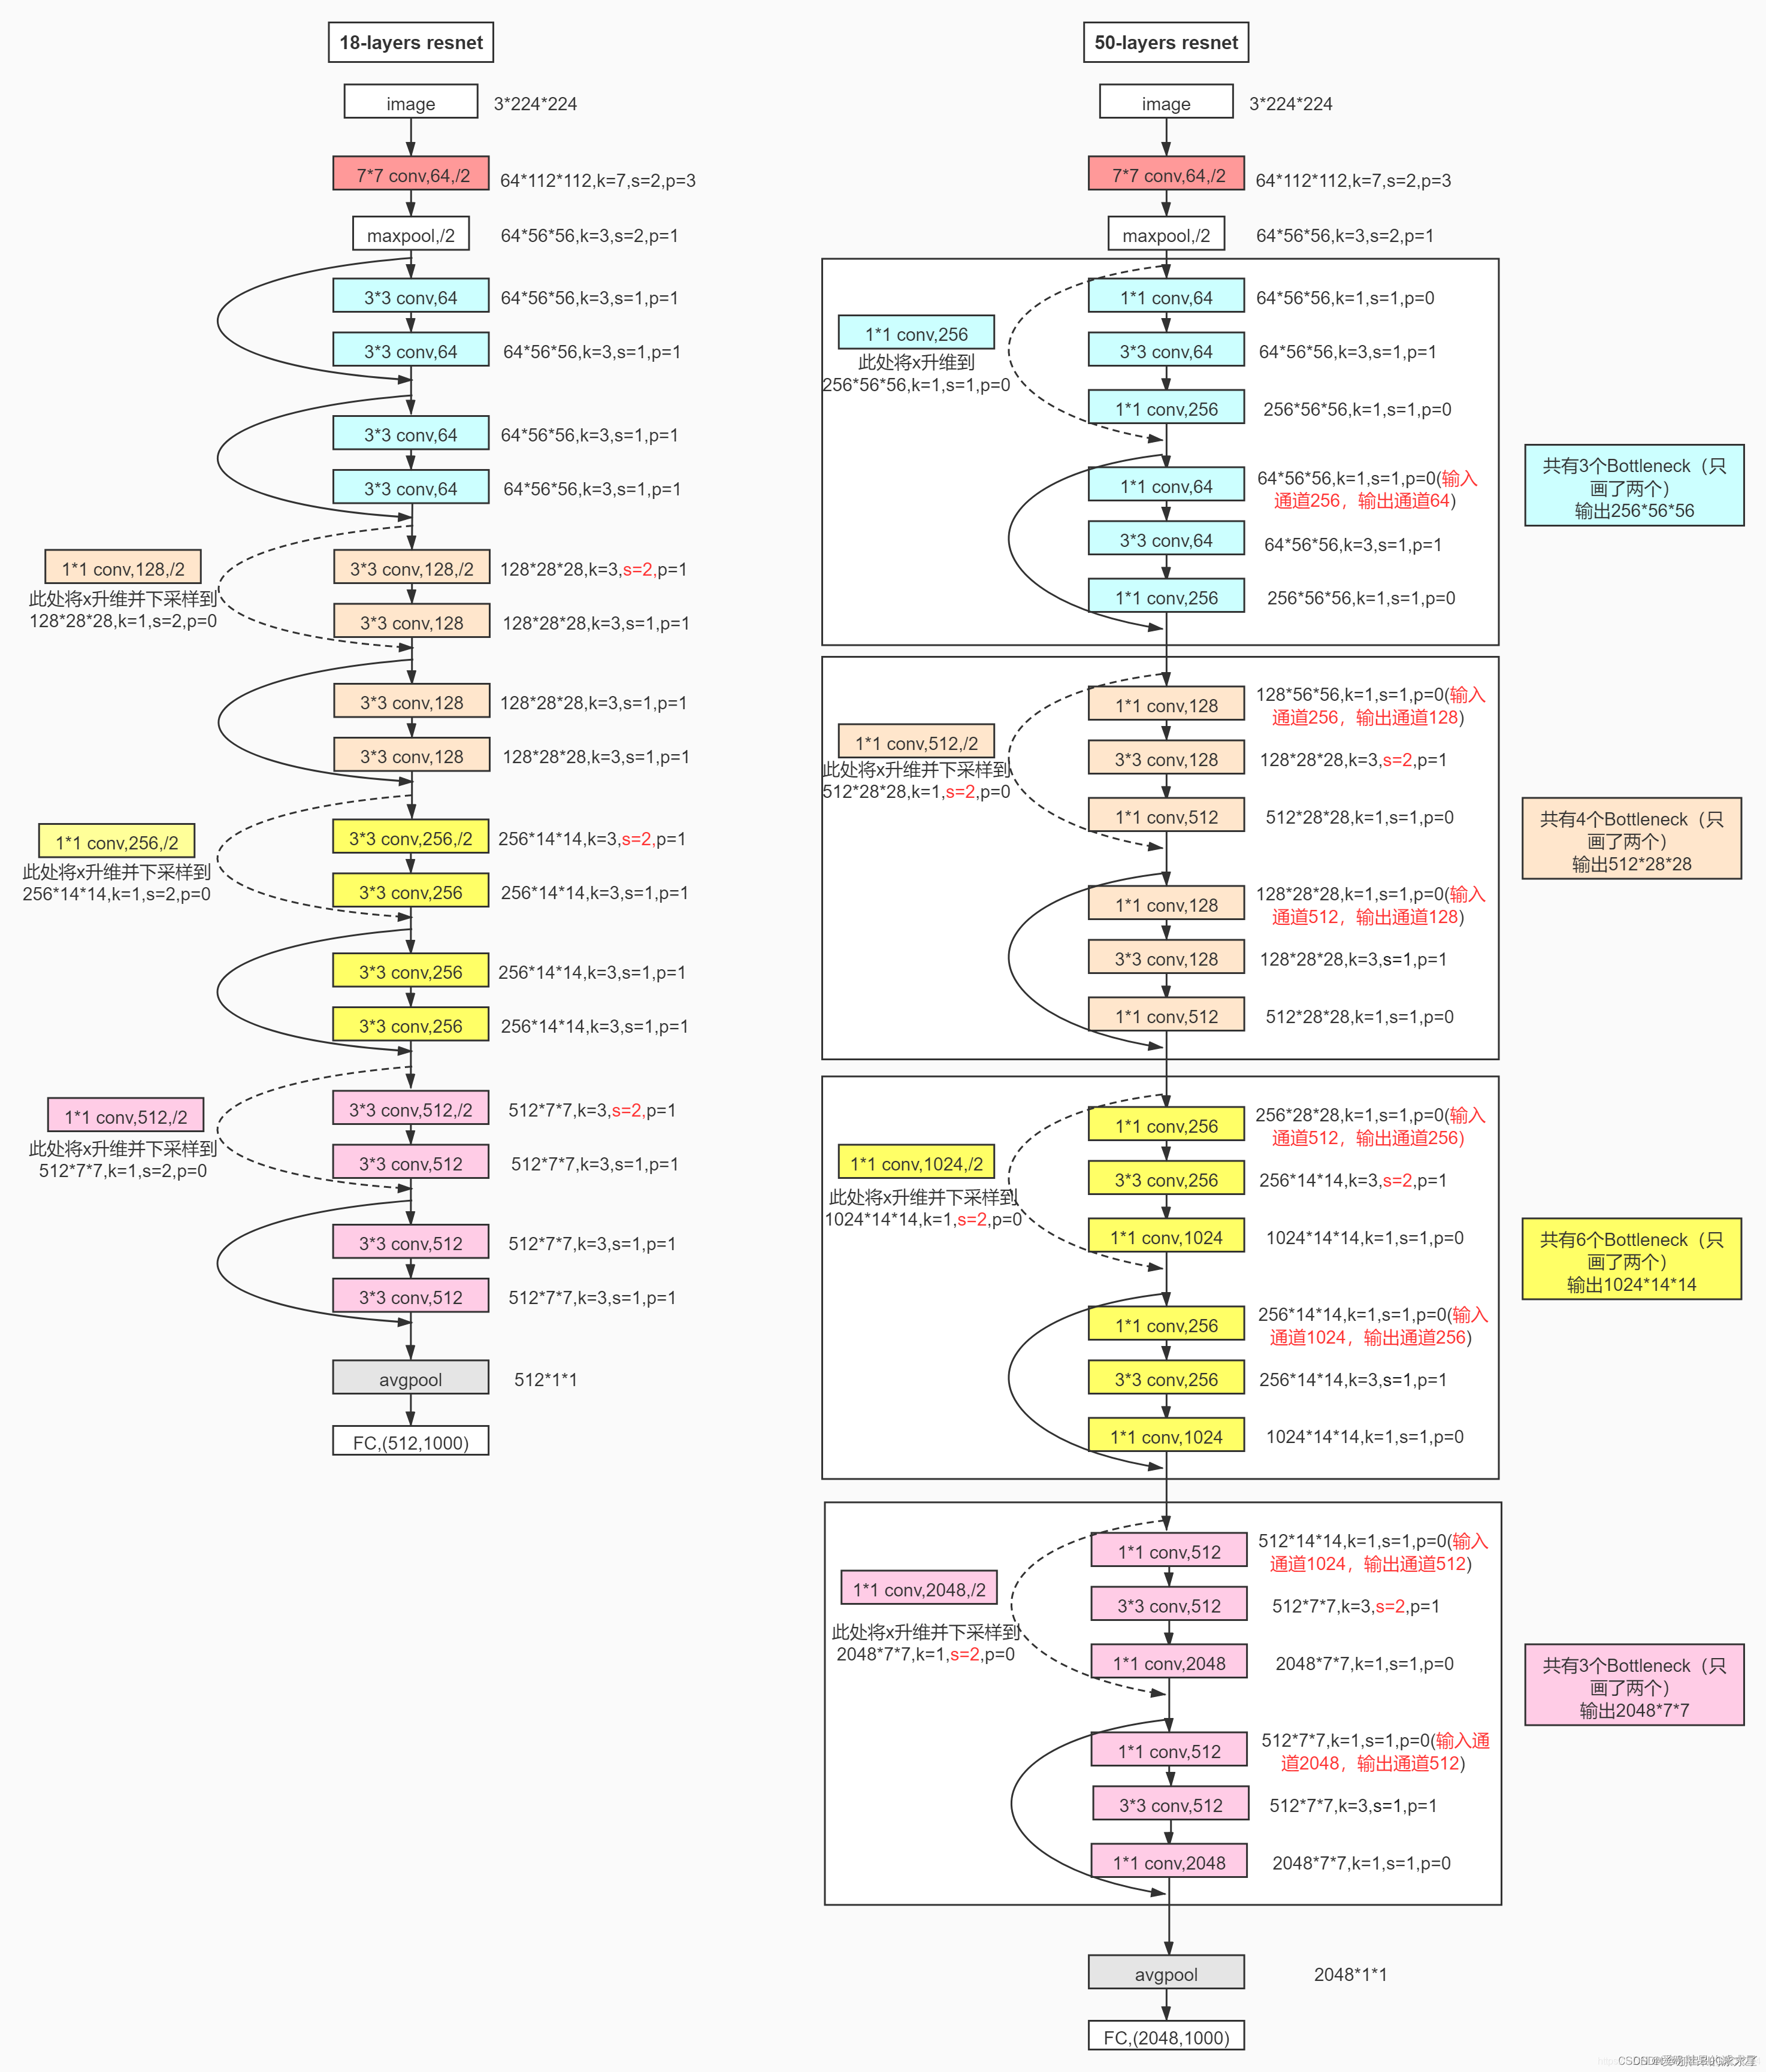
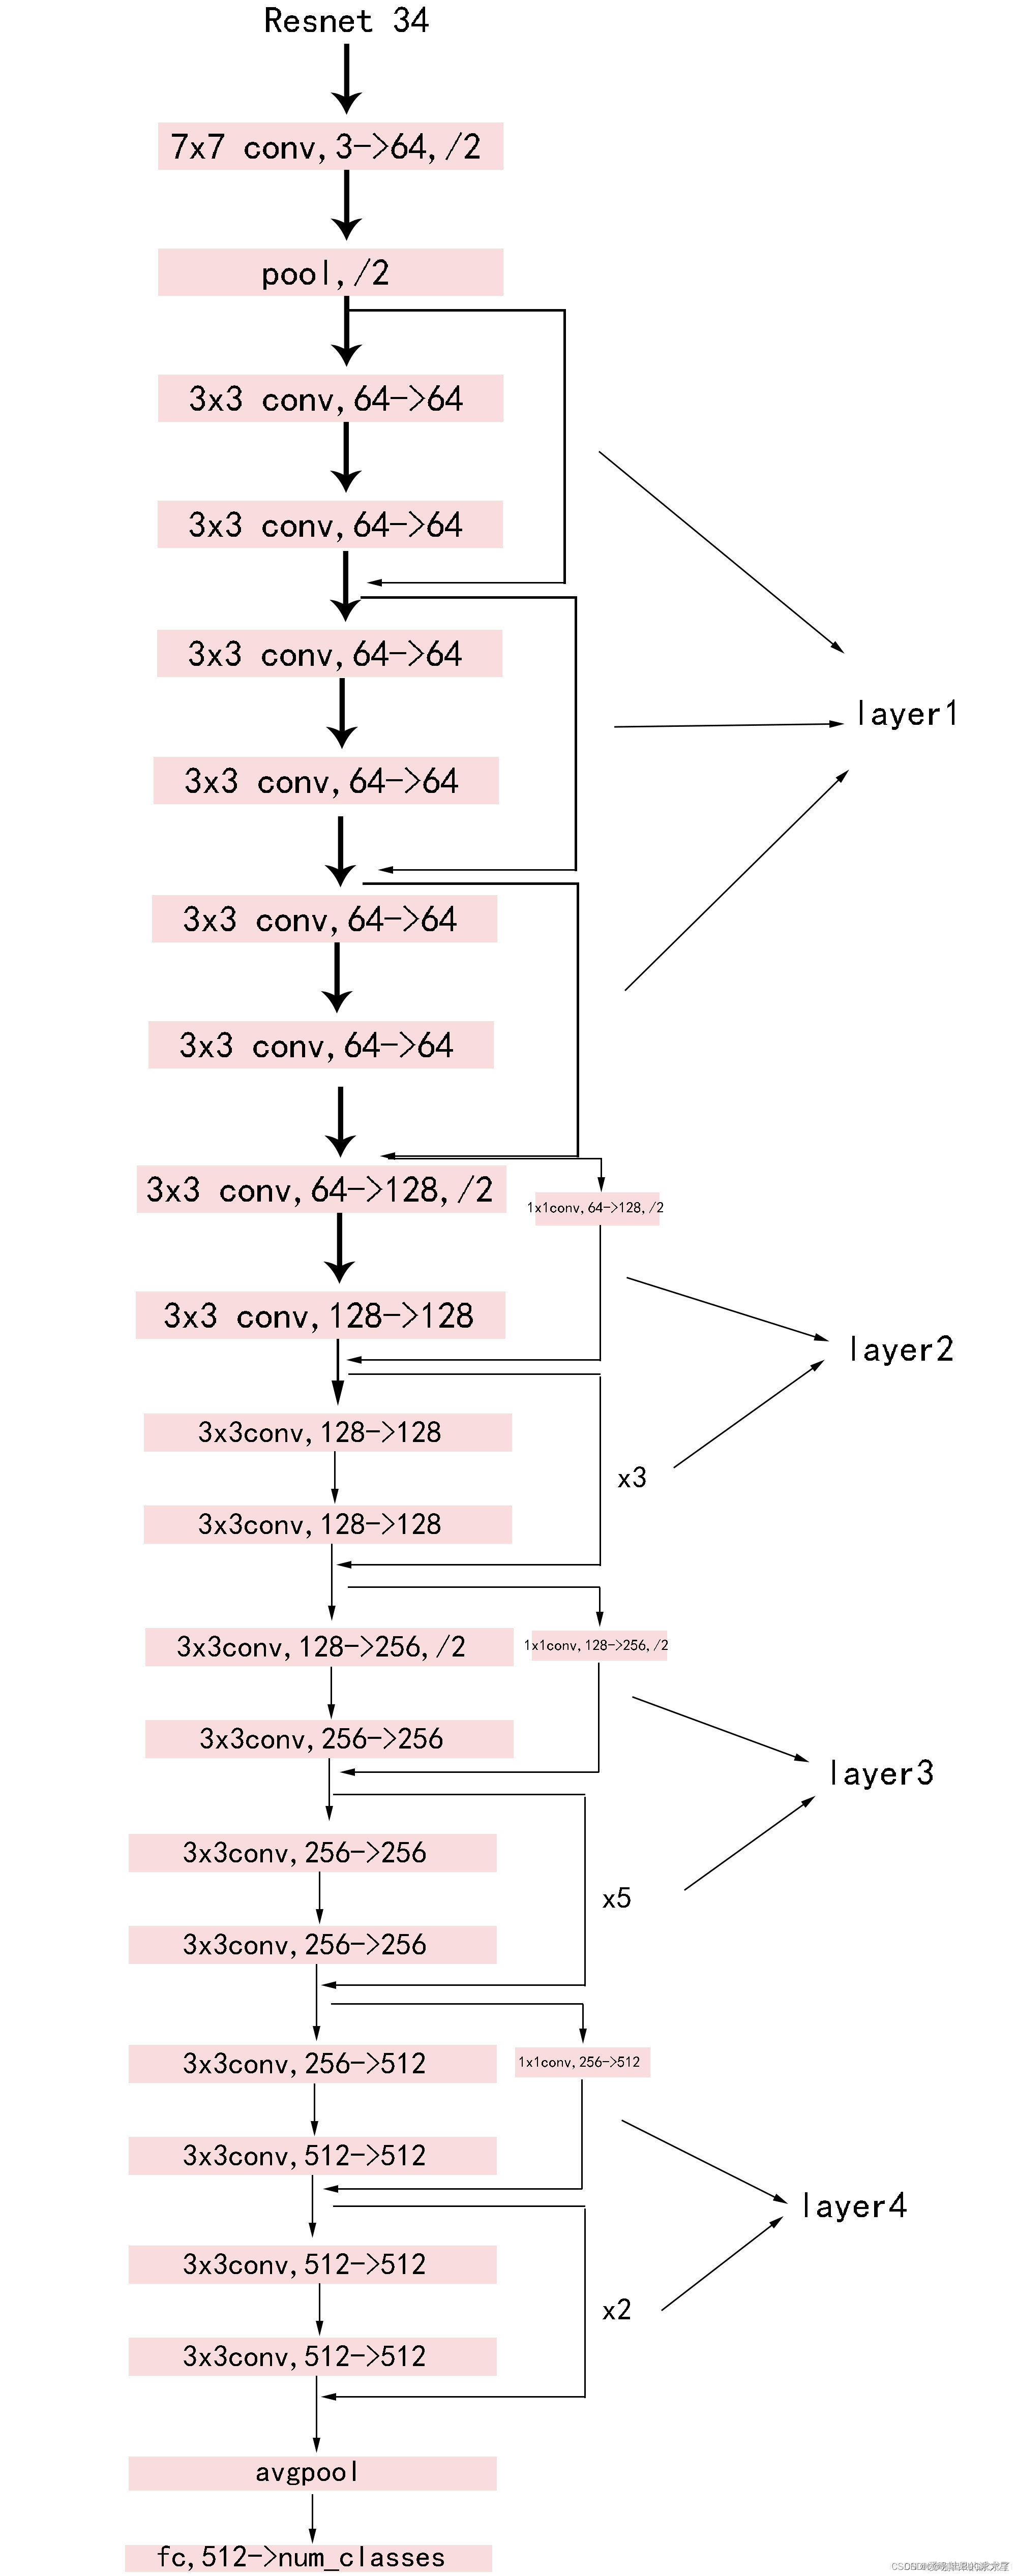
这里给出了我认为比较详细的ResNet18网络具体参数和执行流程图:
2. 实现代码
这里并未采用BasicBlock和BottleNeck复现ResNet18
具体ResNet原理细节这里不多做描述,直接上代码
model.py网络模型部分:
import torch
import torch.nn as nn
from torch.nn import functional as F


"""
把ResNet18的残差卷积单元作为一个Block,这里分为两种:一种是CommonBlock,另一种是SpecialBlock,最后由ResNet18统筹调度
其中SpecialBlock负责完成ResNet18中带有虚线(升维channel增加和下采样操作h和w减少)的Block操作
其中CommonBlock负责完成ResNet18中带有实线的直接相连相加的Block操作
注意ResNet18中所有非shortcut部分的卷积kernel_size=3, padding=1,仅仅in_channel, out_channel, stride的不同
注意ResNet18中所有shortcut部分的卷积kernel_size=1, padding=0,仅仅in_channel, out_channel, stride的不同
"""


class CommonBlock(nn.Module):
    def __init__(self, in_channel, out_channel, stride):        # 普通Block简单完成两次卷积操作
        super(CommonBlock, self).__init__()
        self.conv1 = nn.Conv2d(in_channel, out_channel, kernel_size=3, stride=stride, padding=1, bias=False)
        self.bn1 = nn.BatchNorm2d(out_channel)
        self.conv2 = nn.Conv2d(out_channel, out_channel, kernel_size=3, stride=stride, padding=1, bias=False)
        self.bn2 = nn.BatchNorm2d(out_channel)

    def forward(self, x):
        identity = x                                            # 普通Block的shortcut为直连,不需要升维下采样

        x = F.relu(self.bn1(self.conv1(x)), inplace=True)       # 完成一次卷积
        x = self.bn2(self.conv2(x))                             # 第二次卷积不加relu激活函数

        x += identity                                           # 两路相加
        return F.relu(x, inplace=True)                          # 添加激活函数输出


class SpecialBlock(nn.Module):                                  # 特殊Block完成两次卷积操作,以及一次升维下采样
    def __init__(self, in_channel, out_channel, stride):        # 注意这里的stride传入一个数组,shortcut和残差部分stride不同
        super(SpecialBlock, self).__init__()
        self.change_channel = nn.Sequential(                    # 负责升维下采样的卷积网络change_channel
            nn.Conv2d(in_channel, out_channel, kernel_size=1, stride=stride[0], padding=0, bias=False),
            nn.BatchNorm2d(out_channel)
        )
        self.conv1 = nn.Conv2d(in_channel, out_channel, kernel_size=3, stride=stride[0], padding=1, bias=False)
        self.bn1 = nn.BatchNorm2d(out_channel)
        self.conv2 = nn.Conv2d(out_channel, out_channel, kernel_size=3, stride=stride[1], padding=1, bias=False)
        self.bn2 = nn.BatchNorm2d(out_channel)

    def forward(self, x):
        identity = self.change_channel(x)                       # 调用change_channel对输入修改,为后面相加做变换准备

        x = F.relu(self.bn1(self.conv1(x)), inplace=True)
        x = self.bn2(self.conv2(x))                             # 完成残差部分的卷积

        x += identity
        return F.relu(x, inplace=True)                          # 输出卷积单元


class ResNet18(nn.Module):
    def __init__(self, classes_num):
        super(ResNet18, self).__init__()
        self.prepare = nn.Sequential(           # 所有的ResNet共有的预处理==》[batch, 64, 56, 56]
            nn.Conv2d(3, 64, 7, 2, 3),
            nn.BatchNorm2d(64),
            nn.ReLU(inplace=True),
            nn.MaxPool2d(3, 2, 1)
        )
        self.layer1 = nn.Sequential(            # layer1有点特别,由于输入输出的channel均是64,故两个CommonBlock
            CommonBlock(64, 64, 1),
            CommonBlock(64, 64, 1)
        )
        self.layer2 = nn.Sequential(            # layer234类似,由于输入输出的channel不同,故一个SpecialBlock,一个CommonBlock
            SpecialBlock(64, 128, [2, 1]),
            CommonBlock(128, 128, 1)
        )
        self.layer3 = nn.Sequential(
            SpecialBlock(128, 256, [2, 1]),
            CommonBlock(256, 256, 1)
        )
        self.layer4 = nn.Sequential(
            SpecialBlock(256, 512, [2, 1]),
            CommonBlock(512, 512, 1)
        )
        self.pool = nn.AdaptiveAvgPool2d(output_size=(1, 1))    # 卷积结束,通过一个自适应均值池化==》 [batch, 512, 1, 1]
        self.fc = nn.Sequential(                # 最后用于分类的全连接层,根据需要灵活变化
            nn.Dropout(p=0.5),
            nn.Linear(512, 256),
            nn.ReLU(inplace=True),
            nn.Dropout(p=0.5),
            nn.Linear(256, classes_num)         # 这个使用CIFAR10数据集,定为10分类
        )

    def forward(self, x):
        x = self.prepare(x)         # 预处理

        x = self.layer1(x)          # 四个卷积单元
        x = self.layer2(x)
        x = self.layer3(x)
        x = self.layer4(x)

        x = self.pool(x)            # 池化
        x = x.reshape(x.shape[0], -1)   # 将x展平,输入全连接层
        x = self.fc(x)

        return x
train.py训练部分(使用CIFAR10数据集):
import torch
import visdom
from torch.utils.data import DataLoader
from torchvision import datasets, transforms
from PIL import Image
from matplotlib import pyplot as plt
import numpy as np
from ResNet18 import ResNet18
from torch.nn import CrossEntropyLoss
from torch import optim

BATCH_SIZE = 512                        # 超参数batch大小
EPOCH = 30                              # 总共训练轮数
save_path = "./CIFAR10_ResNet18.pth"    # 模型权重参数保存位置
# classes = ('plane', 'car', 'bird', 'cat', 'deer', 'dog', 'frog', 'horse', 'ship', 'truck')    # CIFAR10数据集类别
device = torch.device("cuda:0" if torch.cuda.is_available() else "cpu")                         # 创建GPU运算环境
print(device)

data_transform = {
                          # 数据预处理
    "train": transforms.Compose([
        transforms.ToTensor(),
        transforms.Normalize((0.5, 0.5, 0.5), (0.5, 0.5, 0.5))
    ]),
    "val": transforms.Compose([
        transforms.ToTensor(),
        transforms.Normalize((0.5, 0.5, 0.5), (0.5, 0.5, 0.5))
    ])
}
# 加载数据集,指定训练或测试数据,指定于处理方式
train_data = datasets.CIFAR10(root='./CIFAR10/', train=True, transform=data_transform["train"], download=True)
test_data = datasets.CIFAR10(root='./CIFAR10/', train=False, transform=data_transform["val"], download=True)

train_dataloader = torch.utils.data.DataLoader(train_data, BATCH_SIZE, True, num_workers=0)
test_dataloader = torch.utils.data.DataLoader(test_data, BATCH_SIZE, False, num_workers=0)

# # 展示图片
# x = 0
# for images, labels in train_data:
#     plt.subplot(3,3,x+1)
#     plt.tight_layout()
#     images = images.numpy().transpose(1, 2, 0)  # 把channel那一维放到最后
#     plt.title(str(classes[labels]))
#     plt.imshow(images)
#     plt.xticks([])
#     plt.yticks([])
#     x += 1
#     if x == 9:
#         break
# plt.show()

# 创建一个visdom,将训练测试情况可视化
viz = visdom.Visdom()

# 测试函数,传入模型和数据读取接口
def evalute(model, loader):
    # correct为总正确数量,total为总测试数量
    correct = 0
    total = len(loader.dataset)
    # 取测试数据
    for x, y in loader:
        x, y = x.to(device), y.to(device)
        # validation和test过程不需要反向传播
        model.eval()
        with torch.no_grad():
            out = model(x)       # 计算测试数据的输出logits
            # 计算出out在第一维度上最大值对应编号,得模型的预测值
            prediction = out.argmax(dim=1)
        # 预测正确的数量correct
        correct += torch.eq(prediction, y).float().sum().item()
    # 最终返回正确率
    return correct / total


net = ResNet18()
net.to(device)                                      # 实例化网络模型并送入GPU
net.load_state_dict(torch.load(save_path))          # 使用上次训练权重接着训练
optimizer = optim.Adam(net.parameters(), lr=0.001)  # 定义优化器
loss_function = CrossEntropyLoss()                  # 多分类问题使用交叉熵损失函数

best_acc, best_epoch = 0.0, 0                       # 最好准确度,出现的轮数
global_step = 0                                     # 全局的step步数,用于画图
for epoch in range(EPOCH):
    running_loss = 0.0                              # 一次epoch的总损失
    net.train()                                     # 开始训练
    for step, (images, labels) in enumerate(train_dataloader, start=0):
        images, labels = images.to(device), labels.to(device)

        optimizer.zero_grad()
        outputs = net(images)
        loss = loss_function(outputs, labels)
        loss.backward()
        optimizer.step()

        running_loss += loss.item()                 # 将一个epoch的损失累加
        # 打印输出当前训练的进度
        rate = (step + 1) / len(train_dataloader)
        a = "*" * int(rate * 50)
        b = "." * int((1 - rate) * 50)
        print("\repoch: {} train loss: {:^3.0f}%[{}->{}]{:.3f}".format(epoch+1, int(rate * 100), a, b, loss), end="")
        # 记录test的loss
        viz.line([loss.item()], [global_step], win='loss', update='append')
        # 每次记录之后将横轴x的值加一
        global_step += 1

    # 在每一个epoch结束,做一次test
    if epoch % 1 == 0:
        # 使用上面定义的evalute函数,测试正确率,传入测试模型net,测试数据集test_dataloader
        test_acc = evalute(net, test_dataloader)
        print("  epoch{} test acc:{}".format(epoch+1, test_acc))
        # 根据目前epoch计算所得的acc,看看是否需要保存当前状态(即当前的各项参数值)以及迭代周期epoch作为最好情况
        if test_acc > best_acc:
            # 保存最好数据
            best_acc = test_acc
            best_epoch = epoch
            # 保存最好的模型参数值状态
            torch.save(net.state_dict(), save_path)

            # 记录validation的val_acc
            viz.line([test_acc], [global_step], win='test_acc', update='append')
print("Finish !")
3. 训练测试结果
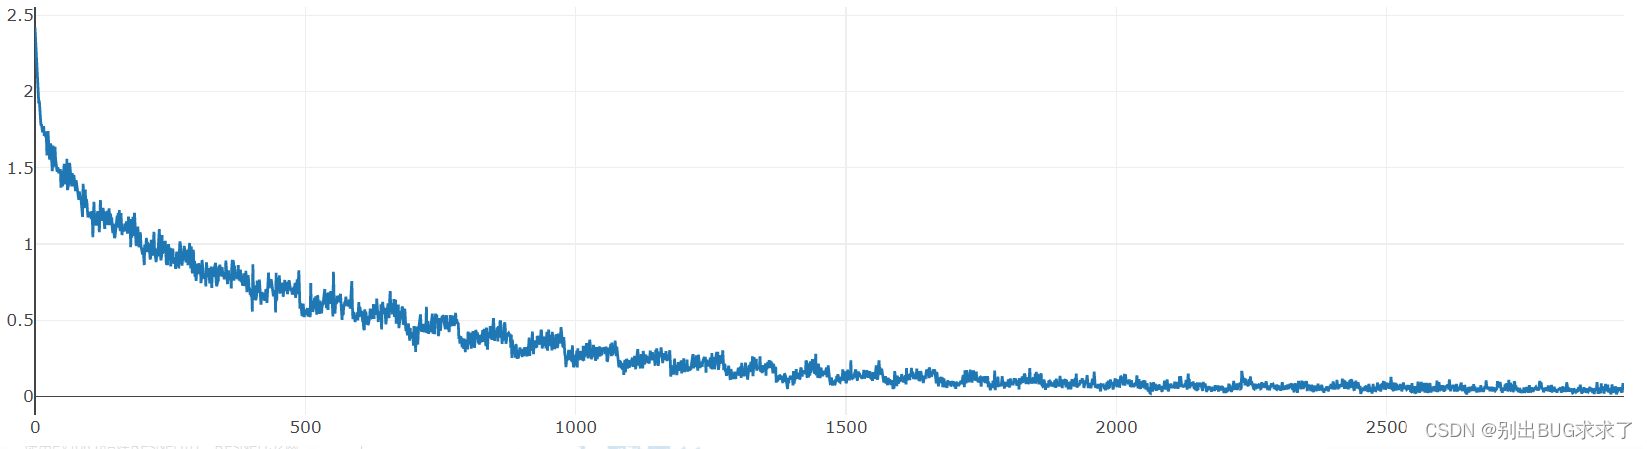
训练损失:
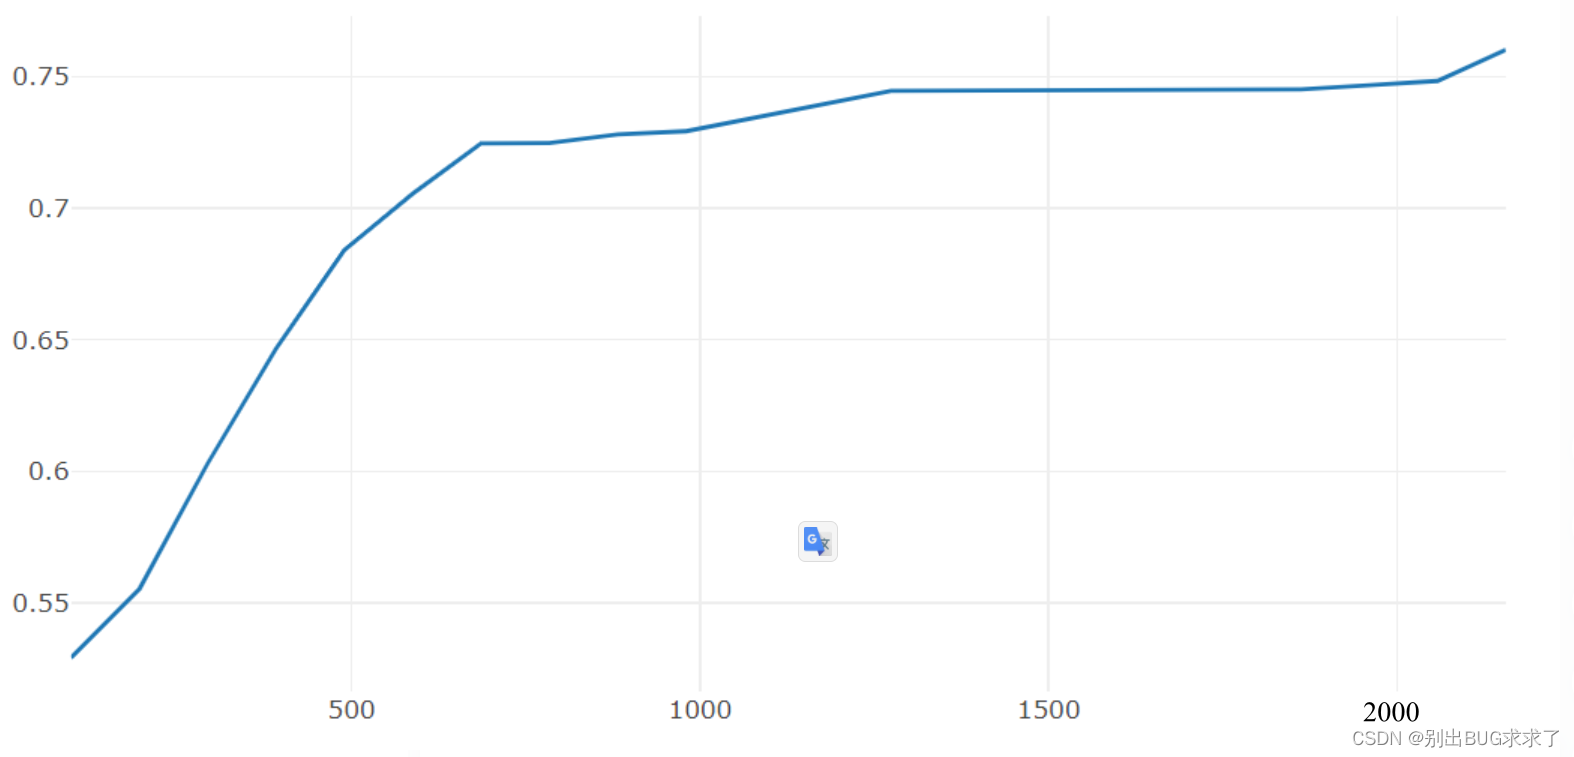
每一个epoch结束之后的测试:
训练时多次修改超参数,最后经过30次epoch之后的测试准确度达到了0.7471,没有在训练下去也没有明显提升,初学深度神经网络,第一次搭建ResNet,我的数据处理等方面处理的有一定欠缺,大家有好的建议也可以提出来
二、使用PyTorch搭建ResNet34网络
1. ResNet34网络结构
参照ResNet18的搭建,由于34层和18层几乎相同,叠加卷积单元数即可,所以没有写注释,具体可以参考我的ResNet18搭建中的注释,ResNet34的训练部分也可以参照。
2. 实现代码
import torch
import torch.nn as nn
from torch.nn import functional as F


class CommonBlock(nn.Module):
    def __init__(self, in_channel, out_channel, stride):
        super(CommonBlock, self).__init__()
        self.conv1 = nn.Conv2d(in_channel, out_channel, kernel_size=3, stride=stride, padding=1, bias=False)
        self.bn1 = nn.BatchNorm2d(out_channel)
        self.conv2 = nn.Conv2d(out_channel, out_channel, kernel_size=3, stride=stride, padding=1, bias=False)
        self.bn2 = nn.BatchNorm2d(out_channel)

    def forward(self, x):
        identity = x

        x = F.relu(self.bn1(self.conv1(x)), inplace=True)
        x = self.bn2(self.conv2(x))

        x += identity
        return F.relu(x, inplace=True)

class SpecialBlock(nn.Module):
    def __init__(self, in_channel, out_channel, stride):
        super(SpecialBlock, self).__init__()
        self.change_channel = nn.Sequential(
            nn.Conv2d(in_channel, out_channel, kernel_size=1, stride=stride[0], padding=0, bias=False),
            nn.BatchNorm2d(out_channel)
        )
        self.conv1 = nn.Conv2d(in_channel, out_channel, kernel_size=3, stride=stride[0], padding=1, bias=False)
        self.bn1 = nn.BatchNorm2d(out_channel)
        self.conv2 = nn.Conv2d(out_channel, out_channel, kernel_size=3, stride=stride[1], padding=1, bias=False)
        self.bn2 = nn.BatchNorm2d(out_channel)

    def forward(self, x):
        identity = self.change_channel(x)

        x = F.relu(self.bn1(self.conv1(x)), inplace=True)
        x = self.bn2(self.conv2(x))

        x += identity
        return F.relu(x, inplace=True)


class ResNet34(nn.Module):
    def __init__(self, classes_num):
        super(ResNet34, self).__init__()
        self.prepare = nn.Sequential(
            nn.Conv2d(3, 64, 7, 2, 3),
            nn.BatchNorm2d(64),
            nn.ReLU(inplace=True),
            nn.MaxPool2d(3, 2, 1)
        )
        self.layer1 = nn.Sequential(
            CommonBlock(64, 64, 1),
            CommonBlock(64, 64, 1),
            CommonBlock(64, 64, 1)
        )
        self.layer2 = nn.Sequential(
            SpecialBlock(64, 128, [2, 1]),
            CommonBlock(128, 128, 1),
            CommonBlock(128, 128, 1),
            CommonBlock(128, 128, 1)
        )
        self.layer3 = nn.Sequential(
            SpecialBlock(128, 256, [2, 1]),
            CommonBlock(256, 256, 1),
            CommonBlock(256, 256, 1),
            CommonBlock(256, 256, 1),
            CommonBlock(256, 256, 1),
            CommonBlock(256, 256, 1)
        )
        self.layer4 = nn.Sequential(
            SpecialBlock(256, 512, [2, 1]),
            CommonBlock(512, 512, 1),
            CommonBlock(512, 512, 1)
        )
        self.pool = nn.AdaptiveAvgPool2d(output_size=(1, 1))
        self.fc = nn.Sequential(
            nn.Dropout(p=0.5),
            nn.Linear(512, 256),
            nn.ReLU(inplace=True),
            nn.Dropout(p=0.5),
            nn.Linear(256, classes_num)
        )

    def forward(self, x):
        x = self.prepare(x)

        x = self.layer1(x)
        x = self.layer2(x)
        x = self.layer3(x)
        x = self.layer4(x)

        x = self.pool(x)
        x = x.reshape(x.shape[0], -1)
        x = self.fc(x)

        return x
三、使用PyTorch搭建ResNet50网络
看过我之前ResNet18和ResNet34搭建的朋友可能想着可不可以把搭建18和34层的方法直接用在50层以上的ResNet的搭建中,我也尝试过。但是ResNet50以上的网络搭建不像是18到34层只要简单修改卷积单元数目就可以完成,ResNet50以上的三种网络都是一个样子,只是层数不同,所以完全可以将34到50层作为一个搭建分水岭。
加上我初学PyTorch和深度神经网络,对于采用BasicBlock和BottleNeck的高效率构建还不是很懂,所以这里给出了类似前两种ResNet的简单暴力堆叠网络层的构建方法
1. ResNet50网络结构
所有不同层数的ResNet:
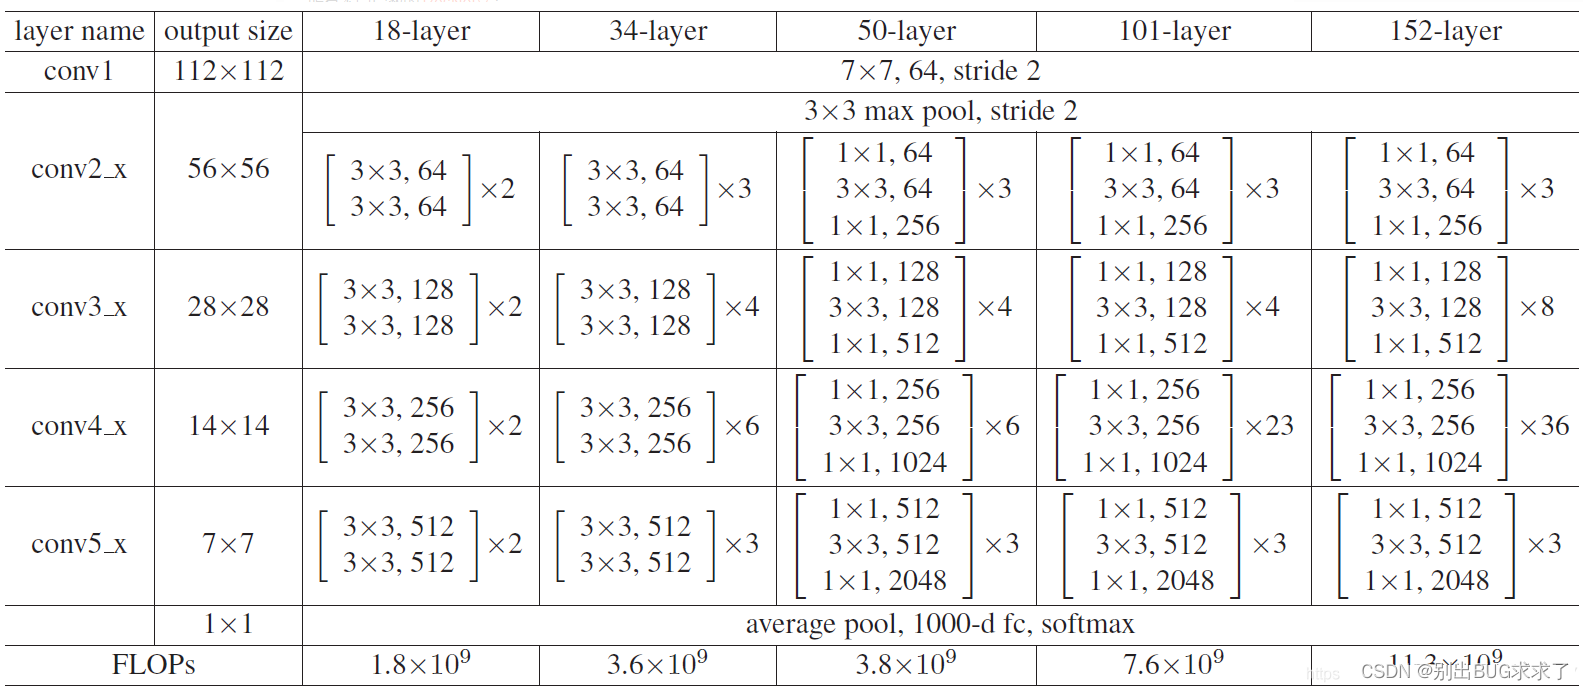
这里给出了我认为比较详细的ResNet50网络具体参数和执行流程图:

2. 实现代码
model.py模型部分:
import torch
import torch.nn as nn
from torch.nn import functional as F

"""
这里的ResNet50的搭建是暴力形式,直接累加完成搭建,没采用BasicBlock和BottleNeck
第一个DownSample类,用于定义shortcut的模型函数,完成两个layer之间虚线的shortcut,负责layer1虚线的升4倍channel以及其他layer虚线的升2倍channel
观察每一个layer的虚线处升channel仅仅是升channel前后的数量不同以及stride不同,对于kernel_size和padding都分别是1和0,不作为DownSample网络类的模型参数
参数in_channel即是升之前的通道数, out_channel即是升之后的通道数, stride即是每一次升channel不同的stride步长,对于layer1升通道的stride=1,其他layer升通道的stride=2,注意不同
"""
"""
运行时一定要注意:
本网络中的ResNet50类中forward函数里面:layer1_shortcut1.to('cuda:0');layer2_shortcut1.to('cuda:0')等语句,是将实例化的DownSample
网络模型放到train.py训练脚本中定义的GPU同一环境下,不加此句一般会如下报错:
Input type (torch.cuda.FloatTensor) and weight type (torch.FloatTensor) should be the same
"""


class DownSample(nn.Module):

    def __init__(self, in_channel, out_channel, stride):            # 传入下采样的前后channel数以及stride步长
        super(DownSample, self).__init__()                          # 继承父类
        self.down = nn.Sequential(                                  # 定义一个模型容器down
            nn.Conv2d(in_channel, out_channel, kernel_size=1, stride=stride, padding=0, bias=False),    # 负责虚线shortcut的唯一且重要的一次卷积
            nn.BatchNorm2d(out_channel),                            # 在卷积和ReLU非线性激活之间,添加BatchNormalization
            nn.ReLU(inplace=True)                                   # shortcut最后加入一个激活函数,置inplace=True原地操作,节省内存
        )

    def forward(self, x):
        out = self.down(x)                                          # 前向传播函数仅仅完成down这个容器的操作
        return out


"""
第一个ResNet50类,不使用BottleNeck单元完成ResNet50层以上的搭建,直接使用forward再加上前面的DownSample模型类函数,指定ResNet50所有参数构建模型
"""


class ResNet50(nn.Module):

    def __init__(self, classes_num):                                # ResNet50仅传一个分类数目,将涉及的所有数据写死,具体数据可以参考下面的图片
        super(ResNet50, self).__init__()
        # 在进入layer1234之间先进行预处理,主要是一次卷积一次池化,从[batch, 3, 224, 224] => [batch, 64, 56, 56]
        self.pre = nn.Sequential(
            # 卷积channel从原始数据的3通道,采用64个卷积核,升到64个channel,卷积核大小、步长、padding均固定
            nn.Conv2d(3, 64, kernel_size=7, stride=2, padding=3, bias=False),
            nn.BatchNorm2d(64),                                     # 卷积后紧接一次BatchNormalization
            nn.ReLU(inplace=True),
            nn.MaxPool2d(kernel_size=3, stride=2, padding=1)        # 预处理最后的一次最大池化操作,数据固定
        )
        """
        每一个layer的操作分为使用一次的first,和使用多次的next组成,first负责每个layer的第一个单元(有虚线)的三次卷积,next负责剩下单元(直连)的三次卷积
        """
        # --------------------------------------------------------------
        self.layer1_first = nn.Sequential(
            nn.Conv2d(64, 64, kernel_size=1, stride=1, padding=0, bias=False),      # layer1_first第一次卷积保持channel不变,和其他layer的first区别
            nn.BatchNorm2d(64),
            nn.ReLU(inplace=True),
            nn.Conv2d(64, 64, kernel_size=3, stride=1, padding=1, bias=False),      # layer1_first第二次卷积stride和其他layer_first的stride不同
            nn.BatchNorm2d(64),
            nn.ReLU(inplace=True),
            nn.Conv2d(64, 256, kernel_size=1, stride=1, padding=0, bias=False),     # layer1_first第三次卷积和其他layer一样,channel升4倍
            nn.BatchNorm2d(256)                                         # 注意最后一次卷积结束不加ReLU激活函数
        )
        self.layer1_next = nn.Sequential(
            nn.Conv2d(256, 64, kernel_size=1, stride=1, padding=0, bias=False),     # layer1_next的第一次卷积负责将channel减少,减少训练参数量
            nn.BatchNorm2d(64),
            nn.ReLU(inplace=True),
            nn.Conv2d(64, 64, kernel_size=3, stride=1, padding=1, bias=False),
            nn.BatchNorm2d(64),
            nn.ReLU(inplace=True),
            nn.Conv2d(64, 256, kernel_size=1, stride=1, padding=0, bias=False),     # layer1_next的最后一次卷积负责将channel增加至可以与shortcut相加
            nn.BatchNorm2d(256)
        )
        # --------------------------------------------------------------    # layer234操作基本相同,这里仅介绍layer2
        self.layer2_first = nn.Sequential(
            nn.Conv2d(256, 128, kernel_size=1, stride=1, padding=0, bias=False),    # 与layer1_first第一次卷积不同,需要降channel至1/2
            nn.BatchNorm2d(128),
            nn.ReLU(inplace=True),
            nn.Conv2d(128, 128, kernel_size=3, stride=2, padding=1, bias=False),    # 注意这里的stride=2与layer34相同,与layer1区别
            nn.BatchNorm2d(128),
            nn.ReLU(inplace=True),
            nn.Conv2d(128, 512, kernel_size=1, stride=1, padding=0, bias=False),    # 再次升channel
            nn.BatchNorm2d(512)
        )
        self.layer2_next = nn.Sequential(
            nn.Conv2d(512, 128, kernel_size=1, stride=1, padding=0, bias=False),    # 负责循环普通的操作
            nn.BatchNorm2d(128),
            nn.ReLU(inplace=True),
            nn.Conv2d(128, 128, kernel_size=3, stride=1, padding=1, bias=False),
            nn.BatchNorm2d(128),
            nn.ReLU(inplace=True),
            nn.Conv2d(128, 512, kernel_size=1, stride=1, padding=0, bias=False),
            nn.BatchNorm2d(512)
        )
        # --------------------------------------------------------------
        self.layer3_first = nn.Sequential(
            nn.Conv2d(512, 256, kernel_size=1, stride=1, padding=0, bias=False),
            nn.BatchNorm2d(256),
            nn.ReLU(inplace=True),
            nn.Conv2d(256, 256, kernel_size=3, stride=2, padding=1, bias=False),
            nn.BatchNorm2d(256),
            nn.ReLU(inplace=True),
            nn.Conv2d(256, 1024, kernel_size=1, stride=1, padding=0, bias=False),
            nn.BatchNorm2d(1024)
        )
        self.layer3_next = nn.Sequential(
            nn.Conv2d(1024, 256, kernel_size=1, stride=1, padding=0, bias=False),
            nn.BatchNorm2d(256),
            nn.ReLU(inplace=True),
            nn.Conv2d(256, 256, kernel_size=3, stride=1, padding=1, bias=False),
            nn.BatchNorm2d(256),
            nn.ReLU(inplace=True),
            nn.Conv2d(256, 1024, kernel_size=1, stride=1, padding=0, bias=False),
            nn.BatchNorm2d(1024)
        )
        # --------------------------------------------------------------
        self.layer4_first = nn.Sequential(
            nn.Conv2d(1024, 512, kernel_size=1, stride=1, padding=0, bias=False),
            nn.BatchNorm2d(512),
            nn.ReLU(inplace=True),
            nn.Conv2d(512, 512, kernel_size=3, stride=2, padding=1, bias=False),
            nn.BatchNorm2d(512),
            nn.ReLU(inplace=True),
            nn.Conv2d(512, 2048, kernel_size=1, stride=1, padding=0, bias=False),
            nn.BatchNorm2d(2048)
        )
        self.layer4_next = nn.Sequential(
            nn.Conv2d(2048, 512, kernel_size=1, stride=1, padding=0, bias=False),
            nn.BatchNorm2d(512),
            nn.ReLU(inplace=True),
            nn.Conv2d(512, 512, kernel_size=3, stride=1, padding=1, bias=False),
            nn.BatchNorm2d(512),
            nn.ReLU(inplace=True),
            nn.Conv2d(512, 2048, kernel_size=1, stride=1, padding=0, bias=False),
            nn.BatchNorm2d(2048)
        )
        self.avg_pool = nn.AdaptiveAvgPool2d((1, 1))     # 经过最后的自适应均值池化为[batch, 2048, 1, 1]
        # 定义最后的全连接层
        self.fc = nn.Sequential(
            nn.Dropout(p=0.5),                  # 以0.5的概率失活神经元
            nn.Linear(2048 * 1 * 1, 1024),      # 第一个全连接层
            nn.ReLU(inplace=True),
            nn.Dropout(p=0.5),
            nn.Linear(1024, classes_num)        # 第二个全连接层,输出类结果
        )

    """
    forward()前向传播函数负责将ResNet类中定义的网络层复用,再与上面的DownSample类完美组合
    """
    def forward(self, x):
        out = self.pre(x)                                       # 对输入预处理,输出out = [batch, 64, 56, 56]
        """
        每一层layer操作由两个部分组成,第一个是带有虚线的卷积单元,其他的是循环完成普通的shortcut为直连的卷积单元
        """
        layer1_shortcut1 = DownSample(64, 256, 1)               # 使用DownSample实例化一个网络模型layer1_shortcut1,参数即是虚线处升channel数据,注意stride=1
        layer1_shortcut1.to('cuda:0')
        layer1_identity1 = layer1_shortcut1(out)                # 调用layer1_shortcut1对卷积单元输入out计算虚线处的identity,用于后面与卷积单元输出相加
        out = self.layer1_first(out)                            # 调用layer1_first完成layer1的第一个特殊的卷积单元
        out = F.relu(out + layer1_identity1, inplace=True)      # 将identity与卷积单元输出相加,经过relu激活函数

        for i in range(2):                                      # 使用循环完成后面几个相同输入输出相同操作的卷积单元
            layer_identity = out                                # 直接直连identity等于输入
            out = self.layer1_next(out)                         # 输入经过普通卷积单元
            out = F.relu(out + layer_identity, inplace=True)    # 两路结果相加,再经过激活函数
        # --------------------------------------------------------------后面layer234都是类似的,这里仅介绍layer2

        layer2_shortcut1 = DownSample(256, 512, 2)              # 注意后面layer234输入输出channel不同,stride=2都是如此
        layer2_shortcut1.to('cuda:0')
        layer2_identity1 = layer2_shortcut1(out)
        out = self.layer2_first(out)
        out = F.relu(out + layer2_identity1, inplace=True)      # 完成layer2的第一个卷积单元

        for i in range(3):                                      # 循环执行layer2剩下的其他卷积单元
            layer_identity = out
            out = self.layer2_next(out)
            out = F.relu(out + layer_identity, inplace=True)
        # --------------------------------------------------------------

        layer3_shortcut1 = DownSample(512, 1024, 2)
        layer3_shortcut1.to('cuda:0')
        layer3_identity1 = layer3_shortcut1(out)
        out = self.layer3_first(out)
        out = F.relu(out + layer3_identity1, inplace=True)

        for i in range(5):
            layer_identity = out
            out = self.layer3_next(out)
            out = F.relu(out + layer_identity, inplace=True)
        # --------------------------------------------------------------

        layer4_shortcut1 = DownSample(1024, 2048, 2)
        layer4_shortcut1.to('cuda:0')
        layer4_identity1 = layer4_shortcut1(out)
        out = self.layer4_first(out)
        out = F.relu(out + layer4_identity1, inplace=True)

        for i in range(2):
            layer_identity = out
            out = self.layer4_next(out)
            out = F.relu(out + layer_identity, inplace=True)
        # 最后一个全连接层
        out = self.avg_pool(out)                # 经过最后的自适应均值池化为[batch, 2048, 1, 1]
        out = out.reshape(out.size(0), -1)      # 将卷积输入[batch, 2048, 1, 1]展平为[batch, 2048*1*1]
        out = self.fc(out)                  # 经过最后一个全连接单元,输出分类out

        return out
ResNet50的训练可以参照前面ResNet18搭建中的训练和测试部分:
经过手写ResNet50网络模型的暴力搭建,我认识到了要想把ResNet及其其他复杂网络的搭建,前提必须要把模型整个流程环节全部弄清楚
例如,ResNet50里面每一次的shortcut里面的升维操作的in_channel,out_channel,kernel_size,stride,padding的参数大小变化
每一个卷积单元具体参数都是什么样的,如何才能最大化简化代码;
还有就是搭建复杂的网络模型中,一定要做到步步为营,一步步搭建并检验,每一步都要理解有理有据,最后才能将整个网络搭建起来
还有一个意外收获就是在训练过程中,发现了这样的报错:
Input type (torch.cuda.FloatTensor) and weight type (torch.FloatTensor) should be the same
原来是因为输入的数据类型为torch.cuda.FloatTensor,说明输入数据在GPU中。模型参数的数据类型为torch.FloatTensor,说明模型还在CPU
故在ResNet50的forward()函数中对实例化的DownSample网络添加到和train.py对ResNet50实例化的网络模型的同一个GPU下,解决了错误
四、使用PyTorch搭建ResNet101、ResNet152网络
参照前面ResNet50的搭建,由于50层以上几乎相同,叠加卷积单元数即可,所以没有写注释。
ResNet101和152的搭建注释可以参照我的ResNet50搭建中的注释
ResNet101和152的训练可以参照我的ResNet18搭建中的训练部分
ResNet101和152可以依旧参照ResNet50的网络图片:
1. 网络结构

2. 实现代码
(1)ResNet101的model.py模型:
import torch
import torch.nn as nn
from torch.nn import functional as F


class DownSample(nn.Module):
    def __init__(self, in_channel, out_channel, stride):
        super(DownSample, self).__init__()
        self.down = nn.Sequential(
            nn.Conv2d(in_channel, out_channel, kernel_size=1, stride=stride, padding=0, bias=False),
            nn.BatchNorm2d(out_channel),
            nn.ReLU(inplace=True)
        )

    def forward(self, x):
        out = self.down(x)
        return out


class ResNet101(nn.Module):
    def __init__(self, classes_num):            # 指定分类数
        super(ResNet101, self).__init__()
        self.pre = nn.Sequential(
            nn.Conv2d(3, 64, kernel_size=7, stride=2, padding=3, bias=False),
            nn.BatchNorm2d(64),
            nn.ReLU(inplace=True),
            nn.MaxPool2d(kernel_size=3, stride=2, padding=1)
        )
        # --------------------------------------------------------------------
        self.layer1_first = nn.Sequential(
            nn.Conv2d(64, 64, kernel_size=1, stride=1, padding=0, bias=False),
            nn.BatchNorm2d(64),
            nn.ReLU(inplace=True),
            nn.Conv2d(64, 64, kernel_size=3, stride=1, padding=1, bias=False),
            nn.BatchNorm2d(64),
            nn.ReLU(inplace=True),
            nn.Conv2d(64, 256, kernel_size=1, stride=1, padding=0, bias=False),
            nn.BatchNorm2d(256)
        )
        self.layer1_next = nn.Sequential(
            nn.Conv2d(256, 64, kernel_size=1, stride=1, padding=0, bias=False),
            nn.BatchNorm2d(64),
            nn.ReLU(inplace=True),
            nn.Conv2d(64, 64, kernel_size=3, stride=1, padding=1, bias=False),
            nn.BatchNorm2d(64),
            nn.ReLU(inplace=True),
            nn.Conv2d(64, 256, kernel_size=1, stride=1, padding=0, bias=False),
            nn.BatchNorm2d(256)
        )
        # --------------------------------------------------------------------
        self.layer2_first = nn.Sequential(
            nn.Conv2d(256, 128, kernel_size=1, stride=1, padding=0, bias=False),
            nn.BatchNorm2d(128),
            nn.ReLU(inplace=True),
            nn.Conv2d(128, 128, kernel_size=3, stride=2, padding=1, bias=False),
            nn.BatchNorm2d(128),
            nn.ReLU(inplace=True),
            nn.Conv2d(128, 512, kernel_size=1, stride=1, padding=0, bias=False),
            nn.BatchNorm2d(512)
        )
        self.layer2_next = nn.Sequential(
            nn.Conv2d(512, 128, kernel_size=1, stride=1, padding=0, bias=False),
            nn.BatchNorm2d(128),
            nn.ReLU(inplace=True),
            nn.Conv2d(128, 128, kernel_size=3, stride=1, padding=1, bias=False),
            nn.BatchNorm2d(128),
            nn.ReLU(inplace=True),
            nn.Conv2d(128, 512, kernel_size=1, stride=1, padding=0, bias=False),
            nn.BatchNorm2d(512)
        )
        # --------------------------------------------------------------------
        self.layer3_first = nn.Sequential(
            nn.Conv2d(512, 256, kernel_size=1, stride=1, padding=0, bias=False),
            nn.BatchNorm2d(256),
            nn.ReLU(inplace=True),
            nn.Conv2d(256, 256, kernel_size=3, stride=2, padding=1, bias=False),
            nn.BatchNorm2d(256),
            nn.ReLU(inplace=True),
            nn.Conv2d(256, 1024, kernel_size=1, stride=1, padding=0, bias=False),
            nn.BatchNorm2d(1024)
        )
        self.layer3_next = nn.Sequential(
            nn.Conv2d(1024, 256, kernel_size=1, stride=1, padding=0, bias=False),
            nn.BatchNorm2d(256),
            nn.ReLU(inplace=True),
            nn.Conv2d(256, 256, kernel_size=3, stride=1, padding=1, bias=False),
            nn.BatchNorm2d(256),
            nn.ReLU(inplace=True),
            nn.Conv2d(256, 1024, kernel_size=1, stride=1, padding=0, bias=False),
            nn.BatchNorm2d(1024)
        )
        # --------------------------------------------------------------------
        self.layer4_first = nn.Sequential(
            nn.Conv2d(1024, 512, kernel_size=1, stride=1, padding=0, bias=False),
            nn.BatchNorm2d(512),
            nn.ReLU(inplace=True),
            nn.Conv2d(512, 512, kernel_size=3, stride=2, padding=1, bias=False),
            nn.BatchNorm2d(512),
            nn.ReLU(inplace=True),
            nn.Conv2d(512, 2048, kernel_size=1, stride=1, padding=0, bias=False),
            nn.BatchNorm2d(2048)
        )
        self.layer4_next = nn.Sequential(
            nn.Conv2d(2048, 512, kernel_size=1, stride=1, padding=0, bias=False),
            nn.BatchNorm2d(512),
            nn.ReLU(inplace=True),
            nn.Conv2d(512, 512, kernel_size=3, stride=1, padding=1, bias=False),
            nn.BatchNorm2d(512),
            nn.ReLU(inplace=True),
            nn.Conv2d(512, 2048, kernel_size=1, stride=1, padding=0, bias=False),
            nn.BatchNorm2d(2048)
        )
        # --------------------------------------------------------------------
        self.avg_pool = nn.AdaptiveAvgPool2d((1, 1))
        self.fc = nn.Sequential(
            nn.Dropout(p=0.5),
            nn.Linear(2048 * 1 * 1, 1000),
            nn.ReLU(inplace=True),
            nn.Dropout(p=0.5),
            nn.Linear(1000, classes_num)
        )

    def forward(self, x):
        out = self.pre(x)
        # --------------------------------------------------------------------
        layer1_shortcut = DownSample(64, 256, 1)
        layer1_shortcut.to('cuda:0')
        layer1_identity = layer1_shortcut(out)
        out = self.layer1_first(out)
        out = F.relu(out + layer1_identity, inplace=True)

        for i in range(2):
            identity = out
            out = self.layer1_next(out)
            out = F.relu(out + identity, inplace=True)
        # --------------------------------------------------------------------
        layer2_shortcut = DownSample(256, 512, 2)
        layer2_shortcut.to('cuda:0')
        layer2_identity = layer2_shortcut(out)
        out = self.layer2_first(out)
        out = F.relu(out + layer2_identity, inplace=True)

        for i in range(3):
            identity = out
            out = self.layer2_next(out)
            out = F.relu(out + identity, inplace=True)
        # --------------------------------------------------------------------
        layer3_shortcut = DownSample(512, 1024, 2)
        layer3_shortcut.to('cuda:0')
        layer3_identity = layer3_shortcut(out)
        out = self.layer3_first(out)
        out = F.relu(out + layer3_identity, inplace=True)

        for i in range(22):
            identity = out
            out = self.layer3_next(out)
            out = F.relu(out + identity, inplace=True)
        # --------------------------------------------------------------------
        layer4_shortcut = DownSample(1024, 2048, 2)
        layer4_shortcut.to('cuda:0')
        layer4_identity = layer4_shortcut(out)
        out = self.layer4_first(out)
        out = F.relu(out + layer4_identity, inplace=True)

        for i in range(2):
            identity = out
            out = self.layer4_next(out)
            out = F.relu(out + identity, inplace=True)
        # --------------------------------------------------------------------
        out = self.avg_pool(out)
        out = out.reshape(out.size(0), -1)
        out = self.fc(out)

        return out
(2) ResNet152的model.py模型:
import torch
import torch.nn as nn
from torch.nn import functional as F


class DownSample(nn.Module):
    def __init__(self, in_channel, out_channel, stride):
        super(DownSample, self).__init__()
        self.down = nn.Sequential(
            nn.Conv2d(in_channel, out_channel, kernel_size=1, stride=stride, padding=0, bias=False),
            nn.BatchNorm2d(out_channel),
            nn.ReLU(inplace=True)
        )

    def forward(self, x):
        out = self.down(x)
        return out


class ResNet152(nn.Module):
    def __init__(self, classes_num):            # 指定了分类数目
        super(ResNet152, self).__init__()
        self.pre = nn.Sequential(
            nn.Conv2d(3, 64, kernel_size=7, stride=2, padding=3, bias=False),
            nn.BatchNorm2d(64),
            nn.ReLU(inplace=True),
            nn.MaxPool2d(kernel_size=3, stride=2, padding=1)
        )
        # -----------------------------------------------------------------------
        self.layer1_first = nn.Sequential(
            nn.Conv2d(64, 64, kernel_size=1, stride=1, padding=0, bias=False),
            nn.BatchNorm2d(64),
            nn.ReLU(inplace=True),
            nn.Conv2d(64, 64, kernel_size=3, stride=1, padding=1, bias=False),
            nn.BatchNorm2d(64),
            nn.ReLU(inplace=True),
            nn.Conv2d(64, 256, kernel_size=1, stride=1, padding=0, bias=False),
            nn.BatchNorm2d(256)
        )
        self.layer1_next = nn.Sequential(
            nn.Conv2d(256, 64, kernel_size=1, stride=1, padding=0, bias=False),
            nn.BatchNorm2d(64),
            nn.ReLU(inplace=True),
            nn.Conv2d(64, 64, kernel_size=3, stride=1, padding=1, bias=False),
            nn.BatchNorm2d(64),
            nn.ReLU(inplace=True),
            nn.Conv2d(64, 256, kernel_size=1, stride=1, padding=0, bias=False),
            nn.BatchNorm2d(256)
        )
        # -----------------------------------------------------------------------
        self.layer2_first = nn.Sequential(
            nn.Conv2d(256, 128, kernel_size=1, stride=1, padding=0, bias=False),
            nn.BatchNorm2d(128),
            nn.ReLU(inplace=True),
            nn.Conv2d(128, 128, kernel_size=3, stride=2, padding=1, bias=False),
            nn.BatchNorm2d(128),
            nn.ReLU(inplace=True),
            nn.Conv2d(128, 512, kernel_size=1, stride=1, padding=0, bias=False),
            nn.BatchNorm2d(512)
        )
        self.layer2_next = nn.Sequential(
            nn.Conv2d(512, 128, kernel_size=1, stride=1, padding=0, bias=False),
            nn.BatchNorm2d(128),
            nn.ReLU(inplace=True),
            nn.Conv2d(128, 128, kernel_size=3, stride=1, padding=1, bias=False),
            nn.BatchNorm2d(128),
            nn.ReLU(inplace=True),
            nn.Conv2d(128, 512, kernel_size=1, stride=1, padding=0, bias=False),
            nn.BatchNorm2d(512)
        )
        # -----------------------------------------------------------------------
        self.layer3_first = nn.Sequential(
            nn.Conv2d(512, 256, kernel_size=1, stride=1, padding=0, bias=False),
            nn.BatchNorm2d(256),
            nn.ReLU(inplace=True),
            nn.Conv2d(256, 256, kernel_size=3, stride=2, padding=1, bias=False),
            nn.BatchNorm2d(256),
            nn.ReLU(inplace=True),
            nn.Conv2d(256, 1024, kernel_size=1, stride=1, padding=0, bias=False),
            nn.BatchNorm2d(1024)
        )
        self.layer3_next = nn.Sequential(
            nn.Conv2d(1024, 256, kernel_size=1, stride=1, padding=0, bias=False),
            nn.BatchNorm2d(256),
            nn.ReLU(inplace=True),
            nn.Conv2d(256, 256, kernel_size=3, stride=1, padding=1, bias=False),
            nn.BatchNorm2d(256),
            nn.ReLU(inplace=True),
            nn.Conv2d(256, 1024, kernel_size=1, stride=1, padding=0, bias=False),
            nn.BatchNorm2d(1024)
        )
        # -----------------------------------------------------------------------
        self.layer4_first = nn.Sequential(
            nn.Conv2d(1024, 512, kernel_size=1, stride=1, padding=0, bias=False),
            nn.BatchNorm2d(512),
            nn.ReLU(inplace=True),
            nn.Conv2d(512, 512, kernel_size=3, stride=2, padding=1, bias=False),
            nn.BatchNorm2d(512),
            nn.ReLU(inplace=True),
            nn.Conv2d(512, 2048, kernel_size=1, stride=1, padding=0, bias=False),
            nn.BatchNorm2d(2048)
        )
        self.layer4_next = nn.Sequential(
            nn.Conv2d(2048, 512, kernel_size=1, stride=1, padding=0, bias=False),
            nn.BatchNorm2d(512),
            nn.ReLU(inplace=True),
            nn.Conv2d(512, 512, kernel_size=3, stride=1, padding=1, bias=False),
            nn.BatchNorm2d(512),
            nn.ReLU(inplace=True),
            nn.Conv2d(512, 2048, kernel_size=1, stride=1, padding=0, bias=False),
            nn.BatchNorm2d(2048)
        )
        # -----------------------------------------------------------------------
        self.avg_pool = nn.AdaptiveAvgPool2d((1, 1))
        self.fc = nn.Sequential(
            nn.Dropout(p=0.5),
            nn.Linear(2048 * 1 * 1, 1000),
            nn.ReLU(inplace=True),
            nn.Dropout(p=0.5),
            nn.Linear(1000, classes_num)
        )

    def forward(self, x):
        out = self.pre(x)
        # -----------------------------------------------------------------------
        layer1_shortcut = DownSample(64, 256, 1)
        # layer1_shortcut.to('cuda:0')
        layer1_identity = layer1_shortcut(out)
        out = self.layer1_first(out)
        out = F.relu(out + layer1_identity, inplace=True)

        for i in range(2):
            identity = out
            out = self.layer1_next(out)
            out = F.relu(out + identity, inplace=True)
        # -----------------------------------------------------------------------
        layer2_shortcut = DownSample(256, 512, 2)
        # layer2_shortcut.to('cuda:0')
        layer2_identity = layer2_shortcut(out)
        out = self.layer2_first(out)
        out = F.relu(out + layer2_identity, inplace=True)

        for i in range(7):
            identity = out
            out = self.layer2_next(out)
            out = F.relu(out + identity, inplace=True)
        # -----------------------------------------------------------------------
        layer3_shortcut = DownSample(512, 1024, 2)
        # layer3_shortcut.to('cuda:0')
        layer3_identity = layer3_shortcut(out)
        out = self.layer3_first(out)
        out = F.relu(out + layer3_identity, inplace=True)

        for i in range(35):
            identity = out
            out = self.layer3_next(out)
            out = F.relu(out + identity, inplace=True)
        # -----------------------------------------------------------------------
        layer4_shortcut = DownSample(1024, 2048, 2)
        # layer4_shortcut.to('cuda:0')
        layer4_identity = layer4_shortcut(out)
        out = self.layer4_first(out)
        out = F.relu(out + layer4_identity, inplace=True)

        for i in range(2):
            identity = out
            out = self.layer4_next(out)
            out = F.relu(out + identity, inplace=True)
        # -----------------------------------------------------------------------
        out = self.avg_pool(out)
        out = out.reshape(out.size(0), -1)
        out = self.fc(out)

        return out
智能推荐
分布式系统一致性(ACID、CAP、BASE、二段提交、三段提交、TCC、幂等性)原理详解_分布式一致性 算法 两段式 三段式-程序员宅基地
文章浏览阅读706次。1 背景一致性是一个抽象的、具有多重含义的计算机术语,在不同应用场景下,有不同的定义和含义。在传统的IT时代,一致性通常指强一致性,强一致性通常体现在你中有我、我中有你、浑然一体;而在互联网时代,一致性的含义远远超出了它原有的含义,在我们讨论互联网时代的一致性之前,我们先了解一下互联网时代的特点,互联网时代信息量巨大、需要计算能力巨大,不但对用户响应速度要求快,而且吞吐量指标也要向外扩展(既:水平伸缩),于是单节点的服务器无法满足需求,服务节点开始池化,想想那个经典的故事,一只筷子一折就断,一把筷子怎么_分布式一致性 算法 两段式 三段式
城市轨道交通运营票务管理论文_城市轨道交通运营企业的票务组织管理-程序员宅基地
文章浏览阅读1.9k次。2018. 9(下) 现代国企研究 37 我国的轨道交通网络在现今已实现全国全面覆盖,无论是火车高铁还是各城市的地铁,都在稳固城市经济的同时,给更多的人带去便捷,逐步缩短其与家的距离。轨道交通网络涉及的票务组织内容又是很复杂的,受到人数,地域,时间甚至于天气的多重制约,例如在早晚高峰时段对于人流的有效疏导和车次的合理排班,都是需要解决的问题。的如何在现有条件下,通过合理的资源配置技术应用等,加强对..._城市轨道交通票务管理系的设计与优化
Linux更新python及安装pip,Linux+Nginx+uWSGI+Django-程序员宅基地
文章浏览阅读199次。升级python升级python要确定安装zlib与zlib-devel,openssl与openssl-devel,bzip2与bzip2-devel否则下面安装setuptools或pip会出错,也可以后面装,只要重新编译一下python就行了。yum install zlib zlib-devel openssl openssl-devel bzip2 bzip2-develwget..._linux python 安装pip
vim使用 tip3-程序员宅基地
文章浏览阅读4.2k次。折叠命令 zf 创建折叠(使用数字表示创建有当前行到下多少行的折叠,比如3j就创建包括4行的折叠) zo 打开折叠(l也可以打开折叠) zc 关闭当前折叠 zm 关闭所有折叠 zr 打开所有折叠 zE 删除所有折叠 zd 删除当前折叠 za 若当前打开则关闭,若当前关闭则打开
点乘和叉乘的区别_解析几何(一)【叉乘为啥这样定义】-程序员宅基地
文章浏览阅读1.5k次。笔者是一个数学系的在读本科生,若是文章中有纰漏,欢迎指出。本篇笔记仅供交流学习。在这里再安利一次【3Blue1Brown的线性代数的本质(Essense of Linear Algebra)系列】,对直观理解线性代数的问题真的非常有帮助。作者3Blue1Brown的主页:3Blue1Brow的主页space.bilibili.com一、叉乘叉乘是解析几何中介绍的第一个相对比较陌生的概念。因此在解..._空间解析几何点乘和叉乘
经验:调教200多个ChatGPT模型后的经验分享_经验chart gpt-程序员宅基地
文章浏览阅读8.6k次,点赞4次,收藏23次。经验:调教200多个ChatGPT模型后的经验分享_经验chart gpt
随便推点
JAVA反射(一):获取Class对象_获取内部类-程序员宅基地
文章浏览阅读1.4k次。1. 获取父类这是最简单也是最容易理解的方法——getSuperclass(),唯一需要说明的是,返回的一定是类,不是接口。2. 获取内部类获取内部类有两种,分别为class.getClasses()与class.getDeclaredClasses(),但它们两个差别极大,见下表: 方法名称 返回结果 包含接口 包含继承结果 仅包含公开 class.getClasses()_获取内部类
Timer_wpf timer-程序员宅基地
文章浏览阅读1.9k次。C# WPF 常用定时器_wpf timer
scrapy重试机制_Scrapy项目之User timeout caused connection failure(异常记录)-程序员宅基地
文章浏览阅读644次。Windows 10家庭中文版,Python 3.6.4,Scrapy 1.5.0,html提示:此文存在问题,真正测试,请勿阅读,shell07-14 14:26更新:cookie通过两个多小时的测试,发现此问题的缘由是昨天编写爬虫程序后,给爬虫程序添加了下面的属性:网络download_timeout = 20dom此属性的解释:scrapyThe amount of time (in s..._user timeout caused connection failure
技术译文 | How Can ScaleFlux Handle MySQL Workload?-程序员宅基地
文章浏览阅读217次。本文是一篇译文,介绍 Percona 的工程师对 ScaleFlux 的性能压测报告翻译:杨奇龙原文地址:https://www.percona.com/blog/2020/08/06/how-can-scaleflux-handle-mysql-workload/最近作者有一个针对 ScaleFlux 的产品也叫做 CSD 2000 进行压测的机会. 本文中作者将介绍使用 Intel SSD 和 ScaleFlux 存储设备进行压测的对比结果。一 我们为什么需要不一样的 ScaleFlux?._scaleflux
electron vue vite 配置安装_wincodesign-2.5.0-程序员宅基地
文章浏览阅读460次。electon 打包安装_wincodesign-2.5.0
华为nova7可以用鸿蒙,华为鸿蒙系统再次更新7款可适配机型!对比安卓,鸿蒙OS的优势有哪些?...-程序员宅基地
文章浏览阅读6.2k次。原标题:华为鸿蒙系统再次更新7款可适配机型!对比安卓,鸿蒙OS的优势有哪些?自从鸿蒙OS系统全面启动公测以来,不断的在更新更多适配机型,就在前不久华为鸿蒙官网又新增了不少的机型,除了之前的Mate系列和P系列外,这次更新的机型有:华为nova6、nova65G、nova75G、nova7Pro5G、nova8、nova8Pro、MatePad10.8英寸。这些机型都可以体验鸿蒙OS 2.0公测版。..._nova7最好用的系统版本