深度学习网络模型 MobileNet系列MobileNet V1、MobileNet V2、MobileNet V3网络详解以及pytorch代码复现_mobilenetv3-程序员宅基地
技术标签: 深度学习 pytorch MobileNet V2 MobileNet V1 MobileNet V3
深度学习网络模型 MobileNet系列MobileNet V1、MobileNet V2、MobileNet V3网络详解以及pytorch代码复现


1、DW卷积与普通卷积计算量对比
DW与PW计算量
普通卷积计算量
计算量对比
因此理论上普通卷积是DW+PW卷积的8到9倍
2、MobileNet V1
MobileNet V1网络结构

MobileNet V1网络结构代码
import torch.nn as nn
import torch

class MobileNetV1(nn.Module):
    def __init__(self, ch_in, n_classes):
        super(MobileNetV1, self).__init__()

        # 定义普通卷积、BN、激活模块
        def conv_bn(inp, oup, stride):
            return nn.Sequential(
                nn.Conv2d(inp, oup, 3, stride, 1, bias=False),
                nn.BatchNorm2d(oup),
                nn.ReLU(inplace=True)
                )
        # 定义DW、PW卷积模块
        def conv_dw(inp, oup, stride):
            return nn.Sequential(
                # dw
                nn.Conv2d(inp, inp, 3, stride, 1, groups=inp, bias=False),   # DW卷积的卷积核输入与输出的数量一致,且等于分组数
                nn.BatchNorm2d(inp),
                nn.ReLU(inplace=True),

                # pw
                nn.Conv2d(inp, oup, 1, 1, 0, bias=False),
                nn.BatchNorm2d(oup),
                nn.ReLU(inplace=True),
                )

        self.model = nn.Sequential(
            conv_bn(ch_in, 32, 2),
            conv_dw(32, 64, 1),
            conv_dw(64, 128, 2),
            conv_dw(128, 128, 1),
            conv_dw(128, 256, 2),
            conv_dw(256, 256, 1),
            conv_dw(256, 512, 2),
            conv_dw(512, 512, 1),
            conv_dw(512, 512, 1),
            conv_dw(512, 512, 1),
            conv_dw(512, 512, 1),
            conv_dw(512, 512, 1),
            conv_dw(512, 1024, 2),
            conv_dw(1024, 1024, 1),
            nn.AdaptiveAvgPool2d(1)
        )
        self.fc = nn.Linear(1024, n_classes)

    def forward(self, x):
        x = self.model(x)
        x = x.view(-1, 1024)
        x = self.fc(x)
        return x

if __name__=='__main__':
    # model check
    model = MobileNetV1(ch_in=3, n_classes=5)
    print(model)
    random_data=torch.rand([1,3,224,224])
    result = model(random_data)
    print(result)
3、MobileNet V2

倒残差结构模块
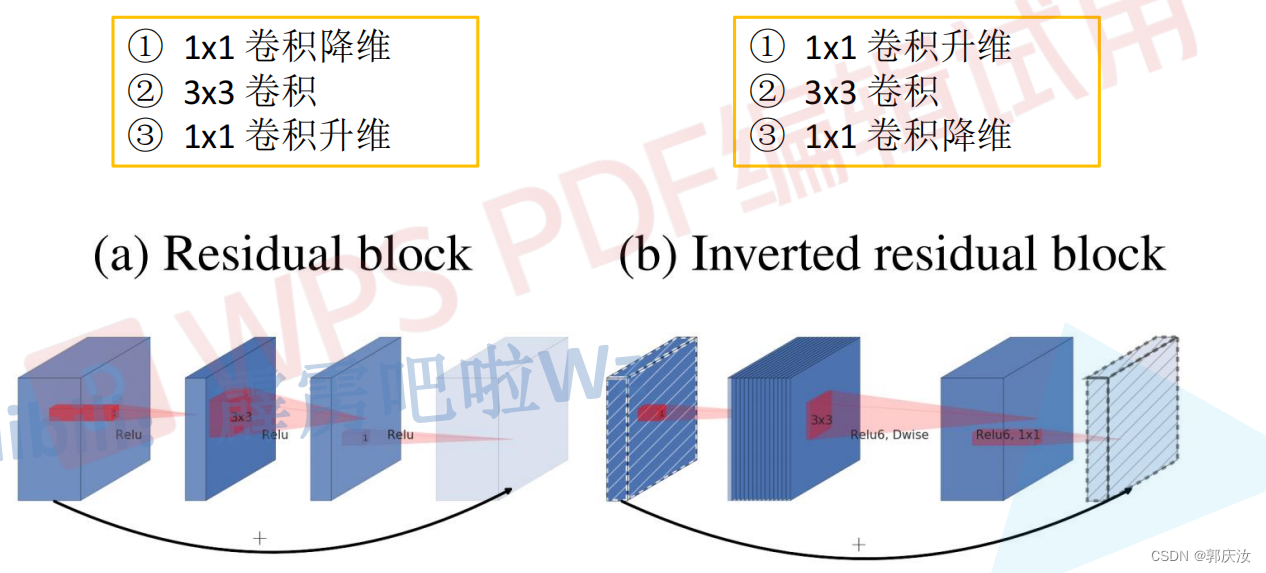
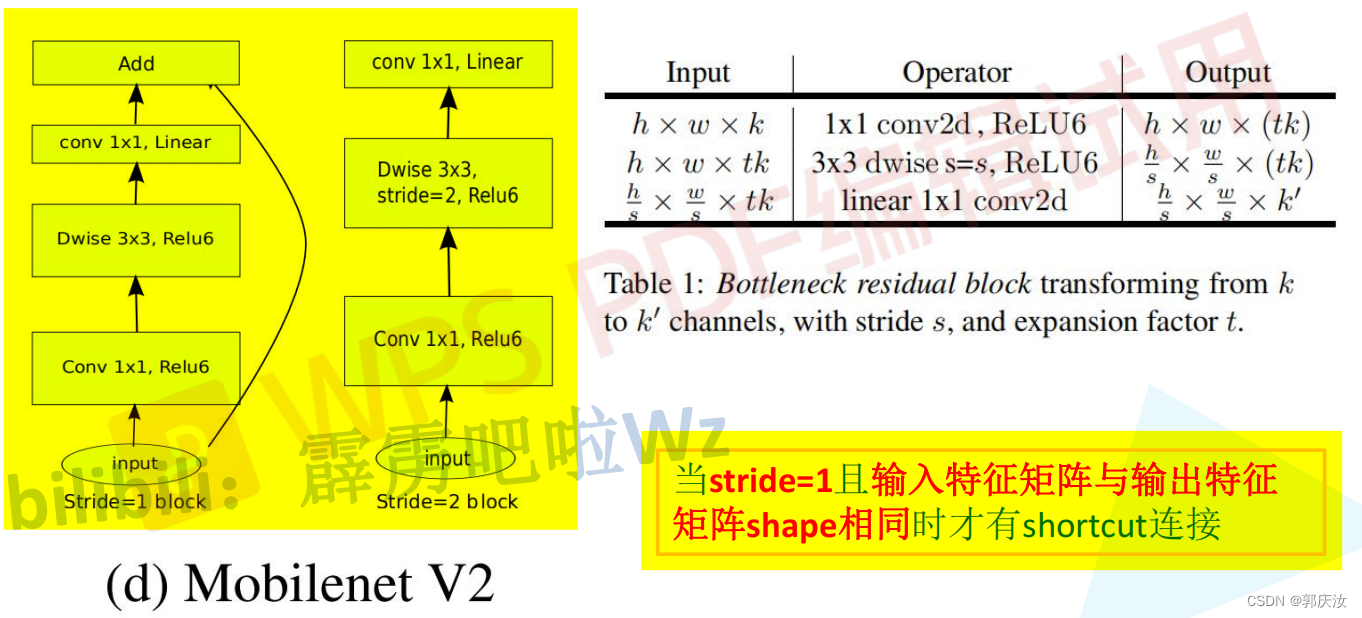
Residual blok与Inverted residual block对比:
- Residual blok:先采用1 x 1的卷积核来对特征矩阵进行压缩,减少输入特征矩阵的channel,再通过3 x 3的卷积核进行特征处理,再采用1 x 1的卷积核来扩充channel维度,形成了两头大中间小的瓶颈结构。并且3 x 3的卷积后面采用Relu激活函数。
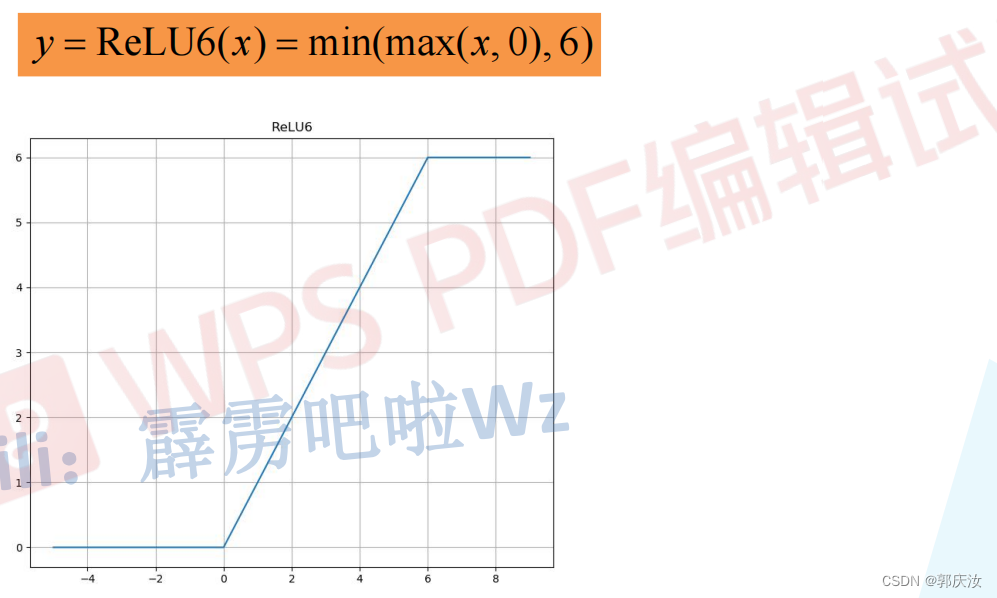
- Inverted residual block:先采用1 x 1的卷积核进行升高channel维度的操作,通过卷积核大小为3 x 3的DW模块进行卷积,再通过1 x 1的卷积进行降低channel维度的处理,形成两头小中间大的结构。并且3 x 3的卷积后面采用Relu6激活函数。
- Relu6激活函数
- 倒残差结构详细示意图
倒残差模块代码
# 定义普通卷积、BN结构
class ConvBNReLU(nn.Sequential):
    def __init__(self, in_channel, out_channel, kernel_size=3, stride=1, groups=1):
        padding = (kernel_size - 1) // 2  # padding的设置根据kernel_size来定,如果kernel_size为3,则padding设置为1;如果kernel_size为1,为padding为0
        super(ConvBNReLU, self).__init__(
            # 在pytorch中,如果设置的 group=1的话,就为普通卷积;如果设置的值为输入特征矩阵的深度的话(即in_channel),则为深度卷积(deptwise conv),并且Dw卷积的输出特征矩阵的深度等于输入特征矩阵的深度
            nn.Conv2d(in_channel, out_channel, kernel_size, stride, padding, groups=groups, bias=False),  # groups=1,表示普通的卷积;因为接下来要使用的是BN层,此处的偏置不起任何作用,所以设置为1
            nn.BatchNorm2d(out_channel),
            nn.ReLU6(inplace=True)    # 此处使用的是Relu6激活函数
        )
# 定义mobile网络基本结构--即到残差结构
class InvertedResidual(nn.Module):
    def __init__(self, in_channel, out_channel, stride, expand_ratio):
        super(InvertedResidual, self).__init__()
        hidden_channel = in_channel * expand_ratio
        self.use_shortcut = stride == 1 and in_channel == out_channel  # stride == 1 and in_channel == out_channel:保证输入矩阵与输出矩阵的shape一致,且通道数也一致,这样才可以进行shurtcut

        layers = []
        if expand_ratio != 1:  # 表示如果扩展因子不为1时,则使用1x1的卷积层(即对输入特征矩阵的深度进行扩充)
            # 1x1 pointwise conv
            layers.append(ConvBNReLU(in_channel, hidden_channel, kernel_size=1))
        layers.extend([
            # 3x3 depthwise conv
            # 在pytorch中,如果设置的 group=1的话,就为普通卷积;如果设置的值为输入特征矩阵的深度的话(即in_channel),则为深度卷积(deptwise conv),并且Dw卷积的输出特征矩阵的深度等于输入特征矩阵的深度
            ConvBNReLU(hidden_channel, hidden_channel, stride=stride, groups=hidden_channel),
            # 1x1 pointwise conv(linear)  因为其后跟随的是线性激活函数,即y=x,所以其后面不在跟随激活函数
            nn.Conv2d(hidden_channel, out_channel, kernel_size=1, bias=False),
            nn.BatchNorm2d(out_channel),
        ])

        self.conv = nn.Sequential(*layers)

    def forward(self, x):
        if self.use_shortcut:
            return x + self.conv(x)
        else:
            return self.conv(x)
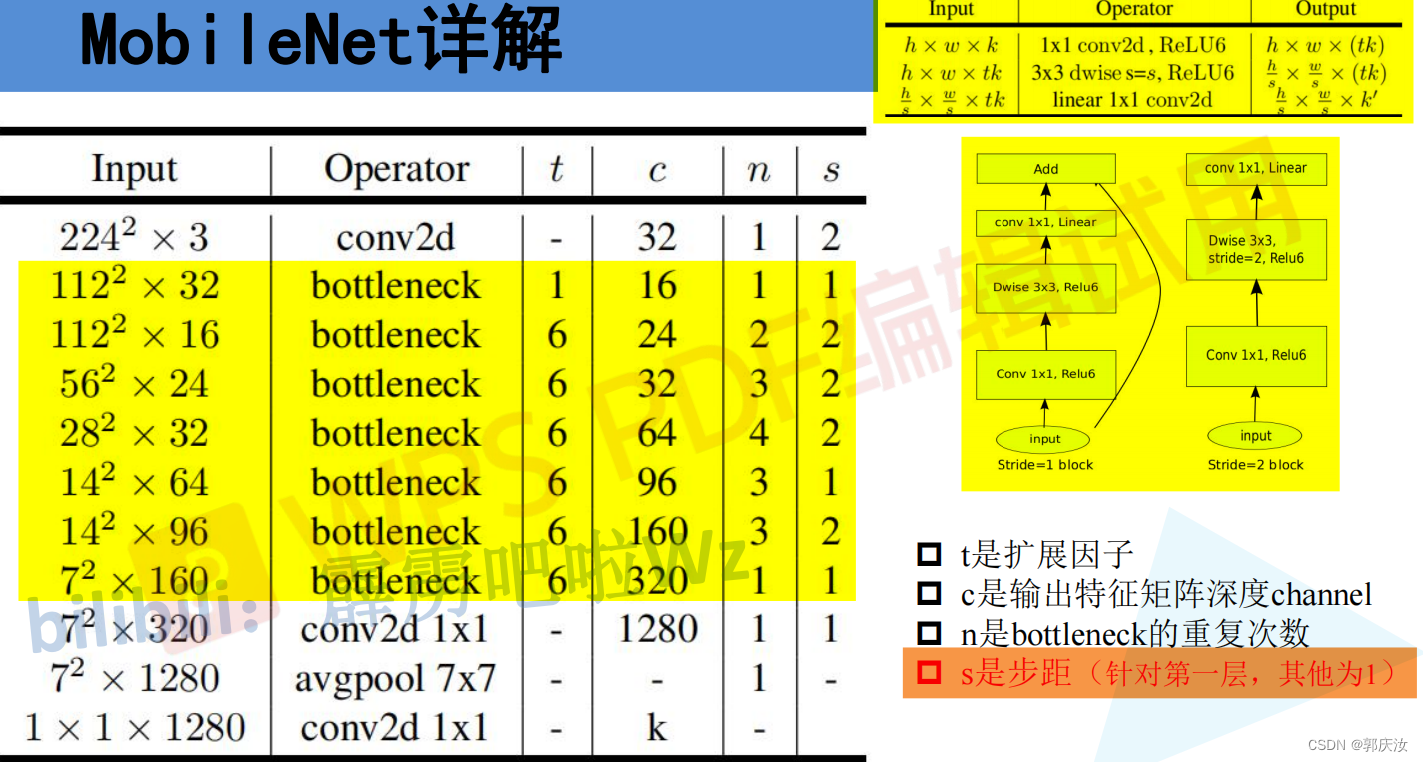
MobileNet V2详细网络结构
MobileNet V2网络结构代码
from torch import nn
import torch


def _make_divisible(ch, divisor=8, min_ch=None):
    """
        将输入的通道数(ch)调整到divisor的整数倍,方便硬件加速
    This function is taken from the original tf repo.
    It ensures that all layers have a channel number that is divisible by 8
    It can be seen here:
    https://github.com/tensorflow/models/blob/master/research/slim/nets/mobilenet/mobilenet.py
    """
    if min_ch is None:
        min_ch = divisor
    new_ch = max(min_ch, int(ch + divisor / 2) // divisor * divisor)
    # Make sure that round down does not go down by more than 10%.
    if new_ch < 0.9 * ch:
        new_ch += divisor
    return new_ch

# 定义普通卷积、BN结构
class ConvBNReLU(nn.Sequential):
    def __init__(self, in_channel, out_channel, kernel_size=3, stride=1, groups=1):
        padding = (kernel_size - 1) // 2  # padding的设置根据kernel_size来定,如果kernel_size为3,则padding设置为1;如果kernel_size为1,为padding为0
        super(ConvBNReLU, self).__init__(
            # 在pytorch中,如果设置的 group=1的话,就为普通卷积;如果设置的值为输入特征矩阵的深度的话(即in_channel),则为深度卷积(deptwise conv),并且Dw卷积的输出特征矩阵的深度等于输入特征矩阵的深度
            nn.Conv2d(in_channel, out_channel, kernel_size, stride, padding, groups=groups, bias=False),  # groups=1,表示普通的卷积;因为接下来要使用的是BN层,此处的偏置不起任何作用,所以设置为1
            nn.BatchNorm2d(out_channel),
            nn.ReLU6(inplace=True)    # 此处使用的是Relu6激活函数
        )

# 定义mobile网络基本结构--即到残差结构
class InvertedResidual(nn.Module):
    def __init__(self, in_channel, out_channel, stride, expand_ratio):
        super(InvertedResidual, self).__init__()
        hidden_channel = in_channel * expand_ratio
        self.use_shortcut = stride == 1 and in_channel == out_channel  # stride == 1 and in_channel == out_channel:保证输入矩阵与输出矩阵的shape一致,且通道数也一致,这样才可以进行shurtcut

        layers = []
        if expand_ratio != 1:  # 表示如果扩展因子不为1时,则使用1x1的卷积层(即对输入特征矩阵的深度进行扩充)
            # 1x1 pointwise conv
            layers.append(ConvBNReLU(in_channel, hidden_channel, kernel_size=1))
        layers.extend([
            # 3x3 depthwise conv
            # 在pytorch中,如果设置的 group=1的话,就为普通卷积;如果设置的值为输入特征矩阵的深度的话(即in_channel),则为深度卷积(deptwise conv),并且Dw卷积的输出特征矩阵的深度等于输入特征矩阵的深度
            ConvBNReLU(hidden_channel, hidden_channel, stride=stride, groups=hidden_channel),
            # 1x1 pointwise conv(linear)  因为其后跟随的是线性激活函数,即y=x,所以其后面不在跟随激活函数
            nn.Conv2d(hidden_channel, out_channel, kernel_size=1, bias=False),
            nn.BatchNorm2d(out_channel),
        ])

        self.conv = nn.Sequential(*layers)

    def forward(self, x):
        if self.use_shortcut:
            return x + self.conv(x)
        else:
            return self.conv(x)

# 定义mobileNetV2网络
class MobileNetV2(nn.Module):
    def __init__(self, num_classes=1000, alpha=1.0, round_nearest=8):
        super(MobileNetV2, self).__init__()
        block = InvertedResidual
        input_channel = _make_divisible(32 * alpha, round_nearest)  # 将卷积核的个数调整为8的整数倍
        last_channel = _make_divisible(1280 * alpha, round_nearest)

        inverted_residual_setting = [
            # t, c, n, s
            [1, 16, 1, 1],
            [6, 24, 2, 2],
            [6, 32, 3, 2],
            [6, 64, 4, 2],
            [6, 96, 3, 1],
            [6, 160, 3, 2],
            [6, 320, 1, 1],
        ]

        features = []
        # conv1 layer
        features.append(ConvBNReLU(3, input_channel, stride=2))   # 添加第一层普通卷积层
        # building inverted residual residual blockes
        for t, c, n, s in inverted_residual_setting:
            output_channel = _make_divisible(c * alpha, round_nearest)   # 根据alpha因子调整卷积核的个数
            for i in range(n):   # 循环添加倒残差模块
                stride = s if i == 0 else 1  # s表示的是倒残差模块结构中第一层卷积对应的步距,剩余层都是1
                features.append(block(input_channel, output_channel, stride, expand_ratio=t))  # 添加一系列倒残差结构
                input_channel = output_channel
        # building last several layers
        features.append(ConvBNReLU(input_channel, last_channel, 1))  # 构建最后一层卷积层
        # combine feature layers
        self.features = nn.Sequential(*features)

        # building classifier
        self.avgpool = nn.AdaptiveAvgPool2d((1, 1))  # 采用自适应平均采样层
        self.classifier = nn.Sequential(
            nn.Dropout(0.2),
            nn.Linear(last_channel, num_classes)
        )

        # weight initialization  初始化全只能怪
        for m in self.modules():
            if isinstance(m, nn.Conv2d):
                nn.init.kaiming_normal_(m.weight, mode='fan_out')
                if m.bias is not None:
                    nn.init.zeros_(m.bias)
            elif isinstance(m, nn.BatchNorm2d):
                nn.init.ones_(m.weight)
                nn.init.zeros_(m.bias)
            elif isinstance(m, nn.Linear):
                nn.init.normal_(m.weight, 0, 0.01)   # 初始化为正态分布的函数,均值为0,方差为0.01
                nn.init.zeros_(m.bias)

    def forward(self, x):
        x = self.features(x)
        x = self.avgpool(x)
        x = torch.flatten(x, 1)
        x = self.classifier(x)
        return x


if __name__ == '__main__':
    divisible = _make_divisible(1)
    print(divisible)
4、MobileNet V3
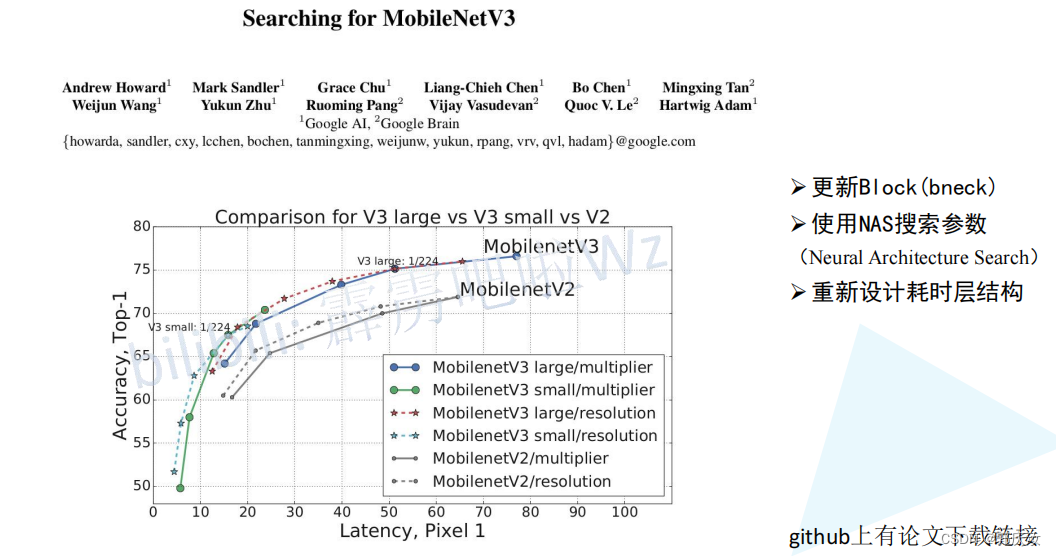
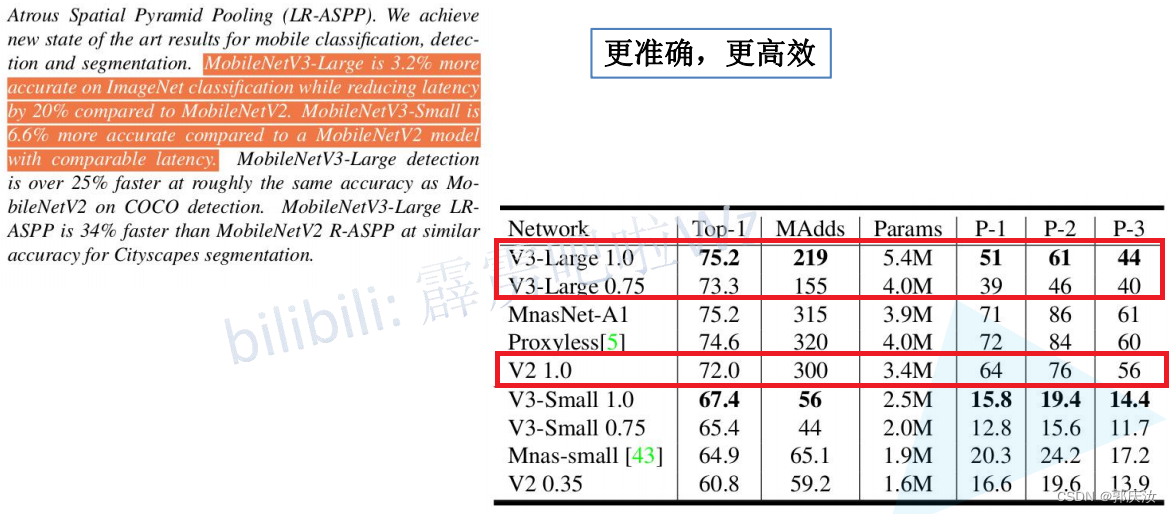
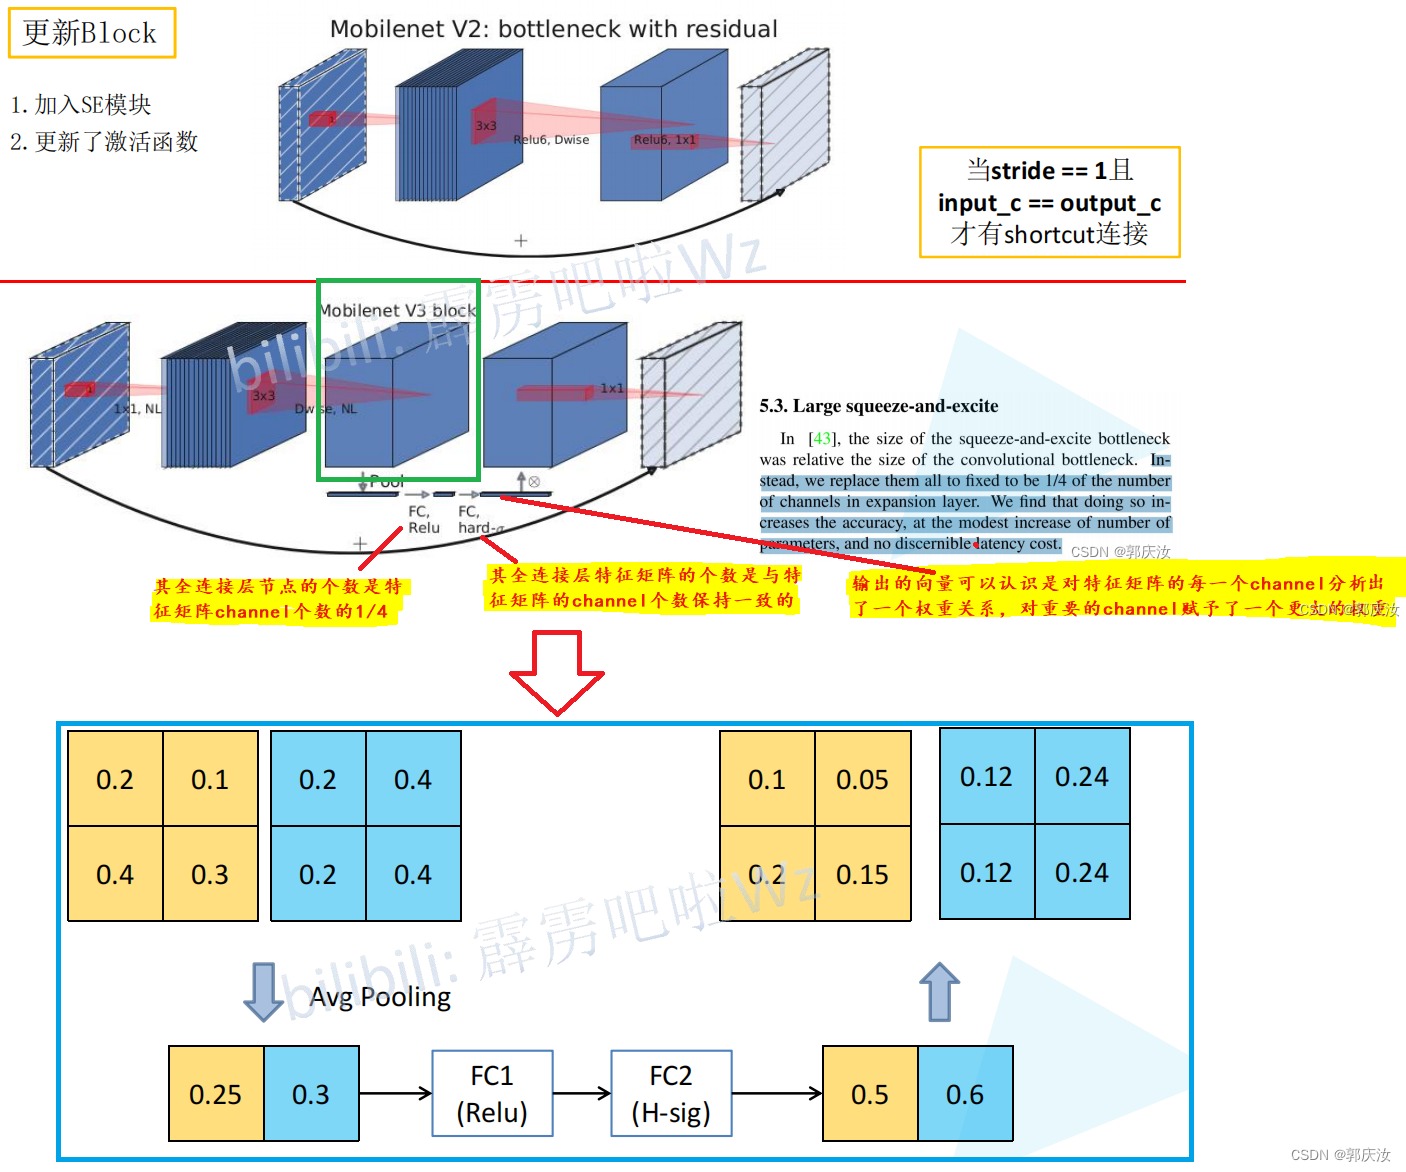
创新点
- 加入了注意力机制SE模块
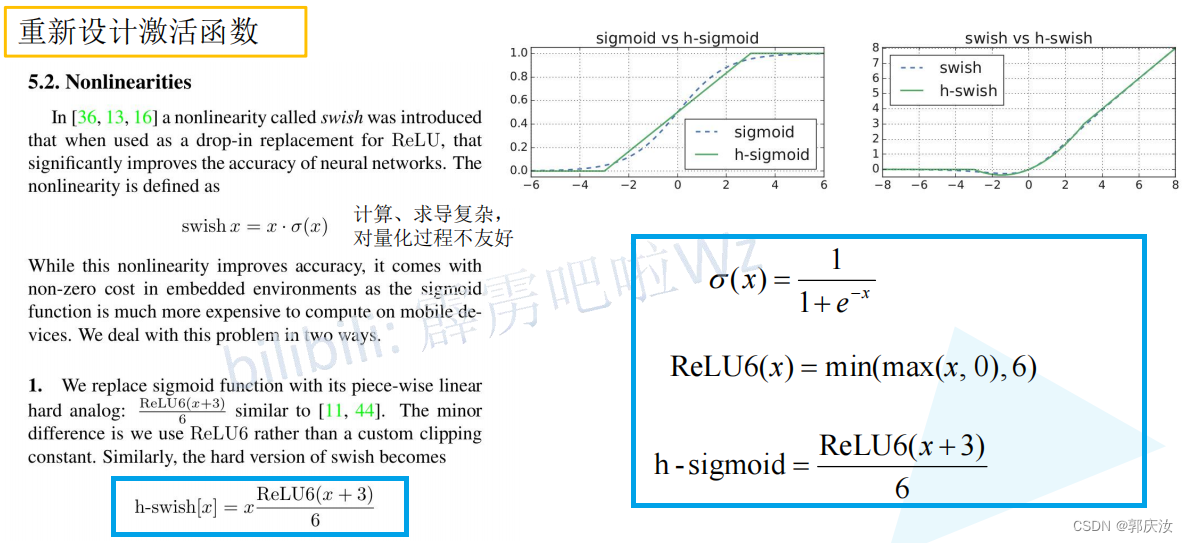
- 使用的新的激活函数
- 激活函数
MobileNet V3详细网络结构
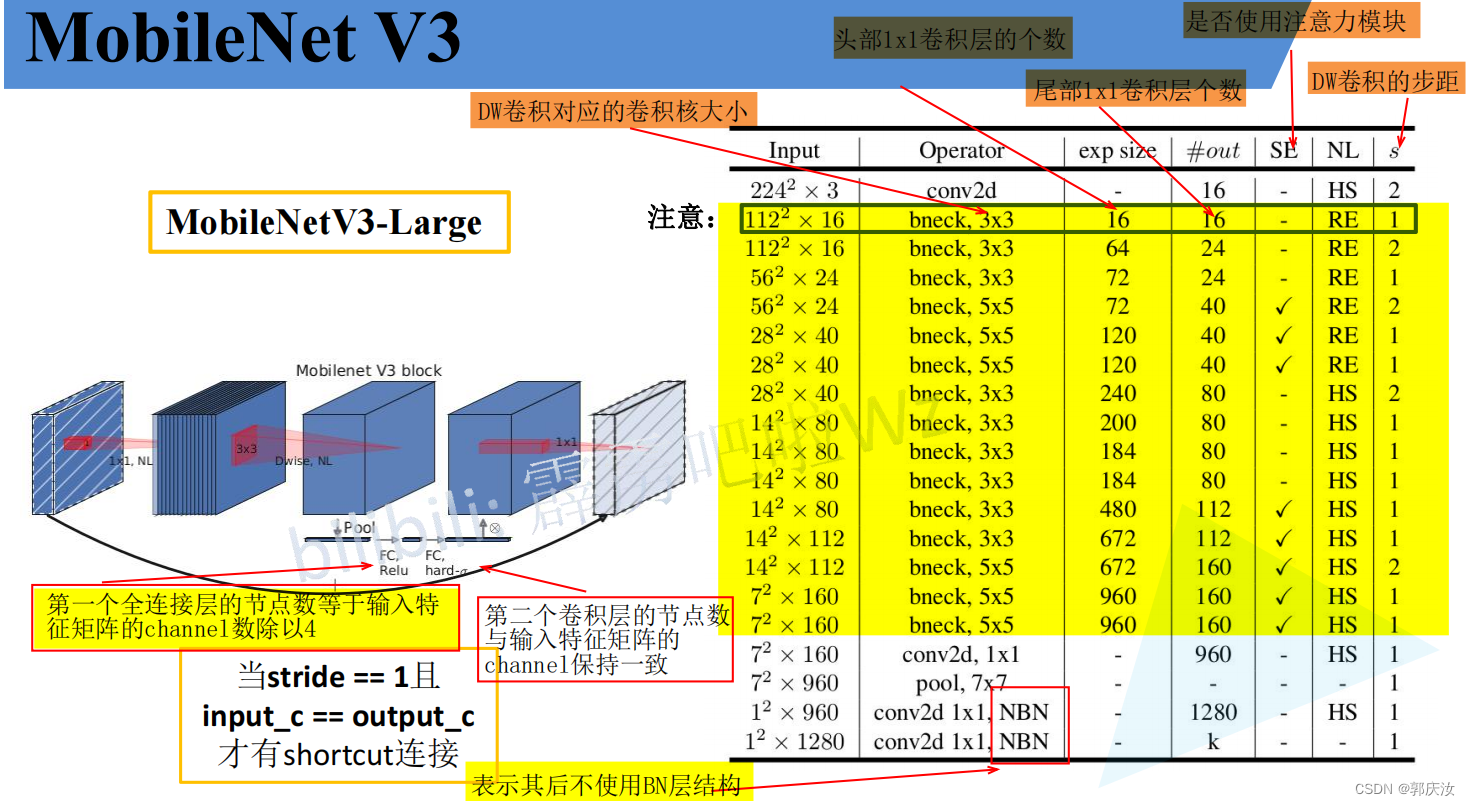
# 定义block的配置类
class InvertedResidualConfig:
    def __init__(self,
                 input_c: int,  # block模块中的第一个1x1卷积层的输入channel数
                 kernel: int,   # depthwise卷积的卷积核大小
                 expanded_c: int,   # block模块中的第一个1x1卷积层的输出channel数
                 out_c: int,  # 经过block模块中第二个1x1卷积层处理过后得到的channel数
                 use_se: bool,  # 是否使用注意力机制模块
                 activation: str,   # 激活方式
                 stride: int,       # 步长
                 width_multi: float):  # width_multi:调节每个卷积层所使用channel的倍率因子
        self.input_c = self.adjust_channels(input_c, width_multi)
        self.kernel = kernel
        self.expanded_c = self.adjust_channels(expanded_c, width_multi)
        self.out_c = self.adjust_channels(out_c, width_multi)
        self.use_se = use_se
        self.use_hs = activation == "HS"  # whether using h-swish activation
        self.stride = stride

    @staticmethod
    def adjust_channels(channels: int, width_multi: float):
        return _make_divisible(channels * width_multi, 8)
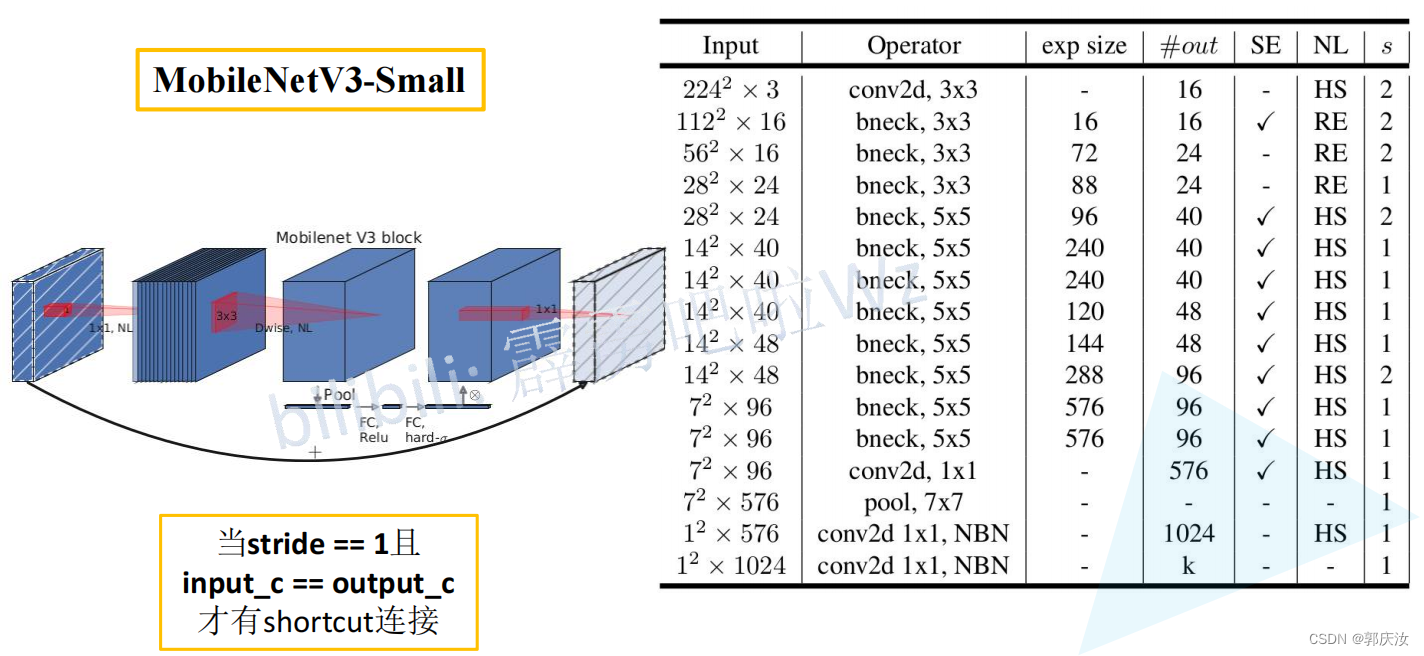
注意力机制SE模块代码
# 注意力机制模块(SE模块,即两个全连接层)   该模块的基本流程是:先进行自适应平均池化(1x1)———>1x1的卷积层———>relu激活层———>1x1的卷积池化———>hardsigmoid()激活函数激活
class SqueezeExcitation(nn.Module):
    def __init__(self, input_c: int, squeeze_factor: int = 4):
        super(SqueezeExcitation, self).__init__()
        squeeze_c = _make_divisible(input_c // squeeze_factor, 8)    # 获得距离该数最近的8的整数倍的数字
        self.fc1 = nn.Conv2d(input_c, squeeze_c, 1)    # 该卷积的输出的squeeze_c是输入input_c的1/4
        self.fc2 = nn.Conv2d(squeeze_c, input_c, 1)

    def forward(self, x: Tensor) -> Tensor:
        scale = F.adaptive_avg_pool2d(x, output_size=(1, 1))   # 将特征矩阵每一个channel上的数据给平均池化到1x1的大小
        scale = self.fc1(scale)
        scale = F.relu(scale, inplace=True)
        scale = self.fc2(scale)
        scale = F.hardsigmoid(scale, inplace=True)   # 激活函数
        return scale * x   # 将得到的数据与传入的对应channel数据进行相乘
InvertedResidual模块代码
# 定义block模块
# 此为block模块,其包含第一个1x1卷积层、DeptWis卷积层、SE注意力机制层(判断是否需求)、第二个1x1卷积层、激活函数(需要判断是否是非线性激活)
class InvertedResidual(nn.Module):
    def __init__(self,
                 cnf: InvertedResidualConfig,   # cnf:配置类参数
                 norm_layer: Callable[..., nn.Module]):      # norm_layer:# BN层
        super(InvertedResidual, self).__init__()

        if cnf.stride not in [1, 2]:  # 判断某一层的配置文件,其步长是否满足条件
            raise ValueError("illegal stride value.")

        # 判断是否进行短连接
        self.use_res_connect = (cnf.stride == 1 and cnf.input_c == cnf.out_c)  # 只有当步长为1,并且输入通道等于输出通道数

        layers: List[nn.Module] = []
        activation_layer = nn.Hardswish if cnf.use_hs else nn.ReLU    # 判断当前的激活函数类型

        # expand
        # 判断是否相等,如果相等,则不适用1x1的卷积层增加channel维度;不相等的话,才使用该层进行升维度
        if cnf.expanded_c != cnf.input_c:
            layers.append(ConvBNActivation(cnf.input_c,
                                           cnf.expanded_c,
                                           kernel_size=1,
                                           norm_layer=norm_layer,
                                           activation_layer=activation_layer))

        # depthwise
        layers.append(ConvBNActivation(cnf.expanded_c,
                                       cnf.expanded_c,
                                       kernel_size=cnf.kernel,   # depthwise卷积的卷积核大小
                                       stride=cnf.stride,
                                       groups=cnf.expanded_c,
                                       norm_layer=norm_layer,   # BN层
                                       activation_layer=activation_layer))

        # 判断是否需要添加SE模块
        if cnf.use_se:
            layers.append(SqueezeExcitation(cnf.expanded_c))

        # project
        layers.append(ConvBNActivation(cnf.expanded_c,
                                       cnf.out_c,
                                       kernel_size=1,
                                       norm_layer=norm_layer,  # BN 层
                                       activation_layer=nn.Identity))   # 此层的activation_layer就是进行里普通的线性激活,没有做任何的处理

        self.block = nn.Sequential(*layers)
        self.out_channels = cnf.out_c
        self.is_strided = cnf.stride > 1

    def forward(self, x: Tensor) -> Tensor:
        result = self.block(x)
        if self.use_res_connect:
            result += x   # 进行shortcut连接

        return result
整体代码
from typing import Callable, List, Optional

import torch
from torch import nn, Tensor
from torch.nn import functional as F
from functools import partial

# 得到同传入数据最近的8的整数倍数值
def _make_divisible(ch, divisor=8, min_ch=None):
    """
    This function is taken from the original tf repo.
    It ensures that all layers have a channel number that is divisible by 8
    It can be seen here:
    https://github.com/tensorflow/models/blob/master/research/slim/nets/mobilenet/mobilenet.py
    """
    if min_ch is None:
        min_ch = divisor
    new_ch = max(min_ch, int(ch + divisor / 2) // divisor * divisor)
    # Make sure that round down does not go down by more than 10%.
    if new_ch < 0.9 * ch:
        new_ch += divisor
    return new_ch

# 普通卷积、BN、激活层模块
class ConvBNActivation(nn.Sequential):
    def __init__(self,
                 in_planes: int,   # 输入特征矩阵的通道
                 out_planes: int,  # 输出特征矩阵的通道
                 kernel_size: int = 3,
                 stride: int = 1,
                 groups: int = 1,
                 norm_layer: Optional[Callable[..., nn.Module]] = None,   # 在卷积后的BN层
                 activation_layer: Optional[Callable[..., nn.Module]] = None):  # 激活函数
        padding = (kernel_size - 1) // 2
        if norm_layer is None:
            norm_layer = nn.BatchNorm2d
        if activation_layer is None:
            activation_layer = nn.ReLU6
        super(ConvBNActivation, self).__init__(nn.Conv2d(in_channels=in_planes,
                                                         out_channels=out_planes,
                                                         kernel_size=kernel_size,
                                                         stride=stride,
                                                         padding=padding,
                                                         groups=groups,
                                                         bias=False),
                                               norm_layer(out_planes),   # BN层
                                               activation_layer(inplace=True))

# 注意力机制模块(SE模块,即两个全连接层)   该模块的基本流程是:先进行自适应平均池化(1x1)———>1x1的卷积层———>relu激活层———>1x1的卷积池化———>hardsigmoid()激活函数激活
class SqueezeExcitation(nn.Module):
    def __init__(self, input_c: int, squeeze_factor: int = 4):
        super(SqueezeExcitation, self).__init__()
        squeeze_c = _make_divisible(input_c // squeeze_factor, 8)    # 获得距离该数最近的8的整数倍的数字
        self.fc1 = nn.Conv2d(input_c, squeeze_c, 1)    # 该卷积的输出的squeeze_c是输入input_c的1/4  其作用与全连接层一样
        self.fc2 = nn.Conv2d(squeeze_c, input_c, 1)

    def forward(self, x: Tensor) -> Tensor:
        scale = F.adaptive_avg_pool2d(x, output_size=(1, 1))   # 将特征矩阵每一个channel上的数据给平均池化到1x1的大小
        scale = self.fc1(scale)
        scale = F.relu(scale, inplace=True)
        scale = self.fc2(scale)
        scale = F.hardsigmoid(scale, inplace=True)   # 激活函数
        return scale * x   # 将得到的数据与传入的对应channel数据进行相乘


# 定义block的配置类
class InvertedResidualConfig:
    def __init__(self,
                 input_c: int,  # block模块中的第一个1x1卷积层的输入channel数
                 kernel: int,   # depthwise卷积的卷积核大小
                 expanded_c: int,   # block模块中的第一个1x1卷积层的输出channel数
                 out_c: int,  # 经过block模块中第二个1x1卷积层处理过后得到的channel数
                 use_se: bool,  # 是否使用注意力机制模块
                 activation: str,   # 激活方式
                 stride: int,       # 步长
                 width_multi: float):  # width_multi:调节每个卷积层所使用channel的倍率因子
        self.input_c = self.adjust_channels(input_c, width_multi)
        self.kernel = kernel
        self.expanded_c = self.adjust_channels(expanded_c, width_multi)
        self.out_c = self.adjust_channels(out_c, width_multi)
        self.use_se = use_se
        self.use_hs = activation == "HS"  # whether using h-swish activation
        self.stride = stride

    @staticmethod
    def adjust_channels(channels: int, width_multi: float):
        return _make_divisible(channels * width_multi, 8)


# 定义block模块
# 此为block模块,其包含第一个1x1卷积层、DeptWis卷积层、SE注意力机制层(判断是否需求)、第二个1x1卷积层、激活函数(需要判断是否是非线性激活)
class InvertedResidual(nn.Module):
    def __init__(self,
                 cnf: InvertedResidualConfig,   # cnf:配置类参数
                 norm_layer: Callable[..., nn.Module]):      # norm_layer:# BN层
        super(InvertedResidual, self).__init__()

        if cnf.stride not in [1, 2]:  # 判断某一层的配置文件,其步长是否满足条件
            raise ValueError("illegal stride value.")

        # 判断是否进行短连接
        self.use_res_connect = (cnf.stride == 1 and cnf.input_c == cnf.out_c)  # 只有当步长为1,并且输入通道等于输出通道数

        layers: List[nn.Module] = []
        activation_layer = nn.Hardswish if cnf.use_hs else nn.ReLU    # 判断当前的激活函数类型

        # expand
        # 判断是否相等,如果相等,则不适用1x1的卷积层增加channel维度;不相等的话,才使用该层进行升维度
        if cnf.expanded_c != cnf.input_c:
            layers.append(ConvBNActivation(cnf.input_c,
                                           cnf.expanded_c,
                                           kernel_size=1,
                                           norm_layer=norm_layer,
                                           activation_layer=activation_layer))

        # depthwise
        layers.append(ConvBNActivation(cnf.expanded_c,
                                       cnf.expanded_c,
                                       kernel_size=cnf.kernel,   # depthwise卷积的卷积核大小
                                       stride=cnf.stride,
                                       groups=cnf.expanded_c,    # 深度DW卷积
                                       norm_layer=norm_layer,   # BN层
                                       activation_layer=activation_layer))

        # 判断是否需要添加SE模块
        if cnf.use_se:
            layers.append(SqueezeExcitation(cnf.expanded_c))

        # project
        layers.append(ConvBNActivation(cnf.expanded_c,
                                       cnf.out_c,
                                       kernel_size=1,
                                       norm_layer=norm_layer,  # BN 层
                                       activation_layer=nn.Identity))   # 此层的activation_layer就是进行里普通的线性激活,没有做任何的处理

        self.block = nn.Sequential(*layers)
        self.out_channels = cnf.out_c
        self.is_strided = cnf.stride > 1

    def forward(self, x: Tensor) -> Tensor:
        result = self.block(x)
        if self.use_res_connect:
            result += x   # 进行shortcut连接

        return result


# MobileNetV3网络结构基础框架:其包括:模型的第一层卷积层———>nx【bneckBlock模块】———>1x1的卷积层———>自适应平均池化层———>全连接层———>全连接层
class MobileNetV3(nn.Module):
    def __init__(self,
                 inverted_residual_setting: List[InvertedResidualConfig],           # beneckBlock结构一系列参数列表
                 last_channel: int,   # 对应的是倒数第二个全连接层输出节点数  1280
                 num_classes: int = 1000,  # 类别个数
                 block: Optional[Callable[..., nn.Module]] = None,   # InvertedResidual核心模块
                 norm_layer: Optional[Callable[..., nn.Module]] = None):
        super(MobileNetV3, self).__init__()

        if not inverted_residual_setting:
            raise ValueError("The inverted_residual_setting should not be empty.")
        elif not (isinstance(inverted_residual_setting, List) and
                  all([isinstance(s, InvertedResidualConfig) for s in inverted_residual_setting])):
            raise TypeError("The inverted_residual_setting should be List[InvertedResidualConfig]")

        if block is None:
            block = InvertedResidual   # block类

        if norm_layer is None:
            norm_layer = partial(nn.BatchNorm2d, eps=0.001, momentum=0.01)  # partial()为python方法,即为nn.BatchNorm2d传入默认的两个参数

        layers: List[nn.Module] = []

        # building first layer
        # 构建第一层卷积结构
        firstconv_output_c = inverted_residual_setting[0].input_c   # 表示第一个卷积层输出的channel数
        layers.append(ConvBNActivation(3,   # 输入图像数据的channel数
                                       firstconv_output_c,    # 输出channel
                                       kernel_size=3,
                                       stride=2,
                                       norm_layer=norm_layer,
                                       activation_layer=nn.Hardswish))
        # building inverted residual blocks
        # 利用循环的方式添加block模块,将每层的配置文件传给block
        for cnf in inverted_residual_setting:
            layers.append(block(cnf, norm_layer))

        # building last several layers
        lastconv_input_c = inverted_residual_setting[-1].out_c  # 最后的bneckblock的输出channel
        lastconv_output_c = 6 * lastconv_input_c    # lastconv_output_c 与 最后的bneckblock的输出channel数是六倍的关系

        # 定义最后一层的卷积层
        layers.append(ConvBNActivation(lastconv_input_c,   # 最后的bneckblock的输出channel数
                                       lastconv_output_c,   # lastconv_output_c 与 最后的bneckblock的输出channel数是六倍的关系
                                       kernel_size=1,
                                       norm_layer=norm_layer,
                                       activation_layer=nn.Hardswish))
        self.features = nn.Sequential(*layers)
        self.avgpool = nn.AdaptiveAvgPool2d(1)
        self.classifier = nn.Sequential(nn.Linear(lastconv_output_c, last_channel),
                                        nn.Hardswish(inplace=True),
                                        nn.Dropout(p=0.2, inplace=True),
                                        nn.Linear(last_channel, num_classes))

        # initial weights
        for m in self.modules():
            if isinstance(m, nn.Conv2d):
                nn.init.kaiming_normal_(m.weight, mode="fan_out")
                if m.bias is not None:
                    nn.init.zeros_(m.bias)
            elif isinstance(m, (nn.BatchNorm2d, nn.GroupNorm)):
                nn.init.ones_(m.weight)
                nn.init.zeros_(m.bias)
            elif isinstance(m, nn.Linear):
                nn.init.normal_(m.weight, 0, 0.01)
                nn.init.zeros_(m.bias)

    def _forward_impl(self, x: Tensor) -> Tensor:
        x = self.features(x)
        x = self.avgpool(x)
        x = torch.flatten(x, 1)
        x = self.classifier(x)

        return x

    def forward(self, x: Tensor) -> Tensor:
        return self._forward_impl(x)


### 构建large基础mobilenet_v3_large模型
def mobilenet_v3_large(num_classes: int = 1000,
                       reduced_tail: bool = False) -> MobileNetV3:
    """
    Constructs a large MobileNetV3 architecture from
    "Searching for MobileNetV3" <https://arxiv.org/abs/1905.02244>.

    weights_link:
    https://download.pytorch.org/models/mobilenet_v3_large-8738ca79.pth

    Args:
        num_classes (int): number of classes
        reduced_tail (bool): If True, reduces the channel counts of all feature layers
            between C4 and C5 by 2. It is used to reduce the channel redundancy in the
            backbone for Detection and Segmentation.
    """
    width_multi = 1.0
    bneck_conf = partial(InvertedResidualConfig, width_multi=width_multi)
    adjust_channels = partial(InvertedResidualConfig.adjust_channels, width_multi=width_multi)

    reduce_divider = 2 if reduced_tail else 1   # 是否较少网络参数标志,默认是False,即不减少

    # # beneckBlock结构一系列参数列表
    inverted_residual_setting = [
        # input_c, kernel, expanded_c, out_c, use_se, activation, stride
        bneck_conf(16, 3, 16, 16, False, "RE", 1),
        bneck_conf(16, 3, 64, 24, False, "RE", 2),  # C1
        bneck_conf(24, 3, 72, 24, False, "RE", 1),
        bneck_conf(24, 5, 72, 40, True, "RE", 2),  # C2
        bneck_conf(40, 5, 120, 40, True, "RE", 1),
        bneck_conf(40, 5, 120, 40, True, "RE", 1),
        bneck_conf(40, 3, 240, 80, False, "HS", 2),  # C3
        bneck_conf(80, 3, 200, 80, False, "HS", 1),
        bneck_conf(80, 3, 184, 80, False, "HS", 1),
        bneck_conf(80, 3, 184, 80, False, "HS", 1),
        bneck_conf(80, 3, 480, 112, True, "HS", 1),
        bneck_conf(112, 3, 672, 112, True, "HS", 1),
        bneck_conf(112, 5, 672, 160 // reduce_divider, True, "HS", 2),  # C4
        bneck_conf(160 // reduce_divider, 5, 960 // reduce_divider, 160 // reduce_divider, True, "HS", 1),
        bneck_conf(160 // reduce_divider, 5, 960 // reduce_divider, 160 // reduce_divider, True, "HS", 1),
    ]
    last_channel = adjust_channels(1280 // reduce_divider)  # C5

    return MobileNetV3(inverted_residual_setting=inverted_residual_setting,
                       last_channel=last_channel,
                       num_classes=num_classes)

### 构建small基础mobilenet_v3_small模型
def mobilenet_v3_small(num_classes: int = 1000,
                       reduced_tail: bool = False) -> MobileNetV3:
    """
    Constructs a large MobileNetV3 architecture from
    "Searching for MobileNetV3" <https://arxiv.org/abs/1905.02244>.

    weights_link:
    https://download.pytorch.org/models/mobilenet_v3_small-047dcff4.pth

    Args:
        num_classes (int): number of classes
        reduced_tail (bool): If True, reduces the channel counts of all feature layers
            between C4 and C5 by 2. It is used to reduce the channel redundancy in the
            backbone for Detection and Segmentation.
    """
    width_multi = 1.0
    bneck_conf = partial(InvertedResidualConfig, width_multi=width_multi)
    adjust_channels = partial(InvertedResidualConfig.adjust_channels, width_multi=width_multi)

    reduce_divider = 2 if reduced_tail else 1

    inverted_residual_setting = [
        # input_c, kernel, expanded_c, out_c, use_se, activation, stride
        bneck_conf(16, 3, 16, 16, True, "RE", 2),  # C1
        bneck_conf(16, 3, 72, 24, False, "RE", 2),  # C2
        bneck_conf(24, 3, 88, 24, False, "RE", 1),
        bneck_conf(24, 5, 96, 40, True, "HS", 2),  # C3
        bneck_conf(40, 5, 240, 40, True, "HS", 1),
        bneck_conf(40, 5, 240, 40, True, "HS", 1),
        bneck_conf(40, 5, 120, 48, True, "HS", 1),
        bneck_conf(48, 5, 144, 48, True, "HS", 1),
        bneck_conf(48, 5, 288, 96 // reduce_divider, True, "HS", 2),  # C4
        bneck_conf(96 // reduce_divider, 5, 576 // reduce_divider, 96 // reduce_divider, True, "HS", 1),
        bneck_conf(96 // reduce_divider, 5, 576 // reduce_divider, 96 // reduce_divider, True, "HS", 1)
    ]
    last_channel = adjust_channels(1024 // reduce_divider)  # C5

    return MobileNetV3(inverted_residual_setting=inverted_residual_setting,
                       last_channel=last_channel,
                       num_classes=num_classes)
pytorch代码复现MobileNet V1~V2
本项目包含训练MobileNet V1、V2、V2模型
项目目录
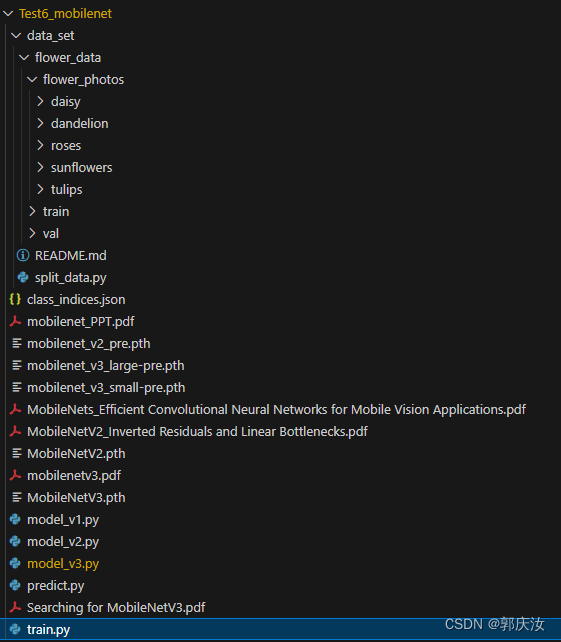
项目代码下载地址:
项目代码下载地址
智能推荐
oracle 12c 集群安装后的检查_12c查看crs状态-程序员宅基地
文章浏览阅读1.6k次。安装配置gi、安装数据库软件、dbca建库见下:http://blog.csdn.net/kadwf123/article/details/784299611、检查集群节点及状态:[root@rac2 ~]# olsnodes -srac1 Activerac2 Activerac3 Activerac4 Active[root@rac2 ~]_12c查看crs状态
解决jupyter notebook无法找到虚拟环境的问题_jupyter没有pytorch环境-程序员宅基地
文章浏览阅读1.3w次,点赞45次,收藏99次。我个人用的是anaconda3的一个python集成环境,自带jupyter notebook,但在我打开jupyter notebook界面后,却找不到对应的虚拟环境,原来是jupyter notebook只是通用于下载anaconda时自带的环境,其他环境要想使用必须手动下载一些库:1.首先进入到自己创建的虚拟环境(pytorch是虚拟环境的名字)activate pytorch2.在该环境下下载这个库conda install ipykernelconda install nb__jupyter没有pytorch环境
国内安装scoop的保姆教程_scoop-cn-程序员宅基地
文章浏览阅读5.2k次,点赞19次,收藏28次。选择scoop纯属意外,也是无奈,因为电脑用户被锁了管理员权限,所有exe安装程序都无法安装,只可以用绿色软件,最后被我发现scoop,省去了到处下载XXX绿色版的烦恼,当然scoop里需要管理员权限的软件也跟我无缘了(譬如everything)。推荐添加dorado这个bucket镜像,里面很多中文软件,但是部分国外的软件下载地址在github,可能无法下载。以上两个是官方bucket的国内镜像,所有软件建议优先从这里下载。上面可以看到很多bucket以及软件数。如果官网登陆不了可以试一下以下方式。_scoop-cn
Element ui colorpicker在Vue中的使用_vue el-color-picker-程序员宅基地
文章浏览阅读4.5k次,点赞2次,收藏3次。首先要有一个color-picker组件 <el-color-picker v-model="headcolor"></el-color-picker>在data里面data() { return {headcolor: ’ #278add ’ //这里可以选择一个默认的颜色} }然后在你想要改变颜色的地方用v-bind绑定就好了,例如:这里的:sty..._vue el-color-picker
迅为iTOP-4412精英版之烧写内核移植后的镜像_exynos 4412 刷机-程序员宅基地
文章浏览阅读640次。基于芯片日益增长的问题,所以内核开发者们引入了新的方法,就是在内核中只保留函数,而数据则不包含,由用户(应用程序员)自己把数据按照规定的格式编写,并放在约定的地方,为了不占用过多的内存,还要求数据以根精简的方式编写。boot启动时,传参给内核,告诉内核设备树文件和kernel的位置,内核启动时根据地址去找到设备树文件,再利用专用的编译器去反编译dtb文件,将dtb还原成数据结构,以供驱动的函数去调用。firmware是三星的一个固件的设备信息,因为找不到固件,所以内核启动不成功。_exynos 4412 刷机
Linux系统配置jdk_linux配置jdk-程序员宅基地
文章浏览阅读2w次,点赞24次,收藏42次。Linux系统配置jdkLinux学习教程,Linux入门教程(超详细)_linux配置jdk
随便推点
matlab(4):特殊符号的输入_matlab微米怎么输入-程序员宅基地
文章浏览阅读3.3k次,点赞5次,收藏19次。xlabel('\delta');ylabel('AUC');具体符号的对照表参照下图:_matlab微米怎么输入
C语言程序设计-文件(打开与关闭、顺序、二进制读写)-程序员宅基地
文章浏览阅读119次。顺序读写指的是按照文件中数据的顺序进行读取或写入。对于文本文件,可以使用fgets、fputs、fscanf、fprintf等函数进行顺序读写。在C语言中,对文件的操作通常涉及文件的打开、读写以及关闭。文件的打开使用fopen函数,而关闭则使用fclose函数。在C语言中,可以使用fread和fwrite函数进行二进制读写。 Biaoge 于2024-03-09 23:51发布 阅读量:7 ️文章类型:【 C语言程序设计 】在C语言中,用于打开文件的函数是____,用于关闭文件的函数是____。
Touchdesigner自学笔记之三_touchdesigner怎么让一个模型跟着鼠标移动-程序员宅基地
文章浏览阅读3.4k次,点赞2次,收藏13次。跟随鼠标移动的粒子以grid(SOP)为partical(SOP)的资源模板,调整后连接【Geo组合+point spirit(MAT)】,在连接【feedback组合】适当调整。影响粒子动态的节点【metaball(SOP)+force(SOP)】添加mouse in(CHOP)鼠标位置到metaball的坐标,实现鼠标影响。..._touchdesigner怎么让一个模型跟着鼠标移动
【附源码】基于java的校园停车场管理系统的设计与实现61m0e9计算机毕设SSM_基于java技术的停车场管理系统实现与设计-程序员宅基地
文章浏览阅读178次。项目运行环境配置:Jdk1.8 + Tomcat7.0 + Mysql + HBuilderX(Webstorm也行)+ Eclispe(IntelliJ IDEA,Eclispe,MyEclispe,Sts都支持)。项目技术:Springboot + mybatis + Maven +mysql5.7或8.0+html+css+js等等组成,B/S模式 + Maven管理等等。环境需要1.运行环境:最好是java jdk 1.8,我们在这个平台上运行的。其他版本理论上也可以。_基于java技术的停车场管理系统实现与设计
Android系统播放器MediaPlayer源码分析_android多媒体播放源码分析 时序图-程序员宅基地
文章浏览阅读3.5k次。前言对于MediaPlayer播放器的源码分析内容相对来说比较多,会从Java-&amp;gt;Jni-&amp;gt;C/C++慢慢分析,后面会慢慢更新。另外,博客只作为自己学习记录的一种方式,对于其他的不过多的评论。MediaPlayerDemopublic class MainActivity extends AppCompatActivity implements SurfaceHolder.Cal..._android多媒体播放源码分析 时序图
java 数据结构与算法 ——快速排序法-程序员宅基地
文章浏览阅读2.4k次,点赞41次,收藏13次。java 数据结构与算法 ——快速排序法_快速排序法


