android 按钮变形动画,Android仿硬币转动微信红包动画效果-程序员宅基地
技术标签: android 按钮变形动画
项目需要研究了一下微信红包动画,即硬币转动的效果,原理其实就是三张不同角度的图片利用AnimationDrawable帧动画进行播放,在参考了案例之后,给自己记录一下完成的过程。
1,在XML文件中定义动画:
步骤如下:
①新建 Android 项目
②在drawable目录中新建一个anim.xml(注意文件名小写)
根标签为animation-list,其中oneshot代表着是否只展示一遍,设置为false会不停的循环播放动画根标签下,通过item标签对动画中的每一个图片进行声明 ,android:duration 表示展示所用的该图片的时间长度 ,可通过该参数来设置图片旋转的速度,其他属性可以自行查找资料~
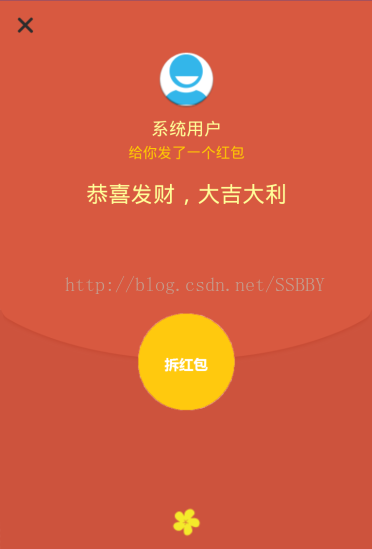
2,设置布局文件,效果以及代码如下
android:orientation="vertical"
android:layout_width="match_parent"
android:layout_height="match_parent"
android:gravity="center_vertical|center_horizontal"
android:background="@drawable/background">
android:id="@+id/top"
android:layout_width="match_parent"
android:layout_height="0dp"
android:layout_weight="1">
android:id="@+id/close"
android:layout_width="32dp"
android:layout_height="32dp"
android:background="@drawable/close"
android:layout_margin="10dp"/>
android:layout_below="@+id/top"
android:layout_width="match_parent"
android:layout_height="0dp"
android:layout_weight="10"
android:orientation="vertical">
android:layout_width="match_parent"
android:layout_height="0dp"
android:layout_weight="3">
android:id="@+id/head_img"
android:layout_width="60dp"
android:layout_height="60dp"
android:background="@drawable/ic_launcher"
android:layout_alignParentTop="true"
android:layout_centerHorizontal="true"/>
android:id="@+id/name"
android:layout_width="wrap_content"
android:layout_height="wrap_content"
android:text="系统用户"
android:layout_marginTop="10dp"
android:layout_below="@+id/head_img"
android:layout_centerHorizontal="true"
android:textColor="@color/yellow"
android:textSize="18sp"/>
android:id="@+id/textView1"
android:layout_width="wrap_content"
android:layout_height="wrap_content"
android:layout_below="@+id/name"
android:layout_centerHorizontal="true"
android:layout_marginTop="5dp"
android:textSize="15sp"
android:textColor="@color/yellow2"
android:text="给你发了一个红包"/>
android:id="@+id/textView2"
android:layout_below="@+id/textView1"
android:layout_centerHorizontal="true"
android:layout_width="wrap_content"
android:layout_height="wrap_content"
android:layout_marginTop="20dp"
android:textColor="@color/yellow"
android:textSize="23sp"
android:text="恭喜发财,大吉大利"/>
android:layout_width="match_parent"
android:layout_height="0dp"
android:layout_weight="3">
android:id="@+id/open_btn"
android:layout_width="100dp"
android:layout_height="100dp"
android:background="@drawable/anim"
android:layout_marginTop="50dp"
android:layout_centerHorizontal="true" />
android:layout_width="match_parent"
android:layout_height="0dp"
android:layout_weight="1">
android:layout_width="wrap_content"
android:layout_height="wrap_content"
android:background="@drawable/blow"
android:layout_alignParentBottom="true"
android:layout_centerHorizontal="true"
android:layout_marginBottom="14dp"
android:id="@+id/imageView" />
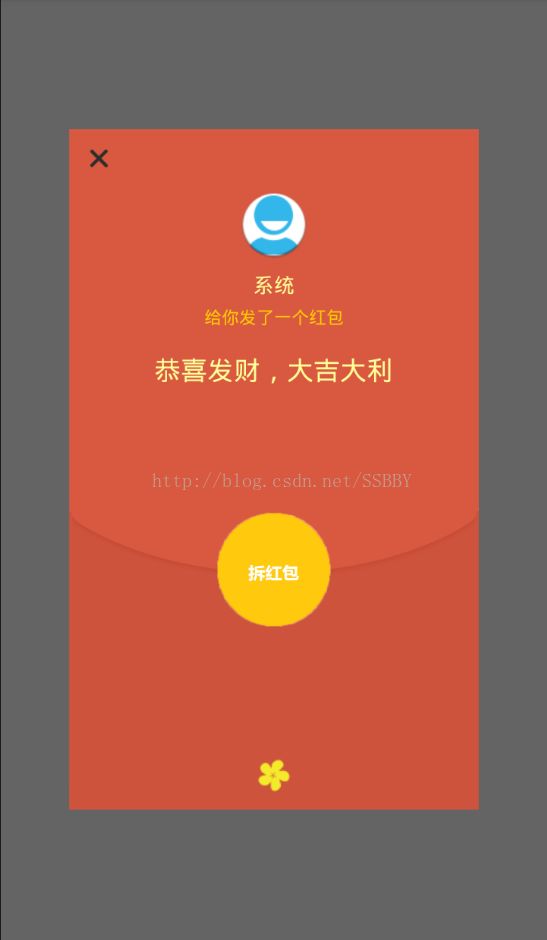
3,实现红包弹窗的效果,效果及代码如下:
步骤如下:
①自定义红包弹窗Diaog类:红色代码部分为启动动画部分
package com.example.xuboyu.luckeymoney;
import android.app.Dialog;
import android.content.Context;
import android.content.DialogInterface;
import android.graphics.drawable.AnimationDrawable;
import android.view.Display;
import android.view.Gravity;
import android.view.LayoutInflater;
import android.view.View;
import android.view.ViewGroup;
import android.view.WindowManager;
import android.widget.Button;
import android.widget.TextView;
/**
* 自定义红包弹窗
* Created by xuboyu on 2017/2/20.
*/
public class LuckeyDialog extends Dialog {
public LuckeyDialog(Context context) {
super(context);
}
public LuckeyDialog(Context context, int theme) {
super(context, theme);
}
public static class Builder {
private Context context;
private String name;//发红包者的名称
private Button red_page;
//拆红包按钮
private String openButtonText;
private OnClickListener openButtonClickListener;
//关闭按钮
private String closeButtonText;
private OnClickListener closeButtonClickListener;
public Builder(Context context, int dialog) {
this.context = context;
}
/**
* Set the Dialog title from resource
*
* @param name
* @return
*/
public Builder setName(int name) {
this.name = (String) context.getText(name);
return this;
}
/**
* Set the Dialog title from String
*
* @param name
* @return
*/
public Builder setName(String name) {
this.name = name;
return this;
}
/**
* Set the positive button resource and it's listener
*
* @param closeButtonText
* @return
*/
public Builder setCloseButton(int closeButtonText,
OnClickListener listener) {
this.closeButtonText = (String) context
.getText(closeButtonText);
this.closeButtonClickListener = listener;
return this;
}
public Builder setCloseButton(String closeButtonText,
OnClickListener listener) {
this.closeButtonText = closeButtonText;
this.closeButtonClickListener = listener;
return this;
}
/**
* Set the positive button resource and it's listener
*
* @param openButtonText
* @return
*/
public Builder setOpenButton(int openButtonText,
OnClickListener listener) {
this.openButtonText = (String) context
.getText(openButtonText);
this.openButtonClickListener = listener;
return this;
}
public Builder setOpenButton(String openButtonText,
OnClickListener listener) {
this.openButtonText = openButtonText;
this.openButtonClickListener = listener;
return this;
}
public LuckeyDialog create() {
LayoutInflater inflater = (LayoutInflater) context
.getSystemService(Context.LAYOUT_INFLATER_SERVICE);
//加载布局
final LuckeyDialog dialog = new LuckeyDialog(context,R.style.Dialog);
View layout = inflater.inflate(R.layout.open, null);
red_page = (Button) layout.findViewById(R.id.open_btn);
//red指的是需要播放动画的ImageView控件
AnimationDrawable animationDrawable = (AnimationDrawable)red_page.getBackground();
animationDrawable.start();//启动动画
dialog.addContentView(layout, new ViewGroup.LayoutParams(
ViewGroup.LayoutParams.FILL_PARENT, ViewGroup.LayoutParams.WRAP_CONTENT));
//设置发红包者姓名
((TextView) layout.findViewById(R.id.name)).setText(name);
//设置拆红包的按钮
if (openButtonText != null) {
((Button) layout.findViewById(R.id.open_btn))
.setText(openButtonText);
if (openButtonClickListener != null) {
((Button) layout.findViewById(R.id.open_btn))
.setOnClickListener(new View.OnClickListener() {
public void onClick(View v) {
openButtonClickListener.onClick(dialog,
DialogInterface.BUTTON_POSITIVE);
}
});
}
} else {
// if no confirm button just set the visibility to GONE
layout.findViewById(R.id.open_btn).setVisibility(
View.GONE);
}
//设置关闭按钮
if (closeButtonText != null) {
((Button) layout.findViewById(R.id.close))
.setText(closeButtonText);
if (closeButtonClickListener != null) {
((Button) layout.findViewById(R.id.close))
.setOnClickListener(new View.OnClickListener() {
public void onClick(View v) {
closeButtonClickListener.onClick(dialog,
DialogInterface.BUTTON_POSITIVE);
}
});
}
} else {
// if no confirm button just set the visibility to GONE
layout.findViewById(R.id.close).setVisibility(
View.GONE);
}
dialog.setContentView(layout);
return dialog;
}
}
}
②在系统style文件中新增一个Diaog
@drawable/red_bg
@null
true
true
false
③在MainActivity中调用自定义的Diaog类并实例化,并且设置弹出的红包占屏幕的比例,不然弹出的红包会占满整个屏幕,红色代码为设置大小代码。
red1.setOnClickListener(new View.OnClickListener() {
@Override
public void onClick(View view) {
LuckeyDialog.Builder builder = new LuckeyDialog.Builder(mContext,R.style.Dialog);//调用style中的Diaog
builder.setName("系统");
builder.setOpenButton("", new DialogInterface.OnClickListener() {
public void onClick(DialogInterface dialog, int which) {
Intent intent = new Intent(mContext,Open.class);
startActivity(intent);
dialog.dismiss();
}
});
builder.setCloseButton("", new DialogInterface.OnClickListener() {
@Override
public void onClick(DialogInterface dialog, int i) {
dialog.dismiss();
}
});
Dialog dialog = builder.create();
Window dialogWindow = dialog.getWindow();
WindowManager m = getWindowManager();
Display d = m.getDefaultDisplay(); // 获取屏幕宽、高用
WindowManager.LayoutParams p = dialogWindow.getAttributes(); // 获取对话框当前的参数值
p.height = (int) (d.getHeight() * 0.7); // 高度设置为屏幕的0.6
p.width = (int) (d.getWidth() * 0.75); // 宽度设置为屏幕的0.65
dialogWindow.setAttributes(p);
dialog.show();
}
});
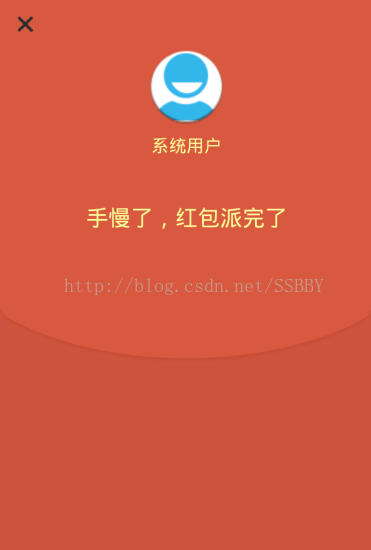
4,完成点击后的两种结果,即抢到和未抢到的两种结果,通过Intent跳转领取成功类或者跳出失败弹窗的简单逻辑即可。
①抢到的效果图,这里界面比较简单就不贴代码了。

②失败弹窗的效果图,这里的自定义弹窗代码与红包弹窗的代码基本相似,区别就在于少了个拆红包按钮而已,布局也相对简单,就不贴出来了,主要在这里面需要使用比例来规划几个部件的位置(参考上面的红包代码),否则无法适配多种屏幕,会出现压缩拉伸变形的情况。
到这里粗略的红包动画效果就基本完成了!当然实际应用中需要用到网络请求之类的,就再按照业务要求加入。
以上所述是小编给大家介绍的Android仿硬币转动微信红包动画效果,希望对大家有所帮助,如果大家有任何疑问请给我留言,小编会及时回复大家的。在此也非常感谢大家对脚本之家网站的支持!
智能推荐
没有U盘Win10电脑下如何使用本地硬盘安装Ubuntu20.04(单双硬盘都行)_没有u盘怎么装ubuntu-程序员宅基地
文章浏览阅读3.6k次,点赞2次,收藏2次。DELL7080台式机两块硬盘。_没有u盘怎么装ubuntu
【POJ 3401】Asteroids-程序员宅基地
文章浏览阅读32次。题面Bessie wants to navigate her spaceship through a dangerous asteroid field in the shape of an N x N grid (1 <= N <= 500). The grid contains K asteroids (1 <= K <= 10,000), which are conv...
工业机器视觉系统的构成与开发过程(理论篇—1)_工业机器视觉系统的构成与开发过程(理论篇—1-程序员宅基地
文章浏览阅读2.6w次,点赞21次,收藏112次。机器视觉则主要是指工业领域视觉的应用研究,例如自主机器人的视觉,用于检测和测量的视觉系统等。它通过在工业领域将图像感知、图像处理、控制理论与软件、硬件紧密结合,并研究解决图像处理和计算机视觉理论在实际应用过程中的问题,以实现高效的运动控制或各种实时操作。_工业机器视觉系统的构成与开发过程(理论篇—1
plt.legend的用法-程序员宅基地
文章浏览阅读5.9w次,点赞32次,收藏58次。legend 传奇、图例。plt.legend()的作用:在plt.plot() 定义后plt.legend() 会显示该 label 的内容,否则会报error: No handles with labels found to put in legend.plt.plot(result_price, color = 'red', label = 'Training Loss') legend作用位置:下图红圈处。..._plt.legend
深入理解 C# .NET Core 中 async await 异步编程思想_netcore async await-程序员宅基地
文章浏览阅读2.2k次,点赞3次,收藏11次。深入理解 C# .NET Core 中 async await 异步编程思想引言一、什么是异步?1.1 简单实例(WatchTV并行CookCoffee)二、深入理解(异步)2.1 当我需要异步返回值时,怎么处理?2.2 充分利用异步并行的高效性async await的秘密引言很久没来CSDN了,快小半年了一直在闲置,也写不出一些带有思想和深度的文章;之前就写过一篇关于async await 的异步理解 ,现在回顾,真的不要太浅和太陋,让人不忍直视!好了,废话不再啰嗦,直入主题:一、什么是异步?_netcore async await
IntelliJ IDEA设置类注释和方法注释带作者和日期_idea作者和日期等注释-程序员宅基地
文章浏览阅读6.5w次,点赞166次,收藏309次。当我看到别人的类上面的多行注释是是这样的:这样的:这样的:好装X啊!我也想要!怎么办呢?往下瞅:跟着我左手右手一个慢动作~~~File--->Settings---->Editor---->File and Code Templates --->Includes--->File Header:之后点applay--..._idea作者和日期等注释
随便推点
发行版Linux和麒麟操作系统下netperf 网络性能测试-程序员宅基地
文章浏览阅读175次。Netperf是一种网络性能的测量工具,主要针对基于TCP或UDP的传输。Netperf根据应用的不同,可以进行不同模式的网络性能测试,即批量数据传输(bulk data transfer)模式和请求/应答(request/reponse)模式。工作原理Netperf工具以client/server方式工作。server端是netserver,用来侦听来自client端的连接,c..._netperf 麒麟
万字长文详解 Go 程序是怎样跑起来的?| CSDN 博文精选-程序员宅基地
文章浏览阅读1.1k次,点赞2次,收藏3次。作者| qcrao责编 | 屠敏出品 | 程序员宅基地刚开始写这篇文章的时候,目标非常大,想要探索 Go 程序的一生:编码、编译、汇编、链接、运行、退出。它的每一步具体如何进行,力图弄清 Go 程序的这一生。在这个过程中,我又复习了一遍《程序员的自我修养》。这是一本讲编译、链接的书,非常详细,值得一看!数年前,我第一次看到这本书的书名,就非常喜欢。因为它模仿了周星驰喜剧..._go run 每次都要编译吗
C++之istringstream、ostringstream、stringstream 类详解_c++ istringstream a >> string-程序员宅基地
文章浏览阅读1.4k次,点赞4次,收藏2次。0、C++的输入输出分为三种:(1)基于控制台的I/O (2)基于文件的I/O (3)基于字符串的I/O 1、头文件[cpp] view plaincopyprint?#include 2、作用istringstream类用于执行C++风格的字符串流的输入操作。 ostringstream类用_c++ istringstream a >> string
MySQL 的 binglog、redolog、undolog-程序员宅基地
文章浏览阅读2k次,点赞3次,收藏14次。我们在每个修改的地方都记录一条对应的 redo 日志显然是不现实的,因此实现方式是用时间换空间,我们在数据库崩了之后用日志还原数据时,在执行这条日志之前,数据库应该是一个一致性状态,我们用对应的参数,执行固定的步骤,修改对应的数据。1,MySQL 就是通过 undolog 回滚日志来保证事务原子性的,在异常发生时,对已经执行的操作进行回滚,回滚日志会先于数据持久化到磁盘上(因为它记录的数据比较少,所以持久化的速度快),当用户再次启动数据库的时候,数据库能够通过查询回滚日志来回滚将之前未完成的事务。_binglog
我的第一个Chrome小插件-基于vue开发的flexbox布局CSS拷贝工具_chrome css布局插件-程序员宅基地
文章浏览阅读3k次。概述之前介绍过 移动Web开发基础-flex弹性布局(兼容写法) 里面有提到过想做一个Chrome插件,来生成flexbox布局的css代码直接拷贝出来用。最近把这个想法实现了,给大家分享下。play-flexbox插件介绍play-flexbox一秒搞定flexbox布局,可直接预览效果,拷贝CSS代码快速用于页面重构。 你也可以通过点击以下链接(codepen示例)查_chrome css布局插件
win10下安装TensorFlow-gpu的流程(包括cuda、cuDnn下载以及安装问题)-程序员宅基地
文章浏览阅读308次。我自己的配置是GeForce GTX 1660 +CUDA10.0+CUDNN7.6.0 + TensorFlow-GPU 1.14.0Win10系统安装tensorflow-gpu(按照步骤一次成功)https://blog.csdn.net/zqxdsy/article/details/103152190环境配置——win10下TensorFlow-GPU安装(GTX1660 SUPER+CUDA10+CUDNN7.4)https://blog.csdn.net/jiDxiaohuo/arti