spring+mybatis+c3p0数据库连接池或druid连接池使用配置整理_c3p0和druid 项目使用比例-程序员宅基地
技术标签: spring java相关 数据库连接池 druid c3p0
在系统性能优化的时候,或者说在进行代码开发的时候,多数人应该都知道一个很基本的原则,那就是保证功能正常良好的情况下,要尽量减少对数据库的操作。
据我所知,原因大概有这样两个:
一个是,一般情况下系统服务器和数据库服务器应该是不在同一硬件上,这时候对数据库的连接、操作就和网络有了很大的关系,连接、操作数据库越多就越影响性能。
二是,数据库的数据持久化在硬件磁盘上,对数据库数据的操作就要进行磁盘的io读写操作,同样是操作越多就越容易影响性能。
而数据库连接池的作用是负责分配、管理和释放数据库连接,它允许应用程序重复使用一个现有的数据库连接,而不是再重新建立一个;释放空闲时间超过最大空闲时间的数据库连接来避免因为没有释放数据库连接而引起的数据库连接遗漏。
因此现在多数项目都会使用到数据库连接池来管理数据库的操作,而不是简单直接的用jdbc。
就我目前所接触的项目来说,用的最多的就是阿里的druid连接池,除此之外就是c3p0,所以抽时间对这两个连接池的常用配置和使用进行一个整理,我觉得也是比较必要的,应该能一定程度上提高日后的工作效率。
至于这两个连接池的具体说明和介绍,网上有非常多的资料,我想也就没有什么必要在这里多说。
首先创建一个简单的数据库表:
CREATE TABLE `myuser` (
   `id` int(11) NOT NULL AUTO_INCREMENT,
   `name` varchar(25) DEFAULT NULL,
   `age` int(11) DEFAULT NULL,
   `recommend` varchar(1000) DEFAULT NULL,
   PRIMARY KEY (`id`)
 ) ENGINE=InnoDB AUTO_INCREMENT=7 DEFAULT CHARSET=utf8
然后创建一个简单的项目,这里用的是spring+mybatis的框架,因为目前来说,操作mysql的时候mybatis是我们用的比较多的。
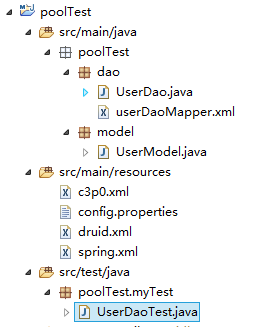
这个代码和配置完整后的项目结构如下图:
首先因为用到spring+mybatis框架和mysql数据库及相关连接池,我们需要先导入必要的依赖jar包,我的项目是个maven项目,导包pom.xml文件如下:
<project xmlns="http://maven.apache.org/POM/4.0.0" xmlns:xsi="http://www.w3.org/2001/XMLSchema-instance"
  xsi:schemaLocation="http://maven.apache.org/POM/4.0.0 http://maven.apache.org/maven-v4_0_0.xsd">
  <modelVersion>4.0.0</modelVersion>
  <groupId>poolTest</groupId>
  <artifactId>poolTest</artifactId>
  <packaging>war</packaging>
  <version>0.0.1-SNAPSHOT</version>
  <name>poolTest Maven Webapp</name>
  <url>http://maven.apache.org</url>
  <dependencies>
    <dependency>
      <groupId>junit</groupId>
      <artifactId>junit</artifactId>
      <version>4.12</version>
    </dependency>
    <dependency>
    	<groupId>org.springframework</groupId>
    	<artifactId>spring-core</artifactId>
    	<version>4.0.3.RELEASE</version>
    </dependency>
    <dependency>
    	<groupId>org.springframework</groupId>
    	<artifactId>spring-context</artifactId>
    	<version>4.0.3.RELEASE</version>
    </dependency>
    <dependency>
    	<groupId>org.springframework</groupId>
    	<artifactId>spring-context-support</artifactId>
    	<version>4.0.3.RELEASE</version>
    </dependency>
    <dependency>
    	<groupId>org.springframework</groupId>
    	<artifactId>spring-beans</artifactId>
    	<version>4.0.3.RELEASE</version>
    </dependency>
    <dependency>
    	<groupId>org.springframework</groupId>
    	<artifactId>spring-aop</artifactId>
    	<version>4.0.3.RELEASE</version>
    </dependency>
    <dependency>
    	<groupId>org.springframework</groupId>
    	<artifactId>spring-aspects</artifactId>
    	<version>4.0.3.RELEASE</version>
    </dependency>
    <dependency>
    	<groupId>org.springframework</groupId>
    	<artifactId>spring-expression</artifactId>
    	<version>4.0.3.RELEASE</version>
    </dependency>
    <dependency>
    	<groupId>org.springframework</groupId>
    	<artifactId>spring-jdbc</artifactId>
    	<version>4.0.3.RELEASE</version>
    </dependency>
    <dependency>
    	<groupId>org.springframework</groupId>
    	<artifactId>spring-tx</artifactId>
    	<version>4.0.3.RELEASE</version>
    </dependency>
    <dependency>
    	<groupId>mysql</groupId>
    	<artifactId>mysql-connector-java</artifactId>
    	<version>5.1.34</version>
    </dependency>
    <dependency>
    	<groupId>org.mybatis</groupId>
    	<artifactId>mybatis-spring</artifactId>
    	<version>1.2.2</version>
    </dependency>
    <dependency>
    	<groupId>org.mybatis</groupId>
    	<artifactId>mybatis</artifactId>
    	<version>3.2.8</version>
    </dependency>
    <dependency>
    	<groupId>commons-logging</groupId>
    	<artifactId>commons-logging</artifactId>
    	<version>1.2</version>
    </dependency>
    <dependency>
    	<groupId>com.mchange</groupId>
    	<artifactId>c3p0</artifactId>
    	<version>0.9.5-pre10</version>
    </dependency>
    <dependency>
    	<groupId>org.springframework</groupId>
    	<artifactId>spring-test</artifactId>
    	<version>4.0.3.RELEASE</version>
    </dependency>
    <dependency>
    	<groupId>com.alibaba</groupId>
    	<artifactId>druid</artifactId>
    	<version>1.0.2</version>
    </dependency>
  </dependencies>
  <build>
    <finalName>poolTest</finalName>
  </build>
</project>
然后对应数据库字段创建一个实体类userModel,这个如此简单,我想自然没有必要多做解释:
package poolTest.model;

/**
 * 用户model
 *
 * @author tuzongxun
 * @date 2017年2月15日 上午11:17:50
 */
public class UserModel {
	private int id;
	/*
	 * 姓名
	 */
	private String name;
	/*
	 * 年龄
	 */
	private int age;
	/*
	 * 介绍
	 */
	private String recommend;

	public int getId() {
		return id;
	}

	public void setId(int id) {
		this.id = id;
	}

	public String getName() {
		return name;
	}

	public void setName(String name) {
		this.name = name;
	}

	public int getAge() {
		return age;
	}

	public void setAge(int age) {
		this.age = age;
	}

	public String getRecommend() {
		return recommend;
	}

	public void setRecommend(String recommend) {
		this.recommend = recommend;
	}

	@Override
	public String toString() {
		return "UserModel [id=" + id + ", name=" + name + ", age=" + age + ", recommend=" + recommend + "]";
	}

}
再然后创建一个dao接口,在接口里写一个简单的抽象方法:
package poolTest.dao;

/**
 * 用户管理dao接口
 *
 * @author tuzongxun
 * @date 2017年2月15日 上午11:15:32
 */
public interface UserDao {
	public int findCount();
}
既然是用了mybatis,自然不再需要写对应的实现类,这个步骤就变成了mybatis的配置,即这里的userDaoMapper.xml,至于里边内容的解释,我曾特意整理过,这里也不再赘述:
<?xml version="1.0" encoding="UTF-8"?>
<!DOCTYPE mapper PUBLIC "-//mybatis.org//DTD Mapper 3.0//EN" "http://mybatis.org/dtd/mybatis-3-mapper.dtd">

<mapper namespace="poolTest.dao.UserDao">
    <select id="findCount"  resultType="int">
        select count(*) from myuser
    </select>
</mapper>
接下来就是主要的配置文件,首先是spring的主配置,这里我命名为spring.xml,因为内容少,所以基本上配置都写在了这里,至于具体的每段配置的解释,都写在了注释中:
<?xml version="1.0" encoding="UTF-8"?>
<beans xmlns:task="http://www.springframework.org/schema/task"
	xmlns="http://www.springframework.org/schema/beans" xmlns:xsi="http://www.w3.org/2001/XMLSchema-instance"
	xmlns:context="http://www.springframework.org/schema/context"
	xsi:schemaLocation="
http://www.springframework.org/schema/beans
http://www.springframework.org/schema/beans/spring-beans-3.0.xsd
http://www.springframework.org/schema/context
http://www.springframework.org/schema/context/spring-context-3.0.xsd">

	<!-- 引入属性文件 -->
	<context:property-placeholder location="classpath:config.properties" ignore-unresolvable="true" />
	<!-- 自动扫描(自动注入) -->
	<context:component-scan base-package="poolTest.dao.*"/>
	<!-- 开启注解 -->
	<context:annotation-config />

	<!-- 一、使用数据库连接池注册数据源,引入相关的配置文件 -->
	<!-- -->
	<import resource="c3p0.xml"/>

	 <!--
	<import resource="c3p0.xml"/>
	 -->
	<!-- 二、创建mybatis会话工厂 -->
	<bean id="sqlSessionFactory" class="org.mybatis.spring.SqlSessionFactoryBean">
	   <property name="dataSource" ref="dataSource"></property>
	   <property name="mapperLocations" value="classpath*:poolTest/dao/*Mapper.xml"></property>
	</bean>

	<!-- 三、创建mybatis会话template -->
	<bean id="sqlSessionTemplate" class="org.mybatis.spring.SqlSessionTemplate">
	   <constructor-arg index="0" ref="sqlSessionFactory"></constructor-arg>
	</bean>

	<!-- 注册接口类的bean,使得程序中可以用注解方式获取 -->
	<bean class="org.mybatis.spring.mapper.MapperScannerConfigurer">
     <property name="basePackage" value="poolTest.dao" />
  </bean>

</beans>
从这个文件中看到,我们需要三个文件:config.properties,也就是数据库数据源的必要参数内容,然后分别是代表c3p0连接池和druid连接池的两个文件:
config.properties:
#数据库驱动
jdbc.driver=com.mysql.jdbc.Driver
#数据库连接url
jdbc.url=jdbc:mysql://192.168.0.7:3306/pooltest?useUnicode=true&characterEncoding=utf-8
#数据库用户名
jdbc.user=tuzongxun
#数据库密码
jdbc.password=123456
c3p0.xml内容如下:
<?xml version="1.0" encoding="UTF-8"?>
<beans xmlns="http://www.springframework.org/schema/beans"
	xmlns:xsi="http://www.w3.org/2001/XMLSchema-instance" xmlns:context="http://www.springframework.org/schema/context"
	xsi:schemaLocation="http://www.springframework.org/schema/beans http://www.springframework.org/schema/beans/spring-beans.xsd
		http://www.springframework.org/schema/context http://www.springframework.org/schema/context/spring-context.xsd">

	<!-- 一、使用c3p0连接池注册数据源 -->
	<bean id="dataSource" class="com.mchange.v2.c3p0.ComboPooledDataSource">
	   <!-- 基础配置 -->
	   <property name="jdbcUrl" value="${jdbc.url}"></property>
     <property name="driverClass" value="${jdbc.driver}"></property>
     <property name="user" value="${jdbc.user}"></property>
     <property name="password" value="${jdbc.password}"></property>

     <!-- 关键配置 -->
     <!--初始化时获取三个连接,取值应在minPoolSize与maxPoolSize之间。Default: 3 -->
     <property name="initialPoolSize" value="3"></property>
     <!--连接池中保留的最小连接数。Default: 2 -->
     <property name="minPoolSize" value="2"></property>
     <!--连接池中保留的最大连接数。Default: 15 -->
     <property name="maxPoolSize" value="15"></property>
     <!--当连接池中的连接耗尽的时候c3p0一次同时获取的连接数。Default: 3 -->
     <property name="acquireIncrement" value="3"></property>

     <!-- 性能配置 -->
     <!-- 控制数据源内加载的PreparedStatements数量。如果maxStatements与maxStatementsPerConnection均为0,则缓存被关闭。Default: 0 -->
     <property name="maxStatements" value="8"></property>
     <!-- maxStatementsPerConnection定义了连接池内单个连接所拥有的最大缓存statements数。Default: 0 -->
     <property name="maxStatementsPerConnection" value="5"></property>
     <!--最大空闲时间,1800秒内未使用则连接被丢弃。若为0则永不丢弃。Default: 0 -->
     <property name="maxIdleTime" value="1800"></property>
	</bean>

</beans>
druid.xml内容如下:
<?xml version="1.0" encoding="UTF-8"?>
<beans xmlns="http://www.springframework.org/schema/beans"
	xmlns:xsi="http://www.w3.org/2001/XMLSchema-instance" xmlns:context="http://www.springframework.org/schema/context"
	xsi:schemaLocation="http://www.springframework.org/schema/beans http://www.springframework.org/schema/beans/spring-beans.xsd
		http://www.springframework.org/schema/context http://www.springframework.org/schema/context/spring-context.xsd">

	<!-- 一、使用druid数据库连接池注册数据源 -->
  <bean id="dataSource" class="com.alibaba.druid.pool.DruidDataSource">
     <!-- 基础配置 -->
     <property name="url" value="${jdbc.url}"></property>
     <property name="driverClassName" value="${jdbc.driver}"></property>
     <property name="username" value="${jdbc.user}"></property>
     <property name="password" value="${jdbc.password}"></property>

     <!-- 关键配置 -->
     <!-- 初始化时建立物理连接的个数。初始化发生在显示调用init方法,或者第一次getConnection时 -->
     <property name="initialSize" value="3" />
     <!-- 最小连接池数量 -->
     <property name="minIdle" value="2" />
     <!-- 最大连接池数量 -->
     <property name="maxActive" value="15" />
     <!-- 配置获取连接等待超时的时间 -->
     <property name="maxWait" value="10000" />

     <!-- 性能配置 -->
     <!-- 打开PSCache,并且指定每个连接上PSCache的大小 -->
     <property name="poolPreparedStatements" value="true" />
     <property name="maxPoolPreparedStatementPerConnectionSize" value="20" />

     <!-- 其他配置 -->
     <!-- 配置间隔多久才进行一次检测,检测需要关闭的空闲连接,单位是毫秒 -->
     <property name="timeBetweenEvictionRunsMillis" value="60000" />
     <!-- 配置一个连接在池中最小生存的时间,单位是毫秒 -->
     <property name="minEvictableIdleTimeMillis" value="300000" />
     <!-- 	建议配置为true,不影响性能,并且保证安全性。申请连接的时候检测,如果空闲时间大于timeBetweenEvictionRunsMillis,
               执行validationQuery检测连接是否有效。 -->
     <property name="testWhileIdle" value="true" />
     <!-- 这里建议配置为TRUE,防止取到的连接不可用 ,申请连接时执行validationQuery检测连接是否有效,做了这个配置会降低性能。-->
     <property name="testOnBorrow" value="true" />
     <!-- 归还连接时执行validationQuery检测连接是否有效,做了这个配置会降低性能 -->
     <property name="testOnReturn" value="false" />
     </bean>

</beans>
从上边的配置中可以看出这两个配置很多地方都是比较相似的,只是有些地方可能功能一样而名称不一样而已,我这里只是为了整理而同时配了两个,只在spring.xml导入的时候切换,实际情况只需要一个就好。
为了验证配置是可用的,我写了一个简单的test类:
package poolTest.myTest;

import org.junit.Test;
import org.junit.runner.RunWith;
import org.springframework.beans.factory.annotation.Autowired;
import org.springframework.test.context.ContextConfiguration;
import org.springframework.test.context.junit4.SpringJUnit4ClassRunner;

import poolTest.dao.UserDao;

/**
 * 数据库连接池使用测试
 *
 * @author tuzongxun
 * @date 2017年2月15日 上午11:16:36
 */
@RunWith(SpringJUnit4ClassRunner.class)
@ContextConfiguration(locations = "classpath:spring.xml")
public class UserDaoTest {
	@Autowired
	UserDao userDao;

	@Test
	public void findCountTest() {
		int count = userDao.findCount();
		System.out.println(count);
	}
}
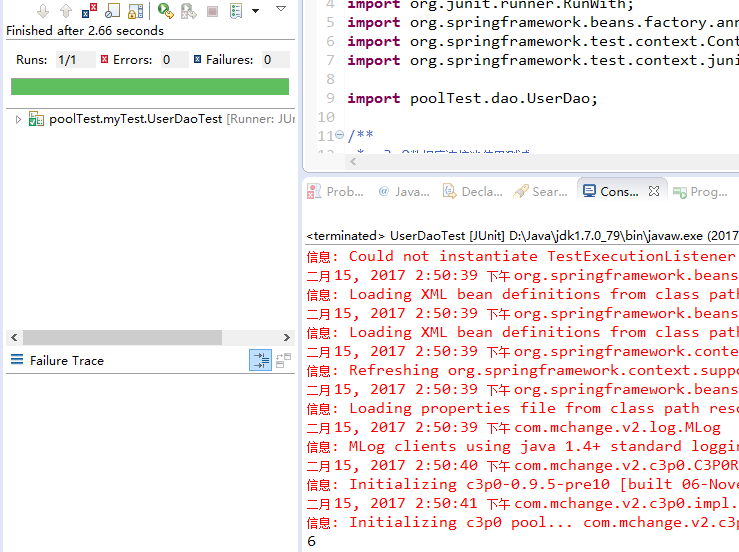
经过运行这个test方法可以看到,不论是导入c3p0.xml还是导入druid.cml,运行结果都是正确并且一样的,代表整个配置可用。
当然了,连接池的配置远不止我所配的这些,不论是c3p0还是druid都还有很多的参数,具体需要配置哪些,可能就需要视具体情况而定了。
其中一些配置说明可以参考下边两篇博客,我在整理的过程中也是参考了不少这两篇博客中的内容。
http://www.cnblogs.com/wuyun-blog/p/5679073.html
http://www.cnblogs.com/lannoy/p/5824866.html
另外,这个简单的项目我也已经打包上传,有兴趣的可以下载:
链接:http://pan.baidu.com/s/1b2sr98
密码:h77k
智能推荐
攻防世界_难度8_happy_puzzle_攻防世界困难模式攻略图文-程序员宅基地
文章浏览阅读645次。这个肯定是末尾的IDAT了,因为IDAT必须要满了才会开始一下个IDAT,这个明显就是末尾的IDAT了。,对应下面的create_head()代码。,对应下面的create_tail()代码。不要考虑爆破,我已经试了一下,太多情况了。题目来源:UNCTF。_攻防世界困难模式攻略图文
达梦数据库的导出(备份)、导入_达梦数据库导入导出-程序员宅基地
文章浏览阅读2.9k次,点赞3次,收藏10次。偶尔会用到,记录、分享。1. 数据库导出1.1 切换到dmdba用户su - dmdba1.2 进入达梦数据库安装路径的bin目录,执行导库操作 导出语句:./dexp cwy_init/[email protected]:5236 file=cwy_init.dmp log=cwy_init_exp.log 注释: cwy_init/init_123..._达梦数据库导入导出
js引入kindeditor富文本编辑器的使用_kindeditor.js-程序员宅基地
文章浏览阅读1.9k次。1. 在官网上下载KindEditor文件,可以删掉不需要要到的jsp,asp,asp.net和php文件夹。接着把文件夹放到项目文件目录下。2. 修改html文件,在页面引入js文件:<script type="text/javascript" src="./kindeditor/kindeditor-all.js"></script><script type="text/javascript" src="./kindeditor/lang/zh-CN.js"_kindeditor.js
STM32学习过程记录11——基于STM32G431CBU6硬件SPI+DMA的高效WS2812B控制方法-程序员宅基地
文章浏览阅读2.3k次,点赞6次,收藏14次。SPI的详情简介不必赘述。假设我们通过SPI发送0xAA,我们的数据线就会变为10101010,通过修改不同的内容,即可修改SPI中0和1的持续时间。比如0xF0即为前半周期为高电平,后半周期为低电平的状态。在SPI的通信模式中,CPHA配置会影响该实验,下图展示了不同采样位置的SPI时序图[1]。CPOL = 0,CPHA = 1:CLK空闲状态 = 低电平,数据在下降沿采样,并在上升沿移出CPOL = 0,CPHA = 0:CLK空闲状态 = 低电平,数据在上升沿采样,并在下降沿移出。_stm32g431cbu6
计算机网络-数据链路层_接收方收到链路层数据后,使用crc检验后,余数为0,说明链路层的传输时可靠传输-程序员宅基地
文章浏览阅读1.2k次,点赞2次,收藏8次。数据链路层习题自测问题1.数据链路(即逻辑链路)与链路(即物理链路)有何区别?“电路接通了”与”数据链路接通了”的区别何在?2.数据链路层中的链路控制包括哪些功能?试讨论数据链路层做成可靠的链路层有哪些优点和缺点。3.网络适配器的作用是什么?网络适配器工作在哪一层?4.数据链路层的三个基本问题(帧定界、透明传输和差错检测)为什么都必须加以解决?5.如果在数据链路层不进行帧定界,会发生什么问题?6.PPP协议的主要特点是什么?为什么PPP不使用帧的编号?PPP适用于什么情况?为什么PPP协议不_接收方收到链路层数据后,使用crc检验后,余数为0,说明链路层的传输时可靠传输
软件测试工程师移民加拿大_无证移民,未受过软件工程师的教育(第1部分)-程序员宅基地
文章浏览阅读587次。软件测试工程师移民加拿大 无证移民,未受过软件工程师的教育(第1部分) (Undocumented Immigrant With No Education to Software Engineer(Part 1))Before I start, I want you to please bear with me on the way I write, I have very little gen...
随便推点
Thinkpad X250 secure boot failed 启动失败问题解决_安装完系统提示secureboot failure-程序员宅基地
文章浏览阅读304次。Thinkpad X250笔记本电脑,装的是FreeBSD,进入BIOS修改虚拟化配置(其后可能是误设置了安全开机),保存退出后系统无法启动,显示:secure boot failed ,把自己惊出一身冷汗,因为这台笔记本刚好还没开始做备份.....根据错误提示,到bios里面去找相关配置,在Security里面找到了Secure Boot选项,发现果然被设置为Enabled,将其修改为Disabled ,再开机,终于正常启动了。_安装完系统提示secureboot failure
C++如何做字符串分割(5种方法)_c++ 字符串分割-程序员宅基地
文章浏览阅读10w+次,点赞93次,收藏352次。1、用strtok函数进行字符串分割原型: char *strtok(char *str, const char *delim);功能:分解字符串为一组字符串。参数说明:str为要分解的字符串,delim为分隔符字符串。返回值:从str开头开始的一个个被分割的串。当没有被分割的串时则返回NULL。其它:strtok函数线程不安全,可以使用strtok_r替代。示例://借助strtok实现split#include <string.h>#include <stdio.h&_c++ 字符串分割
2013第四届蓝桥杯 C/C++本科A组 真题答案解析_2013年第四届c a组蓝桥杯省赛真题解答-程序员宅基地
文章浏览阅读2.3k次。1 .高斯日记 大数学家高斯有个好习惯:无论如何都要记日记。他的日记有个与众不同的地方,他从不注明年月日,而是用一个整数代替,比如:4210后来人们知道,那个整数就是日期,它表示那一天是高斯出生后的第几天。这或许也是个好习惯,它时时刻刻提醒着主人:日子又过去一天,还有多少时光可以用于浪费呢?高斯出生于:1777年4月30日。在高斯发现的一个重要定理的日记_2013年第四届c a组蓝桥杯省赛真题解答
基于供需算法优化的核极限学习机(KELM)分类算法-程序员宅基地
文章浏览阅读851次,点赞17次,收藏22次。摘要:本文利用供需算法对核极限学习机(KELM)进行优化,并用于分类。
metasploitable2渗透测试_metasploitable2怎么进入-程序员宅基地
文章浏览阅读1.1k次。一、系统弱密码登录1、在kali上执行命令行telnet 192.168.26.1292、Login和password都输入msfadmin3、登录成功,进入系统4、测试如下:二、MySQL弱密码登录:1、在kali上执行mysql –h 192.168.26.129 –u root2、登录成功,进入MySQL系统3、测试效果:三、PostgreSQL弱密码登录1、在Kali上执行psql -h 192.168.26.129 –U post..._metasploitable2怎么进入
Python学习之路:从入门到精通的指南_python人工智能开发从入门到精通pdf-程序员宅基地
文章浏览阅读257次。本文将为初学者提供Python学习的详细指南,从Python的历史、基础语法和数据类型到面向对象编程、模块和库的使用。通过本文,您将能够掌握Python编程的核心概念,为今后的编程学习和实践打下坚实基础。_python人工智能开发从入门到精通pdf