SpringMVC(二):SpringMVC的进阶_spring mvc forward怎么转发到web-inf-程序员宅基地
技术标签: spring java # Spring mvc springmvc
第1章 响应数据和结果视图
环境搭建
pom.xml:
<?xml version="1.0" encoding="UTF-8"?>

<project xmlns="http://maven.apache.org/POM/4.0.0" xmlns:xsi="http://www.w3.org/2001/XMLSchema-instance"
         xsi:schemaLocation="http://maven.apache.org/POM/4.0.0 http://maven.apache.org/xsd/maven-4.0.0.xsd">
    <modelVersion>4.0.0</modelVersion>

    <groupId>top.onefine</groupId>
    <artifactId>springmvc_day02_01_response</artifactId>
    <version>1.0-SNAPSHOT</version>
    <packaging>war</packaging>

    <name>springmvc_day02_01_response Maven Webapp</name>
    <!-- FIXME change it to the project's website -->
    <url>http://www.example.com</url>

    <properties>
        <project.build.sourceEncoding>UTF-8</project.build.sourceEncoding>
        <maven.compiler.source>1.8</maven.compiler.source>
        <maven.compiler.target>1.8</maven.compiler.target>
        <!-- Spring版本锁定-->
        <spring.version>5.2.2.RELEASE</spring.version>
    </properties>

    <dependencies>
        <dependency>
            <groupId>junit</groupId>
            <artifactId>junit</artifactId>
            <version>4.11</version>
            <scope>test</scope>
        </dependency>

        <dependency>
            <groupId>org.springframework</groupId>
            <artifactId>spring-context</artifactId>
            <version>${spring.version}</version>
        </dependency>

        <dependency>
            <groupId>org.springframework</groupId>
            <artifactId>spring-web</artifactId>
            <version>${spring.version}</version>
        </dependency>

        <dependency>
            <groupId>org.springframework</groupId>
            <artifactId>spring-webmvc</artifactId>
            <version>${spring.version}</version>
        </dependency>

        <dependency>
            <groupId>javax.servlet</groupId>
            <artifactId>servlet-api</artifactId>
            <version>2.5</version>
            <scope>provided</scope>
        </dependency>

        <dependency>
            <groupId>javax.servlet.jsp</groupId>
            <artifactId>jsp-api</artifactId>
            <version>2.0</version>
            <scope>provided</scope>
        </dependency>

        <!-- https://mvnrepository.com/artifact/org.projectlombok/lombok -->
        <dependency>
            <groupId>org.projectlombok</groupId>
            <artifactId>lombok</artifactId>
            <version>1.18.12</version>
            <scope>provided</scope>
        </dependency>

    </dependencies>

    <build>
        <finalName>springmvc_day02_01_response</finalName>
        <pluginManagement><!-- lock down plugins versions to avoid using Maven defaults (may be moved to parent pom) -->
            <plugins>
                <plugin>
                    <artifactId>maven-clean-plugin</artifactId>
                    <version>3.1.0</version>
                </plugin>
                <!-- see http://maven.apache.org/ref/current/maven-core/default-bindings.html#Plugin_bindings_for_war_packaging -->
                <plugin>
                    <artifactId>maven-resources-plugin</artifactId>
                    <version>3.0.2</version>
                </plugin>
                <plugin>
                    <artifactId>maven-compiler-plugin</artifactId>
                    <version>3.8.0</version>
                </plugin>
                <plugin>
                    <artifactId>maven-surefire-plugin</artifactId>
                    <version>2.22.1</version>
                </plugin>
                <plugin>
                    <artifactId>maven-war-plugin</artifactId>
                    <version>3.2.2</version>
                </plugin>
                <plugin>
                    <artifactId>maven-install-plugin</artifactId>
                    <version>2.5.2</version>
                </plugin>
                <plugin>
                    <artifactId>maven-deploy-plugin</artifactId>
                    <version>2.8.2</version>
                </plugin>
            </plugins>
        </pluginManagement>
    </build>
</project>
src/main/webapp/WEB-INF/web.xml:
<!DOCTYPE web-app PUBLIC
        "-//Sun Microsystems, Inc.//DTD Web Application 2.3//EN"
        "http://java.sun.com/dtd/web-app_2_3.dtd" >

<web-app>
  <display-name>Archetype Created Web Application</display-name>

  <!-- 配置前端控制器——SpringMVC的核心控制器 -->
  <servlet>
    <servlet-name>dispatcherServlet</servlet-name>
    <servlet-class>org.springframework.web.servlet.DispatcherServlet</servlet-class>

    <!-- 配置Servlet的初始化参数,加载SpringMVC配置文件,创建Spring容器-->
    <init-param>
      <param-name>contextConfigLocation</param-name>
      <param-value>classpath:springmvc.xml</param-value>
    </init-param>
    <load-on-startup>1</load-on-startup>  <!-- 配置使得启动服务器时就创建servlet对象,而后就可以接着加载SpringMVC配置文件 -->
  </servlet>

  <servlet-mapping>
    <servlet-name>dispatcherServlet</servlet-name>
    <url-pattern>/</url-pattern><!-- 拦截所有 -->
  </servlet-mapping>

  <!-- 配置解决中文乱码的过滤器 -->
  <filter>
    <filter-name>characterEncodingFilter</filter-name>
    <filter-class>org.springframework.web.filter.CharacterEncodingFilter</filter-class>

    <init-param>
      <param-name>encoding</param-name>
      <param-value>UTF-8</param-value>
    </init-param>
  </filter>

  <filter-mapping>
    <filter-name>characterEncodingFilter</filter-name>
    <url-pattern>/*</url-pattern>
  </filter-mapping>
</web-app>
src/main/resources/springmvc.xml:
<?xml version="1.0" encoding="UTF-8"?>
<beans xmlns="http://www.springframework.org/schema/beans"
       xmlns:mvc="http://www.springframework.org/schema/mvc"
       xmlns:context="http://www.springframework.org/schema/context"
       xmlns:xsi="http://www.w3.org/2001/XMLSchema-instance"
       xsi:schemaLocation="
            http://www.springframework.org/schema/beans
            http://www.springframework.org/schema/beans/spring-beans.xsd
            http://www.springframework.org/schema/mvc
            http://www.springframework.org/schema/mvc/spring-mvc.xsd
            http://www.springframework.org/schema/context
            http://www.springframework.org/schema/context/spring-context.xsd">

    <!-- 开启注解扫描,配置spring创建容器时要扫描的包 -->
    <context:component-scan base-package="top.onefine" />

    <!-- 配置视图解析器对象-->
    <bean id="internalResourceViewResolver" class="org.springframework.web.servlet.view.InternalResourceViewResolver">
        <property name="prefix" value="/WEB-INF/pages/" />  <!-- prefix表示文件所在的位置 -->
        <property name="suffix" value=".jsp" />  <!-- suffix表示文件的后缀名 -->
    </bean>

    <!-- 配置Spring开启注解MVC的支持 -->
    <mvc:annotation-driven />

</beans>
1.1返回值分类
1.1.1 字符串
controller 方法返回字符串可以指定逻辑视图名,通过视图解析器解析为物理视图地址。
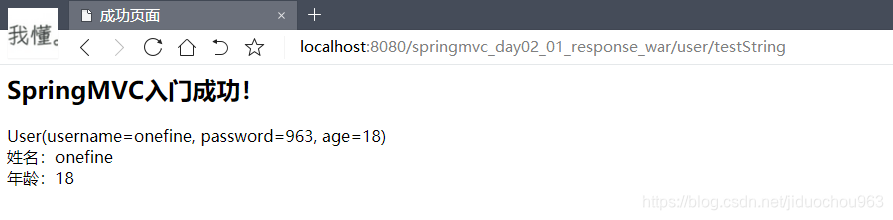
指定逻辑视图名,经过视图解析器解析为 jsp 物理路径: /WEB-INF/pages/success.jsp
<%--
  Created by IntelliJ IDEA.
  User: ONEFINE
  Date: 2020/4/7
  Time: 21:01
  To change this template use File | Settings | File Templates.
--%>
<%@ page contentType="text/html;charset=UTF-8" language="java" isELIgnored="false" %>
<html>
<head>
    <title>成功页面</title>
</head>
<body>
<h2>SpringMVC入门成功!</h2>

${ user } <br/>
姓名:${ user.username } <br/>
年龄:${ user.age }

</body>
</html>
src/main/java/top/onefine/domain/User.java:
package top.onefine.domain;

import lombok.*;

import java.io.Serializable;

@Getter
@Setter
@ToString
@NoArgsConstructor
@AllArgsConstructor
public class User implements Serializable {


    private String username;
    private String password;
    private Integer age;
}
src/main/webapp/response.jsp:
<%--
  Created by IntelliJ IDEA.
  User: ONEFINE
  Date: 2020/4/9
  Time: 19:41
  To change this template use File | Settings | File Templates.
--%>
<%@ page contentType="text/html;charset=UTF-8" language="java" isELIgnored="false" %>
<html>
<head>
    <title>response</title>
</head>
<body>
<a href="user/testString">testString</a>
</body>
</html>
src/main/java/top/onefine/controller/UserController.java:
package top.onefine.controller;

import org.springframework.stereotype.Controller;
import org.springframework.ui.Model;
import org.springframework.web.bind.annotation.RequestMapping;
import top.onefine.domain.User;

@Controller
@RequestMapping("/user")
public class UserController {

    @RequestMapping("/testString")
    public String testString(Model model) {

        System.out.println("testString方法执行了...");
        // 模拟从数据库中查询出User对象
        User user = new User("onefine", "963", 18);
        // 将user对象存入model中(request域中)
        model.addAttribute("user", user);
        // 跳转到xxx页面
        return "success";  // 返回字符串
    }
}
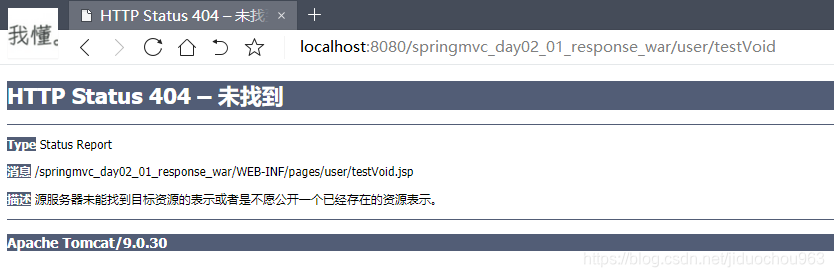
1.1.2 void
默认情况:
@RequestMapping("/testVoid")
public void testVoid() {

    System.out.println("testVoid方法执行了...");
}
jsp:<a href="user/testVoid">testVoid</a>
Servlet 原始 API 可以作为控制器中方法的参数:
@RequestMapping("/testReturnVoid")
public void testReturnVoid(HttpServletRequest request,HttpServletResponse response) throws Exception {

}
在controller 方法形参上可以定义 request 和 response,使用 request 或 response 指定响应结果:
1、使用 request 转向页面,如下:
request.getRequestDispatcher("/WEB-INF/pages/success.jsp").forward(request, response);
2、也可以通过 response 页面重定向:
response.sendRedirect("testRetrunString")
3、也可以通过 response 指定响应结果, 例如响应 json 数据:
response.setCharacterEncoding("utf-8");
response.setContentType("application/json;charset=utf-8");
response.getWriter().write("json 串");
例子:
/**
* 注意:
* 请求转发是一次请求,不需编写项目的名称
* 重定向是两次请求,要写项目名称
* @param request
* @param response
* @throws ServletException
* @throws IOException
*/
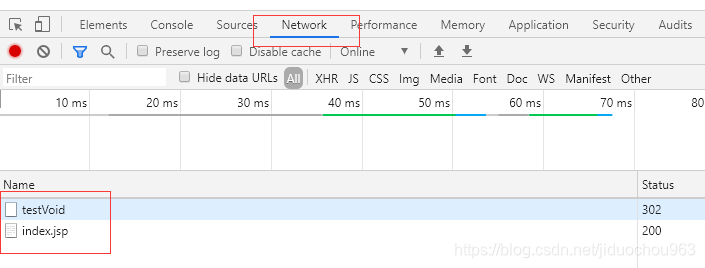
@RequestMapping("/testVoid")
public void testVoid(HttpServletRequest request, HttpServletResponse response) throws ServletException, IOException {
System.out.println("testVoid方法执行了...");
// 请求转发 手动调用转发的方法不会再调 视图解析器 了,需要自己提供完整目录
// request.getRequestDispatcher("/WEB-INF/pages/success.jsp").forward(request, response); // 请求转发不用写项目名称
// 重定向 不能直接请求/WEB-INF目录中的页面
// response.sendRedirect(request.getContextPath() + "/index.jsp");
// 直接给浏览器进行响应
// 设置中文乱码
response.setCharacterEncoding("UTF-8");
response.setContentType("text/html;charset=UTF-8");
response.getWriter().println("hello 中文");
}
注意:重定向是两次请求,
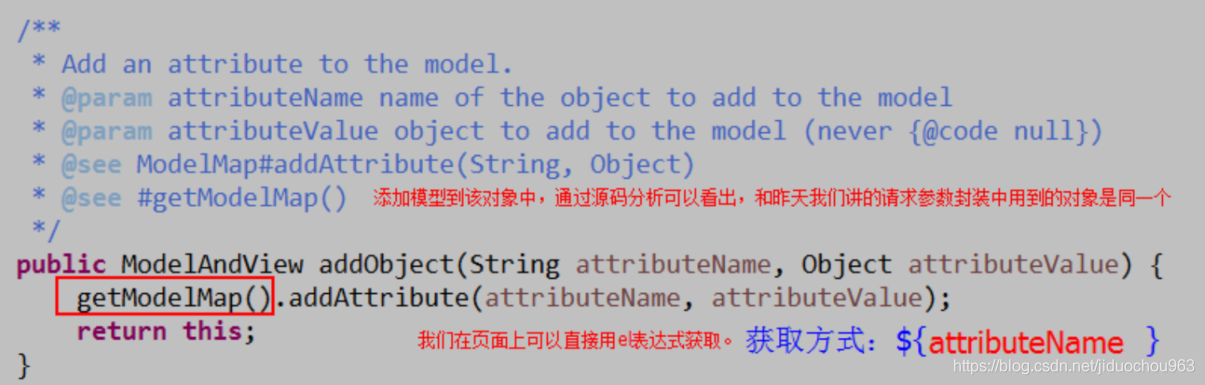
1.1.3 ModelAndView
ModelAndView 是 SpringMVC 为我们提供的一个对象,该对象可以用来调整具体的JSP视图,用作控制器方法的返回值。
注:返回字符串的底层也是采用此方式
该对象中有两个方法:
示例:
@RequestMapping("/testModelAndView")
public ModelAndView testModelAndView() {
System.out.println("testModelAndView方法执行了...");
// 创建ModelAndView对象
ModelAndView mv = new ModelAndView();
// 模拟从数据库中查询出User对象
User user = new User("onefine", "963", 18);
// 把user对象存储到mv对象中,也会吧user对象存入到request域中
mv.addObject("user", user);
// 跳转到指定页面
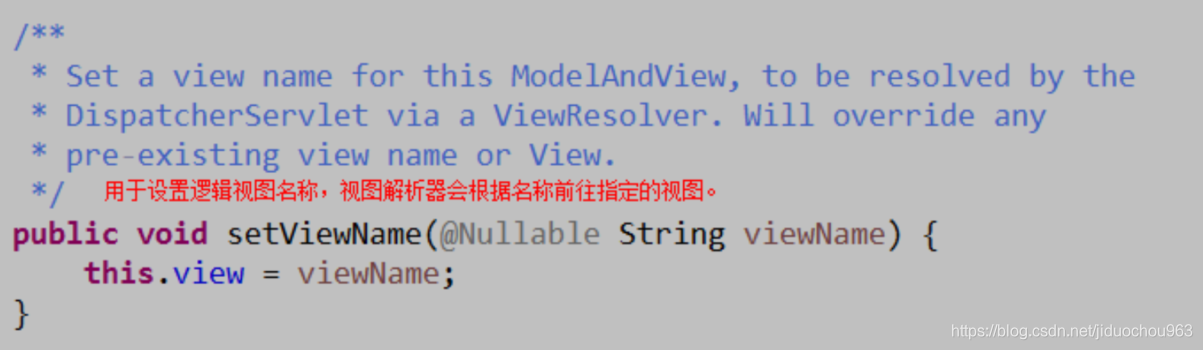
mv.setViewName("success");
// 注:返回字符串的底层也是采用此方式
return mv;
}
1.2转发和重定向
1.2.1 forward 转发
controller 方法在提供了 String 类型的返回值之后,默认就是请求转发。我们也可以写成:
	@RequestMapping(value = "/testForward")
    public String testForward() {

        System.out.println("testForward方法执行了");
        // 请求的转发
        // "forward:转发的JSP路径",不走视图解析器了,所以需要编写完整的路径
        return "forward:/WEB-INF/pages/success.jsp";  // 关键字forward
    }
需要注意的是,如果用了 formward: 则路径必须写成实际视图 url,不能写逻辑视图。
它相当于request.getRequestDispatcher("url").forward(request,response)。使用请求转发,既可以转发到 jsp,也可以转发到其他的控制器方法。
1.2.2 Redirect 重定向
contrller 方法提供了一个 String 类型返回值之后, 它需要在返回值里使用:redirect:
	@RequestMapping(value = "/testRedirect")
    public String testRedirect() {

        System.out.println("testRedirect方法执行了");
        // 重定向,还是不能访问/WEB-INF/的页面,但是不用加项目名了
        return "redirect:/index.jsp";  // 关键字redirect
    }
它相当于“response.sendRedirect(url)” 。需要注意的是,如果是重定向到 jsp 页面,则 jsp 页面不能写在 WEB-INF 目录中,否则无法找到。
1.3ResponseBody响应 json 数据
1.3.1 使用说明
作用:该注解用于将 Controller 的方法返回的对象,通过 HttpMessageConverter 接口转换为指定格式的数据如: json,xml 等,通过 Response 响应给客户端。
1.3.2 使用示例
需求:
使用@ResponseBody 注解实现将 controller 方法返回对象转换为 json 响应给客户端。
前置知识点:
Springmvc 默认用 MappingJacksonHttpMessageConverter 对 json 数据进行转换,需要加入jackson 的包:
<!-- https://mvnrepository.com/artifact/com.fasterxml.jackson.core/jackson-databind -->
<dependency>
   <groupId>com.fasterxml.jackson.core</groupId>
   <artifactId>jackson-databind</artifactId>
   <version>2.10.3</version>
 </dependency>

 <!-- https://mvnrepository.com/artifact/com.fasterxml.jackson.core/jackson-core -->
 <dependency>
   <groupId>com.fasterxml.jackson.core</groupId>
   <artifactId>jackson-core</artifactId>
   <version>2.10.3</version>
 </dependency>

 <!-- https://mvnrepository.com/artifact/com.fasterxml.jackson.core/jackson-annotations -->
 <dependency>
   <groupId>com.fasterxml.jackson.core</groupId>
   <artifactId>jackson-annotations</artifactId>
   <version>2.10.3</version>
 </dependency>
jsp 中的代码:
<%--
  Created by IntelliJ IDEA.
  User: ONEFINE
  Date: 2020/4/9
  Time: 19:41
  To change this template use File | Settings | File Templates.
--%>
<%@ page contentType="text/html;charset=UTF-8" language="java" isELIgnored="false" %>
<html>
<head>
    <title>response</title>
    <script src="js/jquery-3.4.1.js"></script>
    <script>
        // 页面加载,绑定单击事件
        $(function () {

            $("#btn").click(function () {

                $.ajax({

                    // 编写json格式,设置属性和值
                    url: "user/testAjax",
                    contentType: "application/json;charset=UTF-8",
                    data: '{"username": "one fine", "password": "123", "age": 18}',
                    dataType: "json",
                    type: "post",
                    // 处理成功后的回调函数
                    success: function (data) {

                        alert(data.username + ", " + data.password + ", " + data.age);
                    }
                });
            });
        })
    </script>
</head>
<body>
<a href="user/testString">testString</a> <br/>
<a href="user/testVoid">testVoid</a> <br/>

<a href="user/testModelAndView">testModelAndView</a> <br/>

<a href="user/testForward">testForward</a> <br/>

<a href="user/testRedirect">testRedirect</a> <br/>

<button id="btn">发送ajax请求</button>

</body>
</html>
配置静态资源不拦截: src/main/resources/springmvc.xml:
DispatcherServlet会拦截到所有的资源,导致一个问题就是静态资源(img、css、js)也会被拦截到,从而不能被使用。解决问题就是需要配置静态资源不进行拦截,在springmvc.xml配置文件添加:mvc:resources标签,配置不过滤:
- location元素表示webapp目录下的包下的所有文件
- mapping元素表示以/static开头的所有请求路径,如/static/a 或者/static/a/b
<?xml version="1.0" encoding="UTF-8"?>
<beans xmlns="http://www.springframework.org/schema/beans"
       xmlns:mvc="http://www.springframework.org/schema/mvc"
       xmlns:context="http://www.springframework.org/schema/context"
       xmlns:xsi="http://www.w3.org/2001/XMLSchema-instance"
       xsi:schemaLocation="
            http://www.springframework.org/schema/beans
            http://www.springframework.org/schema/beans/spring-beans.xsd
            http://www.springframework.org/schema/mvc
            http://www.springframework.org/schema/mvc/spring-mvc.xsd
            http://www.springframework.org/schema/context
            http://www.springframework.org/schema/context/spring-context.xsd">

    <!-- 开启注解扫描,配置spring创建容器时要扫描的包 -->
    <context:component-scan base-package="top.onefine" />

    <!-- 配置视图解析器对象-->
    <bean id="internalResourceViewResolver" class="org.springframework.web.servlet.view.InternalResourceViewResolver">
        <property name="prefix" value="/WEB-INF/pages/" />  <!-- prefix表示文件所在的位置 -->
        <property name="suffix" value=".jsp" />  <!-- suffix表示文件的后缀名 -->
    </bean>

    <!-- 配置前端控制器:静态资源不拦截(过滤) -->
    <mvc:resources mapping="/js/**" location="/WEB-INF/js/" />
    <mvc:resources mapping="/css/**" location="/WEB-INF/css/" />
    <mvc:resources mapping="/images/**" location="/WEB-INF/images/" />

    <!-- 配置Spring开启注解MVC的支持 -->
    <mvc:annotation-driven />

</beans>
控制器中的完整代码:
- 使用
@RequestBody获取请求体数据,@RequestBody注解也可把json的字符串直接转换成JavaBean的对象 - 使用
@ResponseBody注解把JavaBean对象转换成json字符串,直接响应 - json字符串和JavaBean对象互相转换的过程中,需要使用jackson的jar包
package top.onefine.controller;

import org.springframework.stereotype.Controller;
import org.springframework.ui.Model;
import org.springframework.web.bind.annotation.RequestBody;
import org.springframework.web.bind.annotation.RequestMapping;
import org.springframework.web.bind.annotation.ResponseBody;
import org.springframework.web.servlet.ModelAndView;
import top.onefine.domain.User;

import javax.servlet.ServletException;
import javax.servlet.http.HttpServletRequest;
import javax.servlet.http.HttpServletResponse;
import java.io.IOException;

@Controller
@RequestMapping("/user")
public class UserController {

    @RequestMapping("/testString")
    public String testString(Model model) {

        System.out.println("testString方法执行了...");
        // 模拟从数据库中查询出User对象
        User user = new User("onefine", "963", 18);
        // 将user对象存入model中(request域中)
        model.addAttribute("user", user);
        return "success";  // 返回字符串
    }

    /**
     * 注意:
     *      请求转发是一次请求,不需编写项目的名称
     *      重定向是两次请求,要写项目名称
     * @param request
     * @param response
     * @throws ServletException
     * @throws IOException
     */
    @RequestMapping("/testVoid")
    public void testVoid(HttpServletRequest request, HttpServletResponse response) throws ServletException, IOException {

        System.out.println("testVoid方法执行了...");
        // 请求转发  手动调用转发的方法不会再调 视图解析器 了,需要自己提供完整目录
//        request.getRequestDispatcher("/WEB-INF/pages/success.jsp").forward(request, response); // 请求转发不用写项目名称
        // 重定向  不能直接请求/WEB-INF目录中的页面
//        response.sendRedirect(request.getContextPath() + "/index.jsp");
        // 直接给浏览器进行响应
        // 设置中文乱码
        response.setCharacterEncoding("UTF-8");
        response.setContentType("text/html;charset=UTF-8");
        response.getWriter().println("hello 中文");
    }

    @RequestMapping("/testModelAndView")
    public ModelAndView testModelAndView() {

        System.out.println("testModelAndView方法执行了...");
        // 创建ModelAndView对象
        ModelAndView mv = new ModelAndView();
        // 模拟从数据库中查询出User对象
        User user = new User("onefine", "963", 18);
        // 把user对象存储到mv对象中,也会吧user对象存入到request域中
        mv.addObject("user", user);

        // 跳转到指定页面
        mv.setViewName("success");

        // 注:返回字符串的底层也是采用此方式

        return mv;
    }

    @RequestMapping(value = "/testForward")
    public String testForward() {

        System.out.println("testForward方法执行了");
        // 请求的转发
        return "forward:/WEB-INF/pages/success.jsp";  // 关键字forward
    }

    @RequestMapping(value = "/testRedirect")
    public String testRedirect() {

        System.out.println("testRedirect方法执行了");
        // 重定向,还是不能访问/WEB-INF/的页面,但是不用加项目名了
        return "redirect:/index.jsp";  // 关键字redirect
    }

    @RequestMapping("/testAjax")
    public @ResponseBody User testAjax(@RequestBody User user) {

        // 客户端发送ajax的请求,传的是json字符串,后端已经将json字符串封装到user对象中了
        System.out.println(user);  // 获得请求体
        // 做响应,模拟查询数据库
        user.setUsername("one");
        user.setAge(19);
        return user;  // 由@ResponseBody自动将user对象转为json对象
    }

}
第2章 SpringMVC 实现文件上传
2.1文件上传的回顾
2.1.1 文件上传的必要前提
- form 表单的 enctype 取值必须是:
multipart/form-data,(默认值是:application/x-www-form-urlencoded)。enctype:是表单请求正文的类型 - method 属性取值必须是 Post
- 提供一个文件选择域
<input type=”file” />
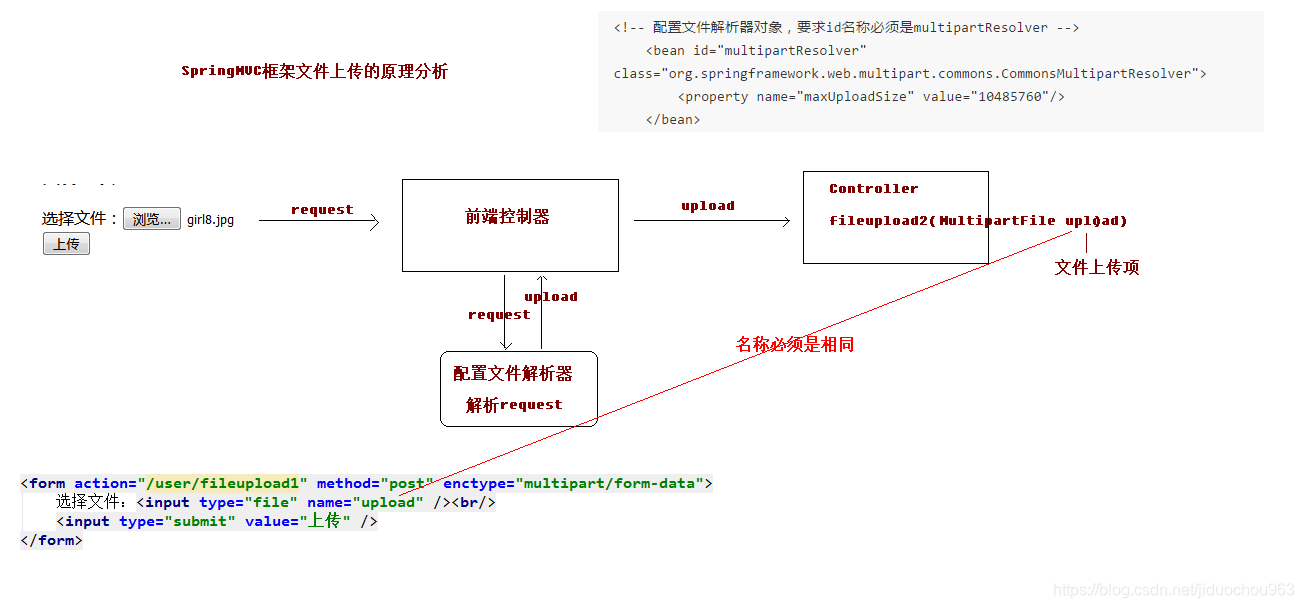
2.1.2 文件上传的原理分析
当 form 表单的 enctype 取值不是默认值后, request.getParameter()将失效。
enctype=”application/x-www-form-urlencoded”时, form 表单的正文内容是:key=value&key=value&key=value
当 form 表单的 enctype 取值为 Mutilpart/form-data 时,请求正文内容就变成:
每一部分都是 MIME 类型描述的正文
-----------------------------7de1a433602ac 				# 分界符
Content-Disposition: form-data; name="userName" 		# 协议头
aaa 													# 协议的正文
-----------------------------7de1a433602ac
Content-Disposition: form-data; name="file";
filename="C:\Users\zhy\Desktop\fileupload_demofile\b.txt"
Content-Type: text/plain 								# 协议的类型( MIME 类型)
bbbbbbbbbbbbbbbbbbbbbbbbbbbbbbbb
-----------------------------7de1a433602ac--
2.1.3 借助第三方组件实现文件上传
使用 Commons-fileupload 组件实现文件上传,需要导入该组件相应的支撑 jar 包: Commons-fileupload 和commons-io。
commons-io 不属于文件上传组件的开发 jar 文件,但Commons-fileupload 组件从 1.1 版本开始,它工作时需要 commons-io 包的支持。
<!-- https://mvnrepository.com/artifact/commons-fileupload/commons-fileupload -->
<dependency>
    <groupId>commons-fileupload</groupId>
    <artifactId>commons-fileupload</artifactId>
    <version>1.4</version>
</dependency>


<!-- https://mvnrepository.com/artifact/commons-io/commons-io -->
<dependency>
    <groupId>commons-io</groupId>
    <artifactId>commons-io</artifactId>
    <version>2.6</version>
</dependency>
2.2 传统方式的文件上传
2.2.1 说明
传统方式的文件上传, 指的是我们上传的文件和访问的应用存在于同一台服务器上。并且上传完成之后,浏览器可能跳转。
2.2.2 非SpringMVC实现步骤
src/main/java/top/onefine/controller/UserController.java:
package top.onefine.controller;
import org.apache.commons.fileupload.FileItem;
import org.apache.commons.fileupload.disk.DiskFileItemFactory;
import org.apache.commons.fileupload.servlet.ServletFileUpload;
import org.springframework.stereotype.Controller;
import org.springframework.web.bind.annotation.RequestMapping;
import javax.servlet.http.HttpServletRequest;
import java.io.File;
import java.util.List;
import java.util.UUID;
@Controller
@RequestMapping("/user")
public class UserController {
// 非SpringMVC方式文件上传
@RequestMapping("/fileUpload1")
public String fileUpload1(HttpServletRequest request) throws Exception {
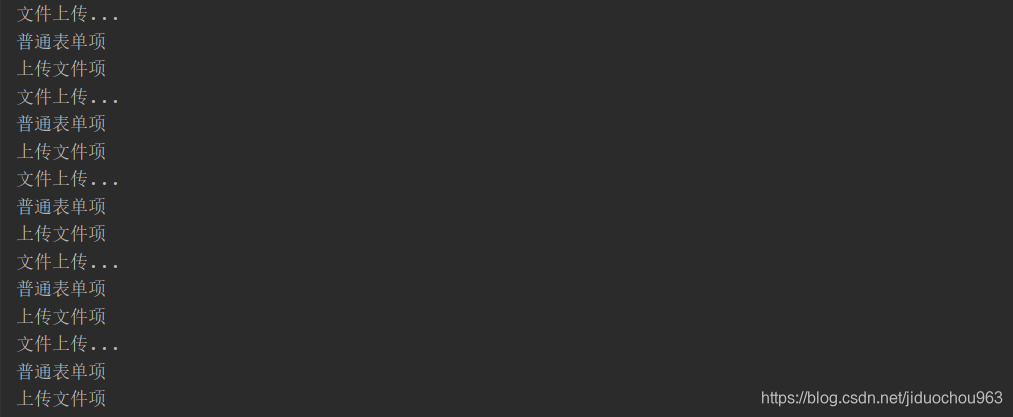
System.out.println("文件上传...");
// 使用fileupload组件完成文件上传
// 指定上传的位置
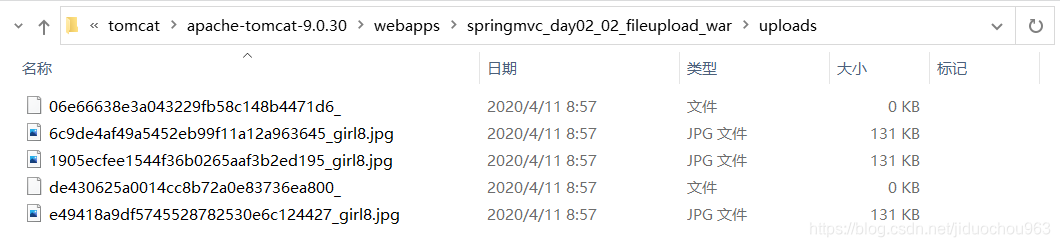
String path = request.getSession().getServletContext().getRealPath("/uploads/");
// 判断该文件路径是否存在
File file = new File(path);
if (!file.exists())
if (!file.mkdir()) // 创建该文件夹
throw new Exception("文件夹创建失败");
// 解析request对象,获取上传的文件项
DiskFileItemFactory factory = new DiskFileItemFactory(); // 磁盘文件项工厂
ServletFileUpload upload = new ServletFileUpload(factory); // 创建文件项
List<FileItem> items = upload.parseRequest(request);// 解析request
// 遍历进行处理
for (FileItem item : items) {
if (item.isFormField()) {
// 普通表单项
System.out.println("普通表单项");
} else {
// 上传文件项
String filename = item.getName(); // 获取上传文件名称
// 将文件的名称设置唯一值,防止文件重复:加上随机数
String uuid = UUID.randomUUID().toString().replace("-", "");
filename = uuid + "_" + filename;
item.write(new File(path, filename)); // 完成文件上传
item.delete(); // 删除临时文件
System.out.println("上传文件项");
}
}
return "success";
}
}
src/main/webapp/index.jsp:
<%@ page contentType="text/html;charset=UTF-8" %>
<html>
<head>
    <title>文件上传</title>
</head>
<body>
<h2>传统方式实现文件上传</h2>

<form action="user/fileUpload1" method="post" enctype="multipart/form-data">
    名称:<input type="text" name="picname"/><br/>
    文件:<input type="file" name="upload" /><br/>
    <input type="submit" value="上传">
</form>


</body>
</html>
src/main/webapp/WEB-INF/pages/success.jsp:
<%@ page contentType="text/html;charset=UTF-8" language="java" isELIgnored="false" %>
<html>
<head>
    <title>成功页面</title>
</head>
<body>
<h2>文件上传成功!</h2>

</body>
</html>
2.2.3 SpringMVC 的实现步骤
src/main/java/top/onefine/controller/UserController.java:
package top.onefine.controller;

import org.apache.commons.fileupload.FileItem;
import org.apache.commons.fileupload.disk.DiskFileItemFactory;
import org.apache.commons.fileupload.servlet.ServletFileUpload;
import org.springframework.stereotype.Controller;
import org.springframework.web.bind.annotation.RequestMapping;
import org.springframework.web.multipart.MultipartFile;

import javax.servlet.http.HttpServletRequest;
import java.io.File;
import java.util.List;
import java.util.UUID;

@Controller
@RequestMapping("/user")
public class UserController {

    // 传统方式文件上传
    // springMVC实现文件上传
    @RequestMapping("/fileUpload2")
    public String fileUpload2(HttpServletRequest request, MultipartFile upload) throws Exception {

        // 注意:MultipartFile的名称upload必须和前端 <input type="file" name="upload" /> 的name名称一样

        // 指定上传的位置
        String path = request.getSession().getServletContext().getRealPath("/uploads/");
        // 判断该文件路径是否存在
        File file = new File(path);
        if (!file.exists())
            if (!file.mkdir()) // 创建该文件夹
                throw new Exception("文件夹创建失败");

        String filename = upload.getOriginalFilename();  // 获取上传文件原始名称
        String uuid = UUID.randomUUID().toString().replace("-", "").toUpperCase();
        filename = uuid + "_" + filename;
        // 完成文件上传
        upload.transferTo(new File(path, filename));
        return "success";
    }
}
配置文件上传解析器对象src/main/resources/springmvc.xml:
<?xml version="1.0" encoding="UTF-8"?>
<beans xmlns="http://www.springframework.org/schema/beans"
       xmlns:mvc="http://www.springframework.org/schema/mvc"
       xmlns:context="http://www.springframework.org/schema/context"
       xmlns:xsi="http://www.w3.org/2001/XMLSchema-instance"
       xsi:schemaLocation="
            http://www.springframework.org/schema/beans
            http://www.springframework.org/schema/beans/spring-beans.xsd
            http://www.springframework.org/schema/mvc
            http://www.springframework.org/schema/mvc/spring-mvc.xsd
            http://www.springframework.org/schema/context
            http://www.springframework.org/schema/context/spring-context.xsd">

    <!-- 开启注解扫描,配置spring创建容器时要扫描的包 -->
    <context:component-scan base-package="top.onefine" />

    <!-- 配置视图解析器对象-->
    <bean id="internalResourceViewResolver" class="org.springframework.web.servlet.view.InternalResourceViewResolver">
        <property name="prefix" value="/WEB-INF/pages/" />  <!-- prefix表示文件所在的位置 -->
        <property name="suffix" value=".jsp" />  <!-- suffix表示文件的后缀名 -->
    </bean>

    <!-- 配置前端控制器:静态资源不拦截(过滤) -->
    <mvc:resources mapping="/js/**" location="/WEB-INF/js/" />
    <mvc:resources mapping="/css/**" location="/WEB-INF/css/" />
    <mvc:resources mapping="/images/**" location="/WEB-INF/images/" />

    <!-- 配置文件上传解析器对象 -->
    <!-- 注意: id 的值是固定的 -->
    <bean id="multipartResolver" class="org.springframework.web.multipart.commons.CommonsMultipartResolver">
        <!-- 设置上传文件的最大尺寸为 10MB = 10 * 1024 * 1024 byte -->
        <property name="maxUploadSize" value="10485760" />
    </bean>

    <!-- 配置Spring开启注解MVC的支持 -->
    <mvc:annotation-driven />

</beans>
注意: 文件上传的解析器 id 是固定的,不能起别的名称,否则无法实现请求参数的绑定。(不光是文件,其他字段也将无法绑定)
jsp文件:
<form action="user/fileUpload2" method="post" enctype="multipart/form-data">
    文件:<input type="file" name="upload" /><br/>
    <input type="submit" value="上传">
</form>
<!--
<form action="/fileUpload" method="post" enctype="multipart/form-data">
名称: <input type="text" name="picname"/><br/>
图片: <input type="file" name="uploadFile"/><br/>
<input type="submit" value="上传"/>
</form>
-->
其他参考:
@Controller("fileUploadController")
public class FileUploadController {

/**
* 文件上传
*/
@RequestMapping("/fileUpload")
public String testResponseJson(String picname,MultipartFile
	uploadFile,HttpServletRequest request) throws Exception{

	//定义文件名
	String fileName = "";
	//1.获取原始文件名
	String uploadFileName = uploadFile.getOriginalFilename();
	//2.截取文件扩展名
	String extendName = uploadFileName.substring(uploadFileName.lastIndexOf(".")+1, uploadFileName.length());
	//3.把文件加上随机数,防止文件重复
	String uuid = UUID.randomUUID().toString().replace("-", "").toUpperCase();
	//4.判断是否输入了文件名
	if(!StringUtils.isEmpty(picname)) {

		fileName = uuid+"_"+picname+"."+extendName;
	} else {

		fileName = uuid+"_"+uploadFileName;
	}
	System.out.println(fileName);
	//2.获取文件路径
	ServletContext context = request.getServletContext();
	String basePath = context.getRealPath("/uploads");
	//3.解决同一文件夹中文件过多问题
	String datePath = new SimpleDateFormat("yyyy-MM-dd").format(new Date());
	//4.判断路径是否存在
	File file = new File(basePath+"/"+datePath);
	if(!file.exists()) {

		file.mkdirs();
	}
	//5.使用 MulitpartFile 接口中方法,把上传的文件写到指定位置
	uploadFile.transferTo(new File(file,fileName));
	return "success";
	}
}
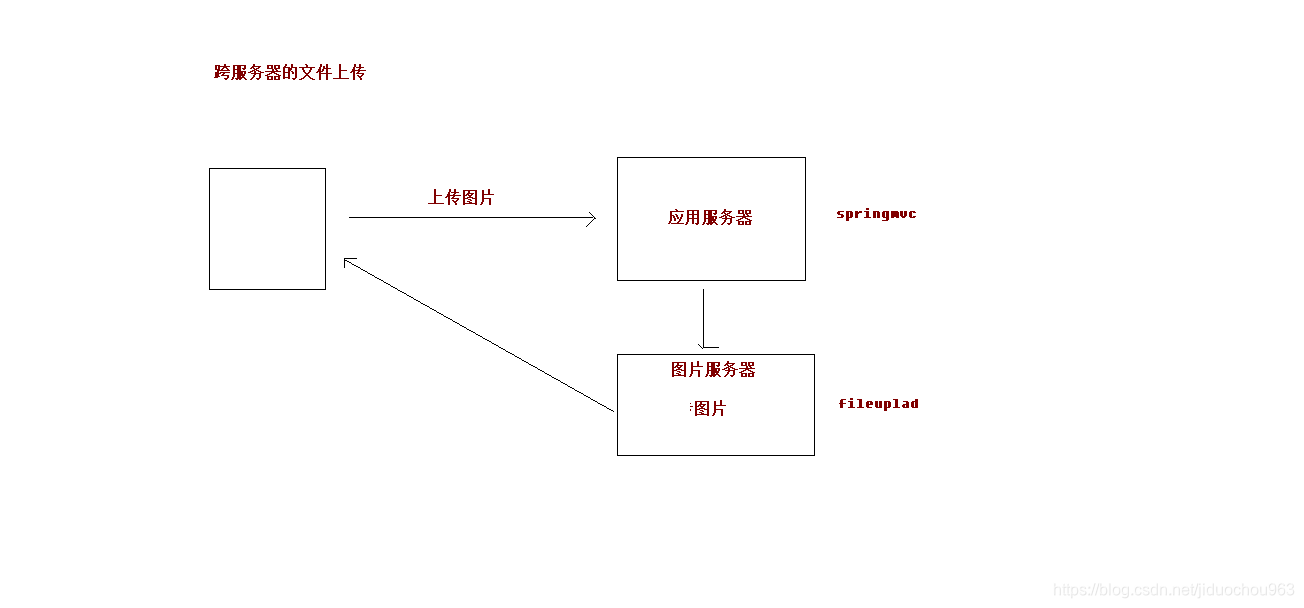
2.3 springmvc 跨服务器方式的文件上传
2.3.1 分服务器的目的
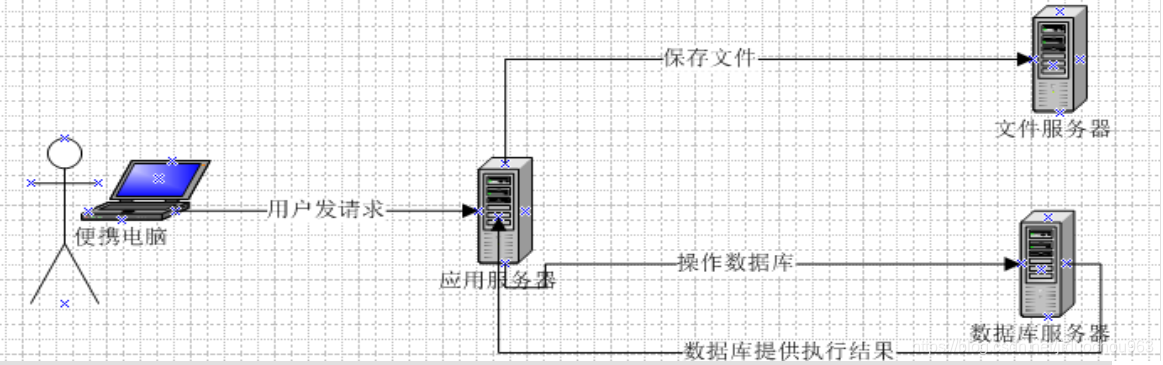
在实际开发中,我们会有很多处理不同功能的服务器。例如:
- 应用服务器:负责部署我们的应用
- 数据库服务器:运行我们的数据库
- 缓存和消息服务器:负责处理大并发访问的缓存和消息
- 文件服务器:负责存储用户上传文件的服务器。
(注意:此处说的不是服务器集群)
分服务器处理的目的是让服务器各司其职,从而提高我们项目的运行效率。
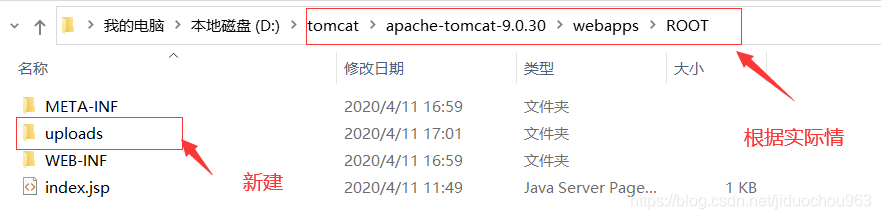
文件服务器环境搭建
src/main/webapp/WEB-INF/web.xml:
<!DOCTYPE web-app PUBLIC
        "-//Sun Microsystems, Inc.//DTD Web Application 2.3//EN"
        "http://java.sun.com/dtd/web-app_2_3.dtd" >

<web-app>
    <display-name>Archetype Created Web Application</display-name>

    <servlet>
        <servlet-name>default</servlet-name>
        <servlet-class>org.apache.catalina.servlets.DefaultServlet</servlet-class>
        <init-param>
            <param-name>debug</param-name>
            <param-value>0</param-value>
        </init-param>
        <init-param>
            <param-name>listings</param-name>
            <param-value>false</param-value>
        </init-param>
        <!-- 接收文件的目标服务器可以支持写入操作。 -->
        <init-param>
            <param-name>readonly</param-name>
            <param-value>false</param-value>
        </init-param>
        <load-on-startup>1</load-on-startup>
    </servlet>

</web-app>
tomcat配置:
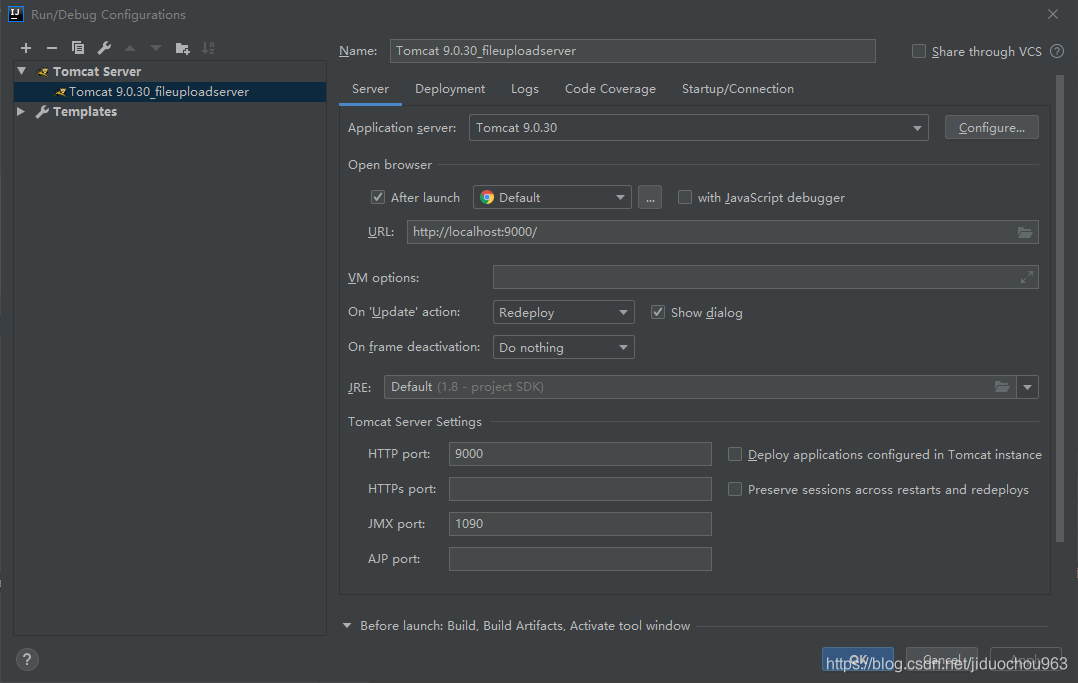

另外,文件服务器发布到tomcat运行后,新建文件夹:
完善应用服务器代码
maven中加入坐标:
<!-- https://mvnrepository.com/artifact/commons-fileupload/commons-fileupload -->
<dependency>
<groupId>commons-fileupload</groupId>
<artifactId>commons-fileupload</artifactId>
<version>1.4</version>
</dependency>
<!-- https://mvnrepository.com/artifact/commons-io/commons-io -->
<dependency>
<groupId>commons-io</groupId>
<artifactId>commons-io</artifactId>
<version>2.6</version>
</dependency>
<!--springmvc跨服务器文件上传 -->
<!-- <!– https://mvnrepository.com/artifact/org.glassfish.jersey.core/jersey-server –>-->
<!-- <dependency>-->
<!-- <groupId>org.glassfish.jersey.core</groupId>-->
<!-- <artifactId>jersey-server</artifactId>-->
<!-- <version>2.30.1</version>-->
<!-- </dependency>-->
<!-- <!– https://mvnrepository.com/artifact/org.glassfish.jersey.core/jersey-client –>-->
<!-- <dependency>-->
<!-- <groupId>org.glassfish.jersey.core</groupId>-->
<!-- <artifactId>jersey-client</artifactId>-->
<!-- <version>2.30.1</version>-->
<!-- </dependency>-->
<!-- https://mvnrepository.com/artifact/com.sun.jersey/jersey-core -->
<dependency>
<groupId>com.sun.jersey</groupId>
<artifactId>jersey-core</artifactId>
<version>1.19.4</version>
</dependency>
<!-- https://mvnrepository.com/artifact/com.sun.jersey/jersey-client -->
<dependency>
<groupId>com.sun.jersey</groupId>
<artifactId>jersey-client</artifactId>
<version>1.19.4</version>
</dependency>
src/main/java/top/onefine/controller/UserController.java:
package top.onefine.controller;

import com.sun.jersey.api.client.Client;
import com.sun.jersey.api.client.WebResource;
import org.apache.commons.fileupload.FileItem;
import org.apache.commons.fileupload.disk.DiskFileItemFactory;
import org.apache.commons.fileupload.servlet.ServletFileUpload;
import org.springframework.stereotype.Controller;
import org.springframework.web.bind.annotation.RequestMapping;
import org.springframework.web.multipart.MultipartFile;

import javax.servlet.http.HttpServletRequest;
import java.io.File;
import java.io.IOException;
import java.util.List;
import java.util.UUID;

@Controller
@RequestMapping("/user")
public class UserController {


    // 跨服务器文件上传
    @RequestMapping("/fileUpload3")
    public String fileUpload3(MultipartFile upload) throws IOException {

        // 注意:MultipartFile的名称upload必须和前端 <input type="file" name="upload" /> 的name名称一样

        // 定义上传服务器路径
        String path = "http://127.0.0.1:9000/uploads/";  // 这里根据实际情况,和文件服务器保持一致

        String filename = upload.getOriginalFilename();  // 获取上传文件名称
        String uuid = UUID.randomUUID().toString().replace("-", "").toUpperCase();
        filename = uuid + "_" + filename;
        // 完成文件上传——跨服务器上传

        // 创建客户端对象
        Client client = Client.create();
        // 和图片服务器进行连接
        WebResource webResource = client.resource(path + filename);
        // 上传文件
        webResource.put(upload.getBytes());

        return "success";
    }
}
jsp页面:
<h2>跨服务器文件上传</h2>
<form action="user/fileUpload3" method="post" enctype="multipart/form-data">
    文件:<input type="file" name="upload" /><br/>
    <input type="submit" value="上传">
</form>
其他参考方式:
@Controller("fileUploadController2")
public class FileUploadController2 {

	public static final String FILESERVERURL = "http://localhost:9090/day06_spring_image/uploads/";
	/**
	* 文件上传,保存文件到不同服务器
	*/
	@RequestMapping("/fileUpload2")
	public String testResponseJson(String picname,MultipartFile uploadFile) throws Exception{

		//定义文件名
		String fileName = "";
		//1.获取原始文件名
		String uploadFileName = uploadFile.getOriginalFilename();
		//2.截取文件扩展名
		String extendName = uploadFileName.substring(uploadFileName.lastIndexOf(".")+1, uploadFileName.length());
		//3.把文件加上随机数,防止文件重复
		String uuid = UUID.randomUUID().toString().replace("-", "").toUpperCase();
		//4.判断是否输入了文件名
		if(!StringUtils.isEmpty(picname)) {

			fileName = uuid+"_"+picname+"."+extendName;
		} else {

			fileName = uuid+"_"+uploadFileName;
		}
		System.out.println(fileName);
		//5.创建 sun 公司提供的 jersey 包中的 Client 对象
		Client client = Client.create();
		//6.指定上传文件的地址,该地址是 web 路径
		WebResource resource = client.resource(FILESERVERURL+fileName);
		//7.实现上传
		String result = resource.put(String.class,uploadFile.getBytes());
		System.out.println(result);
		return "success";
	}
}
同样,可以配置文件上传解析器,同上。
第3章 SpringMVC 中的异常处理
3.1 异常处理的思路
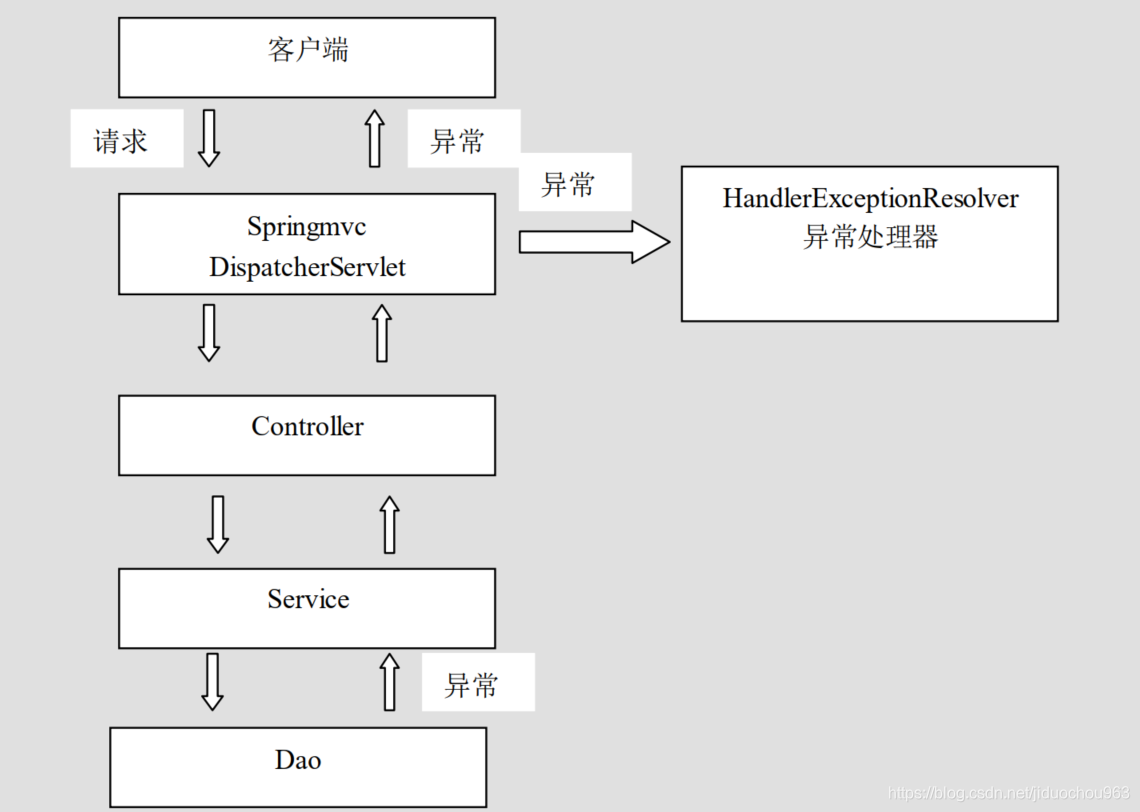
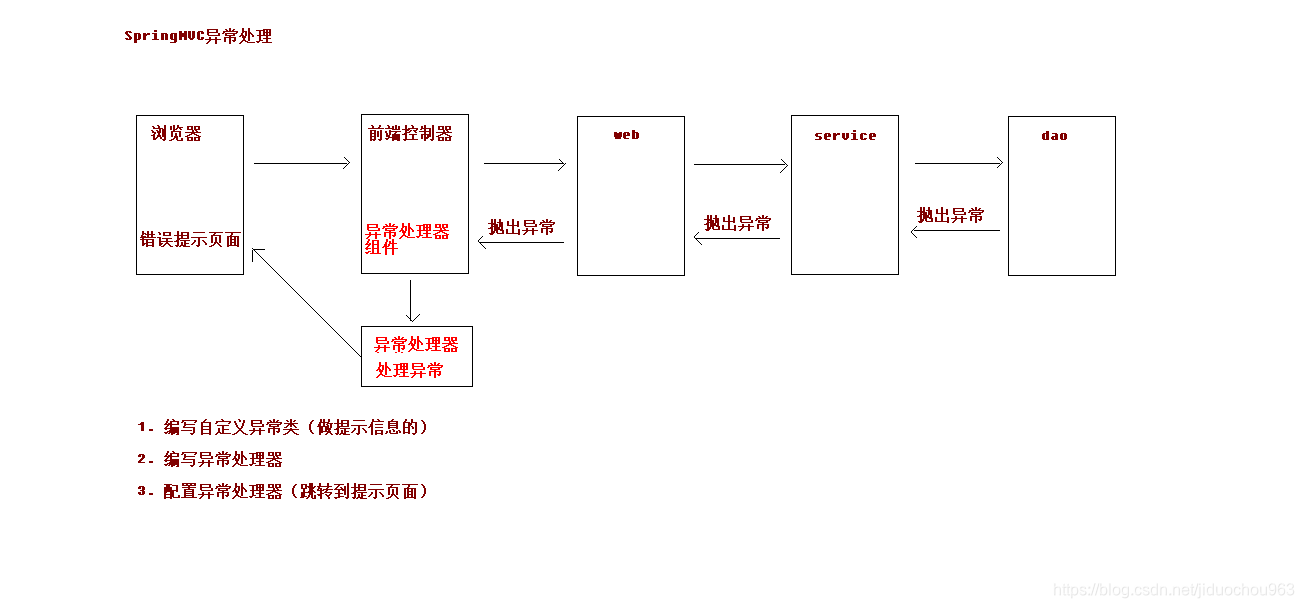
系统中异常包括两类:预期异常和运行时异常 RuntimeException,前者通过捕获异常从而获取异常信息,后者主要通过规范代码开发、测试通过手段减少运行时异常的发生。
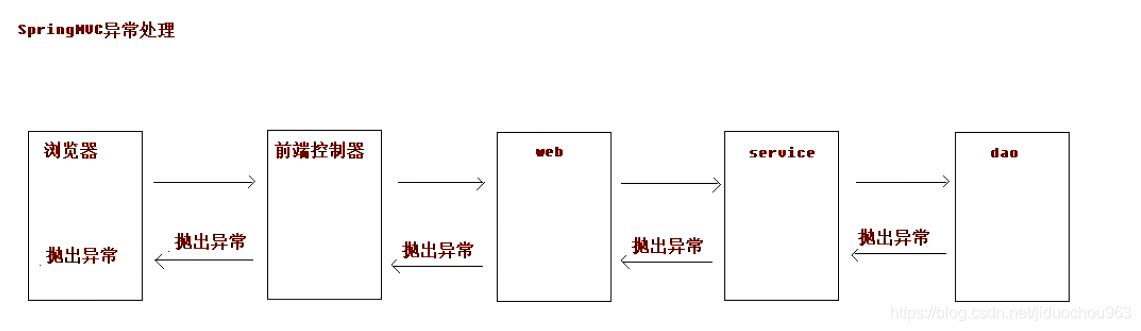
系统的 dao、 service、 controller 出现都通过 throws Exception 向上抛出,最后由 springmvc 前端控制器交由异常处理器进行异常处理。
前端控制器不作处理:
前端控制器做处理:
前端处理器不作处理:
3.2 异常处理步骤
src/main/java/top/onefine/exception/SysException.java:
package top.onefine.exception;

import lombok.AllArgsConstructor;
import lombok.Getter;
import lombok.Setter;

/**
 * 自定义异常类
 */
@Getter
@Setter
@AllArgsConstructor
public class SysException extends Exception {

    // 存储提示信息
    private String message;
}
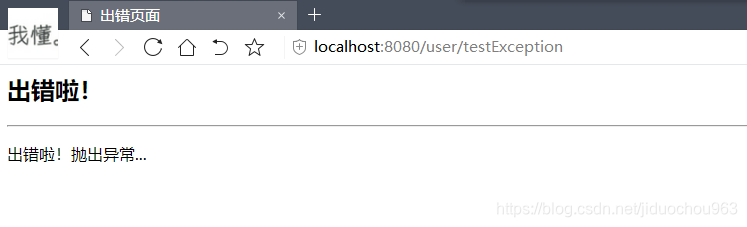
src/main/webapp/WEB-INF/pages/error.jsp:
<%@ page contentType="text/html;charset=UTF-8" language="java" isELIgnored="false" %>
<html>
<head>
    <title>出错页面</title>
</head>
<body>
<h2>出错啦!</h2> <hr/>
<p>${ errorMsg }</p>
</body>
</html>
自定义异常处理器——src/main/java/top/onefine/exception/SysExceptionResolver.java:
package top.onefine.exception;

import org.springframework.web.servlet.HandlerExceptionResolver;
import org.springframework.web.servlet.ModelAndView;

import javax.servlet.http.HttpServletRequest;
import javax.servlet.http.HttpServletResponse;

/**
 * 异常处理器
 */
public class SysExceptionResolver implements HandlerExceptionResolver {

    // 处理异常业务逻辑
    @Override
    public ModelAndView resolveException(HttpServletRequest httpServletRequest, HttpServletResponse httpServletResponse, Object o, Exception e) {

        // 获取到异常对象
        SysException ex = null;
        if (e instanceof SysException)
        	// 这里如果抛出的是自定义异常则直接转换
            ex = (SysException) e;
        else
            // ...处理其他类型的异常,这里根据实际业务修改
            // 这里如果抛出的不是自定义异常则重新构造一个自定义错误异常
            ex = new SysException("系统正在维护...");

        ModelAndView mv = new ModelAndView();
        mv.addObject("errorMsg", ex.getMessage());
        mv.setViewName("error");  // 跳转到error.jsp页面
        return mv;
    }
}
配置异常处理器——src/main/resources/springmvc.xml:
<?xml version="1.0" encoding="UTF-8"?>
<beans xmlns="http://www.springframework.org/schema/beans"
       xmlns:mvc="http://www.springframework.org/schema/mvc"
       xmlns:context="http://www.springframework.org/schema/context"
       xmlns:xsi="http://www.w3.org/2001/XMLSchema-instance"
       xsi:schemaLocation="
            http://www.springframework.org/schema/beans
            http://www.springframework.org/schema/beans/spring-beans.xsd
            http://www.springframework.org/schema/mvc
            http://www.springframework.org/schema/mvc/spring-mvc.xsd
            http://www.springframework.org/schema/context
            http://www.springframework.org/schema/context/spring-context.xsd">

    <!-- 开启注解扫描,配置spring创建容器时要扫描的包 -->
    <context:component-scan base-package="top.onefine" />

    <!-- 配置视图解析器对象-->
    <bean id="internalResourceViewResolver" class="org.springframework.web.servlet.view.InternalResourceViewResolver">
        <property name="prefix" value="/WEB-INF/pages/" />  <!-- prefix表示文件所在的位置 -->
        <property name="suffix" value=".jsp" />  <!-- suffix表示文件的后缀名 -->
    </bean>

    <!-- 配置前端控制器:静态资源不拦截(过滤) -->
    <mvc:resources mapping="/js/**" location="/WEB-INF/js/" />
    <mvc:resources mapping="/css/**" location="/WEB-INF/css/" />
    <mvc:resources mapping="/images/**" location="/WEB-INF/images/" />

    <!-- 配置异常处理器对象 -->
    <bean id="sysExceptionResolver" class="top.onefine.exception.SysExceptionResolver" />

    <!-- 配置Spring开启注解MVC的支持 -->
    <mvc:annotation-driven />

</beans>
src/main/java/top/onefine/controller/UserController.java:
package top.onefine.controller;
import org.springframework.stereotype.Controller;
import org.springframework.web.bind.annotation.RequestMapping;
import top.onefine.exception.SysException;
@Controller
@RequestMapping("/user")
public class UserController {
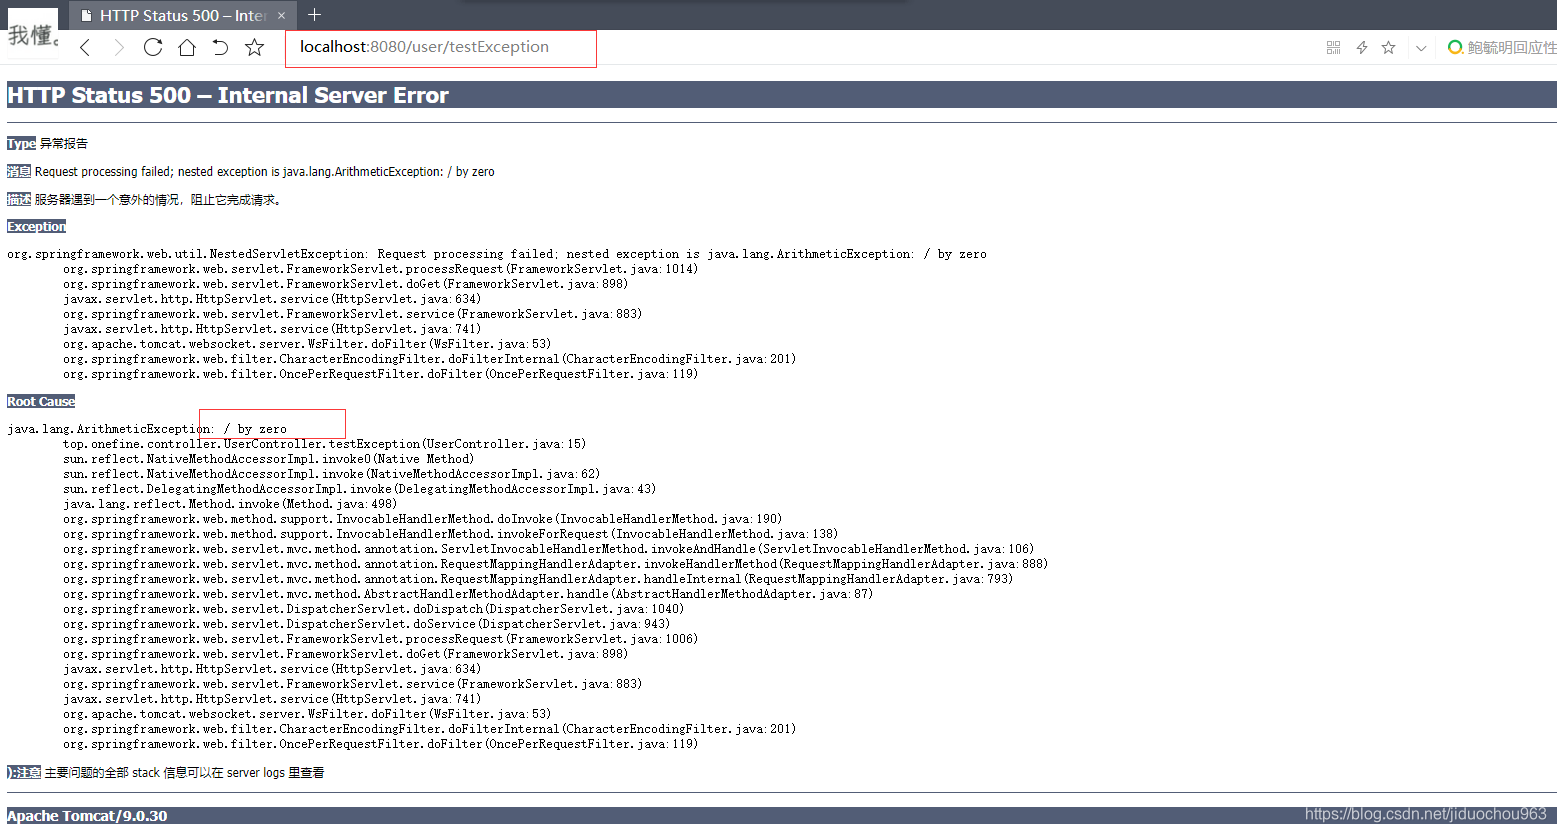
@RequestMapping("/testException")
public String testException() throws SysException {
// 抛出异常,给前端控制器处理
System.out.println("testException方法执行了...");
try {
// 模拟异常
int a = 1 / 0;
} catch (Exception e) {
e.printStackTrace();
// 抛出自定义异常信息
throw new SysException("出错啦!抛出异常...");
}
return "success";
}
}
jsp页面:
<a href="user/testException">异常处理</a>
第4章 SpringMVC 中的拦截器
4.1 拦截器的作用
Spring MVC 的处理器拦截器类似于 Servlet 开发中的过滤器 Filter,用于对处理器进行预处理和后处理。用户可以自己定义一些拦截器来实现特定的功能。
谈到拦截器,还要向大家提一个词——拦截器链(Interceptor Chain)。拦截器链就是将拦截器按一定的顺序联结成一条链。在访问被拦截的方法或字段时,拦截器链中的拦截器就会按其之前定义的顺序被调用。
说到这里,可能大家脑海中有了一个疑问,这不是我们之前学的过滤器吗?是的它和过滤器是有几分相似,但是也有区别,接下来我们就来说说他们的区别:
- 过滤器是 servlet 规范中的一部分, 任何 java web 工程都可以使用。
- 拦截器是 SpringMVC 框架自己的,只有使用了 SpringMVC 框架的工程才能用。
- 过滤器在 url-pattern 中配置了
/*之后,可以对所有要访问的资源拦截。 - 拦截器它是只会拦截访问的控制器方法,如果访问的是 jsp,html,css,image 或者 js 是不会进行拦截的。
它也是 AOP 思想的具体应用。我们要想自定义拦截器, 要求必须实现: HandlerInterceptor 接口。
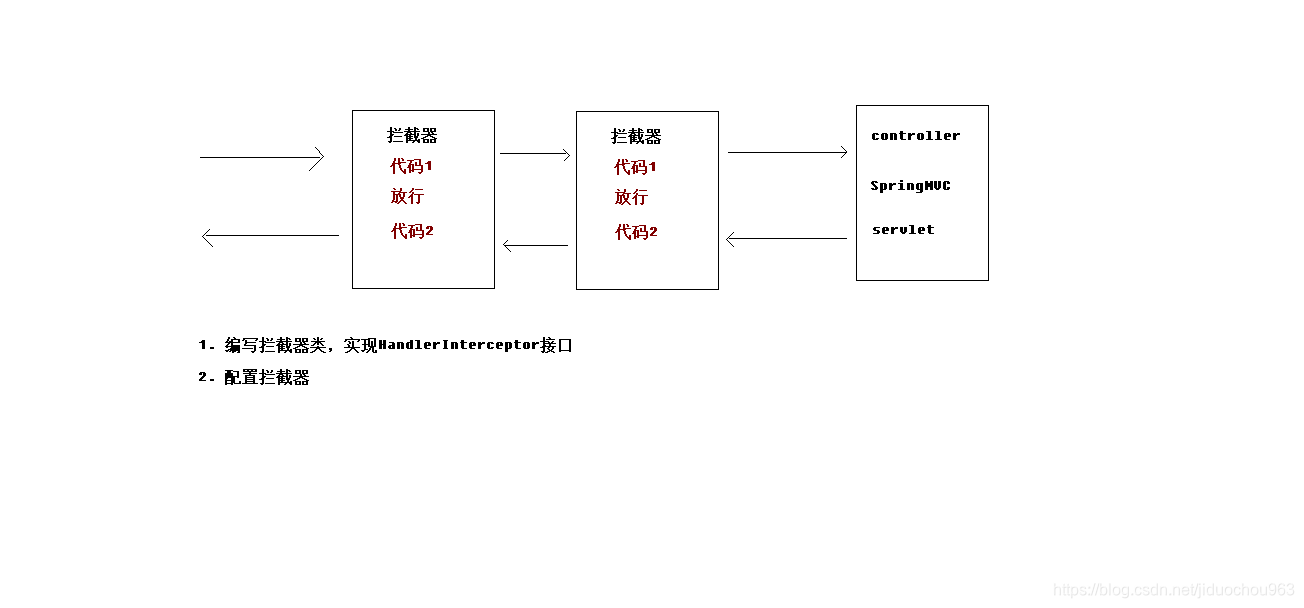
- SpringMVC框架中的拦截器用于对处理器进行预处理和后处理的技术。
- 可以定义拦截器链,连接器链就是将拦截器按着一定的顺序结成一条链,在访问被拦截的方法时,拦截器链中的拦截器会按着定义的顺序执行。
4.2 自定义拦截器的步骤
src/main/webapp/index.jsp:
<a href="user/testInterceptor">拦截器</a>
src/main/webapp/WEB-INF/pages/success.jsp:
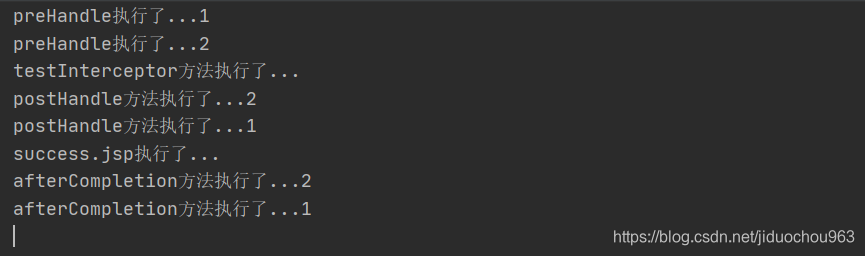
<% System.out.println("success.jsp执行了..."); %>
src/main/java/top/onefine/controller/UserController.java:
package top.onefine.controller;

import org.springframework.stereotype.Controller;
import org.springframework.web.bind.annotation.RequestMapping;

@Controller
@RequestMapping("/user")
public class UserController {


    @RequestMapping("/testInterceptor")
    public String testInterceptor() {

        System.out.println("testInterceptor方法执行了...");
        return "success";
    }
}
src/main/java/top/onefine/interceptor/MyInterceptor1.java:
package top.onefine.interceptor;

import org.springframework.web.servlet.HandlerInterceptor;
import org.springframework.web.servlet.ModelAndView;

import javax.servlet.http.HttpServletRequest;
import javax.servlet.http.HttpServletResponse;

/**
 * 自定义拦截器
 */
public class MyInterceptor1 implements HandlerInterceptor {


    /**
     * 预处理:controller方法执行前执行
     * @param request
     * @param response
     * @param handler
     * @return
     *          true放行,执行下一个拦截器;若没有下一个拦截器了则执行controller中的方法
                false拦截,不放行,进行其他处理
     *
     * @throws Exception
     */
    @Override
    public boolean preHandle(HttpServletRequest request, HttpServletResponse response, Object handler) throws Exception {

        System.out.println("preHandle执行了...1");
        return true;

        // 进行拦截
//        request.getRequestDispatcher("/WEB-INF/pages/error.jsp").forward(request, response);  // 请求转发
//        return false;
    }

    /**
     * 后处理:controller方法执行后执行
     * @param request
     * @param response
     * @param handler
     * @param modelAndView
     * @throws Exception
     */
    @Override
    public void postHandle(HttpServletRequest request, HttpServletResponse response, Object handler, ModelAndView modelAndView) throws Exception {

        System.out.println("postHandle方法执行了...1");
//        request.getRequestDispatcher("/WEB-INF/pages/error.jsp").forward(request, response);  // 请求转发
    }

    /**
     * 页面执行后,该方法执行
     * 可用于释放资源
     * @param request
     * @param response
     * @param handler
     * @param ex
     * @throws Exception
     */
    @Override
    public void afterCompletion(HttpServletRequest request, HttpServletResponse response, Object handler, Exception ex) throws Exception {

        System.out.println("afterCompletion方法执行了...1");
        // 不能再请求转发了
    }
}
放行的含义是指,如果有下一个拦截器就执行下一个,如果该拦截器处于拦截器链的最后一个,则执行控制器中的方法。
src/main/java/top/onefine/interceptor/MyInterceptor2.java:
package top.onefine.interceptor;

import org.springframework.web.servlet.HandlerInterceptor;
import org.springframework.web.servlet.ModelAndView;

import javax.servlet.http.HttpServletRequest;
import javax.servlet.http.HttpServletResponse;

public class MyInterceptor2 implements HandlerInterceptor {

	/**
		如何调用:
		* 按拦截器定义顺序调用

		何时调用:
		* 只要配置了都会调用

		有什么用:
		* 如果程序员决定该拦截器对请求进行拦截处理后还要调用其他的拦截器,或者是业务处理器去进行处理,则返回 true。
		* 如果程序员决定不需要再调用其他的组件去处理请求,则返回 false。
	*/
    @Override
    public boolean preHandle(HttpServletRequest request, HttpServletResponse response, Object handler) throws Exception {

        System.out.println("preHandle执行了...2");
        return true;
    }

	/**
		如何调用:
		* 按拦截器定义逆序调用

		何时调用:
		* 在拦截器链内所有拦截器返成功调用

		有什么用:
		* 在业务处理器处理完请求后,但是 DispatcherServlet 向客户端返回响应前被调用,在该方法中对用户请求 request 进行处理。
	*/
    @Override
    public void postHandle(HttpServletRequest request, HttpServletResponse response, Object handler, ModelAndView modelAndView) throws Exception {

        System.out.println("postHandle方法执行了...2");
    }

	/**
		如何调用:
		* 按拦截器定义逆序调用

		何时调用:
		* 只有 preHandle 返回 true 才调用

		有什么用:
		* 在 DispatcherServlet 完全处理完请求后被调用,
		* 可以在该方法中进行一些资源清理的操作。
	*/
    @Override
    public void afterCompletion(HttpServletRequest request, HttpServletResponse response, Object handler, Exception ex) throws Exception {

        System.out.println("afterCompletion方法执行了...2");
    }
}
src/main/resources/springmvc.xml:
<?xml version="1.0" encoding="UTF-8"?>
<beans xmlns="http://www.springframework.org/schema/beans"
       xmlns:mvc="http://www.springframework.org/schema/mvc"
       xmlns:context="http://www.springframework.org/schema/context"
       xmlns:xsi="http://www.w3.org/2001/XMLSchema-instance"
       xsi:schemaLocation="
            http://www.springframework.org/schema/beans
            http://www.springframework.org/schema/beans/spring-beans.xsd
            http://www.springframework.org/schema/mvc
            http://www.springframework.org/schema/mvc/spring-mvc.xsd
            http://www.springframework.org/schema/context
            http://www.springframework.org/schema/context/spring-context.xsd">

    <!-- 开启注解扫描,配置spring创建容器时要扫描的包 -->
    <context:component-scan base-package="top.onefine" />

    <!-- 配置视图解析器对象-->
    <bean id="internalResourceViewResolver" class="org.springframework.web.servlet.view.InternalResourceViewResolver">
        <property name="prefix" value="/WEB-INF/pages/" />  <!-- prefix表示文件所在的位置 -->
        <property name="suffix" value=".jsp" />  <!-- suffix表示文件的后缀名 -->
    </bean>

    <!-- 配置前端控制器:静态资源不拦截(过滤) -->
    <mvc:resources mapping="/js/**" location="/WEB-INF/js/" />
    <mvc:resources mapping="/css/**" location="/WEB-INF/css/" />
    <mvc:resources mapping="/images/**" location="/WEB-INF/images/" />

    <!-- 拦截器配置,配置拦截器的作用范围 -->
    <mvc:interceptors>
        <!-- 配置第一个拦截器 -->
        <mvc:interceptor>
            <!-- 指定要拦截的url -->
            <mvc:mapping path="/user/**"/><!-- 拦截/user下面的所有url -->
            <!-- 指定不要拦截的url -->
<!--            <mvc:exclude-mapping path=""/>-->
            <!-- 配置拦截器对象 -->
            <bean class="top.onefine.interceptor.MyInterceptor1" />
        </mvc:interceptor>
        <!-- 配置第二个拦截器 -->
        <mvc:interceptor>
            <!-- 指定要拦截的具体方法 -->
            <mvc:mapping path="/**"/><!-- 拦截所有 -->
            <!-- 配置拦截器对象 -->
            <bean class="top.onefine.interceptor.MyInterceptor2" />
        </mvc:interceptor>
        <!--配置其他拦截器...-->
    </mvc:interceptors>

    <!-- 配置Spring开启注解MVC的支持 -->
    <mvc:annotation-driven />

</beans>
注意:
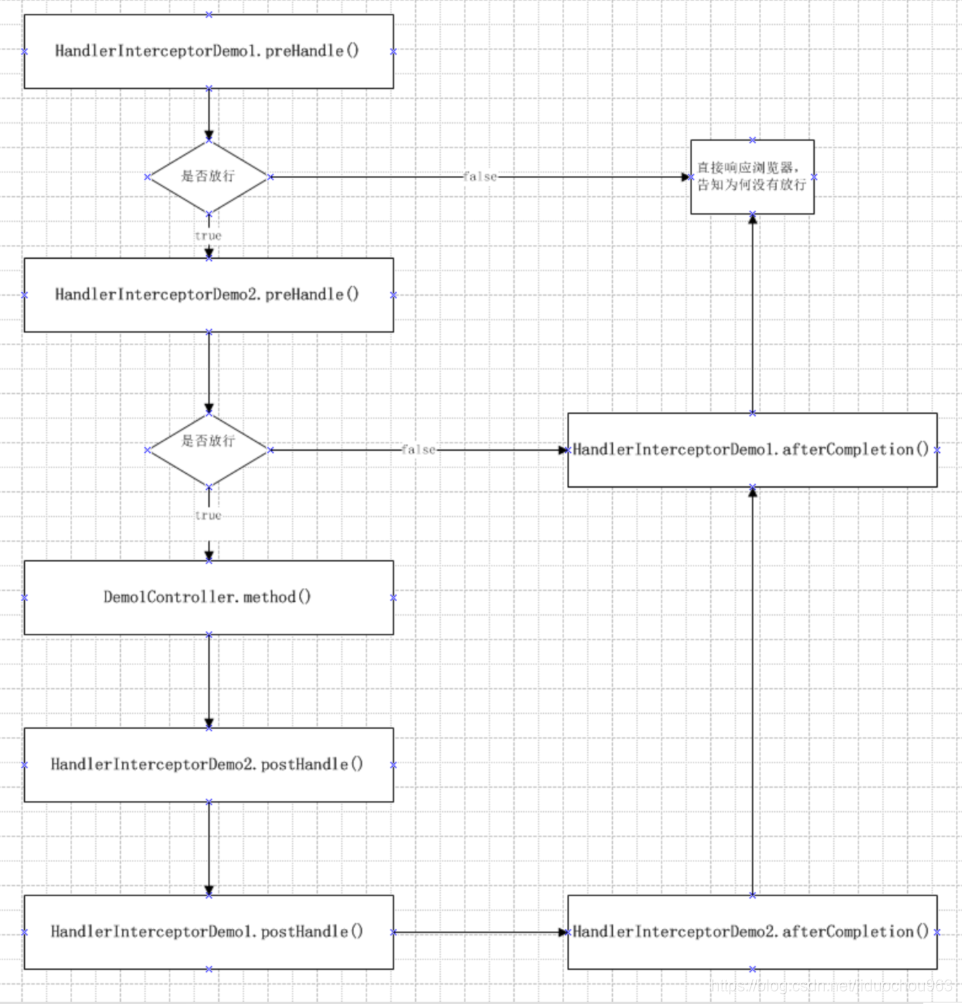
- preHandle方法是controller方法执行前拦截的方法
+ 可以使用request或者response跳转到指定的页面
+ return true放行,执行下一个拦截器,如果没有拦截器,执行controller中的方法。
+ return false不放行,不会执行controller中的方法。- postHandle是controller方法执行后执行的方法,在JSP视图执行前。
+ 可以使用request或者response跳转到指定的页面
+ 如果指定了跳转的页面,那么controller方法跳转的页面将不会显示。- postHandle方法是在JSP执行后执行
+ request或者response不能再跳转页面了
多个拦截器的执行顺序:多个拦截器是按照配置的顺序决定的。
4.3 拦截器的简单案例(验证用户是否登录)
实现思路
-
1、 有一个登录页面,需要写一个 controller 访问页面
-
2、 登录页面有一提交表单的动作。需要在 controller 中处理。
- 2.1、 判断用户名密码是否正确
- 2.2、 如果正确 向 session 中写入用户信息
- 2.3、 返回登录成功。
-
3、 拦截用户请求,判断用户是否登录
- 3.1、 如果用户已经登录。放行
- 3.2、 如果用户未登录,跳转到登录页面
控制器代码
//登陆页面
@RequestMapping("/login")
public String login(Model model)throws Exception{

	return "login";
}

//登陆提交
//userid:用户账号, pwd:密码
@RequestMapping("/loginsubmit")
public String loginsubmit(HttpSession session,String userid,String pwd)throws Exception{

	//向 session 记录用户身份信息
	session.setAttribute("activeUser", userid);
	return "redirect:/main.jsp";
}

//退出
@RequestMapping("/logout")
public String logout(HttpSession session)throws Exception{

	//session 过期
	session.invalidate();
	return "redirect:index.jsp";
}
拦截器代码
public class LoginInterceptor implements HandlerInterceptor{

	@Override
	Public boolean preHandle(HttpServletRequest request, HttpServletResponse response, Object handler) throws Exception {

		//如果是登录页面则放行
		if(request.getRequestURI().indexOf("login.action")>=0){

			return true;
		}
		HttpSession session = request.getSession();
		//如果用户已登录也放行
		if(session.getAttribute("user")!=null){

			return true;
		}
		//用户没有登录挑战到登录页面
		request.getRequestDispatcher("/WEB-INF/jsp/login.jsp").forward(request, response);
		return false;
	}
}
智能推荐
攻防世界_难度8_happy_puzzle_攻防世界困难模式攻略图文-程序员宅基地
文章浏览阅读645次。这个肯定是末尾的IDAT了,因为IDAT必须要满了才会开始一下个IDAT,这个明显就是末尾的IDAT了。,对应下面的create_head()代码。,对应下面的create_tail()代码。不要考虑爆破,我已经试了一下,太多情况了。题目来源:UNCTF。_攻防世界困难模式攻略图文
达梦数据库的导出(备份)、导入_达梦数据库导入导出-程序员宅基地
文章浏览阅读2.9k次,点赞3次,收藏10次。偶尔会用到,记录、分享。1. 数据库导出1.1 切换到dmdba用户su - dmdba1.2 进入达梦数据库安装路径的bin目录,执行导库操作 导出语句:./dexp cwy_init/[email protected]:5236 file=cwy_init.dmp log=cwy_init_exp.log 注释: cwy_init/init_123..._达梦数据库导入导出
js引入kindeditor富文本编辑器的使用_kindeditor.js-程序员宅基地
文章浏览阅读1.9k次。1. 在官网上下载KindEditor文件,可以删掉不需要要到的jsp,asp,asp.net和php文件夹。接着把文件夹放到项目文件目录下。2. 修改html文件,在页面引入js文件:<script type="text/javascript" src="./kindeditor/kindeditor-all.js"></script><script type="text/javascript" src="./kindeditor/lang/zh-CN.js"_kindeditor.js
STM32学习过程记录11——基于STM32G431CBU6硬件SPI+DMA的高效WS2812B控制方法-程序员宅基地
文章浏览阅读2.3k次,点赞6次,收藏14次。SPI的详情简介不必赘述。假设我们通过SPI发送0xAA,我们的数据线就会变为10101010,通过修改不同的内容,即可修改SPI中0和1的持续时间。比如0xF0即为前半周期为高电平,后半周期为低电平的状态。在SPI的通信模式中,CPHA配置会影响该实验,下图展示了不同采样位置的SPI时序图[1]。CPOL = 0,CPHA = 1:CLK空闲状态 = 低电平,数据在下降沿采样,并在上升沿移出CPOL = 0,CPHA = 0:CLK空闲状态 = 低电平,数据在上升沿采样,并在下降沿移出。_stm32g431cbu6
计算机网络-数据链路层_接收方收到链路层数据后,使用crc检验后,余数为0,说明链路层的传输时可靠传输-程序员宅基地
文章浏览阅读1.2k次,点赞2次,收藏8次。数据链路层习题自测问题1.数据链路(即逻辑链路)与链路(即物理链路)有何区别?“电路接通了”与”数据链路接通了”的区别何在?2.数据链路层中的链路控制包括哪些功能?试讨论数据链路层做成可靠的链路层有哪些优点和缺点。3.网络适配器的作用是什么?网络适配器工作在哪一层?4.数据链路层的三个基本问题(帧定界、透明传输和差错检测)为什么都必须加以解决?5.如果在数据链路层不进行帧定界,会发生什么问题?6.PPP协议的主要特点是什么?为什么PPP不使用帧的编号?PPP适用于什么情况?为什么PPP协议不_接收方收到链路层数据后,使用crc检验后,余数为0,说明链路层的传输时可靠传输
软件测试工程师移民加拿大_无证移民,未受过软件工程师的教育(第1部分)-程序员宅基地
文章浏览阅读587次。软件测试工程师移民加拿大 无证移民,未受过软件工程师的教育(第1部分) (Undocumented Immigrant With No Education to Software Engineer(Part 1))Before I start, I want you to please bear with me on the way I write, I have very little gen...
随便推点
Thinkpad X250 secure boot failed 启动失败问题解决_安装完系统提示secureboot failure-程序员宅基地
文章浏览阅读304次。Thinkpad X250笔记本电脑,装的是FreeBSD,进入BIOS修改虚拟化配置(其后可能是误设置了安全开机),保存退出后系统无法启动,显示:secure boot failed ,把自己惊出一身冷汗,因为这台笔记本刚好还没开始做备份.....根据错误提示,到bios里面去找相关配置,在Security里面找到了Secure Boot选项,发现果然被设置为Enabled,将其修改为Disabled ,再开机,终于正常启动了。_安装完系统提示secureboot failure
C++如何做字符串分割(5种方法)_c++ 字符串分割-程序员宅基地
文章浏览阅读10w+次,点赞93次,收藏352次。1、用strtok函数进行字符串分割原型: char *strtok(char *str, const char *delim);功能:分解字符串为一组字符串。参数说明:str为要分解的字符串,delim为分隔符字符串。返回值:从str开头开始的一个个被分割的串。当没有被分割的串时则返回NULL。其它:strtok函数线程不安全,可以使用strtok_r替代。示例://借助strtok实现split#include <string.h>#include <stdio.h&_c++ 字符串分割
2013第四届蓝桥杯 C/C++本科A组 真题答案解析_2013年第四届c a组蓝桥杯省赛真题解答-程序员宅基地
文章浏览阅读2.3k次。1 .高斯日记 大数学家高斯有个好习惯:无论如何都要记日记。他的日记有个与众不同的地方,他从不注明年月日,而是用一个整数代替,比如:4210后来人们知道,那个整数就是日期,它表示那一天是高斯出生后的第几天。这或许也是个好习惯,它时时刻刻提醒着主人:日子又过去一天,还有多少时光可以用于浪费呢?高斯出生于:1777年4月30日。在高斯发现的一个重要定理的日记_2013年第四届c a组蓝桥杯省赛真题解答
基于供需算法优化的核极限学习机(KELM)分类算法-程序员宅基地
文章浏览阅读851次,点赞17次,收藏22次。摘要:本文利用供需算法对核极限学习机(KELM)进行优化,并用于分类。
metasploitable2渗透测试_metasploitable2怎么进入-程序员宅基地
文章浏览阅读1.1k次。一、系统弱密码登录1、在kali上执行命令行telnet 192.168.26.1292、Login和password都输入msfadmin3、登录成功,进入系统4、测试如下:二、MySQL弱密码登录:1、在kali上执行mysql –h 192.168.26.129 –u root2、登录成功,进入MySQL系统3、测试效果:三、PostgreSQL弱密码登录1、在Kali上执行psql -h 192.168.26.129 –U post..._metasploitable2怎么进入
Python学习之路:从入门到精通的指南_python人工智能开发从入门到精通pdf-程序员宅基地
文章浏览阅读257次。本文将为初学者提供Python学习的详细指南,从Python的历史、基础语法和数据类型到面向对象编程、模块和库的使用。通过本文,您将能够掌握Python编程的核心概念,为今后的编程学习和实践打下坚实基础。_python人工智能开发从入门到精通pdf