Blazor WebAssembly+Duende.IdentityServer+EF Core认证授权企业级实战_blazor identity ef 权限-程序员宅基地
技术标签: c# IdentityServer efcore # ASP.NET Core 认证授权 blazor
接上一篇(基础知识):Blazor WebAssembly身份认证与授权
文章目录
1. 前言
本文将从0开始介绍如何搭建一个适用于Blazor WASM应用的且基于OpenID和OAuth2.0的认证授权服务。我们会从创建空白项目一步一步开始,让大家了解到整个搭建流程,没有直接使用微软给定的认证模板或者IdentityServer的UI模板。
- 前端使用的是Blazor WebAssembly最新版本(基于 .net 5.0),主要我认为相对于Blazor Server来说,这个才是Web的未来。而且可以充分开会客户机的性能。
- 认证服务使用的Duende.IdentityServer 5.0版本。至于为什么没有使用现在常用的IdentityServer4呢?主要因为Duende.IdentityServer是IdentityServer4的后续版本,本质是同一个产品,会长期更新,虽然对于商业使用是需要授权的。但是对于一般的测试开发免费。IdentityServer4到2022年5月份就停止支持了,后续怎么发展不得而知。
- 数据存储使用的是目前的最新版的EF Core 5.0
至于为什么起名为企业级实战?在开始写这篇博文之前,在互联网上经历一番搜索后发现,大多数文章介绍的都很笼统,要么是基于官方的template解读(比如Blazor+Asp.net core Identity),要么还是用的一些测试配置(比如用的IdentityServer的TestUser,InMemoryClients等)。并没有说如何基于我们已有应用进行改造,并没有说生产上如何实践。
基于以上种种,所以就有了这篇文章。本文可能没有覆盖到你所使用场景的方方面面,欢迎在评论区交流探讨。
2. 搭建IdentityServer服务
2.1 安装dotnet命令行工具
安装IdentityServer的dotnet工具dotnet new --install Duende.IdentityServer.Templates,接下我们会用这个工具添加一些默认UI
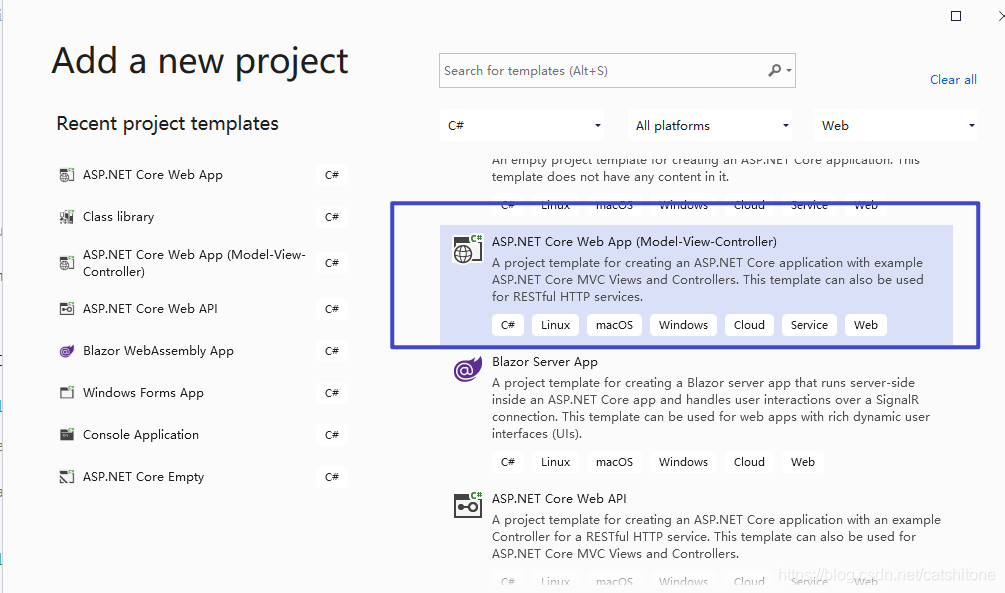
2.2 创建ASP.NET Core Web MVC项目:
创建一个ASP.NET Core Web MVC项目,启动端口设置为:5000。
然后在项目的根目录下执行dotnet new isui --force命令,添加所需要的控制器和视图,执行完之后可以在右侧的解决方案中看到新添加的controll和view:

此时可以移除原有Controller->HomeControll.cs了,因为在Quickstart里已经有了。
2.3 配置IdentityServer
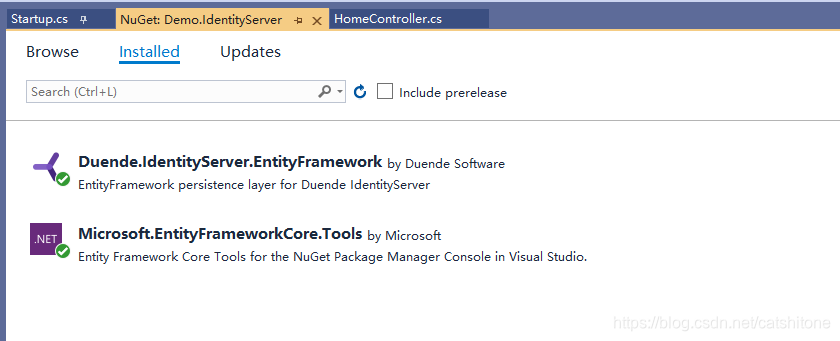
因为我们这次不整IdentityServer的TestUser,InMemoryClients练习数据的那一套,这些配置我们都需要从数据库读取。ORM我们选择使用EF Core,所以需要安装以下NuGet包:
- Duende.IdentityServer.EntityFramework:提供认证授权服务和数据存储功能
- Microsoft.EntityFrameworkCore.Tools:用来更新数据库结构
- Microsoft.EntityFrameworkCore.SqlServer:这里使用SqlServer数据库
安装后如下:
2.3.1 配置数据库连接字符串
{

  "Logging": {

    "LogLevel": {

      "Default": "Information",
      "Microsoft": "Warning",
      "Microsoft.Hosting.Lifetime": "Information"
    }
  },
  "AllowedHosts": "*",
  "ConnectionStrings": {

    "DemoMain": "Server=.,1433;Database=Demo.Main;Uid=xxx;Pwd=xxxx;",
    "DemoIds": "Server=.,1433;Database=Demo.IdentityServer;Uid=xx;Pwd=xxxx;"
  }
}
这里我们配置了两个数据库字符串DemoMain和DemoIds,一个是业务数据库,一个是IdentityServer的数据库(存放Ids认证和授权用到的一些东西)。
然后创建一个DemoMainDbContext 数据库上下文,以后会通过这个上下文验证用户密码。
    public class SysUser
    {

        public long Id {
     get; set; }
        public string UserName {
     get; set; }
        public string Password {
     get; set; }
        public string Email {
     get; set; }
    }
    public class DemoMainDbContext : DbContext
    {

        public DemoMainDbContext(DbContextOptions<DbContextOptions<DemoMainDbContext>> options) : base(options)
        {

            this.Database.EnsureCreated();
        }
        public DbSet<SysUser> Users {
     get; set; }

        protected override void OnModelCreating(ModelBuilder modelBuilder)
        {

            modelBuilder.Entity<SysUser>().ToTable("SysUser");
        }
    }
2.3.2 注册服务与配置管道
主要是以下几点:
- 注册
DemoMainDbContext的上下文 - 注册Cors:因为我们的解决方案将来会有多个应用,其他应用访问Ids的话会涉及到跨域问题。这里配置跨域的代码依自身需求灵活变通即可。
- 注册IdentityServer:
AddConfigurationStore用来配置ConfigurationDbContext上下文,存储那些受保护的ApiScope、IdentityResource、Client。AddOperationalStore用来配置PersistedGrantDbContext上下文,存储请求的token。 - 配置Cookie管道:
- 配置Cors:
- 配置IdentityServer:
Startup.cs完整代码参考如下:
public void ConfigureServices(IServiceCollection services)
{

    var conStrMain = Configuration.GetConnectionString("DemoMain");
    var conStrIds = Configuration.GetConnectionString("DemoIds");
    //注册数据库上下文
    services.AddDbContext<DemoMainDbContext>(opt => opt.UseSqlServer(conStrMain));
    //注册跨域
    services.AddCors(opt =>
    {

        opt.AddDefaultPolicy(builder => builder.AllowAnyOrigin().AllowAnyMethod().AllowAnyHeader());
    });
    //注册IdentityServer
    var migrationAsm = typeof(Startup).Assembly.GetName().Name;
    services.AddIdentityServer(opt =>
    {

        opt.Authentication.CookieSameSiteMode = Microsoft.AspNetCore.Http.SameSiteMode.Strict;
    })
        .AddConfigurationStore(opt =>
        {

            opt.ConfigureDbContext = b => b.UseSqlServer(conStrIds, sql => sql.MigrationsAssembly(migrationAsm));
        })
        .AddOperationalStore(opt =>
        {

            opt.ConfigureDbContext = b => b.UseSqlServer(conStrIds, sql => sql.MigrationsAssembly(migrationAsm));
        });
    services.AddControllersWithViews();
}
// This method gets called by the runtime. Use this method to configure the HTTP request pipeline.
public void Configure(IApplicationBuilder app, IWebHostEnvironment env)
{

    if (env.IsDevelopment())
    {

        app.UseDeveloperExceptionPage();
    }
    else
    {

        app.UseExceptionHandler("/Home/Error");
    }
    app.UseStaticFiles();
    //配置Cookie策略
    app.UseCookiePolicy(new CookiePolicyOptions
    {

        MinimumSameSitePolicy = Microsoft.AspNetCore.Http.SameSiteMode.Lax
    });
    app.UseRouting();
    //Use跨域
    app.UseCors();
    //Use Ids
    app.UseIdentityServer();
    app.UseAuthorization();
    app.UseEndpoints(endpoints =>
    {

        endpoints.MapControllerRoute(
            name: "default",
            pattern: "{controller=Home}/{action=Index}/{id?}");
    });
}
到这里IdentityServer的配置基本已经完成,但是我们还是没法运行,因为没有测试数据也没有对应的IdentityServer数据库架构。
2.3.3 配置测试数据
新建一个IdsConfig.cs类,添加以下方法:
//配置要保护的身份资源
public static List<IdentityResource> IdentityResources => new List<IdentityResource>()
{

    new IdentityResources.OpenId(),//必须有
    new IdentityResources.Profile()
};
//配置要保护的API资源
public static List<ApiScope> ApiScopes => new List<ApiScope>
{

    new ApiScope
    {

        Name="Classified",
        DisplayName="机密资源"
    }
};
//配置请求端
public static List<Client> Clients => new List<Client>
{

    new Client
    {

        ClientId="blazor_code2",
        AllowedGrantTypes=GrantTypes.Code,
        AllowedScopes={

            "Classified",
            IdentityServerConstants.StandardScopes.OpenId,
            IdentityServerConstants.StandardScopes.Profile,
        },
        RedirectUris=
        {

        	//如果请求过来的redirectUri在这个列表里,则会允许跳转。
            "http://localhost:7000/authentication/login-callback",
        },
        PostLogoutRedirectUris=
        {

        	//同上
            "http://localhost:7000/authentication/logout-callback",
        },
        RequireClientSecret=false,//不需要设置secret
        AllowedCorsOrigins={
     "http://localhost:7000"}//不需要跨域的话,可以不用这么设置
    },
};
以上的配置数据我们仅用来初始化数据库。
如上所看到的,我们添加了一个名为blazor_code2的client,并设置了RedirectUris和PostLogoutRedirectUris,用来登录成功之后和退出之后进行跳转。
这里的localhost:7000是我们接下来要创建的Blazor WebAssembly应用。因为Blazor WebAssembly属于客户端应用,所有的代码都保留在用户电脑里,而客户是不可信的,所以我们这里不需要设置ClientSecret和AccessToken,因为没法保证它们的安全。
2.3.4 数据初始化
接下来我们在IdsConfig.cs里添加一个SeedData方法,用来初始化上一步的配置数据:
public static void SeedData(IApplicationBuilder app)
{

    using (var serviceScope = app.ApplicationServices.GetService<IServiceScopeFactory>().CreateScope())
    {

    	//初始化时执行迁移记录
        serviceScope.ServiceProvider.GetRequiredService<PersistedGrantDbContext>().Database.Migrate();
        var context = serviceScope.ServiceProvider.GetRequiredService<ConfigurationDbContext>();
        context.Database.Migrate();
        //设置Clients
        context.Clients.RemoveRange(context.Clients.ToArray());//清空之前的,方便调试
        IdsConfig.Clients.ForEach(c => context.Clients.Add(c.ToEntity()));
        context.SaveChanges();
        //设置IdentityResource
        if (!context.IdentityResources.Any())
        {

            IdsConfig.IdentityResources.ForEach(r => context.IdentityResources.Add(r.ToEntity()));
            context.SaveChanges();
        }
        //设置ApiScope
        if (!context.ApiScopes.Any())
        {

            IdsConfig.ApiScopes.ForEach(a => context.ApiScopes.Add(a.ToEntity()));
            context.SaveChanges();
        }
        //给数据库加一个测试用户
		var mainContext = serviceScope.ServiceProvider.GetRequiredService<DemoMainDbContext>();
		if(!mainContext.Users.Any())
		{

    		mainContext.Users.Add(new SysUser
    		{

        		UserName = "admin",
        		Password = "1234",
        		Email = "[email protected]"
    		});
    		mainContext.SaveChanges();
		}
    }
}
然后在Stratup.cs的Configure方法,调用SeedData:
public void Configure(IApplicationBuilder app, IWebHostEnvironment env)
{

    IdsConfig.SeedData(app);
    //...
}
2.3.5 数据库迁移
打开PMC(Package Management Console),执行以下命令创建迁移记录:
Add-Migration InitialIdentityServerPersistedGrantDbMigration -c PersistedGrantDbContext -o Data/Migrations/IdentityServer/PersistedGrantDb

Add-Migration InitialIdentityServerConfigurationDbMigration -c ConfigurationDbContext -o Data/Migrations/IdentityServer/ConfigurationDb

当应用运行起来,就会执行迁移记录。
3. 创建WebApi应用
IdentityServer的创建告一段落了,接下来我们创建一个受IdentityServer保护的WebApi应用。
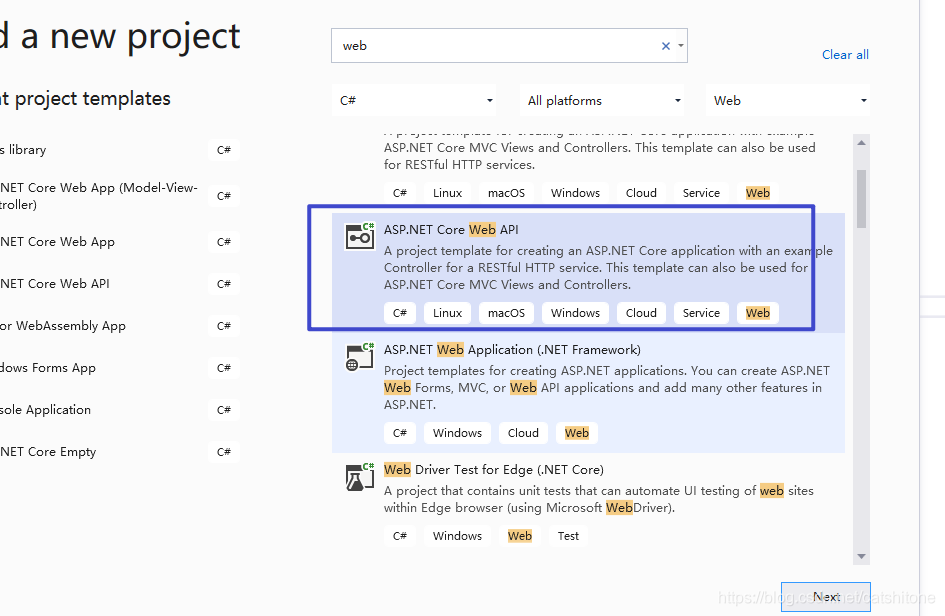

启动端口设置为:6001。
3.1 安装NuGet包
首先安装NuGet包:Microsoft.AspNetCore.Authentication.JwtBearer,用来验证请求资源时传进来的token。
3.2 配置Startup.cs
示例代码如下:
public void ConfigureServices(IServiceCollection services)
{

    services.AddCors(opt =>
    {

        opt.AddDefaultPolicy(builder =>
        {

            builder.AllowAnyOrigin().AllowAnyHeader().AllowAnyMethod();
        });
    });
    services.AddAuthentication("Bearer")
        .AddJwtBearer("Bearer", opt =>
        {

            opt.Authority = "http://localhost:5000";//IdentityServer的地址
            opt.TokenValidationParameters = new Microsoft.IdentityModel.Tokens.TokenValidationParameters
            {

                ValidateAudience = false//验证token是否来自trusted issuer, 大多数情况下都不需要验证。
            };
            opt.RequireHttpsMetadata = false;//我们没有使用https,所以这里disable。
        });
    services.AddAuthorization(opt =>
    {

        opt.AddPolicy("Policy1", builder =>
        {

            //首先需要通过验证
            builder.RequireAuthenticatedUser();
            //其次需要有Classified的scope
            builder.RequireClaim("scope", "Classified");
        });
    });
    services.AddControllers();
}
// This method gets called by the runtime. Use this method to configure the HTTP request pipeline.
public void Configure(IApplicationBuilder app, IWebHostEnvironment env)
{

    if (env.IsDevelopment())
    {

        app.UseDeveloperExceptionPage();
    }
    app.UseRouting();
    app.UseCors();//添加跨域
    app.UseAuthentication();//添加认证
    app.UseAuthorization();
    app.UseEndpoints(endpoints =>
    {

        endpoints.MapControllers();
    });
}
主要工作是以下几点:
- 因为我们需要跨域,所以在服务和请求管道里配置了Cors。
- 配置了基于
Bearer的token验证,拿到token之后会到localhost:5000上进行验证,也就是我们上一步创建的IdentityServer应用。 - 然后配置另一个基于策略的授权
Policy1,这个策略表示需要包含名为Classified的scope
3.3 保护控制器
在控制器上应用[Authorize]特性,保护控制器:
namespace Demo.ApiResource.Controllers
{

    [ApiController]
    [Route("[controller]")]
    [Authorize("Policy1")]
    public class WeatherForecastController : ControllerBase
    {

        //...
    }
}
到此WebApi的配置结束。
4. 创建Blazor WebAssembly应用
在创建Blazor WASM应用之前,建议先看下这篇文章:Blazor WebAssembly身份认证与授权,对Blazor的认证组件有个大致了解。
然后我们创建一个用ASP.NET Core 作为Host的Blazor WebAssembly应用,认证类型里选中Individual Accounts,然后勾上ASP.NET Core hosted:
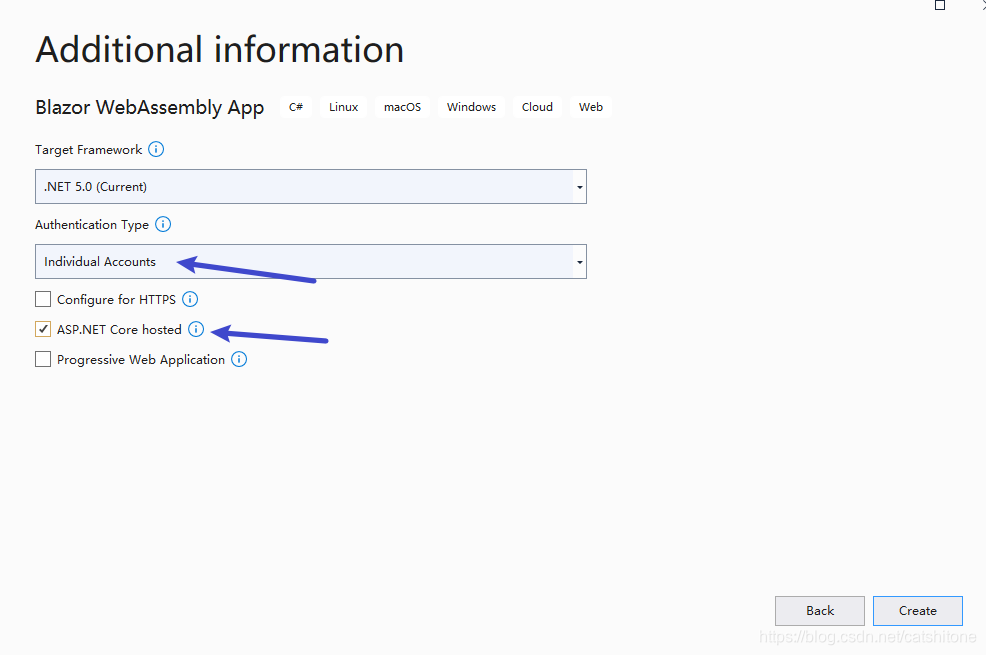
启动端口设置为7000
4.1 Host端配置
创建好项目之后,Host端的这些东西我们暂时不用可以都删除,简简单单的让它只做为一个Host就够了:
然后修改下Startup.cs把不要的代码也注释掉,清清爽爽:
public void ConfigureServices(IServiceCollection services)
{

    //services.AddDbContext<ApplicationDbContext>(options =>
    //    options.UseSqlServer(
    //        Configuration.GetConnectionString("DefaultConnection")));
    //services.AddDatabaseDeveloperPageExceptionFilter();
    //services.AddDefaultIdentity<ApplicationUser>(options => options.SignIn.RequireConfirmedAccount = true)
    //    .AddEntityFrameworkStores<ApplicationDbContext>();
    //services.AddIdentityServer()
    //    .AddApiAuthorization<ApplicationUser, ApplicationDbContext>();
    //services.AddAuthentication()
    //    .AddIdentityServerJwt();
    services.AddControllersWithViews();
    services.AddRazorPages();
}
// This method gets called by the runtime. Use this method to configure the HTTP request pipeline.
public void Configure(IApplicationBuilder app, IWebHostEnvironment env)
{

    if (env.IsDevelopment())
    {

        app.UseDeveloperExceptionPage();
        app.UseMigrationsEndPoint();
        app.UseWebAssemblyDebugging();
    }
    else
    {

        app.UseExceptionHandler("/Error");
        // The default HSTS value is 30 days. You may want to change this for production scenarios, see https://aka.ms/aspnetcore-hsts.
        app.UseHsts();
    }
    //app.UseHttpsRedirection();
    app.UseBlazorFrameworkFiles();
    app.UseStaticFiles();
    app.UseRouting();
    //app.UseIdentityServer();
    //app.UseAuthentication();
    //app.UseAuthorization();
    app.UseEndpoints(endpoints =>
    {

        endpoints.MapRazorPages();
        endpoints.MapControllers();
        endpoints.MapFallbackToFile("index.html");
    });
}
4.2 Client端配置
因为需要用到一些认证组件,所以需要首先在Client端安装NuGet包:Microsoft.AspNetCore.Components.WebAssembly.Authentication。
接下来配置Program.cs:
public static async Task Main(string[] args)
{

    var builder = WebAssemblyHostBuilder.CreateDefault(args);
    builder.RootComponents.Add<App>("#app");
    //注册自定义的http handler
    builder.Services.AddScoped<CustomAuthorizationMessageHandler>();
    builder.Services.AddHttpClient("webapi", client => client.BaseAddress = new Uri("http://localhost:6001"))
        .AddHttpMessageHandler<CustomAuthorizationMessageHandler>();
    //注册一个通用的HttpClient,让Blazor访问自身提供的服务
    builder.Services.AddScoped(sp => new HttpClient {
     BaseAddress = new Uri(builder.HostEnvironment.BaseAddress) });
    builder.Services.AddOidcAuthentication(opt =>
    {

        //这里是写死了,可以配置到appsettings.json里
        opt.ProviderOptions.Authority = "http://localhost:5000";
        opt.ProviderOptions.ClientId = "blazor_code2";
        opt.ProviderOptions.PostLogoutRedirectUri = "http://localhost:7000/authentication/logout-callback";
        opt.ProviderOptions.RedirectUri = "http://localhost:7000/authentication/login-callback";
        opt.ProviderOptions.ResponseType = "code";
    });
    builder.Services.AddApiAuthorization();
    await builder.Build().RunAsync();
}
注意
这里有一个坑,微软的官方文档说的也很模糊,当AddHttpMessageHandler时,会让你使用BaseAddressAuthorizationMessageHandler。但是使用这个handler,并不会让你请求到localhost:6000上,而一直是localhost:5000,具体原因可以参考BaseAddressAuthorizationMessageHandler的源码。
所以我们这里自定义了一个CustomAuthorizationMessageHandler,并进行了注册。自定义handler的代码如下:
    public class CustomAuthorizationMessageHandler : AuthorizationMessageHandler
    {

        public CustomAuthorizationMessageHandler(IAccessTokenProvider provider,
            NavigationManager navigationManager, IConfiguration configuration)
            : base(provider, navigationManager)
        {

            ConfigureHandler(authorizedUrls: new[] {
     "http://localhost:6001" }, scopes: new[] {
     "Classified" });
        }
    }
(主要设置webapi的url和请求的scope)
4.3 访问API
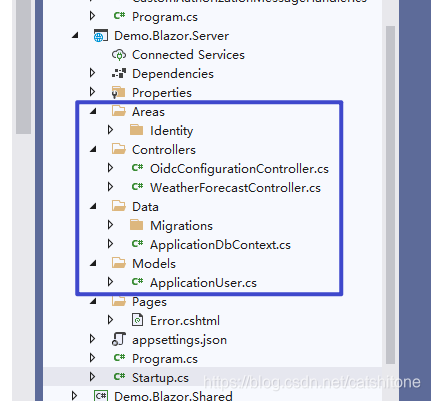
这里我们使用[Authorize]特性保护我们的Blazor页面Counter和FetchData。当请求到这两个页面上时会首先验证用户,没有登录的话会提示登录。
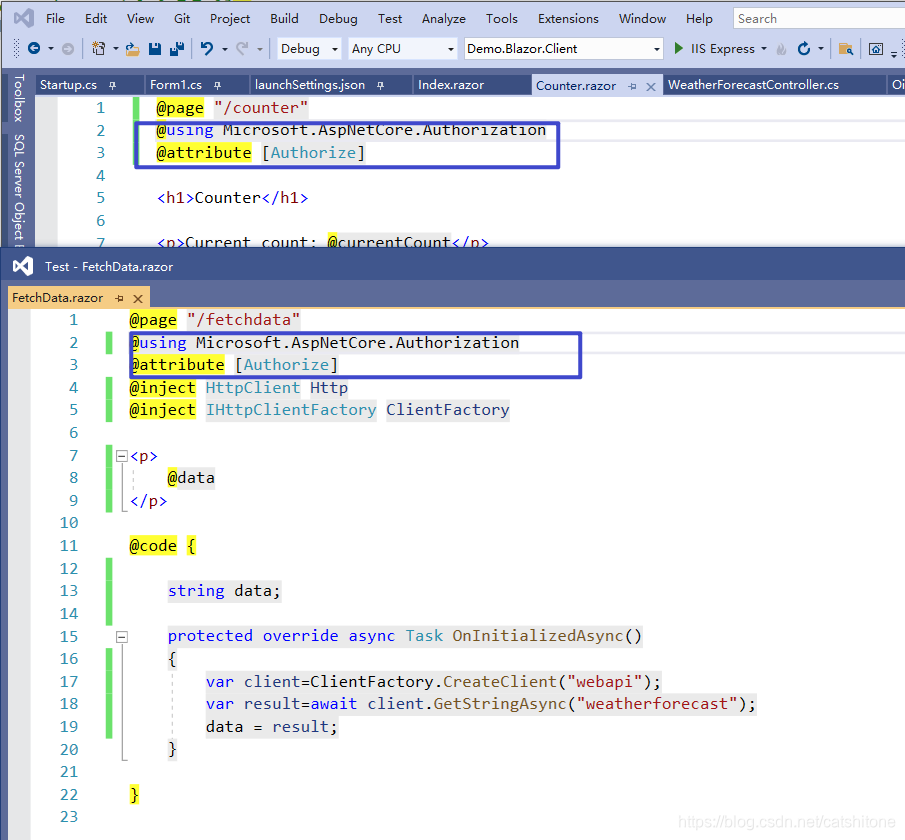
在FetchData页面,我们还请求了之前的WebApi应用,获取天气数据,会请求到http://localhost:6001/weatherforecast。还注入另外一个HttpClient,用这个实例可以请求到host上的服务。
5. 整合测试
在整合测试之前,我们再回顾已下几个要点:
- 我们用的是OpenId 授权码模式
- IdentityServer的端口是:5000
- WeiApi的端口是:6001
- Blazor应用的端口是:7000
确认以上几点没有问题之后,我们就可以开始调试项目了。我们先启动IdentityServer,然后尝试进行登录,不出意外的话,会遇到如下问题:
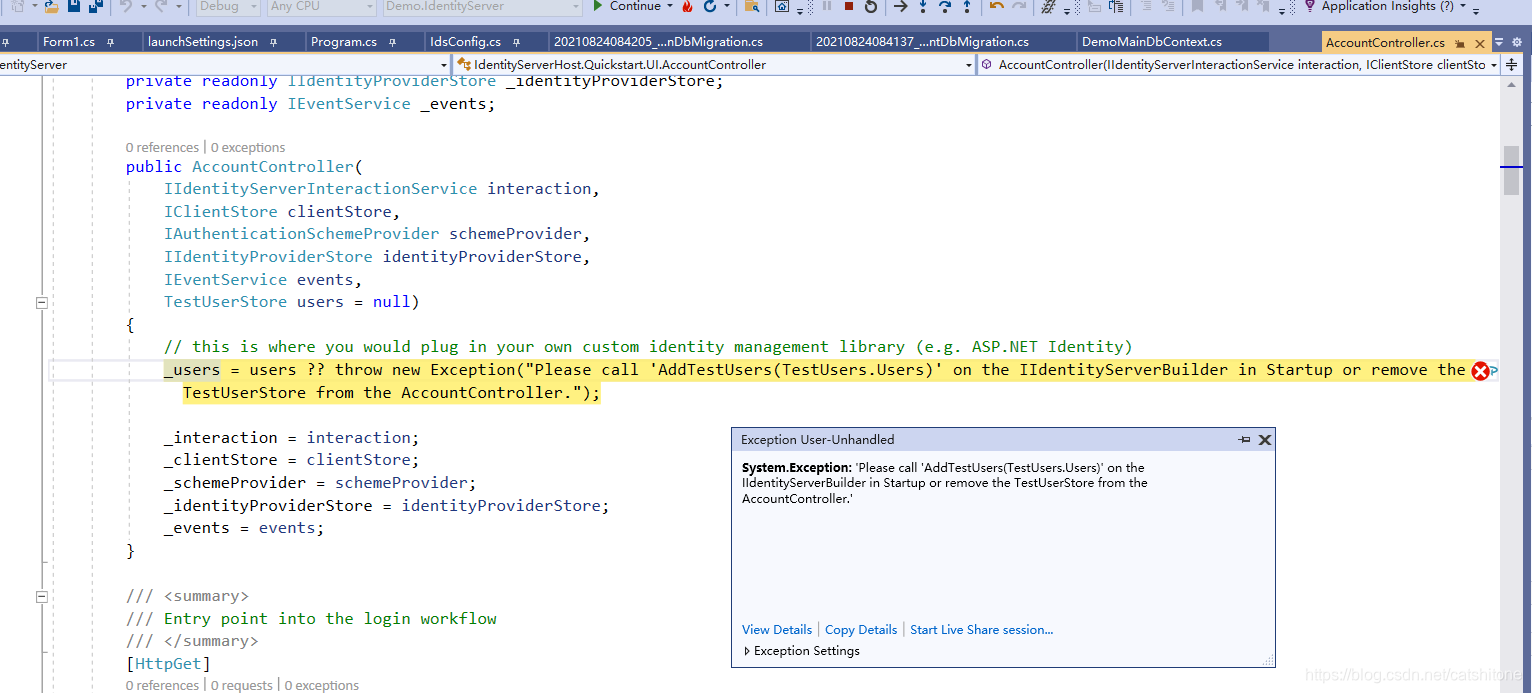
这是因为我们之前说过不用TestUser,而是使用自己数据库的用户数据。所以需要对AccountController进行改造,主要是更改Login方法,这个比较简单,就不做介绍了。
调整之后启动项目,正常情况下应该有如下展示:

6. 其他
如果你使用的是资源拥有着凭着模式(ResourceOwnerPassword)且想使用自己数据库的用户进行验证该怎么办呢?则值需要实现IResourceOwnerPasswordValidator和IProfileService接口即可。具体可以参考下面的引用3。 这里我贴下代码仅供参考:
ResourceOwnerPasswordValidator.cs
public class ResourceOwnerPasswordValidator : IResourceOwnerPasswordValidator
{

    OpsDbContext dbContext;
    public ResourceOwnerPasswordValidator(OpsDbContext dbContext)
    {

        this.dbContext = dbContext;
    }
    public async Task ValidateAsync(ResourceOwnerPasswordValidationContext context)
    {

        try
        {

            var user = await dbContext.Users.FirstOrDefaultAsync(u => u.UserName == context.UserName);
            if (user != null)
            {

                if (user.Password == context.Password.ToSHA256())
                {

                    context.Result = new GrantValidationResult(subject: user.Id.ToString(), authenticationMethod: "custom", claims: GetUserClaims(user));
                    return;
                }
                context.Result = new GrantValidationResult(Duende.IdentityServer.Models.TokenRequestErrors.InvalidGrant, "密码错误");
            }
            context.Result = new GrantValidationResult(Duende.IdentityServer.Models.TokenRequestErrors.InvalidGrant, "用户不存在");
        }
        catch (Exception ex)
        {

            context.Result = new GrantValidationResult(Duende.IdentityServer.Models.TokenRequestErrors.InvalidGrant, $"出现异常:{
      ex.Message}");
        }
    }
    public static IEnumerable<Claim> GetUserClaims(StorageLayer.Entity.SysUser user)
    {

        return new Claim[]
        {

            new Claim("user_id", user.Id.ToString() ?? ""),
            new Claim(JwtClaimTypes.Name, user.UserName),
            new Claim(JwtClaimTypes.Email, user.Email?? ""),
            new Claim("some_claim_you_want_to_see", user.CreateTime.ToString()),
            //roles
            new Claim(JwtClaimTypes.Role, "管理员")
        };
    }
}
ProfileService.cs
public class ProfileService : IProfileService
{

    OpsDbContext dbContext;
    public ProfileService(OpsDbContext dbContext)
    {

        this.dbContext = dbContext;
    }
    //Get user profile date in terms of claims when calling /connect/userinfo
    public async Task GetProfileDataAsync(ProfileDataRequestContext context)
    {

        //depending on the scope accessing the user data.
        if (!string.IsNullOrEmpty(context.Subject.Identity.Name))
        {

            //get user from db (in my case this is by email)
            var user = await dbContext.Users.FirstOrDefaultAsync(u=>u.UserName== context.Subject.Identity.Name);
            if (user != null)
            {

                var claims = ResourceOwnerPasswordValidator.GetUserClaims(user);
                //set issued claims to return
                context.IssuedClaims = claims.Where(x => context.RequestedClaimTypes.Contains(x.Type)).ToList();
            }
        }
        else
        {

            //get subject from context (this was set ResourceOwnerPasswordValidator.ValidateAsync),
            //where and subject was set to my user id.
            var userId = context.Subject.Claims.FirstOrDefault(x => x.Type == "sub");
            if (!string.IsNullOrEmpty(userId?.Value) && long.Parse(userId.Value) > 0)
            {

                //get user from db (find user by user id)
                var user = await dbContext.Users.FindAsync(long.Parse(userId.Value));
                // issue the claims for the user
                if (user != null)
                {

                    var claims = ResourceOwnerPasswordValidator.GetUserClaims(user);
                    context.IssuedClaims = claims.Where(x => context.RequestedClaimTypes.Contains(x.Type)).ToList();
                }
            }
        }
    }
    public Task IsActiveAsync(IsActiveContext context)
    {

        get subject from context (set in ResourceOwnerPasswordValidator.ValidateAsync),
        //var userId = context.Subject.Claims.FirstOrDefault(x => x.Type == "user_id");
        //if (!string.IsNullOrEmpty(userId?.Value) && long.Parse(userId.Value) > 0)
        //{

        //    var user = await _userRepository.FindAsync(long.Parse(userId.Value));
        //    if (user != null)
        //    {

        //        if (user.IsActive)
        //        {

        //            context.IsActive = user.IsActive;
        //        }
        //    }
        //}
        return Task.CompletedTask;
    }
}
最后,进行注册:
public void ConfigureServices(IServiceCollection services)
{

    services.AddSqlService(Configuration, "SysOpsConStr");
    services.AddCors(opt =>
    {

        opt.AddPolicy("allowAll", builder =>
        {

            builder.AllowAnyOrigin().AllowAnyMethod().AllowAnyHeader();
        });
    });
    var conStr = Configuration.GetConnectionString("SysIdsConStr");
    var migrationAsm = typeof(Startup).GetTypeInfo().Assembly.GetName().Name;
    services.AddIdentityServer(opt =>
    {

        opt.Authentication.CookieSameSiteMode = Microsoft.AspNetCore.Http.SameSiteMode.Strict;
    })
        .AddConfigurationStore(opt =>
        {

            opt.ConfigureDbContext = b => b.UseSqlServer(conStr, sql => sql.MigrationsAssembly(migrationAsm));
        })
        .AddOperationalStore(opt =>
        {

            opt.ConfigureDbContext = b => b.UseSqlServer(conStr, sql => sql.MigrationsAssembly(migrationAsm));
        });
    //进行注册
    services.AddTransient<IResourceOwnerPasswordValidator, ResourceOwnerPasswordValidator>();
    services.AddTransient<IProfileService, ProfileService>();

    services.AddControllersWithViews();
}
源代码在开源项目:Blazor-Treadstone
参考资料:
智能推荐
使用nginx解决浏览器跨域问题_nginx不停的xhr-程序员宅基地
文章浏览阅读1k次。通过使用ajax方法跨域请求是浏览器所不允许的,浏览器出于安全考虑是禁止的。警告信息如下:不过jQuery对跨域问题也有解决方案,使用jsonp的方式解决,方法如下:$.ajax({ async:false, url: 'http://www.mysite.com/demo.do', // 跨域URL ty..._nginx不停的xhr
在 Oracle 中配置 extproc 以访问 ST_Geometry-程序员宅基地
文章浏览阅读2k次。关于在 Oracle 中配置 extproc 以访问 ST_Geometry,也就是我们所说的 使用空间SQL 的方法,官方文档链接如下。http://desktop.arcgis.com/zh-cn/arcmap/latest/manage-data/gdbs-in-oracle/configure-oracle-extproc.htm其实简单总结一下,主要就分为以下几个步骤。..._extproc
Linux C++ gbk转为utf-8_linux c++ gbk->utf8-程序员宅基地
文章浏览阅读1.5w次。linux下没有上面的两个函数,需要使用函数 mbstowcs和wcstombsmbstowcs将多字节编码转换为宽字节编码wcstombs将宽字节编码转换为多字节编码这两个函数,转换过程中受到系统编码类型的影响,需要通过设置来设定转换前和转换后的编码类型。通过函数setlocale进行系统编码的设置。linux下输入命名locale -a查看系统支持的编码_linux c++ gbk->utf8
IMP-00009: 导出文件异常结束-程序员宅基地
文章浏览阅读750次。今天准备从生产库向测试库进行数据导入,结果在imp导入的时候遇到“ IMP-00009:导出文件异常结束” 错误,google一下,发现可能有如下原因导致imp的数据太大,没有写buffer和commit两个数据库字符集不同从低版本exp的dmp文件,向高版本imp导出的dmp文件出错传输dmp文件时,文件损坏解决办法:imp时指定..._imp-00009导出文件异常结束
python程序员需要深入掌握的技能_Python用数据说明程序员需要掌握的技能-程序员宅基地
文章浏览阅读143次。当下是一个大数据的时代,各个行业都离不开数据的支持。因此,网络爬虫就应运而生。网络爬虫当下最为火热的是Python,Python开发爬虫相对简单,而且功能库相当完善,力压众多开发语言。本次教程我们爬取前程无忧的招聘信息来分析Python程序员需要掌握那些编程技术。首先在谷歌浏览器打开前程无忧的首页,按F12打开浏览器的开发者工具。浏览器开发者工具是用于捕捉网站的请求信息,通过分析请求信息可以了解请..._初级python程序员能力要求
Spring @Service生成bean名称的规则(当类的名字是以两个或以上的大写字母开头的话,bean的名字会与类名保持一致)_@service beanname-程序员宅基地
文章浏览阅读7.6k次,点赞2次,收藏6次。@Service标注的bean,类名:ABDemoService查看源码后发现,原来是经过一个特殊处理:当类的名字是以两个或以上的大写字母开头的话,bean的名字会与类名保持一致public class AnnotationBeanNameGenerator implements BeanNameGenerator { private static final String C..._@service beanname
随便推点
二叉树的各种创建方法_二叉树的建立-程序员宅基地
文章浏览阅读6.9w次,点赞73次,收藏463次。1.前序创建#include<stdio.h>#include<string.h>#include<stdlib.h>#include<malloc.h>#include<iostream>#include<stack>#include<queue>using namespace std;typed_二叉树的建立
解决asp.net导出excel时中文文件名乱码_asp.net utf8 导出中文字符乱码-程序员宅基地
文章浏览阅读7.1k次。在Asp.net上使用Excel导出功能,如果文件名出现中文,便会以乱码视之。 解决方法: fileName = HttpUtility.UrlEncode(fileName, System.Text.Encoding.UTF8);_asp.net utf8 导出中文字符乱码
笔记-编译原理-实验一-词法分析器设计_对pl/0作以下修改扩充。增加单词-程序员宅基地
文章浏览阅读2.1k次,点赞4次,收藏23次。第一次实验 词法分析实验报告设计思想词法分析的主要任务是根据文法的词汇表以及对应约定的编码进行一定的识别,找出文件中所有的合法的单词,并给出一定的信息作为最后的结果,用于后续语法分析程序的使用;本实验针对 PL/0 语言 的文法、词汇表编写一个词法分析程序,对于每个单词根据词汇表输出: (单词种类, 单词的值) 二元对。词汇表:种别编码单词符号助记符0beginb..._对pl/0作以下修改扩充。增加单词
android adb shell 权限,android adb shell权限被拒绝-程序员宅基地
文章浏览阅读773次。我在使用adb.exe时遇到了麻烦.我想使用与bash相同的adb.exe shell提示符,所以我决定更改默认的bash二进制文件(当然二进制文件是交叉编译的,一切都很完美)更改bash二进制文件遵循以下顺序> adb remount> adb push bash / system / bin /> adb shell> cd / system / bin> chm..._adb shell mv 权限
投影仪-相机标定_相机-投影仪标定-程序员宅基地
文章浏览阅读6.8k次,点赞12次,收藏125次。1. 单目相机标定引言相机标定已经研究多年,标定的算法可以分为基于摄影测量的标定和自标定。其中,应用最为广泛的还是张正友标定法。这是一种简单灵活、高鲁棒性、低成本的相机标定算法。仅需要一台相机和一块平面标定板构建相机标定系统,在标定过程中,相机拍摄多个角度下(至少两个角度,推荐10~20个角度)的标定板图像(相机和标定板都可以移动),即可对相机的内外参数进行标定。下面介绍张氏标定法(以下也这么称呼)的原理。原理相机模型和单应矩阵相机标定,就是对相机的内外参数进行计算的过程,从而得到物体到图像的投影_相机-投影仪标定
Wayland架构、渲染、硬件支持-程序员宅基地
文章浏览阅读2.2k次。文章目录Wayland 架构Wayland 渲染Wayland的 硬件支持简 述: 翻译一篇关于和 wayland 有关的技术文章, 其英文标题为Wayland Architecture .Wayland 架构若是想要更好的理解 Wayland 架构及其与 X (X11 or X Window System) 结构;一种很好的方法是将事件从输入设备就开始跟踪, 查看期间所有的屏幕上出现的变化。这就是我们现在对 X 的理解。 内核是从一个输入设备中获取一个事件,并通过 evdev 输入_wayland