jetpack compose原理解析-程序员宅基地
技术标签: jetpack compose android jetpack
目录
jetpack compose原理解析
jetpack compse
Jetpack Compose是Google在2019 I/O大会上公布开源的一个非捆绑工具包。Jetpack Compose是用于构建原生Android UI的现代工具包。 Jetpack Compose使用更少的代码,强大的工具和直观的Kotlin API,简化并加速了Android上的UI开发。最为重要的是jetpack compose基于响应式架构构建,完美支持响应式开发。不过目前仅有预览版,正式版还没确定,本文也是基于当前预览版对其原理进行简单分析。
声明式ui开发
在我们了解其原理之前,我们需要明白一个概念–声明式ui开发。何为声明式ui,与之相对应的还有一个命令式ui开发,目前我们安卓ui开发的大多数模式即为命令式ui开发,即我们创建了一个widget之后,需要重新获取这个widget实例,然后通过调用相关函数(即命令)改变其属性,比如以下我们常见的代码
var times = 0
val button:Button = findViewById(R.id.button)
val textView:TextView = findViewById(R.id.text)
button.setOnClickListener{

			++times
           textView.text="click times:${
      times}"
           }
上诉代码非常简单,实现功能也非常清楚,即一个textview用来展示button的点击次数,我们可以发现每次改变textview的文本,我们需要获取textView的实例然后调用setText这个命令去改变其文本,而声明式ui则不同,通常他会有一个状态(如flutter的widget)用来描述当前界面(状态通常是不可变的,每次变化均会产生新的实例),然后我们只需要根据其状态声明下当前界面,比如使用flutter来实现上诉功能的代码如下
class MyHomePage extends StatefulWidget {

  MyHomePage({
    Key key, this.title}) : super(key: key);
  final String title;

  @override
  _MyHomePageState createState() => _MyHomePageState();
}

class _MyHomePageState extends State<MyHomePage> {

  int _counter = 0;

  void _incrementCounter() {

    setState(() {

      _counter++;
    });
  }

  @override
  Widget build(BuildContext context) {

    return Scaffold(
      appBar: AppBar(
        title: Text(widget.title),
      ),
      body: Center(
        child: Column(
          mainAxisAlignment: MainAxisAlignment.center,
          children: <Widget>[
            Text(
              'click times:',
            ),
            Container(
                width: 20,
                height: 20,
                child: Text(
                  '$_counter',
                  style: Theme.of(context).textTheme.headline4,
                )),
          ],
        ),
      ),
      floatingActionButton: FloatingActionButton(
        onPressed: _incrementCounter,
        tooltip: 'Increment',
        child: Icon(Icons.add),
      ),
    );
  }
}
(这里为什么使用flutter代码来展示,因为我觉得jetpack compose通过注解隐藏了太多实现细节,初学者可能不太好理解,而flutter则不同,从直观上更好理解)
可以看到每次状态改变,我们都是通过build函数重新声明了界面布局,然后重新展示即可(这里StatefulWidget和State感兴趣的同学可以去了解下flutter开发,不属于本文所要讲解的范围,只需要通过该例子了解声明式开发的特点即可,可以简单的理解下每次button click的setState都会触发State.build函数重新声明布局)。这就是声明式ui和命令式ui的不同之处,从中我们也可以很快的发现声明式ui的好处,可以让我们开发更聚焦于状态的变化以及逻辑的实现,而不是在界面上,我们只需要根据当前呢的状态声明对应的ui布局即可,而且我们可以根据状态方便的进行界面重建等工作,这对于移动式开发非常友好。不过我们也可以发现其缺点,即每次重建带来的性能损耗,即使所有声明式框架都会有对应的算法在底层对组件(这里指的是渲染以及布局相关的组件,不是flutter的widget,对应于flutter即是element和renderobject)进行最大程度的复用(如react的virutal dom ,flutter的element diff 以及jetpack compose的gap buffert等),不过即使如此,在性能上对比命令式ui还是有一定损耗(不过目前来说,性能已经不是界面开发的首要考虑因素)。
接下来我们就来探索下安卓未来的ui构建方式jetpack compose的底层实现原理,不过为了更好的了解本文,大家可以先去阅读下面这篇文章
jetpack compose思想介绍
这篇文章从实现原理的层面讲解了jetpack compose,我也是基于这篇文章以及源码来去探究jetpack compose的。同时大家也会发现jetpack compose和flutter一些api的相似之处,本篇文章我也会对两者进行对比来分析下两者实现的异同
原理分析
jetpack compose从名字就可以看出,该框架基于组合优于继承的理念构建,这也是函数式响应式编程所提倡的。一开始接触jetpack compose,我第一直觉是基于安卓现有的view体系架构进行封装,尽可能的复用当前组件,但是了解后发现其实不然,jetpack compose抛弃了原有安卓view的体系,完全重新实现了一套新的ui体系(目前jetpack compose不过也提供了使用兼容原有view的方法),对此谷歌给出的解释是原有的view体系过于庞大,并且理念过于陈旧,不如借当前机会不破不立,完全基于新的理念来重新实现一套现代的ui体系。
整体框架介绍
我们大家清楚,ui最终可以使用树的形式来描述,compose也是一样,他最终是LayoutNode的一棵树,不过为了实现声明式ui的特点我们需要将配置和绘制进行分离,同时还需要在适当的时机进行node复用,所以compose借助于注解用来实现相关细节,对于compose来说整体的ui框架大致是这样的
1.@Composable 注解的函数 这里是ui的声明和配置,这也是直接面向开发者的
2.基于注解和Composer 的具体细节实现 这里实现了LayoutNode的缓存以及复用,同时也实现了对于属性变化的监听
3.LayoutNode主要用于布局和绘制
熟悉flutter开发的同学都知道,flutter中有重要的三棵树 widget 、element和renderobject。
1.widget是对ui的描述
2.element是对组件的复用
3.renderobject用于布局和绘制
我们将两者进行对比,其实发现两者有很多的相似之处,虽然实现的方式天差地别,但是其思想却是相通的(不过我个人觉得flutter的实现方式更容易理解点,compose隐藏了太多细节和运用了太多高级封装,在进行原理分析上难度可能比较大)
compose LayoutNode布局介绍
其实flutter和compose两者不仅仅思想上比较类似,在布局的实现上两者也都差不多,compose采用了和flutter一样的布局方式即盒约束(盒约束是指widget可以按照指定限制条件来决定自身如何占用布局空间,所谓的“盒”即指自身的渲染框。有关于盒约束介绍,可以查看这篇文章flutter盒约束),这个我们可以在LayoutNode的源码中看到
这里即用来计算布局空间约束,同样在布局过程中传递的参数Constraints 可以看出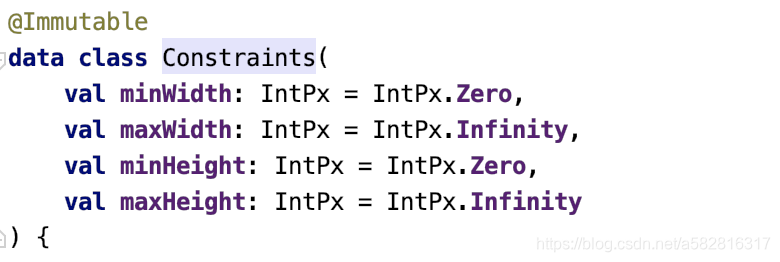
这里和flutter的盒约束类似,了解flutter的同学应该知道,flutter布局过程中有一个relayout boundary(重布局边界约束)这个优化条件用来加快布局,即我们的view在重布局过程中如果遇到重布局边界,将不会继续向上传递布局请求,因为这个view无论怎么变化,将不会影响父view的布局,所以父view将不需要重新布局,一开始基于两者布局的相似性我也认为compose也会采用相关优化方法,不过继续追踪代码发现并没有,这里不清楚为什么,或者后续正式版有可能会加上这个优化,这部分代码在MeasureAndLayoutDelegate 的requestRelayout中可以看到
  /**
     * Requests remeasure for this [layoutNode] and nodes affected by its measure result.
     *
     * @return returns true if the [measureAndLayout] execution should be scheduled as a result
     * of the request.
     */
    fun requestRemeasure(layoutNode: LayoutNode): Boolean {

        return trace("AndroidOwner:onRequestMeasure") {

            layoutNode.requireOwner()
            if (layoutNode.isMeasuring) {

                // we're already measuring it, let's swallow. example when it happens: we compose
                // DataNode inside WithConstraints, this calls onRequestMeasure on DataNode's
                // parent, but this parent is WithConstraints which is currently measuring.
                return false
            }
            if (layoutNode.needsRemeasure) {

                // requestMeasure has already been called for this node
                return false
            }
            if (layoutNode.isLayingOut) {

                // requestMeasure is currently laying out and it is incorrect to request remeasure
                // now, let's postpone it.
                layoutNode.markRemeasureRequested()
                postponedMeasureRequests.add(layoutNode)
                consistencyChecker?.assertConsistent()
                return false
            }

            // find root of layout request:
            var layout = layoutNode
            while (layout.affectsParentSize && layout.parent != null) {

                val parent = layout.parent!!
                if (parent.isMeasuring || parent.isLayingOut) {

                    if (!layout.needsRemeasure) {

                        layout.markRemeasureRequested()
                        // parent is currently measuring and we set needsRemeasure to true so if
                        // the parent didn't yet try to measure the node it will remeasure it.
                        // if the parent didn't plan to measure during this pass then needsRemeasure
                        // stay 'true' and we will manually call 'onRequestMeasure' for all
                        // the not-measured nodes in 'postponedMeasureRequests'.
                        postponedMeasureRequests.add(layout)
                    }
                    consistencyChecker?.assertConsistent()
                    return false
                } else {

                    layout.markRemeasureRequested()
                    if (parent.needsRemeasure) {

                        // don't need to do anything else since the parent is already scheduled
                        // for a remeasuring
                        consistencyChecker?.assertConsistent()
                        return false
                    }
                    layout = parent
                }
            }
            layout.markRemeasureRequested()

            requestRelayout(layout.parent ?: layout)
        }
    }
虽然在往上传递布局请求时候会有affectsParentSize判断,但是这个属性赋值代码如下
        // The more idiomatic, `if (parentLayoutNode?.isMeasuring == true)` causes boxing
        affectsParentSize = parent != null && parent.isMeasuring == true
经过分析代码发现这个属性只是简单判断父亲有没有正在测量布局,并不是重布局边界,并且我定义了一个固定大小的Text当改变其属性时,依然会将测量请求传递至rootview验证了我的结论(这里我不是非常确定,只是基于我的代码和所看到的进行分析)
@Composeable注解实现细节
接下来我们再来看下@Composeable注解到底做了啥,这部分代码不好直接查看,因为他是基于koltin注解去动态生成的,我在studio中并没有直接找到生成的相关代码,我是采用这种方法去查看的,先编译出一个apk 然后将其中的classes.dex文件进行反编译成jar文件,再将jar文件引入任意一个安卓工程中,即可查看相关代码
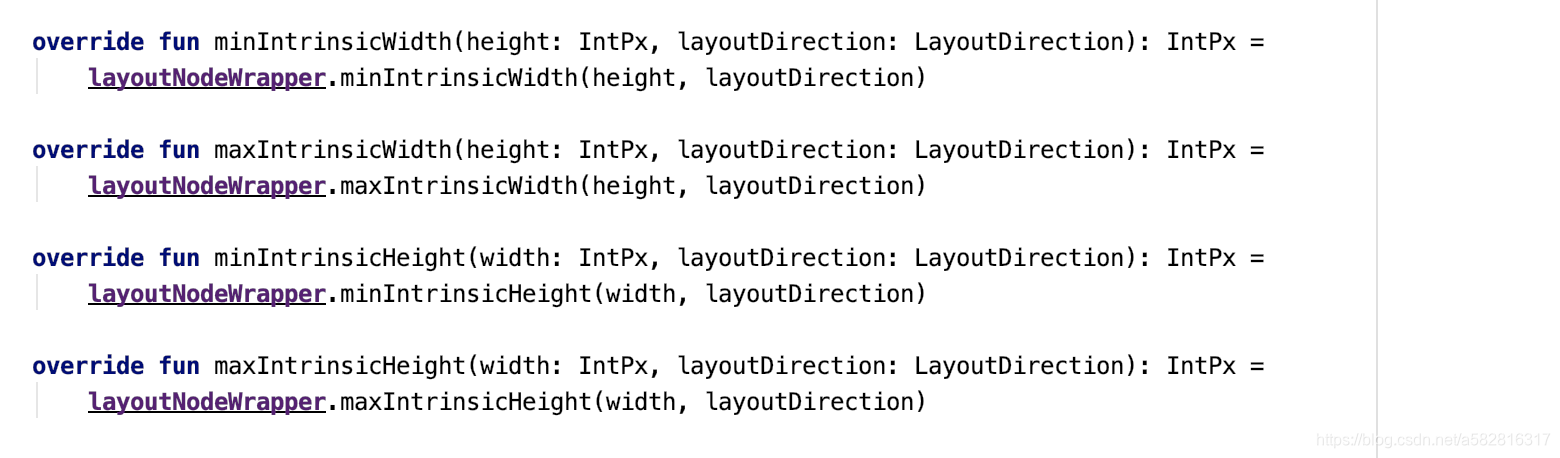
我们先来看下Layout所对应的代码,这是compose布局的基础类,如Column都是基于它实现,它对应的原函数如下
/**
 * [Layout] is the main core component for layout. It can be used to measure and position
 * zero or more children.
 *
 * Intrinsic measurement blocks define the intrinsic sizes of the current layout. These
 * can be queried by the parent in order to understand, in specific cases, what constraints
 * should the layout be measured with:
 * - [minIntrinsicWidthMeasureBlock] defines the minimum width this layout can take, given
 *   a specific height, such that the content of the layout will be painted correctly
 * - [minIntrinsicHeightMeasureBlock] defines the minimum height this layout can take, given
 *   a specific width, such that the content of the layout will be painted correctly
 * - [maxIntrinsicWidthMeasureBlock] defines the minimum width such that increasing it further
 *   will not decrease the minimum intrinsic height
 * - [maxIntrinsicHeightMeasureBlock] defines the minimum height such that increasing it further
 *   will not decrease the minimum intrinsic width
 *
 * For a composable able to define its content according to the incoming constraints,
 * see [WithConstraints].
 *
 * Example usage:
 * @sample androidx.ui.core.samples.LayoutWithProvidedIntrinsicsUsage
 *
 * @param children The children composable to be laid out.
 * @param modifier Modifiers to be applied to the layout.
 * @param minIntrinsicWidthMeasureBlock The minimum intrinsic width of the layout.
 * @param minIntrinsicHeightMeasureBlock The minimum intrinsic height of the layout.
 * @param maxIntrinsicWidthMeasureBlock The maximum intrinsic width of the layout.
 * @param maxIntrinsicHeightMeasureBlock The maximum intrinsic height of the layout.
 * @param measureBlock The block defining the measurement and positioning of the layout.
 *
 * @see Layout
 * @see WithConstraints
 */
@Composable
/*inline*/ fun Layout(
    /*crossinline*/
    children: @Composable () -> Unit,
    /*crossinline*/
    minIntrinsicWidthMeasureBlock: IntrinsicMeasureBlock,
    /*crossinline*/
    minIntrinsicHeightMeasureBlock: IntrinsicMeasureBlock,
    /*crossinline*/
    maxIntrinsicWidthMeasureBlock: IntrinsicMeasureBlock,
    /*crossinline*/
    maxIntrinsicHeightMeasureBlock: IntrinsicMeasureBlock,
    modifier: Modifier = Modifier,
    /*crossinline*/
    measureBlock: MeasureBlock
) {

    val measureBlocks = object : LayoutNode.MeasureBlocks {

        override fun measure(
            measureScope: MeasureScope,
            measurables: List<Measurable>,
            constraints: Constraints,
            layoutDirection: LayoutDirection
        ) = measureScope.measureBlock(measurables, constraints, layoutDirection)
        override fun minIntrinsicWidth(
            intrinsicMeasureScope: IntrinsicMeasureScope,
            measurables: List<IntrinsicMeasurable>,
            h: IntPx,
            layoutDirection: LayoutDirection
        ) = intrinsicMeasureScope.minIntrinsicWidthMeasureBlock(measurables, h, layoutDirection)
        override fun minIntrinsicHeight(
            intrinsicMeasureScope: IntrinsicMeasureScope,
            measurables: List<IntrinsicMeasurable>,
            w: IntPx,
            layoutDirection: LayoutDirection
        ) = intrinsicMeasureScope.minIntrinsicHeightMeasureBlock(measurables, w, layoutDirection)
        override fun maxIntrinsicWidth(
            intrinsicMeasureScope: IntrinsicMeasureScope,
            measurables: List<IntrinsicMeasurable>,
            h: IntPx,
            layoutDirection: LayoutDirection
        ) = intrinsicMeasureScope.maxIntrinsicWidthMeasureBlock(measurables, h, layoutDirection)
        override fun maxIntrinsicHeight(
            intrinsicMeasureScope: IntrinsicMeasureScope,
            measurables: List<IntrinsicMeasurable>,
            w: IntPx,
            layoutDirection: LayoutDirection
        ) = intrinsicMeasureScope.maxIntrinsicHeightMeasureBlock(measurables, w, layoutDirection)
    }
    Layout(children, measureBlocks, modifier)
}

/**
 * [Layout] is the main core component for layout. It can be used to measure and position
 * zero or more children.
 *
 * The intrinsic measurements of this layout will be calculated by running the measureBlock,
 * while swapping measure calls with appropriate intrinsic measurements. Note that these
 * provided implementations will not be accurate in all cases - when this happens, the other
 * overload of [Layout] should be used to provide correct measurements.
 *
 * For a composable able to define its content according to the incoming constraints,
 * see [WithConstraints].
 *
 * Example usage:
 * @sample androidx.ui.core.samples.LayoutUsage
 *
 * @param children The children composable to be laid out.
 * @param modifier Modifiers to be applied to the layout.
 * @param measureBlock The block defining the measurement and positioning of the layout.
 *
 * @see Layout
 * @see WithConstraints
 */
@Composable
/*inline*/ fun Layout(
    /*crossinline*/
    children: @Composable () -> Unit,
    modifier: Modifier = Modifier,
    /*noinline*/
    measureBlock: MeasureBlock
) {


    val measureBlocks = remember(measureBlock) {
     MeasuringIntrinsicsMeasureBlocks(measureBlock) }
    Layout(children, measureBlocks, modifier)
}

/*@PublishedApi*/ @Composable internal /*inline*/ fun Layout(
    /*crossinline*/
    children: @Composable () -> Unit,
    measureBlocks: LayoutNode.MeasureBlocks,
    modifier: Modifier
) {

    LayoutNode(modifier = currentComposer.materialize(modifier), measureBlocks = measureBlocks) {

        children()
    }
}
注解生成后的代码如下
public static final void Layout(final Function3 var0, final MeasureBlocks var1, final Modifier var2, Composer var3, int var4, final int var5) {

      Intrinsics.checkNotNullParameter(var0, "children");
      Intrinsics.checkNotNullParameter(var1, "measureBlocks");
      Intrinsics.checkNotNullParameter(var2, "modifier");
      var3.startRestartGroup(var4);
      Modifier var8 = ComposedModifierKt.materialize(var3, var2);
      UiComposer var7 = (UiComposer)var3;
      var7.startNode(1043845699);
      LayoutNode var6;
      if (var7.getInserting()) {

         var6 = new LayoutNode();
         var7.emitNode(var6);
      } else {

         var6 = (LayoutNode)var7.useNode();
      }

      ComposerUpdater var11 = new ComposerUpdater((Composer)var7, var6);
      Composer var9 = var11.getComposer();
      if (var9.getInserting() || !Intrinsics.areEqual(var9.nextSlot(), var8)) {

         var9.updateValue(var8);
         ((LayoutNode)var11.getNode()).setModifier(var8);
      }

      Composer var12 = var11.getComposer();
      if (var12.getInserting() || !Intrinsics.areEqual(var12.nextSlot(), var1)) {

         var12.updateValue(var1);
         ((LayoutNode)var11.getNode()).setMeasureBlocks(var1);
      }

      var0.invoke(var3, 495126159, var5 & 6);
      var7.endNode();
      ScopeUpdateScope var10 = var3.endRestartGroup();
      if (var10 != null) {

         var10.updateScope((Function3)(new Function3() {

            // $FF: synthetic method
            // $FF: bridge method
            public Object invoke(Object var1x, Object var2x, Object var3) {

               this.invoke((Composer)var1x, ((Number)var2x).intValue(), ((Number)var3).intValue());
               return Unit.INSTANCE;
            }

            public final void invoke(Composer var1x, int var2x, int var3) {

               LayoutKt.Layout(var0, var1, var2, var1x, var2x, var5 | 1);
            }
         }));
      }
   }
我们可以看到注解帮我们自动处理了node的创建 复用 以及更新,这里面我们主要借助Composer类来对node进行管理,而@Composeable注解的函数最终会生成一个RestartableFunction函数,即上述代码的var0
关于 LayoutNode的复用,compose这里比较复杂,使用了一个叫gap buffer的方法来进行layoutnode的缓存和基于位置记忆来判断是否复用,这一块我目前了解的还不是非常透彻,不过大家可以先简单的认为是一个数组用来保存不同位置的信息,然后取出信息进行对比,这块相关的代码在SlotTable这个类以及相关类中,大家感兴趣的话可以了解下,后面如果我对这块有更深的了解会专门写一篇文章进行介绍。
属性更新
compose使用state来标记属性状态,state标记的属性只要发生变化即会自动通知界面更新,我们接下来来探索这部分的实现原理,先看以下代码
@Composable
fun Greeting(name: String) {

    var count by state {
     0 }
    Column {

        Text(text = "click times:${
      count}")
        Button(onClick = {

            ++count
        }) {

            Text("button")
        }
    }
}
其注解生成的代码如下
public static final void Greeting(final String var0, Composer var1, int var2, final int var3) {

      Intrinsics.checkParameterIsNotNull(var0, "name");
      var1.startRestartGroup(var2);
      if ((var3 & 6) == 0) {

         byte var7;
         if (var1.changed(var0)) {

            var7 = 4;
         } else {

            var7 = 2;
         }

         var2 = var7 | var3;
      } else {

         var2 = var3;
      }

      if ((var2 & 3 ^ 2) == 0 && var1.getSkipping()) {

         var1.skipToGroupEnd();
      } else {

         var1.startReplaceableGroup(-1469557643);
         Function2 var4;
         if (true & true) {

            var4 = MutableStateKt.getReferentiallyEqual();
         } else {

            var4 = null;
         }

         var1.startReplaceableGroup(701502689);
         Object var5 = var1.nextSlot();
         Object var8;
         if (var5 != SlotTable.Companion.getEMPTY()) {

            var8 = var5;
         } else {

            var8 = MutableStateKt.mutableStateOf(0, var4);
            var1.updateValue(var8);
         }

         var1.endReplaceableGroup();
         final MutableState var9 = (MutableState)var8;
         var1.endReplaceableGroup();
         ColumnKt.Column((Modifier)null, (Vertical)null, (Horizontal)null, (Function4)RestartableFunctionKt.restartableFunction(var1, -756387618, true, new Function4() {

            // $FF: synthetic method
            // $FF: bridge method
            public Object invoke(Object var1, Object var2, Object var3, Object var4) {

               this.invoke((ColumnScope)var1, (Composer)var2, ((Number)var3).intValue(), ((Number)var4).intValue());
               return Unit.INSTANCE;
            }

            public final void invoke(ColumnScope var1, Composer var2, int var3, int var4) {

               Intrinsics.checkParameterIsNotNull(var1, "<this>");
               if (((var4 | 6) & 11 ^ 10) == 0 && var2.getSkipping()) {

                  var2.skipToGroupEnd();
               } else {

                  TextKt.Text-bHUNS4Y(Intrinsics.stringPlus("click times:", MainActivityKt.Greeting$lambda-1(var9)), (Modifier)null, Color.constructor-VKZWuLQ(ULong.constructor-impl(0L)), TextUnit.constructor-impl(0L), (FontStyle)null, (FontFamily)null, TextUnit.constructor-impl(0L), (TextDecoration)null, (TextAlign)null, TextUnit.constructor-impl(0L), (TextOverflow)null, false, 0, (Map)null, (Function1)null, (TextStyle)null, var2, 537342775, 0, 0, 65534);
                  final MutableState var5 = var9;
                  var2.startReplaceableGroup(537342836);
                  Object var6 = var2.nextSlot();
                  if (var6 == SlotTable.Companion.getEMPTY()) {

                     var6 = new Function0() {

                        // $FF: synthetic method
                        // $FF: bridge method
                        public Object invoke() {

                           this.invoke();
                           return Unit.INSTANCE;
                        }

                        public final void invoke() {

                           MutableState var1 = var5;
                           MainActivityKt.Greeting$lambda-2(var1, MainActivityKt.Greeting$lambda-1(var1) + 1);
                           MainActivityKt.Greeting$lambda-1(var5);
                        }
                     };
                     var2.updateValue(var6);
                  }

                  var2.endReplaceableGroup();
                  ButtonKt.Button-AidQf7c((Function0)var6, (Modifier)null, false, Dp.constructor-impl(0.0F), Dp.constructor-impl(0.0F), (Shape)null, (Border)null, Color.constructor-VKZWuLQ(ULong.constructor-impl(0L)), Color.constructor-VKZWuLQ(ULong.constructor-impl(0L)), Color.constructor-VKZWuLQ(ULong.constructor-impl(0L)), Color.constructor-VKZWuLQ(ULong.constructor-impl(0L)), (InnerPadding)null, (Function3)RestartableFunctionKt.restartableFunction(var2, -756387738, true, new Function3() {

                     // $FF: synthetic method
                     // $FF: bridge method
                     public Object invoke(Object var1, Object var2, Object var3) {

                        this.invoke((Composer)var1, ((Number)var2).intValue(), ((Number)var3).intValue());
                        return Unit.INSTANCE;
                     }

                     public final void invoke(Composer var1, int var2, int var3) {

                        if ((var3 & 3 ^ 2) == 0 && var1.getSkipping()) {

                           var1.skipToGroupEnd();
                        } else {

                           TextKt.Text-bHUNS4Y("button", (Modifier)null, Color.constructor-VKZWuLQ(ULong.constructor-impl(0L)), TextUnit.constructor-impl(0L), (FontStyle)null, (FontFamily)null, TextUnit.constructor-impl(0L), (TextDecoration)null, (TextAlign)null, TextUnit.constructor-impl(0L), (TextOverflow)null, false, 0, (Map)null, (Function1)null, (TextStyle)null, var1, -1162860348, 6, 0, 65534);
                        }
                     }
                  }), var2, 537342819, 0, 4094);
               }
            }
         }), var1, -1469557627, 0, 7);
      }

      ScopeUpdateScope var6 = var1.endRestartGroup();
      if (var6 != null) {

         var6.updateScope((Function3)(new Function3() {

            // $FF: synthetic method
            // $FF: bridge method
            public Object invoke(Object var1, Object var2, Object var3x) {

               this.invoke((Composer)var1, ((Number)var2).intValue(), ((Number)var3x).intValue());
               return Unit.INSTANCE;
            }

            public final void invoke(Composer var1, int var2, int var3x) {

               MainActivityKt.Greeting(var0, var1, var2, var3 | 1);
            }
         }));
      }
   }

   private static final int Greeting$lambda_1/* $FF was: Greeting$lambda-1*/(MutableState var0) {

      State var2 = (State)var0;
      KProperty var1 = $$delegatedProperties[0];
      return ((Number)var2.getValue()).intValue();
   }

   private static final void Greeting$lambda_2/* $FF was: Greeting$lambda-2*/(MutableState var0, int var1) {

      KProperty var2 = $$delegatedProperties[0];
      var0.setValue(var1);
   }
代码非常简单,即点击button 改变text文字,我们跟踪state可以发现,state最终是生成一个MutableState的变量,而我们改变其值最终都会调用起setValue函数
    @Suppress("UNCHECKED_CAST")
    override var value: T
        get() = next.readable(this).value
        set(value) = next.withCurrent {

            if (!areEquivalent(it.value, value)) {

                next.writable(this).value = value
            }
        }
这里会对属性进行判断,如果一样则不做变化,如果不一样则改变并记录值,这里next.writable来自于Frames类,写入新的值会触发writeObserver回调
/**
 * Return a writable frame record for the given record. It is assumed that this is called for the
 * first framed record in a frame object. If the frame is read-only calling this will throw. A
 * record is writable if it was created in the current writable frame. A writable record will always
 * be the readable record (as all newer records are invalid it must be the newest valid record).
 * This means that if the readable record is not from the current frame, a new record must be
 * created. To create a new writable record, a record can be reused, if possible, and the readable
 * record is applied to it. If a record cannot be reused, a new record is created and the readable
 * record is applied to it. Once the values are correct the record is made live by giving it the
 * current frame id.
 */
fun <T : Record> T.writable(framed: Framed, frame: Frame): T {

    if (frame.readonly) throw IllegalStateException("In a readonly frame")
    val id = frame.id
    val readData = readable<T>(this, id, frame.invalid)

    // If the readable data was born in this frame, it is writable.
    if (readData.frameId == frame.id) return readData

    // The first write to an framed in frame
    frame.writeObserver?.let {
     it(framed, false) }

    // Otherwise, make a copy of the readable data and mark it as born in this frame, making it
    // writable.
    val newData = synchronized(framed) {

        // Calling used() on a framed object might return the same record for each thread calling
        // used() therefore selecting the record to reuse should be guarded.

        // Note: setting the frameId to Int.MAX_VALUE will make it invalid for all frames. This
        // means we can release the lock on the object as used() will no longer select it. Using id
        // could also be used but it puts the object into a state where the reused value appears to
        // be the current valid value for the the frame. This is not an issue if the frame is only
        // being read from a single thread but using Int.MAX_VALUE allows multiple readers, single
        // writer, of a frame. Note that threads reading a mutating frame should not cache the
        // result of readable() as the mutating thread calls to writable() can change the result of
        // readable().
        @Suppress("UNCHECKED_CAST")
        (used(framed, id, frame.invalid) as T?)?.apply {
     frameId = Int.MAX_VALUE }
            ?: readData.create().apply {

                frameId = Int.MAX_VALUE; framed.prependFrameRecord(this as T)
            } as T
    }
    newData.assign(readData)
    newData.frameId = id

    frame.modified?.add(framed)

    return newData
}
而writeObserver回调由FramesManager注册
    private val writeObserver: (write: Any, isNew: Boolean) -> Unit = {
     value, isNew ->
        if (!commitPending) {

            commitPending = true
            schedule {

                commitPending = false
                nextFrame()
            }
        }
        recordWrite(value, isNew)
    }
这里会通知下一帧对数据进行改变,在nextFrame函数中
    fun nextFrame() {

        if (inFrame) {

            commit()
            open()
        }
    }
回调用commit提交当前帧的改变
/**
 * Commit the given frame. Throws FrameAborted if changes in the frame collides with the current
 * committed frame.
 */
fun commit(frame: Frame) {

    // NOTE: the this algorithm is currently does not guarantee a serializable frame operation as it
    // doesn't prevent crossing writes as described here https://arxiv.org/pdf/1412.2324.pdf

    // Just removing the frame from the open frame set is enough to make it visible, however, this
    // should only be done after first determining that there are no colliding writes in the commit.

    // A write is considered colliding if any write occurred on the object in a frame committed
    // since the frame was last opened. There is a trivial cases that can be dismissed immediately,
    // no writes occurred.
    val modified = frame.modified
    val id = frame.id
    val listeners = synchronized(sync) {

        if (!openFrames.get(id)) throw IllegalStateException("Frame not open")
        if (modified == null || modified.size == 0) {

            closeFrame(frame)
            emptyList()
        } else {

            // If there are modifications we need to ensure none of the modifications have
            // collisions.

            // A record is guaranteed not collide if no other write was performed to the record by a
            // committed frame since this frame was opened. No writes to a framed object occurred
            // if, ignoring this frame, the readable records for the framed object are the same. If
            // they are different, and the records could be merged, (such as considering writes to
            // different fields as not colliding) could be allowed here but, for now, the all writes
            // to a record are considered atomic. Additionally, if the field values can be merged
            // (e.g. using a conflict-free data type) this could also be allowed here.

            val current = openFrames
            val nextFrame = maxFrameId
            val start = frame.invalid.set(id)
            for (framed in frame.modified) {

                val first = framed.firstFrameRecord
                if (readable(
                        first,
                        nextFrame,
                        current
                    ) != readable(first, id, start)
                ) {

                    abort(frame)
                }
            }
            closeFrame(frame)
            commitListeners.toList()
        }
    }
    if (modified != null)
        for (commitListener in listeners) {

            commitListener(modified, frame)
        }
}
最终在commitListener 通知commitObserver进行重建,这里通过两个map获取需要重建的RecomposerScope,最终调用composer的invalidate对界面进行更新
private val commitObserver: (committed: Set<Any>, frame: Frame) -> Unit = {
     committed, frame ->
        trace("Model:commitTransaction") {

            val currentInvalidations = synchronized(lock) {

                val deferred = deferredMap.getValueOf(frame)
                val immediate = immediateMap.getValueOf(frame)
                // Ignore the object if its invalidations were all immediate for the frame.
                invalidations[committed.filter {

                    !immediate.contains(it) || deferred.contains(it)
                }]
            }
            if (currentInvalidations.isNotEmpty()) {

                if (!isMainThread()) {

                    schedule {

                        currentInvalidations.forEach {
     scope -> scope.invalidate() }
                    }
                } else {

                    currentInvalidations.forEach {
     scope -> scope.invalidate() }
                }
            }
        }
    }
这里invalidations的值会在composer获取值的时候记录每一个composer,所以当该值发生变化即可通知到composer刷新
    private val readObserver: (read: Any) -> Unit = {
     read ->
        currentComposerInternal?.currentRecomposeScope?.let {

            synchronized(lock) {

                it.used = true
                invalidations.add(read, it)
            }
        }
    }
小结
本篇文章简单的对jetpack compose ui大体架构实现原理进行简单的分析,不过由于目前我对这部分代码还没有完全搞清楚,只是大概了解其部分流程和架构,所以分析起来可能有点乱,部分地方并没有完全讲解清楚,后面我会继续对其源码进行进一步分析,会继续整理总结,争取完全理清相关原理
智能推荐
在Ubuntu上安装更轻量且响应更快的XFCE桌面环境_ubuntu xfce-程序员宅基地
文章浏览阅读3k次。通过安装XFCE桌面环境,你可以在Ubuntu上获得更轻量级和响应更快的桌面体验。在本文中,我们介绍了安装XFCE的步骤,包括更新系统、安装XFCE、配置默认的显示管理器和选择XFCE桌面环境。如果你在Ubuntu上寻求一种更轻便的桌面环境,那么安装XFCE可能是一个不错的选择。安装XFCE后,你需要将默认的显示管理器设置为LightDM,以便在登录时使用XFCE桌面环境。根据自己的需要进行调整,并享受你全新的XFCE桌面环境。现在,你可以享受在Ubuntu上使用XFCE的轻便和快速的桌面体验了!_ubuntu xfce
键值对集合-程序员宅基地
文章浏览阅读3.4k次。键值对集合Set集合Set集合是什么Set对象是值的集合,可以按照插入的顺序迭代它的元素。Set集合中的元素只会出现一次,即 Set集合中的元素是唯一的。const set = new Set([1,2,3,4,5]);NaN和 undefined都可以被存储在Set集合中,NaN之间被视为相同的值。const set = new Set([NaN,NaN]);console.log(set);// Set { NaN }对象被存储在Set集合中时,两个对象总是不相等的。const s_键值对集合
蓝桥杯 海盗比酒量-程序员宅基地
文章浏览阅读445次。海盗比酒量有一群海盗(不多于20人),在船上比拼酒量。过程如下:打开一瓶酒,所有在场的人平分喝下,有几个人倒下了。再打开一瓶酒平分,又有倒下的,再次重复...... 直到开了第4瓶酒,坐着的已经所剩无几,海盗船长也在其中。当第4瓶酒平分喝下后,大家都倒下了。等船长醒来,发现海盗船搁浅了。他在航海日志中写到:“......昨天,我正好喝了一瓶.......奉劝大家,开船不喝酒,喝酒别开船.........
Web基础知识与常用技术-程序员宅基地
文章浏览阅读5.8k次。Web基础知识与常用技术
人人开源 获取定时任务CronTrigger出现异常-程序员宅基地
文章浏览阅读2.5k次。人人开源 获取定时任务CronTrigger出现异常报错信息:org.springframework.beans.factory.UnsatisfiedDependencyException:Error creating bean with name ‘scheduleJobController’: Unsatisfieddependency expressed through field ‘scheduleJobService’; nestedexception is org.springf
python获取邮件内容_python 接收邮件获取邮件内容-程序员宅基地
文章浏览阅读1.5k次。收取邮件有两种协议,POP3和IMAP,POP3相对于IMAP功能较少无法对邮件进行更深层次的操作,因此本文使用IMAP协议收取邮件。python提供了很多收邮件的模块,本文使用imaplib来接收邮件。前提需要在邮件箱的设置中打开允许IMAP,不同邮件开启全方式不同,具体开启方式自行百度。(本文使用outlook,默认开启)难点获得邮件不难,难点是如何解析邮件的内容,由于邮件内容的编码是不固定的..._python接收邮件內容
随便推点
你管这破玩意儿叫高可用-程序员宅基地
文章浏览阅读2.1k次,点赞4次,收藏33次。大家好,我是坤哥今天我们来聊一下互联网三高(高并发、高性能、高可用)中的高可用,看完本文相信能解开你关于高可用设计的大部分困惑前言高可用(High availability,即 HA)的主..._码海 架构 分层
线性插值和二次插值_插值参数模型的线性回归连接和重要主题-程序员宅基地
文章浏览阅读5.5k次。线性插值和二次插值The model may turn out to be far too complex if we continuously keep adding more variables. 如果我们不断增加更多的变量,该模型可能会变得过于复杂。 Will fail to simplify as it is memorizing the training data. 记住训练数据将无法..._回归插值必须是线性
nested exception is org.springframework.jdbc.BadSqlGram 问题-程序员宅基地
文章浏览阅读7.3k次。type Exception reportmessage Request processing failed; nested exception is org.springframework.jdbc.BadSqlGrammarException:description The server encountered an internal error that prevented it f..._nested exception is org.springframework.jdbc.badsqlgrammarexception:
GooglePay默认支付(payment)应用 之一_registeredservicescache nfc-程序员宅基地
文章浏览阅读3.5k次。make Google pay as the default payment app.Google pay无法设置为默认NFC payment应用。Google Pay消失了。_registeredservicescache nfc
记本地搭建一个简单网站的过程_cmd创建本地网站-程序员宅基地
文章浏览阅读1.5k次。一个暑假的时间前端和后端的东西都学了一点,最近也是进入了瓶颈期,所以想把之前学的东西串联一下,自己搭建一个简易的网站,主要功能就是从前端注册账号并登陆的小功能吧。当然也可以用来做一个最最基础的小sql注入,最后做到什么样子就算什么样子吧。一、部署服务器之前一段时间为了学习php,安装了phpstudy,里面集成了Apache和MySQL。但是由于小白比较懵,自己又手动安装了MySQL。安装..._cmd创建本地网站
echarts legend换行显示-程序员宅基地
文章浏览阅读2.8k次。1.文字换行显示formatter: function (params) { //超过十个字符就换行展示 var newParamsName = "";// 最终拼接成的字符串 var paramsNameNumber = params.length;// 实际标签的个数 var provideNumber = 3;// 每行能显示的字的个数 var rowNumber _echarts legend换行