前端之登录注册页面案例_前端登录页面-程序员宅基地
一、效果图
(1)登录界面

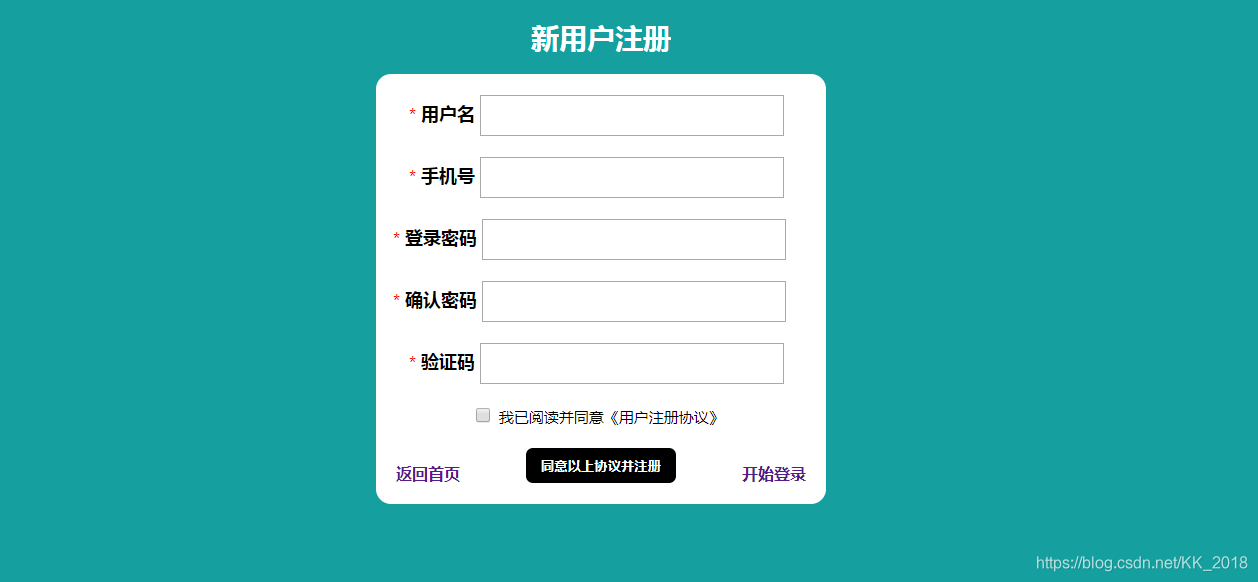
(2)注册界面
二、详细设计
(1)登录界面
<!DOCTYPE html>
<html lang="en">

<head>
    <meta charset="UTF-8">
    <title>登录界面</title>
    <style>
        html,body{
            height: 100%;
        }
        body{
            background: #006666;
        }
        h1{
            color: #FFF;
            text-align: center;
        }
        .container{
            margin: 100px auto;
            width: 30%;
        }
        form{
            background: #FFF;
            height: 300px;
            width: 100%;
            border-radius: 10px;
            position: relative;
        }
        label{
            color: #000;
            font-weight: bold;
            font-size: 20px;
            margin-left: 40px;
        }
        input{
            text-align: left;
            margin: 10px;
        }
        .input{
            width: 80%;
            height: 35px;
            margin-left: 40px;
        }
        .checkbox{
            margin-left: 30px;
        }
        a{
            text-decoration: none;
            font-weight: bold;
        }
        .submit{
            display: inline-block;
            margin-top: 0;
            margin-left:145px;
            background: #000;
            border: none;
            color: #FFF;
            height: 35px;
            width: 100px;
            text-align: center;
            font-weight: bold;
            border-radius: 5px;
        }
        .left{
            margin: 20px;
        }
        .right{
            position: absolute;
            right: 20px;
        }
    </style>
</head>

<body>
    <div class="container">
        <h1>用户登录</h1>
        <form>
            <br>
            <label for="username">用户名</label><br>
            <input type="text" name="username" id="username" class="input" value="" placeholder="用户名admin"><br>
            <label for="pwd">密码</label><br>
            <input type="password" name="" id="pwd" class="input" value="" placeholder="密码admin">
            <div class="checkbox">
                <input type="checkbox" name="">
                <span>记住密码</span>
            </div>
            <button type="submit" class="submit" onclick="submits(this)">开始登录</button>
            <br>
            <a href="index.html" class="left">返回首页</a>
            <a href="register.html" class="right">注册账号</a>
        </form>
    </div>
    <script>
     function submits(btn){
        var userName = document.getElementById("username").value;
        var pwd = document.getElementById("pwd").value;
        console.log(userName)
        if (userName == "admin" && pwd == "admin") {
           alert("用户名和密码正确,但是连接服务器失败!")
        }
        else {
            alert("用户名或密码不正确!");
        }
    };
    </script>
</body>

</html>
(2)注册界面
<!DOCTYPE html>
<html lang="en">
<head>
  <meta charset="UTF-8">
  <title>用户注册界面</title>
  <style>
    body{
      background: #159f9f;
    }
    .container{
      margin: 0 auto;
      width: 500px;
    }
    form{
      width: 450px;
      margin: 0 auto;
      background: #FFF;
      border-radius: 15px;
      position: relative;
    }
    h1{
      font-size: 28px;
      text-align: center;
      color: #FFF;
    }
    .p{
      color: red;
      margin-left: 33px;
      display: inline-block;//不占单独一行的块级元素
    }
    label{
      font-size: 18px;
      font-weight: bold;
    }
    .register{
      height: 35px;
      width: 300px;
    }
    .q{
      color:red;
      margin-left:17px;
      display:inline-block;
    }
    .checkbox{
      margin-left: 100px;
      display: inline-block;
      width: 15px;
      height: 15px;
    }
    .submit{
      border-radius: 7px;
      margin-left: 150px;
      height: 35px;
      width: 150px;
      background-color: #000;
      border: none;
      display: block;
      padding: 0;
      color: #FFF;
      font-weight: bold;
      cursor: pointer;
    }
    a{
      text-decoration: none;
      font-weight: bold;
    }
    .left,.right{
      position: absolute;
      bottom: 20px;
    }
    .left{
      left: 20px;
    }
    .right{
      right: 20px;
    }
  </style>
</head>
<body>
  <div class="container">
    <h1>新用户注册</h1>
    <form>
      <br>
      <span class="p">*</span>
      <label for="username">用户名</label>
      <input type="text" name="" id="username" placeholder="" class="register"><br><br>
      <span class="p">*</span>
      <label for="phonenumber">手机号</label>
      <input type="text" name="" id="phonenumber" class="register">
      <br><br>
      <span class="q">*</span>
      <label for="pwd">登录密码</label>
      <input type="password" name="" id="pwd" class="register"><br><br>
      <span class="q">*</span>
      <label for="c_pwd">确认密码</label>
      <input type="password" name="" id="c_pwd" class="register"><br><br>
      <span class="p">*</span>
      <label for="verify">验证码</label>
      <input type="text" id="verify" class="register" name=""><br><br>
      <input type="checkbox" class="checkbox" name="">
      <span style="font-size:15px">我已阅读并同意《用户注册协议》</span>
      <br><br>
      <input type="submit" name="" value="同意以上协议并注册" class="submit" onclick="register(this)"><br>
      <a href="index.html" class="left">返回首页</a>
      <a href="login.html" class="right">开始登录</a>
    </form>
  </div>
  <script>
    var checkbox=document.getElementsByClassName('checkbox');
    function register(btn){
      if(checkbox[0].checked==true){
        alert("注册成功!");
      }
      else{
        alert("请先阅读并同意《用户注册协议》!")
      }
    }
  </script>
</body>
</html>
三、部分效果
(1)登录界面


(2)注册界面


智能推荐
使用vue-preview 缩略图预览 完美解决-程序员宅基地
文章浏览阅读4.5k次。首先先安装插件cnpm i vue-preview -S在vue全局,也就是main.js声明插件import VuePreview from 'vue-preview'Vue.use(VuePreview)在组件里插入 <div class="thumbs"> <vue-preview :slides="list" @close="handleClos..._vue-preview
云原生学习的最佳路径_云原生学习路线-程序员宅基地
文章浏览阅读2.8k次,点赞3次,收藏16次。云原生最佳学习路径,csdn学习会员的福利_云原生学习路线
第三章:UltraiSO制作启动u盘+制作winPE镜像+硬盘安装系统_ultraiso制作u盘启动-程序员宅基地
文章浏览阅读4.5k次,点赞3次,收藏21次。一、使用ultraiso制作启动u盘第一步:双击打开ultraiso,点击文件->打开->选择下载好的iso文件->打开。第二步:点击启动->写入硬盘映像。(写入方式建议使用USB-HDD+,隐藏分区选 无)。第三步:选择U盘,格式化,开始第四步:点击开始,弹出数据将格式化警告,确定后开始写入第五步:警告窗口点击确定,等待格式化完毕,关闭格式化窗口。_ultraiso制作u盘启动
SMITH WATERMAN算法-程序员宅基地
文章浏览阅读1.3k次。1.1 序列相似性比较生物信息学中,对各种生物大分子序列进行分析是一件非常基本的工作。从序列的片段测定,拼接,基因的表达分析,到RNA和蛋白质的结构功能预测,物种亲缘树的构建都需要进行生物分子序列相似性的比较。在遗传物质长期的演化过程中,原本相同的DNA序列由于其中一条序列缺失了几个片断,或增加了几个片断,或某段子序列发生了位置的变化等,从而导致他们发生了不同,这两条序列不一定能进行精确的..._smith-waterman 算法时间复杂度
FL Studio Producer Edition 21.1.1全插件+Crack下载链接(亲测可用,非钓鱼)_flstudio求crack文件-程序员宅基地
文章浏览阅读777次,点赞2次,收藏2次。不知道为什么现在钓鱼的这么多(有答案的请在评论区上告诉我),就一个学习版的编曲软件有必要这样子搞吗?我也是在各类博客上找了一大堆教程,根本没几个能用的,索性直接到海盗湾上找了一个,发现可以直接拿来用。_flstudio求crack文件
Kubernetes为什么叫K8S,K8S的优势到底是什么让它成为当前热门?_kubernetes的优势有哪些-程序员宅基地
文章浏览阅读3.5k次。Kubernetes简介、优势、架构优势、用途、核心概念、术语、快速部署_kubernetes的优势有哪些
随便推点
【12C考题精解】OCP 1z0-060 QUESTION 3: Managing the SYSAUX Tablespace-程序员宅基地
文章浏览阅读155次。QUESTION 3 Which two statements are true about the use of the procedures listed in the v$sysau..._oracle ocp 1z0-060模拟试题库
Spring的简介和工作原理_spring原理和实现机制-程序员宅基地
文章浏览阅读1.3k次。一、简介Spring 是个java企业级应用的开源开发框架。Spring主要用来开发Java应用,但是有些扩展是针对构建J2EE平台的web应用。Spring 框架目标是简化Java企业级应用开发,并通过POJO为基础的编程模型促进良好的编程习惯。二、工作原理Spring最核心的两个点就是IOC和AOP1、 IoC(Inversion of control): 控制反转概念:控制权由对象本身转向容器;由容器根据配置文件去创建实例并创建各个实例之间的依赖关系核心:bean工厂;..._spring原理和实现机制
鸿蒙开发api9及以上之相册权限、相机权限、文件读写权限申请的正确方法_magicos 文件读写权限开发-程序员宅基地
文章浏览阅读1.1k次,点赞8次,收藏8次。"ohos.permission.MEDIA_LOCATION" 文件位置权限: 允许应用访问用户媒体文件中的地理位置信息。"ohos.permission.READ_MEDIA" 文件读权限。"ohos.permission.WRITE_MEDIA"文件写权限。1.在module.json5中注册权限信息。和"abilities": []同级别。2.然后在需要调用的地方。获取当前context。4.最后才是代码调用。_magicos 文件读写权限开发
Websocket全讲解。跨平台的通讯协议 !!基于websocket的高并发即时通讯服务器开发。_websocket是跨平台的吗-程序员宅基地
文章浏览阅读565次。所用核心技术选型:Tomcat + Spring 4.0.3 + Mongodb(高并发数据库)SpringQueue(消息队列)+ ActiveMQ (消息队列)Spring-data-Mongo + Servlet 3.0+Spring-WebsocketMaven注:以下Websocket 均省略成 WB先说Websocket 的原理。 Websocket 是全..._websocket是跨平台的吗
SpringBoot项目打包成jar后,使用ClassPathResource获取classpath(resource)下文件失败_jar classpathresource-程序员宅基地
文章浏览阅读8.7k次,点赞3次,收藏28次。我在读取邮件模板的时候,本地测试使用ClassPathResource都可以正常读取,但打包成jar包传到服务器上就无法获取了,报错信息是:class path resource [xxxx] cannot be resolved to absolute file path because it does not reside in the file system: jar:file:xxxx.jar!/BOOT-INF/classes!xxxx,话不多说,先看正确的获取方法:使用PathMatchingR_jar classpathresource
数学分析习题集+历年考研真题解析(2024.04.06)-程序员宅基地
文章浏览阅读904次,点赞11次,收藏10次。数学分析习题集+历年考研真题解析(2024.04.06)