numpy+cnn_numpycnn.relu-程序员宅基地
技术标签: deep learning python
import numpy
import sys


def conv_(img, conv_filter):
    filter_size = conv_filter.shape[1]
    result = numpy.zeros((img.shape))
    #Looping through the image to apply the convolution operation.
    for r in numpy.uint16(numpy.arange(filter_size/2.0,
                          img.shape[0]-filter_size/2.0+1)):
        for c in numpy.uint16(numpy.arange(filter_size/2.0,
                                           img.shape[1]-filter_size/2.0+1)):
            """
            Getting the current region to get multiplied with the filter.
            How to loop through the image and get the region based on
            the image and filer sizes is the most tricky part of convolution.
            """
            curr_region = img[r-numpy.uint16(numpy.floor(filter_size/2.0)):r+numpy.uint16(numpy.ceil(filter_size/2.0)),
                              c-numpy.uint16(numpy.floor(filter_size/2.0)):c+numpy.uint16(numpy.ceil(filter_size/2.0))]
            #Element-wise multipliplication between the current region and the filter.
            curr_result = curr_region * conv_filter
            conv_sum = numpy.sum(curr_result) #Summing the result of multiplication.
            result[r, c] = conv_sum #Saving the summation in the convolution layer feature map.

    #Clipping the outliers of the result matrix.
    final_result = result[numpy.uint16(filter_size/2.0):result.shape[0]-numpy.uint16(filter_size/2.0),
                          numpy.uint16(filter_size/2.0):result.shape[1]-numpy.uint16(filter_size/2.0)]
    return final_result
def conv(img, conv_filter):
    if len(img.shape) > 2 or len(conv_filter.shape) > 3: # Check if number of image channels matches the filter depth.
        if img.shape[-1] != conv_filter.shape[-1]:
            print("Error: Number of channels in both image and filter must match.")
            sys.exit()
    if conv_filter.shape[1] != conv_filter.shape[2]: # Check if filter dimensions are equal.
        print('Error: Filter must be a square matrix. I.e. number of rows and columns must match.')
        sys.exit()
    if conv_filter.shape[1]%2==0: # Check if filter diemnsions are odd.
        print('Error: Filter must have an odd size. I.e. number of rows and columns must be odd.')
        sys.exit()

    # An empty feature map to hold the output of convolving the filter(s) with the image.
    feature_maps = numpy.zeros((img.shape[0]-conv_filter.shape[1]+1,
                                img.shape[1]-conv_filter.shape[1]+1,
                                conv_filter.shape[0]))

    # Convolving the image by the filter(s).
    for filter_num in range(conv_filter.shape[0]):
        print("Filter ", filter_num + 1)
        curr_filter = conv_filter[filter_num, :] # getting a filter from the bank.
        """
        Checking if there are mutliple channels for the single filter.
        If so, then each channel will convolve the image.
        The result of all convolutions are summed to return a single feature map.
        """
        if len(curr_filter.shape) > 2:
            conv_map = conv_(img[:, :, 0], curr_filter[:, :, 0]) # Array holding the sum of all feature maps.
            for ch_num in range(1, curr_filter.shape[-1]): # Convolving each channel with the image and summing the results.
                conv_map = conv_map + conv_(img[:, :, ch_num],
                                  curr_filter[:, :, ch_num])
        else: # There is just a single channel in the filter.
            conv_map = conv_(img, curr_filter)
        feature_maps[:, :, filter_num] = conv_map # Holding feature map with the current filter.
    return feature_maps # Returning all feature maps.


def pooling(feature_map, size=2, stride=2):
    #Preparing the output of the pooling operation.
    pool_out = numpy.zeros((numpy.uint16((feature_map.shape[0]-size+1)/stride+1),
                            numpy.uint16((feature_map.shape[1]-size+1)/stride+1),
                            feature_map.shape[-1]))
    for map_num in range(feature_map.shape[-1]):
        r2 = 0
        for r in numpy.arange(0,feature_map.shape[0]-size+1, stride):
            c2 = 0
            for c in numpy.arange(0, feature_map.shape[1]-size+1, stride):
                pool_out[r2, c2, map_num] = numpy.max([feature_map[r:r+size,  c:c+size, map_num]])
                c2 = c2 + 1
            r2 = r2 +1
    return pool_out

def relu(feature_map):
    #Preparing the output of the ReLU activation function.
    relu_out = numpy.zeros(feature_map.shape)
    for map_num in range(feature_map.shape[-1]):
        for r in numpy.arange(0,feature_map.shape[0]):
            for c in numpy.arange(0, feature_map.shape[1]):
                relu_out[r, c, map_num] = numpy.max([feature_map[r, c, map_num], 0])
    return relu_out
import skimage.data
import numpy
import matplotlib
import NumPyCNN as numpycnn
# Reading the image
#img = skimage.io.imread("test.jpg")
#img = skimage.data.checkerboard()
img = skimage.data.chelsea()
#img = skimage.data.camera()
# Converting the image into gray.
img = skimage.color.rgb2gray(img)
# First conv layer
#l1_filter = numpy.random.rand(2,7,7)*20 # Preparing the filters randomly.
l1_filter = numpy.zeros((2,3,3))
l1_filter[0, :, :] = numpy.array([[[-1, 0, 1],
[-1, 0, 1],
[-1, 0, 1]]])
l1_filter[1, :, :] = numpy.array([[[1, 1, 1],
[0, 0, 0],
[-1, -1, -1]]])
print("\n**Working with conv layer 1**")
l1_feature_map = numpycnn.conv(img, l1_filter)
print("\n**ReLU**")
l1_feature_map_relu = numpycnn.relu(l1_feature_map)
print("\n**Pooling**")
l1_feature_map_relu_pool = numpycnn.pooling(l1_feature_map_relu, 2, 2)
print("**End of conv layer 1**\n")
# Second conv layer
l2_filter = numpy.random.rand(3, 5, 5, l1_feature_map_relu_pool.shape[-1])
print("\n**Working with conv layer 2**")
l2_feature_map = numpycnn.conv(l1_feature_map_relu_pool, l2_filter)
print("\n**ReLU**")
l2_feature_map_relu = numpycnn.relu(l2_feature_map)
print("\n**Pooling**")
l2_feature_map_relu_pool = numpycnn.pooling(l2_feature_map_relu, 2, 2)
print("**End of conv layer 2**\n")
# Third conv layer
l3_filter = numpy.random.rand(1, 7, 7, l2_feature_map_relu_pool.shape[-1])
print("\n**Working with conv layer 3**")
l3_feature_map = numpycnn.conv(l2_feature_map_relu_pool, l3_filter)
print("\n**ReLU**")
l3_feature_map_relu = numpycnn.relu(l3_feature_map)
print("\n**Pooling**")
l3_feature_map_relu_pool = numpycnn.pooling(l3_feature_map_relu, 2, 2)
print("**End of conv layer 3**\n")
# Graphing results
fig0, ax0 = matplotlib.pyplot.subplots(nrows=1, ncols=1)
ax0.imshow(img).set_cmap("gray")
ax0.set_title("Input Image")
ax0.get_xaxis().set_ticks([])
ax0.get_yaxis().set_ticks([])
matplotlib.pyplot.savefig("in_img.png", bbox_inches="tight")
matplotlib.pyplot.close(fig0)
# Layer 1
fig1, ax1 = matplotlib.pyplot.subplots(nrows=3, ncols=2)
ax1[0, 0].imshow(l1_feature_map[:, :, 0]).set_cmap("gray")
ax1[0, 0].get_xaxis().set_ticks([])
ax1[0, 0].get_yaxis().set_ticks([])
ax1[0, 0].set_title("L1-Map1")
ax1[0, 1].imshow(l1_feature_map[:, :, 1]).set_cmap("gray")
ax1[0, 1].get_xaxis().set_ticks([])
ax1[0, 1].get_yaxis().set_ticks([])
ax1[0, 1].set_title("L1-Map2")
ax1[1, 0].imshow(l1_feature_map_relu[:, :, 0]).set_cmap("gray")
ax1[1, 0].get_xaxis().set_ticks([])
ax1[1, 0].get_yaxis().set_ticks([])
ax1[1, 0].set_title("L1-Map1ReLU")
ax1[1, 1].imshow(l1_feature_map_relu[:, :, 1]).set_cmap("gray")
ax1[1, 1].get_xaxis().set_ticks([])
ax1[1, 1].get_yaxis().set_ticks([])
ax1[1, 1].set_title("L1-Map2ReLU")
ax1[2, 0].imshow(l1_feature_map_relu_pool[:, :, 0]).set_cmap("gray")
ax1[2, 0].get_xaxis().set_ticks([])
ax1[2, 0].get_yaxis().set_ticks([])
ax1[2, 0].set_title("L1-Map1ReLUPool")
ax1[2, 1].imshow(l1_feature_map_relu_pool[:, :, 1]).set_cmap("gray")
ax1[2, 0].get_xaxis().set_ticks([])
ax1[2, 0].get_yaxis().set_ticks([])
ax1[2, 1].set_title("L1-Map2ReLUPool")
matplotlib.pyplot.savefig("L1.png", bbox_inches="tight")
matplotlib.pyplot.close(fig1)
# Layer 2
fig2, ax2 = matplotlib.pyplot.subplots(nrows=3, ncols=3)
ax2[0, 0].imshow(l2_feature_map[:, :, 0]).set_cmap("gray")
ax2[0, 0].get_xaxis().set_ticks([])
ax2[0, 0].get_yaxis().set_ticks([])
ax2[0, 0].set_title("L2-Map1")
ax2[0, 1].imshow(l2_feature_map[:, :, 1]).set_cmap("gray")
ax2[0, 1].get_xaxis().set_ticks([])
ax2[0, 1].get_yaxis().set_ticks([])
ax2[0, 1].set_title("L2-Map2")
ax2[0, 2].imshow(l2_feature_map[:, :, 2]).set_cmap("gray")
ax2[0, 2].get_xaxis().set_ticks([])
ax2[0, 2].get_yaxis().set_ticks([])
ax2[0, 2].set_title("L2-Map3")
ax2[1, 0].imshow(l2_feature_map_relu[:, :, 0]).set_cmap("gray")
ax2[1, 0].get_xaxis().set_ticks([])
ax2[1, 0].get_yaxis().set_ticks([])
ax2[1, 0].set_title("L2-Map1ReLU")
ax2[1, 1].imshow(l2_feature_map_relu[:, :, 1]).set_cmap("gray")
ax2[1, 1].get_xaxis().set_ticks([])
ax2[1, 1].get_yaxis().set_ticks([])
ax2[1, 1].set_title("L2-Map2ReLU")
ax2[1, 2].imshow(l2_feature_map_relu[:, :, 2]).set_cmap("gray")
ax2[1, 2].get_xaxis().set_ticks([])
ax2[1, 2].get_yaxis().set_ticks([])
ax2[1, 2].set_title("L2-Map3ReLU")
ax2[2, 0].imshow(l2_feature_map_relu_pool[:, :, 0]).set_cmap("gray")
ax2[2, 0].get_xaxis().set_ticks([])
ax2[2, 0].get_yaxis().set_ticks([])
ax2[2, 0].set_title("L2-Map1ReLUPool")
ax2[2, 1].imshow(l2_feature_map_relu_pool[:, :, 1]).set_cmap("gray")
ax2[2, 1].get_xaxis().set_ticks([])
ax2[2, 1].get_yaxis().set_ticks([])
ax2[2, 1].set_title("L2-Map2ReLUPool")
ax2[2, 2].imshow(l2_feature_map_relu_pool[:, :, 2]).set_cmap("gray")
ax2[2, 2].get_xaxis().set_ticks([])
ax2[2, 2].get_yaxis().set_ticks([])
ax2[2, 2].set_title("L2-Map3ReLUPool")
matplotlib.pyplot.savefig("L2.png", bbox_inches="tight")
matplotlib.pyplot.close(fig2)
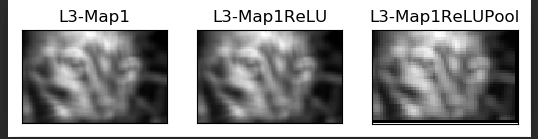
# Layer 3
fig3, ax3 = matplotlib.pyplot.subplots(nrows=1, ncols=3)
ax3[0].imshow(l3_feature_map[:, :, 0]).set_cmap("gray")
ax3[0].get_xaxis().set_ticks([])
ax3[0].get_yaxis().set_ticks([])
ax3[0].set_title("L3-Map1")
ax3[1].imshow(l3_feature_map_relu[:, :, 0]).set_cmap("gray")
ax3[1].get_xaxis().set_ticks([])
ax3[1].get_yaxis().set_ticks([])
ax3[1].set_title("L3-Map1ReLU")
ax3[2].imshow(l3_feature_map_relu_pool[:, :, 0]).set_cmap("gray")
ax3[2].get_xaxis().set_ticks([])
ax3[2].get_yaxis().set_ticks([])
ax3[2].set_title("L3-Map1ReLUPool")
matplotlib.pyplot.savefig("L3.png", bbox_inches="tight")
matplotlib.pyplot.close(fig3)
图片保存结果如下:


It's amazing!
卷积层-激活层-池化层
提问:像素全为正,relu激活层还有什么用呢?
答:卷积滤波器的参数可以为负,卷积层的输出可以是负值,所以relu激活层仍然有意义;
提问:池化层后不是就只有一个值了吗?
答:池化层和卷积层一样也有一个类似滤波器进行池化,进行了一个下采样,而不是对整个featuremap选择最大的一个值;比如说2*2 步长为2,每四个元素中选择最大的一个;
提问:为什么没有训练也会不错的效果呢?
答:从逆向思维的角度来看,说明卷积层参数初始值设置得不错;如图所示:本文中的滤波器值如下

智能推荐
Android涂鸦画板原理详解——从初级到高级(二)-程序员宅基地
文章浏览阅读995次。前言前面写了《Android涂鸦画板原理详解——从初级到高级(一)》,讲了涂鸦原理初级和中级的应用,现在讲解高级应用。如果没有看过前面一篇文章的同学,建议先去看看哈。准备高级涂鸦涉及到图片操作,包括对图片进行缩放移动、涂鸦等,这里涉及到矩阵的变换。关于矩阵变换的知识,请查看我的另一篇文章《浅谈矩阵变换——Matrix》。根据文中的介绍,接下来使用变换坐标系的空间想象去理解涂鸦中涉及到的矩阵变..._电子涂鸦板原理
python中数字加引号和不加引号的区别_Python小白不得不注意的几点:单引号、双引号、三个单引号和三个双引号区别!...-程序员宅基地
文章浏览阅读6.3k次。一、单引号和双引号在Python中我们都知道单引号和双引号都可以用来表示一个字符串,比如str1 = 'python'str2 = "python"str1和str2是没有任何区别的。但是如果遇到需要转义字符的情况,来看单引号和双引号的版本。单引号版本:str3 = 'We all know that \'A\' and \'B\' are two capital letters.'双引号版本:s..._python中数字加引号和不加引号的区别
蓝桥杯 历届真题 立方和问题【决赛】【本科组】_蓝桥杯立方和-程序员宅基地
文章浏览阅读390次。关键是怎么去掉重复,将答案都保存在一个数组中,排序,新数据存入后与数组中已存在的数据比较,若都相同,则重复,将元素从数组中移除,不相同,保留,最后输出该数组。a = 1,b=12,c=9,d=10 就是一个解。因为:1的立方加12的立方等于1729,而9的立方加10的立方也等于1729。你的任务是:找到所有小于30的不同的正整数解。a、b、c、d是互不相同的小于30的正整数。因为是小于30的整数,用暴力法不会炸,用四重循环,再加上判断条件。当然,a=12,b=1,c=9,d=10 显然也是解。_蓝桥杯立方和
openssh aix_获取最新版本的OpenSSH for AIX-程序员宅基地
文章浏览阅读1.5k次。什么是开放安全壳? Open Secure Shell(OpenSSH)是网络连接工具SSH协议套件的开源版本。 这些工具提供经过身份验证和加密的外壳程序功能。 Shell是命令语言解释器,可从命令行字符串,stdin或文件中读取输入。 为什么要使用OpenSSH? 在不安全的公共网络(如Internet)上运行时,可以使用SSH命令套件而不是不安全的命令telnet,ftp和r命令。..._aix最新版ssh
不会真有人觉得聊天机器人难吧-程序员宅基地
文章浏览阅读483次,点赞3次,收藏3次。本系列会基于自己实现的类Pytorch工具实现一个Seq2Seq 带Attention机制的聊天机器人,在本系列文章中,大家会了解到实现聊天机器人的所有知识,以及如何实现一个类似PyTorch一样的深度学习框架。欢迎关注哦。
Java学习路线_自动机理论、语言和计算导论 site:csdn.net-程序员宅基地
文章浏览阅读923次。前提条件: 需要有高中毕业的水准 (或者同等学历的也行,比如中专,我本人就是读中专然后再读自考大专的)。学习方式: 完全可以自学,最好自己有电脑。偏重方向: 偏重软件,而不是计算机硬件。英语要求: 掌握3000个左右的常用单词,能读就差不多了, 如果不想看英文可以找中文翻译版的,我个人偏向看中文,对于非常好的书我通常中英文都买来看。以下列出的书是按照循序渐进的方式介绍的, _自动机理论、语言和计算导论 site:csdn.net
随便推点
ios-微信自动抢红包插件-程序员宅基地
文章浏览阅读976次。2019独角兽企业重金招聘Python工程师标准>>> ..._csdn ios微信抢红包
Flutter列表和表格的综合运用_flutter多行合并表格布局-程序员宅基地
文章浏览阅读807次,点赞2次,收藏2次。最近Flutter项目中遇到一个比较有意思的页面,页面稍显复杂,考验的是列表和表格的综合运用,感觉有必要总结一下。自己粗糙绘制了一下原型,大致要求如下:页面可上下滑动点击Tab标题时,Tab栏下方区域页面进行切换,且Tab栏滑动到顶部也就是紧挨着标题栏下方时,悬浮在顶部,用户再次向上滑动时,Tab下方页面进行上滑,而Tab栏固定不变Tab栏下方页面为表格数据,有多少..._flutter多行合并表格布局
github -ubuntu 首次git clone 代码错误Please make sure you have the correct access rights and the repositor-程序员宅基地
文章浏览阅读1.2k次。首次从github git clone 代码到ubuntu本机中, 若出现以下错误:joaquin@vmachine:/home$ sudo git clone [email protected]:jasgooddy/distributed-saving-.git[sudo] password for joaquin: Cloning into 'distributed-sa
【IntelliJ IDEA工具】spring boot使用JPA自动生成实体类(数据库表逆向工程自动生成带注释的实体类)_springdatajpa逆向生成实体类-程序员宅基地
文章浏览阅读1.2k次。1、maven依赖: <!-- JPA,用于自动生成表结构 --> <dependency> <groupId>org.springframework.boot</groupId> <artifactId>spring-boot-starter-data-jpa</artifactId> </dependency> &_springdatajpa逆向生成实体类
TMDS_tmds解码程序-程序员宅基地
文章浏览阅读1.4k次。module vdc_encode( rst, clk, de, d, c0, c1, q_out); input rst; input clk; input de, c0, c1; input[7:0] d; output reg[9:0] q_out; reg[9:0] q_m;..._tmds解码程序
Windows上彻底卸载软件及清理残留数据的详细步骤_windows可以彻底卸载软件的-程序员宅基地
文章浏览阅读2.7w次,点赞14次,收藏87次。在Windows操作系统上安装和卸载软件是常见的操作。然而,仅仅通过常规的卸载过程并不能完全清除软件的所有残留数据。为了彻底卸载软件并清理相关的残留数据,我们需要采取额外的步骤。本文将详细介绍在Windows上彻底卸载软件以及清理残留数据的步骤。_windows可以彻底卸载软件的