android CoordinatorLayout使用-程序员宅基地
技术标签: android Android coordinatorLayout
CoordinatorLayout有什么作用
CoordinatorLayout作为“super-powered FrameLayout”基本实现两个功能:
1、作为顶层布局
2、调度协调子布局
CoordinatorLayout使用新的思路通过协调调度子布局的形式实现触摸影响布局的形式产生动画效果。CoordinatorLayout通过设置子View的 Behaviors来调度子View。系统(Support V7)提供了AppBarLayout.Behavior, AppBarLayout.ScrollingViewBehavior, FloatingActionButton.Behavior, SwipeDismissBehavior<V extends View> 等。
使用CoordinatorLayout需要在Gradle加入Support Design Library:
compile 'com.android.support:design:22.2.1'
CoordinatorLayout与FloatingActionButton
定义布局文件:
<?xml version="1.0" encoding="utf-8"?>
<android.support.design.widget.CoordinatorLayout
    xmlns:android="http://schemas.android.com/apk/res/android"
    xmlns:app="http://schemas.android.com/apk/res-auto"
    android:layout_width="match_parent"
    android:layout_height="match_parent">


    <android.support.design.widget.FloatingActionButton
        android:id="@+id/fab"
        android:layout_width="wrap_content"
        android:layout_height="wrap_content"
        android:layout_gravity="end|bottom"
        android:layout_margin="16dp"
        android:src="@drawable/ic_done" />

</android.support.design.widget.CoordinatorLayout>
CoordinatorLayout作为“super-powered FrameLayout”,设置子视图的android:layout_gravity属性控制位置。
Activity:
public class MainActivity extends AppCompatActivity {


    @Override
    protected void onCreate(Bundle savedInstanceState) {
        super.onCreate(savedInstanceState);
        setContentView(R.layout.activity_main);
        findViewById(R.id.fab).setOnClickListener(new View.OnClickListener() {
            @Override
            public void onClick(View view) {

                Snackbar.make(view,"FAB",Snackbar.LENGTH_LONG)
                        .setAction("cancel", new View.OnClickListener() {
                            @Override
                            public void onClick(View v) {
                                //这里的单击事件代表点击消除Action后的响应事件

                            }
                        })
                        .show();
            }
        });
    }
}
效果:
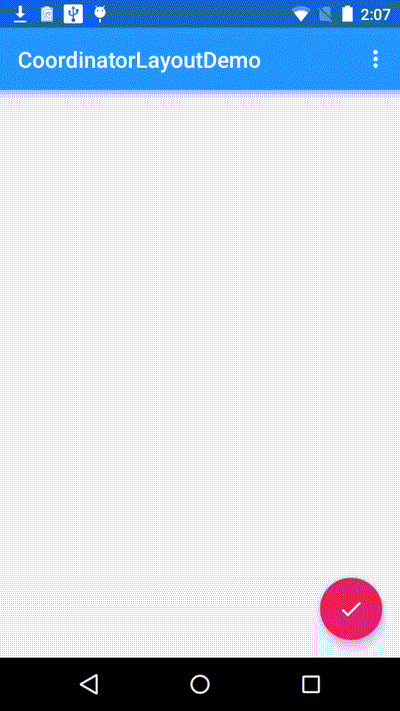
FloatingActionButton是最简单的使用CoordinatorLayout的例子,FloatingActionButton默认使用FloatingActionButton.Behavior。
CoordinatorLayout与AppBarLayout
AppBarLayout嵌套TabLayout
布局文件代码:
<android.support.design.widget.CoordinatorLayout xmlns:android="http://schemas.android.com/apk/res/android"
    xmlns:app="http://schemas.android.com/apk/res-auto"
    android:id="@+id/main_content"
    android:layout_width="match_parent"
    android:layout_height="match_parent">

    <android.support.design.widget.AppBarLayout
        android:id="@+id/appbar"
        android:layout_width="match_parent"
        android:layout_height="wrap_content"
        android:theme="@style/ThemeOverlay.AppCompat.Dark.ActionBar">

        <android.support.v7.widget.Toolbar
            android:id="@+id/toolbar"
            android:layout_width="match_parent"
            android:layout_height="?attr/actionBarSize"
            android:background="?attr/colorPrimary"
            app:popupTheme="@style/ThemeOverlay.AppCompat.Light"
            app:layout_scrollFlags="scroll|enterAlways" />

        <android.support.design.widget.TabLayout
            android:id="@+id/tabs"
            android:layout_width="match_parent"
            android:layout_height="wrap_content" />

    </android.support.design.widget.AppBarLayout>

    <android.support.v4.view.ViewPager
        android:id="@+id/viewpager"
        android:layout_width="match_parent"
        android:layout_height="match_parent"
        app:layout_behavior="@string/appbar_scrolling_view_behavior" />

    <android.support.design.widget.FloatingActionButton
        android:id="@+id/fab"
        android:layout_width="wrap_content"
        android:layout_height="wrap_content"
        android:layout_gravity="end|bottom"
        android:layout_margin="@dimen/fab_margin"
        android:src="@drawable/ic_done" />

</android.support.design.widget.CoordinatorLayout>
效果:
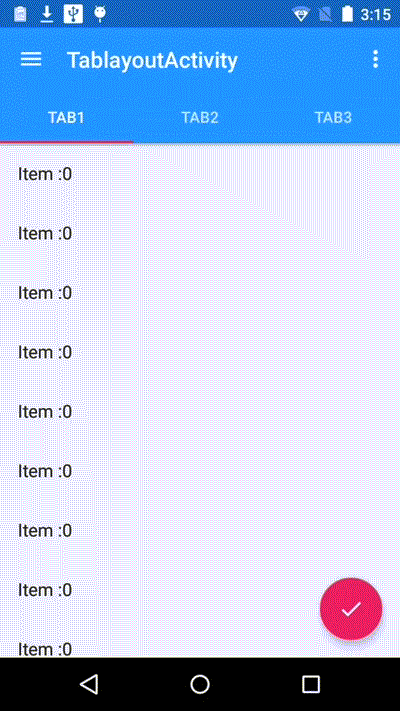
效果显示,视图滚动时,Toolbar会隐藏,这个效果是Android Support Library里面,新增的CoordinatorLayout, AppBarLayout实现的。通过AppBarLayout的子视图的属性控制。观察AppBarLayout的子布局,Toobar有app:layout_scrollFlags属性,这就是控制滑动时视图效果的属性。app:layout_scrollFlags有四个值:
- scroll: 所有想滚动出屏幕的view都需要设置这个flag, 没有设置这个flag的view将被固定在屏幕顶部。例如,TabLayout 没有设置这个值,将会停留在屏幕顶部。
- enterAlways: 设置这个flag时,向下的滚动都会导致该view变为可见,启用快速“返回模式”。
- enterAlwaysCollapsed: 当你的视图已经设置minHeight属性又使用此标志时,你的视图只能已最小高度进入,只有当滚动视图到达顶部时才扩大到完整高度。
- exitUntilCollapsed: 滚动退出屏幕,最后折叠在顶端。
为了ToolBar可以滚动,CoordinatorLayout里面,放一个带有可滚动的View.如上的例子,放的是ViewPager,而ViewPager里面是放了RecylerView的,即是可以滚动的View。CoordinatorLayout包含的子视图中带有滚动属性的View需要设置app:layout_behavior属性。例如,示例中Viewpager设置了此属性。
app:layout_behavior="@string/appbar_scrolling_view_behavior"
为了使得Toolbar有滑动效果,必须做到如下三点:
 1. CoordinatorLayout作为布局的父布局容器。
 2. 给需要滑动的组件设置 app:layout_scrollFlags=”scroll|enterAlways” 属性。
 3. 给滑动的组件设置app:layout_behavior属性
AppBarLayout嵌套CollapsingToolbarLayout
xml:
<?xml version="1.0" encoding="utf-8"?>
<android.support.design.widget.CoordinatorLayout xmlns:android="http://schemas.android.com/apk/res/android"
    xmlns:app="http://schemas.android.com/apk/res-auto"
    android:id="@+id/main_content"
    android:layout_width="match_parent"
    android:layout_height="match_parent"
    android:fitsSystemWindows="true">

    <android.support.design.widget.AppBarLayout
        android:id="@+id/appbar"
        android:layout_width="match_parent"
        android:layout_height="256dp"
        android:theme="@style/ThemeOverlay.AppCompat.Dark.ActionBar"
        android:fitsSystemWindows="true">

        <android.support.design.widget.CollapsingToolbarLayout
            android:id="@+id/collapsing_toolbar"
            android:layout_width="match_parent"
            android:layout_height="match_parent"
            app:layout_scrollFlags="scroll|exitUntilCollapsed"
            android:fitsSystemWindows="true"
            app:contentScrim="?attr/colorPrimary"
            app:expandedTitleMarginStart="48dp"
            app:expandedTitleMarginEnd="64dp">

            <ImageView
                android:id="@+id/backdrop"
                android:layout_width="match_parent"
                android:layout_height="match_parent"
                android:scaleType="centerCrop"
                android:fitsSystemWindows="true"
                android:src="@drawable/header"
                app:layout_collapseMode="parallax"
                />

            <android.support.v7.widget.Toolbar
                android:id="@+id/toolbar"
                android:layout_width="match_parent"
                android:layout_height="?attr/actionBarSize"
                app:popupTheme="@style/ThemeOverlay.AppCompat.Light"
                app:layout_collapseMode="pin" />

        </android.support.design.widget.CollapsingToolbarLayout>

    </android.support.design.widget.AppBarLayout>

    <android.support.v4.widget.NestedScrollView
        android:layout_width="match_parent"
        android:layout_height="match_parent"
        app:layout_behavior="@string/appbar_scrolling_view_behavior">

        <LinearLayout
            android:layout_width="match_parent"
            android:layout_height="match_parent"
            android:orientation="vertical"
            android:paddingTop="24dp">

            <android.support.v7.widget.CardView
                android:layout_width="match_parent"
                android:layout_height="wrap_content"
                android:layout_margin="16dp">

                <LinearLayout
                    style="@style/Widget.CardContent"
                    android:layout_width="match_parent"
                    android:layout_height="wrap_content">

                    <TextView
                        android:layout_width="match_parent"
                        android:layout_height="wrap_content"
                        android:text="CardView"
                        android:textAppearance="@style/TextAppearance.AppCompat.Title" />

                    <TextView
                        android:layout_width="match_parent"
                        android:layout_height="wrap_content"
                        android:text="@string/card_string" />

                </LinearLayout>

            </android.support.v7.widget.CardView>
          ……
        </LinearLayout>

    </android.support.v4.widget.NestedScrollView>

    <android.support.design.widget.FloatingActionButton
        android:layout_height="wrap_content"
        android:layout_width="wrap_content"
        app:layout_anchor="@id/appbar"
        app:layout_anchorGravity="bottom|right|end"
        android:src="@drawable/ic_done"
        android:layout_margin="@dimen/fab_margin"
        android:clickable="true"/>

</android.support.design.widget.CoordinatorLayout>
效果图:
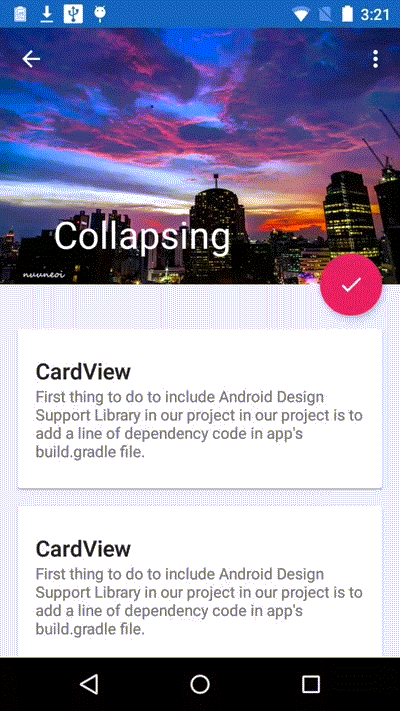
这种效果在详情页面用的较多,展示个性化内容,图像有强烈的吸引力。这个效果重点使用了CollapsingToolbarLayout 。
CollapsingToolbarLayout可实现Toolbar的折叠效果。CollapsingToolbarLayout的子视图类似与LinearLayout垂直方向排放。
CollapsingToolbarLayout 提供以下属性和方法是用:
- Collapsing title:ToolBar的标题,当CollapsingToolbarLayout全屏没有折叠时,title显示的是大字体,在折叠的过程中,title不断变小到一定大小的效果。你可以调用setTitle(CharSequence)方法设置title。
- Content scrim:ToolBar被折叠到顶部固定时候的背景,你可以调用setContentScrim(Drawable)方法改变背景或者 在属性中使用 app:contentScrim=”?attr/colorPrimary”来改变背景。
- Status bar scrim:状态栏的背景,调用方法setStatusBarScrim(Drawable)。还没研究明白,不过这个只能在Android5.0以上系统有效果。
- Parallax scrolling children:CollapsingToolbarLayout滑动时,子视图的视觉差,可以通过属性app:layout_collapseParallaxMultiplier=”0.6”改变。值de的范围[0.0,1.0],值越大视察越大。
- CollapseMode :子视图的折叠模式,在子视图设置,有两种“pin”:固定模式,在折叠的时候最后固定在顶端;“parallax”:视差模式,在折叠的时候会有个视差折叠的效果。我们可以在布局中使用属性app:layout_collapseMode=”parallax”来改变。
CoordinatorLayout 还提供了一个 layout_anchor 的属性,连同 layout_anchorGravity 一起,可以用来放置与其他视图关联在一起的悬浮视图(如 FloatingActionButton)。本例中使用FloatingActionButton。
通过下面的参数设置了FloatingActionButton的位置,两个属性共同作用使得FAB 浮动按钮也能折叠消失,展现。
app:layout_anchor="@id/appbar"
app:layout_anchorGravity="bottom|right|end"
使用CollapsingToolbarLayout实现折叠效果,需要注意3点
1. AppBarLayout的高度固定
2. CollapsingToolbarLayout的子视图设置layout_collapseMode属性
3. 关联悬浮视图设置app:layout_anchor,app:layout_anchorGravity属性
自定义behavior
CoordinatorLayout功能如此强大,而他的神奇之处在于Behavior对象,CoordinatorLayout自己并不控制View,所有的控制权都在Behavior。前面写到了FloatingActionButton.Behavior,AppBarLayout.Behavior, AppBarLayout.ScrollingViewBehavior。 AppBarLayout中有两个Behavior,一个是拿来给它自己用的,另一个是拿来给它的兄弟结点用的。这些Behavior实现了复杂的控制功能。系统的Behavior毕竟有限,我们可以通过自定义的方式来实现自己的Behavior。
通过 CoordinatorLayout.Behavior(YourView.Behavior.class) 来定义自己的Behavior,并在layout 文件中设置 app:layout_behavior=”com.example.app.YourView$Behavior” 来达到效果。
自定义Behavior 需要重写两个方法:
 public boolean layoutDependsOn(CoordinatorLayout parent, View child, View dependency)

 public boolean onDependentViewChanged(CoordinatorLayout parent, View child, View dependency)
如下面的例子,实现了点击FloatingActionButton点击旋转90度,并适配Snackbar。
public class RotateBehavior  extends CoordinatorLayout.Behavior<FloatingActionButton> {

    private static final String TAG = RotateBehavior.class.getSimpleName();

    public RotateBehavior() {
    }

    public RotateBehavior(Context context, AttributeSet attrs) {
        super(context, attrs);
    }

    @Override
    public boolean layoutDependsOn(CoordinatorLayout parent, FloatingActionButton child, View dependency) {
        return dependency instanceof Snackbar.SnackbarLayout;
    }

    @Override
    public boolean onDependentViewChanged(CoordinatorLayout parent, FloatingActionButton child, View dependency) {
        float translationY = getFabTranslationYForSnackbar(parent, child);
        float percentComplete = -translationY / dependency.getHeight();
        child.setRotation(-90 * percentComplete);
        child.setTranslationY(translationY);
        return false;
    }

    private float getFabTranslationYForSnackbar(CoordinatorLayout parent,
                                                FloatingActionButton fab) {
        float minOffset = 0;
        final List<View> dependencies = parent.getDependencies(fab);
        for (int i = 0, z = dependencies.size(); i < z; i++) {
            final View view = dependencies.get(i);
            if (view instanceof Snackbar.SnackbarLayout && parent.doViewsOverlap(fab, view)) {
                minOffset = Math.min(minOffset,
                        ViewCompat.getTranslationY(view) - view.getHeight());
            }
        }

        return minOffset;
    }
}
xml:
<android.support.design.widget.CoordinatorLayout xmlns:android="http://schemas.android.com/apk/res/android"
    xmlns:app="http://schemas.android.com/apk/res-auto"
    android:id="@+id/main_content"
    android:layout_width="match_parent"
    android:layout_height="match_parent"
    android:fitsSystemWindows="true">
    <android.support.design.widget.FloatingActionButton
        android:id="@+id/fab"
        android:layout_width="wrap_content"
        android:layout_height="wrap_content"
        android:layout_gravity="end|bottom"
        android:layout_margin="@dimen/fab_margin"
        android:src="@drawable/ic_done"
        app:layout_behavior="com.meizu.coordinatorlayoutdemo.RotateBehavior"/>
</android.support.design.widget.CoordinatorLayout>
效果:

综上,基本覆盖了CoordinatorLayout的使用方式。
智能推荐
基础的Linux命令_touch index.js-程序员宅基地
文章浏览阅读92次。基本的Linux命令改变目录回退到上一个目录显示当前所在目录路径列出当前目录中的所有文件新建一个文件,如index.js,在当前目录下新建一个index.js文件删除一个文件新建一个目录(新建一个文件夹)删除一个文件夹index移动文件重新初始化终端清屏查看命令历史帮助退出注释改变目录cd回退到上一个目录cd…显示当前所在目录路径pwd列出当前目录中的所有文件ls新建一个文件,如index.js,在当前目录下新建一个index.js文件touch index.js删除一个文件如rm _touch index.js
Qt中如何将QComboBox中的选项StringItem与数值内联binding_qt combobox显示数值和实际值怎么绑定-程序员宅基地
文章浏览阅读501次。Qt中如何将QComboBox中的选项StringItem与数值内联binding开发文档中有两种方法第一种:第二种:这里介绍第二种(我认为更简单的一种)就用我目前做的一个小项目来说吧我的combo box中有各种各样的运动,每种运动自动内联着它所对应的一个小时所消耗的卡路里(int)consume::consume(QWidget *parent) : QDialog(parent), ui(new Ui::consume){ ui->setupUi(_qt combobox显示数值和实际值怎么绑定
最新大猿人中控充值系统 免授权学习版 支持公众号H5、分销等功能_猿人充值系统 3.2 漏洞-程序员宅基地
文章浏览阅读1.5k次。简介:最新大猿人中控充值系统 免授权破解版 支持公众号H5、分销等功能功能简介:大猿人中控系统目前是市面上用的最多的电话费充值中控系统,支持代理分销、公众号H5、API接口对接等功能,也是目前最完善的一款中控系统,前端全开源,已破解免授权!配置环境:php7.3 + Redis搭建教程:1、首先吧大猿人中控系统压缩包上传到服务器内进行解压,然后吧数据库文件导入数据库内2、修改/application/database.php 文件进行配置链接数据库。_猿人充值系统 3.2 漏洞
创建异形窗口[3]-程序员宅基地
文章浏览阅读81次。为什么80%的码农都做不了架构师?>>> ..._gtk3 异形窗口
C语言:验证下列矩阵是否为魔方阵。魔方阵是每一行、每一列、主副对角线上的元素之和都是相等的矩阵。-程序员宅基地
文章浏览阅读2.6k次。#include <stdio.h>#include <string.h>#include <string.h>int main(void){ int a[5][5] = {17,24,1,8,15, 23,5,7,14,16, 4,6,13,20,22, 10,12,19,21,3, 11,18,25._验证下列矩阵是否为魔方阵。魔方阵是每一行、每一列、主副对角线上的元素之和都是
Django疫情返乡人员管理系统-11411,计算机毕业设计开题选题+程序定制+论文书写+答辩ppt书写-原创(题目+编号)的定制程序-程序员宅基地
文章浏览阅读51次。免费领取项目源码,请关注赞收藏并私信博主,谢谢-本课题研究的疫情返乡人员管理系统,主要功能模块包括:防疫须知、疫情用品、返乡报备、用户反馈管理等,主要是主要采取Mysql作为后台数据的主要存储单元,运用软件工程原理和开发方法,采用Python的Django技术构建的,实现了系统的全部功能。本次报告,首先分析了研究的背景、作用、意义,为研究工作的合理性打下了基础。
随便推点
您绝对不能错过的 10 个 OKR 示例!_优秀的okr案例-程序员宅基地
文章浏览阅读429次,点赞6次,收藏8次。在此基础上,制定团队 OKR,它可以是产品层面的或部门层面的,但它们会融入组织的目标中。使用 OKR 方法的一个巨大好处是,它可以针对不同的部门和团队进行细分, 以便整个公司追求相同的组织目标,但利用特定的关键结果。如果您没有达到 100% 的关键结果,您仍然应该为实现这一目标所付出的努力感到自豪,评估是否需要进行更改,并重新调整下一个周期的目标和关键结果。令人惊讶的是,伦敦商学院进行的一项研究显示,在接受调查的 11,000 名高级管理人员中,只有三分之一能够列出他们公司的三大优先事项。_优秀的okr案例
HDU 5350(MZL's munhaff function-哈夫曼树)_禎痲霤攷 hdu-程序员宅基地
文章浏览阅读2.1k次。MZL's munhaff functionTime Limit: 3000/1500 MS (Java/Others) Memory Limit: 131072/131072 K (Java/Others)Total Submission(s): 230 Accepted Submission(s): 133Problem DescriptionMZL is _禎痲霤攷 hdu
AndroidStudio4.1 自定义模板_android studio 4.1 自定义模板-程序员宅基地
文章浏览阅读1.3k次。AndroidStudio4.0之前,可以在template的文件夹里使用freemarker的自定义模板,可以在AndroidStudio的文件夹中,随意的添加适合自己的自定义模板,之前鸿洋大神的文章已经有来详细的介绍(https://blog.csdn.net/lmj623565791/article/details/51592043)。但是从4.1版本开始提供新的方式,Geminio,用Kotlin的形式编写新的template,而且需要使用插件的形式,才能使用自定义的模板,摸索了好几天,终于解决了_android studio 4.1 自定义模板
微信小程序云开发-酒店点餐类系统,附带(node.js在widows环境下的配置过程)_云开发可以做扫码类么-程序员宅基地
文章浏览阅读3.2k次,点赞3次,收藏11次。前些日子,帮一个学生做了一个毕业设计,是关于酒店点餐的微信小程序,现在整理一下过程。本款小程序是基于微信云开发的,现在做微信小程序的一大方便是:微信给大家提供了免费空间(云开发),对于不想花钱去租用服务器和域名的小伙伴儿来说,这无疑是一大喜事! 本款小程序非常适合商城类小程序的二次开发或是学习商城类小程序最佳的一个案例。废话不多说,直接上图:小程序..._云开发可以做扫码类么
jq使用ajax报错404,jQuery中ajax错误调试分析-程序员宅基地
文章浏览阅读1.8k次。jQuery中把ajax封装得非常好。但是日常开发中,我偶尔还是会遇到ajax报错。这里简单分析一下ajax报错一般的jQuery用法如下,ajax通过post方式提交"汤姆和老鼠"这段数据到xxx.php文件中。成功后则打印返回的数据,失败则打印错误原因。$.ajax({url:"xxx.php",type:"post",datatype:"json",data:{"cat":"tom","mo..._jquery ajax保存数据到后端flask,出现404not found错误
HDU 1587 Flowers 解题报告_2019 flowers acm-程序员宅基地
文章浏览阅读1.3k次。动态规划 完全背包_2019 flowers acm