Android Studio开发:简单的登录注册界面_android studio 登录注册页面-程序员宅基地
技术标签: Android开发
Android开发:编写简单的登录界面与注册界面
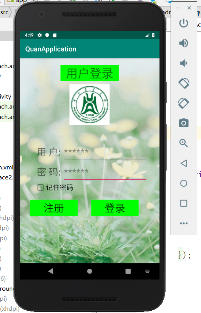
1.登录界面布局
1.1主布局的布局方式是垂直布局,第一个TextView控件在顶部居中布置,显示“用户登录
”字样
<TextView
        android:layout_width="wrap_content"
        android:layout_height="wrap_content"
        android:layout_marginTop="20dp"
        android:layout_gravity="center"
        android:paddingLeft="16dp"
        android:paddingRight="16dp"
        android:background="#00FF00"
        android:textSize="35dp"
        android:text="@string/login_text" />
第二个ImageView控件位于TextView控件下方
<ImageView
        android:layout_width="wrap_content"
        android:layout_height="wrap_content"
        android:layout_gravity="center"
        android:layout_marginTop="10dp"
        android:src="@mipmap/school4"/>
1.2添加第一个子布局,布局方式是水平布局,包含一个TextView控件和一个EditView控件,显示“用户”,和获取用户账号信息。
<LinearLayout
        android:layout_width="wrap_content"
        android:layout_height="wrap_content"
        android:orientation="horizontal">

        <TextView
            android:layout_width="wrap_content"
            android:layout_height="wrap_content"
            android:layout_marginTop="50dp"
            android:layout_marginLeft="50dp"
            android:text="@string/username_text"
            android:textSize="28dp" />

        <EditText
            android:layout_width="250dp"
            android:layout_height="wrap_content"
            android:id="@+id/input_user_text"
            android:layout_marginTop="50dp"
            android:layout_marginLeft="5dp"
            android:maxLines="1"
            android:textSize="28dp"
            android:hint="@string/input_user_text"
            />

    </LinearLayout>
1.3第二个子布局和第一个子布局类似,稍微改一下.xml文件就可以,用于显示“密码”和获取密码信息
<LinearLayout
        android:layout_width="wrap_content"
        android:layout_height="wrap_content"
        android:orientation="horizontal">

        <TextView
            android:layout_width="wrap_content"
            android:layout_height="wrap_content"
            android:layout_marginLeft="50dp"
            android:text="@string/key_text"
            android:textSize="28dp" />

        <EditText
            android:layout_width="250dp"
            android:layout_height="wrap_content"
            android:id="@+id/input_key_text"
            android:layout_marginLeft="5dp"
            android:maxLines="1"
            android:textSize="28dp"
            android:hint="@string/input_key_text"
            />

    </LinearLayout>
1.4第三个子布局是加入一个CheckBox控件,用于记住账号和密码信息
<LinearLayout
        android:layout_width="wrap_content"
        android:layout_height="wrap_content"
        android:orientation="horizontal">
        <CheckBox
            android:layout_width="wrap_content"
            android:layout_height="wrap_content"
            android:id="@+id/checkbox_text"
            android:orientation="vertical"
            android:layout_marginLeft="45dp"
            android:checked="true"
            android:textSize="20dp"
            android:text="@string/checkbox_text"/>

    </LinearLayout>
1.5最后一个子布局是两个Button控件,用于显示“注册”按钮和“登录”按钮
<LinearLayout
        android:layout_width="wrap_content"
        android:layout_height="wrap_content"
        android:layout_marginTop="20dp"
        android:orientation="horizontal">

        <Button
            android:layout_width="wrap_content"
            android:layout_height="wrap_content"
            android:id="@+id/register_button"
            android:layout_marginLeft="30dp"
            android:background="#00FF00"
            android:paddingLeft="40dp"
            android:paddingRight="40dp"
            android:textSize="30dp"
            android:text="@string/register_button" />

        <Button
            android:layout_width="wrap_content"
            android:layout_height="wrap_content"
            android:id="@+id/login_button"
            android:layout_marginLeft="40dp"
            android:background="#00FF00"
            android:paddingLeft="40dp"
            android:paddingRight="40dp"
            android:textSize="30dp"
            android:text="@string/login_button"/>

    </LinearLayout>
1.6 背景图片都是我自己从网上找的,这个不重要
1.7 activity_main.xml文件
<?xml version="1.0" encoding="utf-8"?>
<LinearLayout xmlns:android="http://schemas.android.com/apk/res/android"


    android:layout_width="match_parent"
    android:layout_height="match_parent"
    android:orientation="vertical"
    android:background="@mipmap/bgj">


    <TextView
        android:layout_width="wrap_content"
        android:layout_height="wrap_content"
        android:layout_marginTop="20dp"
        android:layout_gravity="center"
        android:paddingLeft="16dp"
        android:paddingRight="16dp"
        android:background="#00FF00"
        android:textSize="35dp"
        android:text="@string/login_text" />

    <ImageView
        android:layout_width="wrap_content"
        android:layout_height="wrap_content"
        android:layout_gravity="center"
        android:layout_marginTop="10dp"
        android:src="@mipmap/school4"/>

    <LinearLayout
        android:layout_width="wrap_content"
        android:layout_height="wrap_content"
        android:orientation="horizontal">

        <TextView
            android:layout_width="wrap_content"
            android:layout_height="wrap_content"
            android:layout_marginTop="50dp"
            android:layout_marginLeft="50dp"
            android:text="@string/username_text"
            android:textSize="28dp" />

        <EditText
            android:layout_width="250dp"
            android:layout_height="wrap_content"
            android:id="@+id/input_user_text"
            android:layout_marginTop="50dp"
            android:layout_marginLeft="5dp"
            android:maxLines="1"
            android:textSize="28dp"
            android:hint="@string/input_user_text"
            />

    </LinearLayout>

    <LinearLayout
        android:layout_width="wrap_content"
        android:layout_height="wrap_content"
        android:orientation="horizontal">

        <TextView
            android:layout_width="wrap_content"
            android:layout_height="wrap_content"
            android:layout_marginLeft="50dp"
            android:text="@string/key_text"
            android:textSize="28dp" />

        <EditText
            android:layout_width="250dp"
            android:layout_height="wrap_content"
            android:id="@+id/input_key_text"
            android:layout_marginLeft="5dp"
            android:maxLines="1"
            android:textSize="28dp"
            android:hint="@string/input_key_text"
            />

    </LinearLayout>

    <LinearLayout
        android:layout_width="wrap_content"
        android:layout_height="wrap_content"
        android:orientation="horizontal">
        <CheckBox
            android:layout_width="wrap_content"
            android:layout_height="wrap_content"
            android:id="@+id/checkbox_text"
            android:orientation="vertical"
            android:layout_marginLeft="45dp"
            android:checked="true"
            android:textSize="20dp"
            android:text="@string/checkbox_text"/>

    </LinearLayout>

    <LinearLayout
        android:layout_width="wrap_content"
        android:layout_height="wrap_content"
        android:layout_marginTop="20dp"
        android:orientation="horizontal">

        <Button
            android:layout_width="wrap_content"
            android:layout_height="wrap_content"
            android:id="@+id/register_button"
            android:layout_marginLeft="30dp"
            android:background="#00FF00"
            android:paddingLeft="40dp"
            android:paddingRight="40dp"
            android:textSize="30dp"
            android:text="@string/register_button" />

        <Button
            android:layout_width="wrap_content"
            android:layout_height="wrap_content"
            android:id="@+id/login_button"
            android:layout_marginLeft="40dp"
            android:background="#00FF00"
            android:paddingLeft="40dp"
            android:paddingRight="40dp"
            android:textSize="30dp"
            android:text="@string/login_button"/>

    </LinearLayout>

</LinearLayout>
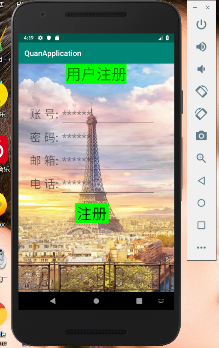
2.注册界面布局
2.1主布局为垂直布局,第一个TextView控件在顶部居中布置,显示“用户注册”字样
<TextView
        android:layout_width="wrap_content"
        android:layout_height="wrap_content"
        android:text="@string/register_surface"
        android:textSize="40dp"
        android:background="#00FF00"
        android:layout_gravity="center"
        />
2.2第一个LinearLayout控件,包含一个TextView控件和EditView控件,用于提醒用户输入和获取账号信息
<LinearLayout
        android:layout_width="wrap_content"
        android:layout_height="wrap_content"
        android:orientation="horizontal">

        <TextView
            android:layout_width="wrap_content"
            android:layout_height="wrap_content"
            android:text="@string/identity_text"
            android:textSize="30dp"
            android:layout_marginTop="50dp"
            android:layout_marginLeft="30dp"/>

        <EditText
            android:id="@+id/input_identity_text"
            android:layout_width="250dp"
            android:layout_height="wrap_content"
            android:layout_marginTop="50dp"
            android:layout_marginLeft="5dp"
            android:textSize="30dp"
            android:maxLines="1"
            android:hint="******"/>
    </LinearLayout>
2.2 第二个、第三个以及第四个LinearLayout控件,组件和第一个LinearLayout控件是相同的,分别用于提醒用户输入和系统获取密码、邮箱、电话等信息
<LinearLayout
        android:layout_width="wrap_content"
        android:layout_height="wrap_content"
        android:orientation="horizontal">

        <TextView
            android:layout_width="wrap_content"
            android:layout_height="wrap_content"
            android:text="@string/password_text"
            android:textSize="30dp"
            android:layout_marginLeft="30dp"/>

        <EditText
            android:id="@+id/input_password_text"
            android:layout_width="250dp"
            android:layout_height="wrap_content"
            android:layout_marginLeft="5dp"
            android:textSize="30dp"
            android:maxLines="1"
            android:hint="******"/>
    </LinearLayout>

    <LinearLayout
        android:layout_width="wrap_content"
        android:layout_height="wrap_content"
        android:orientation="horizontal">

        <TextView
            android:layout_width="wrap_content"
            android:layout_height="wrap_content"
            android:text="@string/mailbox_text"
            android:textSize="30dp"
            android:layout_marginLeft="30dp"/>

        <EditText
            android:id="@+id/input_mailbox_text"
            android:layout_width="250dp"
            android:layout_height="wrap_content"
            android:layout_marginLeft="5dp"
            android:textSize="30dp"
            android:maxLines="1"
            android:hint="******"/>
    </LinearLayout>

    <LinearLayout
        android:layout_width="wrap_content"
        android:layout_height="wrap_content"
        android:orientation="horizontal">

        <TextView
            android:layout_width="wrap_content"
            android:layout_height="wrap_content"
            android:text="@string/phonenumber_text"
            android:textSize="30dp"
            android:layout_marginLeft="30dp"/>

        <EditText
            android:id="@+id/input_phonenumber_text"
            android:layout_width="250dp"
            android:layout_height="wrap_content"
            android:layout_marginLeft="5dp"
            android:textSize="30dp"
            android:maxLines="1"
            android:hint="******"/>
    </LinearLayout>
2.3 最后一个LinearLayout控件只有Button这一个控件,显示“注册”,用于点击注册
<LinearLayout
        android:layout_width="wrap_content"
        android:layout_height="wrap_content"
        android:orientation="horizontal">
    <Button
        android:id="@+id/surface2_register_button"
        android:layout_width="wrap_content"
        android:layout_height="wrap_content"
        android:textSize="40dp"
        android:background="#00FF00"
        android:layout_marginLeft="150dp"
        android:layout_marginTop="20dp"
        android:text="@string/surface2_register_button"
        />

    </LinearLayout>
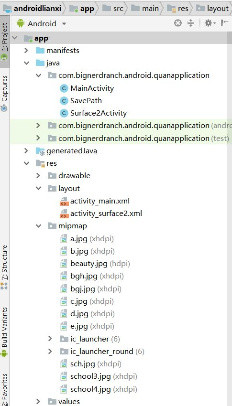
3.代码
3.1 项目结构
3.2 activity_surface2.xml
<?xml version="1.0" encoding="utf-8"?>
<LinearLayout xmlns:android="http://schemas.android.com/apk/res/android"

    android:layout_width="match_parent"
    android:layout_height="match_parent"
    android:orientation="vertical"
    android:background="@mipmap/bgh">

    <TextView
        android:layout_width="wrap_content"
        android:layout_height="wrap_content"
        android:text="@string/register_surface"
        android:textSize="40dp"
        android:background="#00FF00"
        android:layout_gravity="center"
        />

    <LinearLayout
        android:layout_width="wrap_content"
        android:layout_height="wrap_content"
        android:orientation="horizontal">

        <TextView
            android:layout_width="wrap_content"
            android:layout_height="wrap_content"
            android:text="@string/identity_text"
            android:textSize="30dp"
            android:layout_marginTop="50dp"
            android:layout_marginLeft="30dp"/>

        <EditText
            android:id="@+id/input_identity_text"
            android:layout_width="250dp"
            android:layout_height="wrap_content"
            android:layout_marginTop="50dp"
            android:layout_marginLeft="5dp"
            android:textSize="30dp"
            android:maxLines="1"
            android:hint="******"/>
    </LinearLayout>

    <LinearLayout
        android:layout_width="wrap_content"
        android:layout_height="wrap_content"
        android:orientation="horizontal">

        <TextView
            android:layout_width="wrap_content"
            android:layout_height="wrap_content"
            android:text="@string/password_text"
            android:textSize="30dp"
            android:layout_marginLeft="30dp"/>

        <EditText
            android:id="@+id/input_password_text"
            android:layout_width="250dp"
            android:layout_height="wrap_content"
            android:layout_marginLeft="5dp"
            android:textSize="30dp"
            android:maxLines="1"
            android:hint="******"/>
    </LinearLayout>

    <LinearLayout
        android:layout_width="wrap_content"
        android:layout_height="wrap_content"
        android:orientation="horizontal">

        <TextView
            android:layout_width="wrap_content"
            android:layout_height="wrap_content"
            android:text="@string/mailbox_text"
            android:textSize="30dp"
            android:layout_marginLeft="30dp"/>

        <EditText
            android:id="@+id/input_mailbox_text"
            android:layout_width="250dp"
            android:layout_height="wrap_content"
            android:layout_marginLeft="5dp"
            android:textSize="30dp"
            android:maxLines="1"
            android:hint="******"/>
    </LinearLayout>

    <LinearLayout
        android:layout_width="wrap_content"
        android:layout_height="wrap_content"
        android:orientation="horizontal">

        <TextView
            android:layout_width="wrap_content"
            android:layout_height="wrap_content"
            android:text="@string/phonenumber_text"
            android:textSize="30dp"
            android:layout_marginLeft="30dp"/>

        <EditText
            android:id="@+id/input_phonenumber_text"
            android:layout_width="250dp"
            android:layout_height="wrap_content"
            android:layout_marginLeft="5dp"
            android:textSize="30dp"
            android:maxLines="1"
            android:hint="******"/>
    </LinearLayout>

    <LinearLayout
        android:layout_width="wrap_content"
        android:layout_height="wrap_content"
        android:orientation="horizontal">
    <Button
        android:id="@+id/surface2_register_button"
        android:layout_width="wrap_content"
        android:layout_height="wrap_content"
        android:textSize="40dp"
        android:background="#00FF00"
        android:layout_marginLeft="150dp"
        android:layout_marginTop="20dp"
        android:text="@string/surface2_register_button"
        />

    </LinearLayout>

</LinearLayout>
3.3 strings.xml
<resources>
    <string name="app_name">QuanApplication</string>
    <string name="login_text">用户登录</string>
    <string name="checkbox_text">记住密码</string>
    <string name="username_text">用 户:</string>
    <string name="input_user_text">******</string>
    <string name="key_text">密 码:</string>
    <string name="input_key_text">******</string>
    <string name="register_button">注册</string>
    <string name="login_button">登录</string>

    <string name="message1">账号或者密码不能为空</string>
    <string name="message2">保存成功</string>

    <string name="press_login_button1">欢迎登录!</string>
    <string name="press_login_button2">登录失败!</string>
    <string name="press_register_button">欢迎注册!</string>

    <string name="register_surface">用户注册</string>
    <string name="identity_text">账 号:</string>
    <string name="input_identity_text">******</string>
    <string name="password_text">密 码:</string>
    <string name="input_password_text"></string>
    <string name="mailbox_text">邮 箱:</string>
    <string name="input_mailbox_text"></string>
    <string name="phonenumber_text">电 话:</string>
    <string name="input_phonenumber_text"></string>
    <string name="surface2_register_button">注册</string>
    <string name="register_message">注册成功!</string>
    <string name="surface2_message">不能为空!</string>
</resources>
3.4 MainActivity.java
package com.bignerdranch.android.quanapplication;

import android.support.v7.app.AppCompatActivity;
import android.os.Bundle;
import android.view.View;
import android.widget.Button;
import android.widget.EditText;
import android.widget.Toast;
import android.app.Activity;
import android.app.Service;
import android.text.TextUtils;
import android.view.Menu;
import android.view.View;
import android.widget.CheckBox;
import java.util.Map;
import android.content.Intent;


public class MainActivity extends AppCompatActivity {

    private CheckBox mCheckBox;
    private Button mRegisterButton;//注册按钮
    private Button mLoginButton;//登录按钮

    private EditText mUser;
    private EditText mKey;

    @Override
    protected void onCreate(Bundle savedInstanceState) {
        super.onCreate(savedInstanceState);
        setContentView(R.layout.activity_main);

        mUser=(EditText)findViewById(R.id.input_user_text);
        mKey=(EditText)findViewById(R.id.input_key_text);
        mRegisterButton=(Button)findViewById(R.id.register_button);
        mLoginButton=(Button)findViewById(R.id.login_button);
        mCheckBox=(CheckBox)findViewById(R.id.checkbox_text);
        //检查是否有账号密码,如果有,需要回显
        Map<String, String> map=SavePath.Get(this);
        if(map!=null){
            mUser.setText(map.get("user"));
            mKey.setText(map.get("key"));
        }


        mLoginButton.setOnClickListener(new View.OnClickListener(){
            @Override
            public void onClick(View v)  //给登录按钮设置监听器
            {
                String username = mUser.getText().toString();
                String userpassword = mKey.getText().toString();
                String username1=Surface2Activity.Getusername();//获取注册值
                String userpassword1=Surface2Activity.Getuserpassword();//获取注册值

                //if(!username.equals(username1))//验证
                //{Toast.makeText(MainActivity.this, username1,
                       // Toast.LENGTH_SHORT).show();}


                if(TextUtils.isEmpty(username)||TextUtils.isEmpty(userpassword)){
                    Toast.makeText(MainActivity.this, R.string.message1,
                            Toast.LENGTH_SHORT).show();
                }
                if(mCheckBox.isChecked()){
                    boolean result=SavePath.Save(MainActivity.this,username,userpassword);
                    if(result){
                        Toast.makeText(MainActivity.this, R.string.message2,
                                Toast.LENGTH_SHORT).show();
                    }
                }

                if(username.equals(username1)&&userpassword.equals(userpassword1)) {
                    Toast.makeText(MainActivity.this, R.string.press_login_button1,
                            Toast.LENGTH_SHORT).show();//事件触发,显示欢迎信息
                    //下面跳转问卷界面
                }
                else {
                    Toast.makeText(MainActivity.this,R.string.press_login_button2,
                            Toast.LENGTH_SHORT).show();//事件触发,显示登录失败
                }

            }
        });

        mRegisterButton.setOnClickListener(new View.OnClickListener(){
            @Override
            public void onClick(View v)
            {
                Intent intent = new Intent();
                intent.setClass(MainActivity.this, Surface2Activity.class);
                startActivity(intent);//跳转注册界面

                finish();
            }
        });

    }
}
3.5 Surface2Activity.java
package com.bignerdranch.android.quanapplication;

import android.support.v7.app.AppCompatActivity;
import android.os.Bundle;
import android.view.View;
import android.widget.Button;
import android.widget.EditText;
import android.widget.Toast;
import android.app.Activity;
import android.app.Service;
import android.text.TextUtils;
import android.view.Menu;
import android.view.View;
import android.widget.CheckBox;
import java.util.Map;
import android.content.Intent;


public class MainActivity extends AppCompatActivity {

    private CheckBox mCheckBox;
    private Button mRegisterButton;//注册按钮
    private Button mLoginButton;//登录按钮

    private EditText mUser;
    private EditText mKey;

    @Override
    protected void onCreate(Bundle savedInstanceState) {
        super.onCreate(savedInstanceState);
        setContentView(R.layout.activity_main);

        mUser=(EditText)findViewById(R.id.input_user_text);
        mKey=(EditText)findViewById(R.id.input_key_text);
        mRegisterButton=(Button)findViewById(R.id.register_button);
        mLoginButton=(Button)findViewById(R.id.login_button);
        mCheckBox=(CheckBox)findViewById(R.id.checkbox_text);
        //检查是否有账号密码,如果有,需要回显
        Map<String, String> map=SavePath.Get(this);
        if(map!=null){
            mUser.setText(map.get("user"));
            mKey.setText(map.get("key"));
        }


        mLoginButton.setOnClickListener(new View.OnClickListener(){
            @Override
            public void onClick(View v)  //给登录按钮设置监听器
            {
                String username = mUser.getText().toString();
                String userpassword = mKey.getText().toString();
                String username1=Surface2Activity.Getusername();//获取注册值
                String userpassword1=Surface2Activity.Getuserpassword();//获取注册值

                //if(!username.equals(username1))//验证
                //{Toast.makeText(MainActivity.this, username1,
                       // Toast.LENGTH_SHORT).show();}


                if(TextUtils.isEmpty(username)||TextUtils.isEmpty(userpassword)){
                    Toast.makeText(MainActivity.this, R.string.message1,
                            Toast.LENGTH_SHORT).show();
                }
                if(mCheckBox.isChecked()){
                    boolean result=SavePath.Save(MainActivity.this,username,userpassword);
                    if(result){
                        Toast.makeText(MainActivity.this, R.string.message2,
                                Toast.LENGTH_SHORT).show();
                    }
                }

                if(username.equals(username1)&&userpassword.equals(userpassword1)) {
                    Toast.makeText(MainActivity.this, R.string.press_login_button1,
                            Toast.LENGTH_SHORT).show();//事件触发,显示欢迎信息
                    //下面跳转问卷界面
                }
                else {
                    Toast.makeText(MainActivity.this,R.string.press_login_button2,
                            Toast.LENGTH_SHORT).show();//事件触发,显示登录失败
                }

            }
        });

        mRegisterButton.setOnClickListener(new View.OnClickListener(){
            @Override
            public void onClick(View v)
            {
                Intent intent = new Intent();
                intent.setClass(MainActivity.this, Surface2Activity.class);
                startActivity(intent);//跳转注册界面

                finish();
            }
        });

    }
}
3.6 SavePath.java
package com.bignerdranch.android.quanapplication;

import java.io.BufferedReader;
import java.io.File;
import java.io.FileInputStream;
import java.io.FileNotFoundException;
import java.io.FileOutputStream;
import java.io.IOException;
import java.io.InputStreamReader;
import java.util.HashMap;
import java.util.Map;

import android.content.Context;
import android.os.Environment;

public class SavePath {
    public static boolean Save(Context context,String user,String key){

        try {

            File f= new File(context.getFilesDir(),"info.txt");
            FileOutputStream fs=new FileOutputStream(f);
            fs.write((user+"#####"+key).getBytes());
            fs.close();
            return true;
        } catch (Exception e) {
            // TODO Auto-generated catch block
            e.printStackTrace();
            return false;
        }
    }
    public static Map<String,String> Get(Context context){
        File f= new File(context.getFilesDir(),"info.txt");
        try {
            BufferedReader br= new BufferedReader(new InputStreamReader(new FileInputStream(f)));
            String s=br.readLine();
            String[] srinfo=s.split("#####");
            Map<String,String> map=new HashMap<String, String>();
            map.put("user",srinfo[0]);
            map.put("key",srinfo[1]);
            return map;
        } catch (Exception e) {
            // TODO Auto-generated catch block
            e.printStackTrace();
            return null;
        }


    }

}
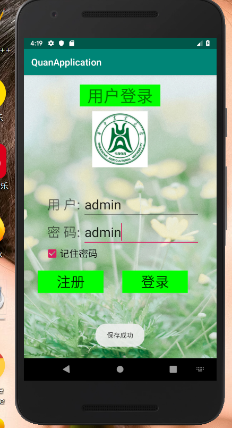
4.代码运行截图

5.参考博客地址
https://blog.csdn.net/lx144630/article/details/82768759
https://blog.csdn.net/as4061218/article/details/50295673
https://blog.csdn.net/mjyy10181103/article/details/78261500
欢迎使用Markdown编辑器
你好! 这是你第一次使用 Markdown编辑器 所展示的欢迎页。如果你想学习如何使用Markdown编辑器, 可以仔细阅读这篇文章,了解一下Markdown的基本语法知识。
新的改变
我们对Markdown编辑器进行了一些功能拓展与语法支持,除了标准的Markdown编辑器功能,我们增加了如下几点新功能,帮助你用它写博客:
- 全新的界面设计 ,将会带来全新的写作体验;
- 在创作中心设置你喜爱的代码高亮样式,Markdown 将代码片显示选择的高亮样式 进行展示;
- 增加了 图片拖拽 功能,你可以将本地的图片直接拖拽到编辑区域直接展示;
- 全新的 KaTeX数学公式 语法;
- 增加了支持甘特图的mermaid语法1 功能;
- 增加了 多屏幕编辑 Markdown文章功能;
- 增加了 焦点写作模式、预览模式、简洁写作模式、左右区域同步滚轮设置 等功能,功能按钮位于编辑区域与预览区域中间;
- 增加了 检查列表 功能。
功能快捷键
撤销:Ctrl/Command + Z
重做:Ctrl/Command + Y
加粗:Ctrl/Command + B
斜体:Ctrl/Command + I
标题:Ctrl/Command + Shift + H
无序列表:Ctrl/Command + Shift + U
有序列表:Ctrl/Command + Shift + O
检查列表:Ctrl/Command + Shift + C
插入代码:Ctrl/Command + Shift + K
插入链接:Ctrl/Command + Shift + L
插入图片:Ctrl/Command + Shift + G
合理的创建标题,有助于目录的生成
直接输入1次#,并按下space后,将生成1级标题。
输入2次#,并按下space后,将生成2级标题。
以此类推,我们支持6级标题。有助于使用TOC语法后生成一个完美的目录。
如何改变文本的样式
强调文本 强调文本
加粗文本 加粗文本
标记文本
删除文本
引用文本
H2O is是液体。
210 运算结果是 1024.
插入链接与图片
链接: link.
图片: 
带尺寸的图片: ![]()
居中的图片: 
居中并且带尺寸的图片: ![]()
当然,我们为了让用户更加便捷,我们增加了图片拖拽功能。
如何插入一段漂亮的代码片
去博客设置页面,选择一款你喜欢的代码片高亮样式,下面展示同样高亮的 代码片.
// An highlighted block
var foo = 'bar';
生成一个适合你的列表
- 项目
- 项目
- 项目
- 项目
- 项目1
- 项目2
- 项目3
- 计划任务
- 完成任务
创建一个表格
一个简单的表格是这么创建的:
| 项目 | Value |
|---|---|
| 电脑 | $1600 |
| 手机 | $12 |
| 导管 | $1 |
设定内容居中、居左、居右
使用:---------:居中
使用:----------居左
使用----------:居右
| 第一列 | 第二列 | 第三列 |
|---|---|---|
| 第一列文本居中 | 第二列文本居右 | 第三列文本居左 |
SmartyPants
SmartyPants将ASCII标点字符转换为“智能”印刷标点HTML实体。例如:
| TYPE | ASCII | HTML |
|---|---|---|
| Single backticks | 'Isn't this fun?' |
‘Isn’t this fun?’ |
| Quotes | "Isn't this fun?" |
“Isn’t this fun?” |
| Dashes | -- is en-dash, --- is em-dash |
– is en-dash, — is em-dash |
创建一个自定义列表
-
Markdown
- Text-to- HTML conversion tool Authors
- John
- Luke
如何创建一个注脚
一个具有注脚的文本。2
注释也是必不可少的
Markdown将文本转换为 HTML。
KaTeX数学公式
您可以使用渲染LaTeX数学表达式 KaTeX:
Gamma公式展示 Γ ( n ) = ( n − 1 ) ! ∀ n ∈ N \Gamma(n) = (n-1)!\quad\forall n\in\mathbb N Γ(n)=(n−1)!∀n∈N 是通过欧拉积分
Γ ( z ) = ∫ 0 ∞ t z − 1 e − t d t   . \Gamma(z) = \int_0^\infty t^{z-1}e^{-t}dt\,. Γ(z)=∫0∞tz−1e−tdt.
你可以找到更多关于的信息 LaTeX 数学表达式here.
新的甘特图功能,丰富你的文章
- 关于 甘特图 语法,参考 这儿,
UML 图表
可以使用UML图表进行渲染。 Mermaid. 例如下面产生的一个序列图::
这将产生一个流程图。:
- 关于 Mermaid 语法,参考 这儿,
FLowchart流程图
我们依旧会支持flowchart的流程图:
- 关于 Flowchart流程图 语法,参考 这儿.
导出与导入
导出
如果你想尝试使用此编辑器, 你可以在此篇文章任意编辑。当你完成了一篇文章的写作, 在上方工具栏找到 文章导出 ,生成一个.md文件或者.html文件进行本地保存。
导入
如果你想加载一篇你写过的.md文件或者.html文件,在上方工具栏可以选择导入功能进行对应扩展名的文件导入,
继续你的创作。
注脚的解释 ︎
智能推荐
从MIF文件直接读取道路数据-程序员宅基地
文章浏览阅读344次。stringfile=@"C:\Inetpub\wwwroot\SSWeb\node\Road.MIF";//载入数据,使用绝对路径(单独制作的综合节点图层)StreamReadersr=newStreamReader(file);stringnextLine,sTmp;longnTmp,mTmp;..._mif路网数据
为什么要用Python来处理数据分析_用python处理数据的意义是什么-程序员宅基地
文章浏览阅读947次。如果你对数据分析有所了解,一定听说过一些亲民的工具如Excel、Tableau、PowerBI等,都能成为数据分析的得力助手。但它们的不足也是显而易见的:操作繁琐,复用性差,功能相对局限单一。怎么解决呢?——PythonPython有很多优点,如果你能很好的运用到工作中,会发现工作效率大大提升,涨薪也是再正常不过的事情。Python优点一:“流程可控,工作高效”举个例子,Excel做分析..._用python处理数据的意义是什么
Openlayer加载WFS图层及C#编写ASP.net代理解决跨域问题,好长的题目-程序员宅基地
文章浏览阅读283次。NND,openlayers跨域访问geoserver居然要用到代理,貌似Felx就不用,用C#编写代理网上普遍是这样的: public class GeoServerProxy1 : IHttpHandler { public void ProcessRequest(HttpContext context) { ..._asp.net 引入 openlayers
SEC7120: 在 Access-Control-Allow-Origin 标头中未找到源_sec7120 无法支持-程序员宅基地
文章浏览阅读7.6k次。SEC7120: 在 Access-Control-Allow-Origin 标头中未找到源 https://b.test.com。SCRIPT7002: XMLHttpRequest: 网络错误 0x80070005, 拒绝访问。SEC7119: https://api.test.com/api/product/single/queryPageRecommendProductPop?typeId=图文 的 XMLHttpRequest 需要飞行前 CORS。SEC7118: https://api._sec7120 无法支持
kubrnetes集群管理系列之pod详解(三)_集群和pod的关系-程序员宅基地
文章浏览阅读585次。k8s集群的最重要的管理工作都是围绕着pods这个资源来进行的,可以说是最根本的东西,没有之一,pods的地位可以简单理解为docker里的容器,但和容器又有所不同(当然是有所不同了嘛,要不干嘛还叫pods,直接叫容器得了,不是更方便???),因此,在进行管理工作前,我们需要明确pods到底是什么玩意,能干什么,为什么要用它,然后才是对pods的增删改查等等这些具体的管理工作了。pod是一组并置的容器,代表了Kubernetes中的基本构建模 块。在实际应用中我们并不会单独部署容器,更多的是针对组pod 的_集群和pod的关系
笔记——idea修改相关配置(字节码,SDK)的版本_idea修改项目sdk-程序员宅基地
文章浏览阅读3.1k次,点赞4次,收藏4次。1,file→setting中的Java Compiler内,设置项目字节码版本和目标字节码版本。(目标字节码版本在点击maven中刷新时,会被还原成1.5,还没解决。)2,file→project structure→project中,设置SDK以及语言等级This SDK is default for all project modules.对于所有项目模块,这个SDK都是默认的。A module specific SDK can be configured for each of the m_idea修改项目sdk
随便推点
影视处理计算机配置,影视后期制作电脑配置需要什么-程序员宅基地
文章浏览阅读3.4k次。说起电脑配置大家应该都不陌生,配置直译文是配备布置的意思,就是把缺少的不足并且设置好。在这里我们说到的是影视后期制作电脑配置,这是关于影视后期制作的电脑配置,是专门对于后期制作中的电脑的配置方法,下面我们就系统的看一下。电脑配置:主板:映泰 Hi-Fi Z87W,大板,Z87芯片组,4条DDR3插槽,2条显卡插槽,¥699。CPU:酷睿i7-4770K ,最新Haswell架构 第四代i7,四核八..._做视频需要电脑什么配置
Android 自定义漂亮的Seekbar样式_android seekbar 覆盖线条-程序员宅基地
文章浏览阅读2.9k次,点赞2次,收藏18次。Android自定义漂亮的Seekbar样式Seekbar通常用于与用户有交互的操作,便于拖拉进度,显示当前进度,当然一个漂亮的seekbar无疑会增加许多用户体验性,下面我就通过一个实例,展示一下怎么自定义一个漂亮的seekbar.一、Seekbar的属性:android:max[integer]//设置拖动条的最大值android:progress[integer]//设置当前的进度值andro_android seekbar 覆盖线条
Java(TM) 已被阻止,因为它已过时并且需要更新_已阻止java,因为它已过时并且需要更新-程序员宅基地
文章浏览阅读1.9w次,点赞2次,收藏3次。1、问题原因Internet Explorer (IE) 提供了一项新的安全功能,称为 ActiveX 控件阻止,用来检查 IE插件的版本是否为最新版本,如果不是最新版本,则要求用户升级组件。如果此功能发现 Java 已过时,则将阻止应用程序或 Web 页的加载,并且将提供更新 Java 的选项。2、解决方案建议您先更新 Java,然后再允许应用程序运行。单击更新并下载最新_已阻止java,因为它已过时并且需要更新
elasticsearch得分设置以及分词器不同层次定义_elasticsearch 分词词性权重-程序员宅基地
文章浏览阅读1k次。GET _cat/indicesGET hotel/_searchGET /_search{ "query": { "constant_score": { "filter": { "term": { "lvg_mc": "酒店" } }, "boost": 1.2 } }}DELETE /my_index PUT /my_index{ "settings": { "numbe_elasticsearch 分词词性权重
RPI.GPIO使用手册_rpi.gpio用法-程序员宅基地
文章浏览阅读1.6w次,点赞5次,收藏71次。目录(?)[+]RPiGPIO模块基本使用导入模块引脚编号方式设置一个通道输入输出设置多个通道的输出清空GPIO 输入上拉或者下拉电阻测试输入轮询中断与边沿检测线程回调开关去抖GPIO 输出设置RPiGPIO设置为高电平输出设置低电平输出同时设置多个通道的输出清空PWM脉冲宽度调制1.RPi.GPIO模块基本使用导入模_rpi.gpio用法
JavaMail发送邮件和附件(源码)-程序员宅基地
文章浏览阅读8.6k次。JavaMail是Sun发布的处理电子邮件的应用程序接口,它预置了一些最常用的邮件传送协议的实现方法,并且提供了很容易的方法去调用它们。JavaMail是Sun发布的应用程序接口,所以目前它还没有被JDK包含。因此你需要从Sun的官方网站上下载到JavaMail类文件包。除此之外还需要Sun的JAF(JavaBeans Activation Framework ),否则JavaMail将不能运行。