GeoServer二次开发-OWS服务(自定义模块)_geoserver二次开发教程-程序员宅基地
技术标签: GeoServer
title: GeoServer二次开发-OWS服务(自定义模块)
date: 2021-04-25
author: ac
tags:
- GeoServer
categories:
- GIS
本章介绍GeoServer Dispatcher如何在GeoServer中实现OWS服务,以及创建GeoServer 自定义模块的步骤,将其用作GeoServer扩展。
1. OWS
OGC定义了一系列Web协议,这些协议都遵循类似的设计(接口)。将这些共有的接口实现规范和标准参考抽离出来,就形成了OWS。OWS使用以下方法定义服务:
- Service
- Version
- Request - a service
GeoServer的ows 包的org.geoserver.ows.Dispatcher 类处理所有OWS的请求,同时Spring框架会为这些请求注入合适的实现。
这些服务使用jar包中包含的Spring applicationContext.xml文件为Dispatcher进行配置。
2. OWS示例
现在我们开始来实现一个简单的OWS服务。
- 新建一个Maven项目
- 创建插件(plug-in)
- 打包编译
- 部署运行
新建一个Maven项目
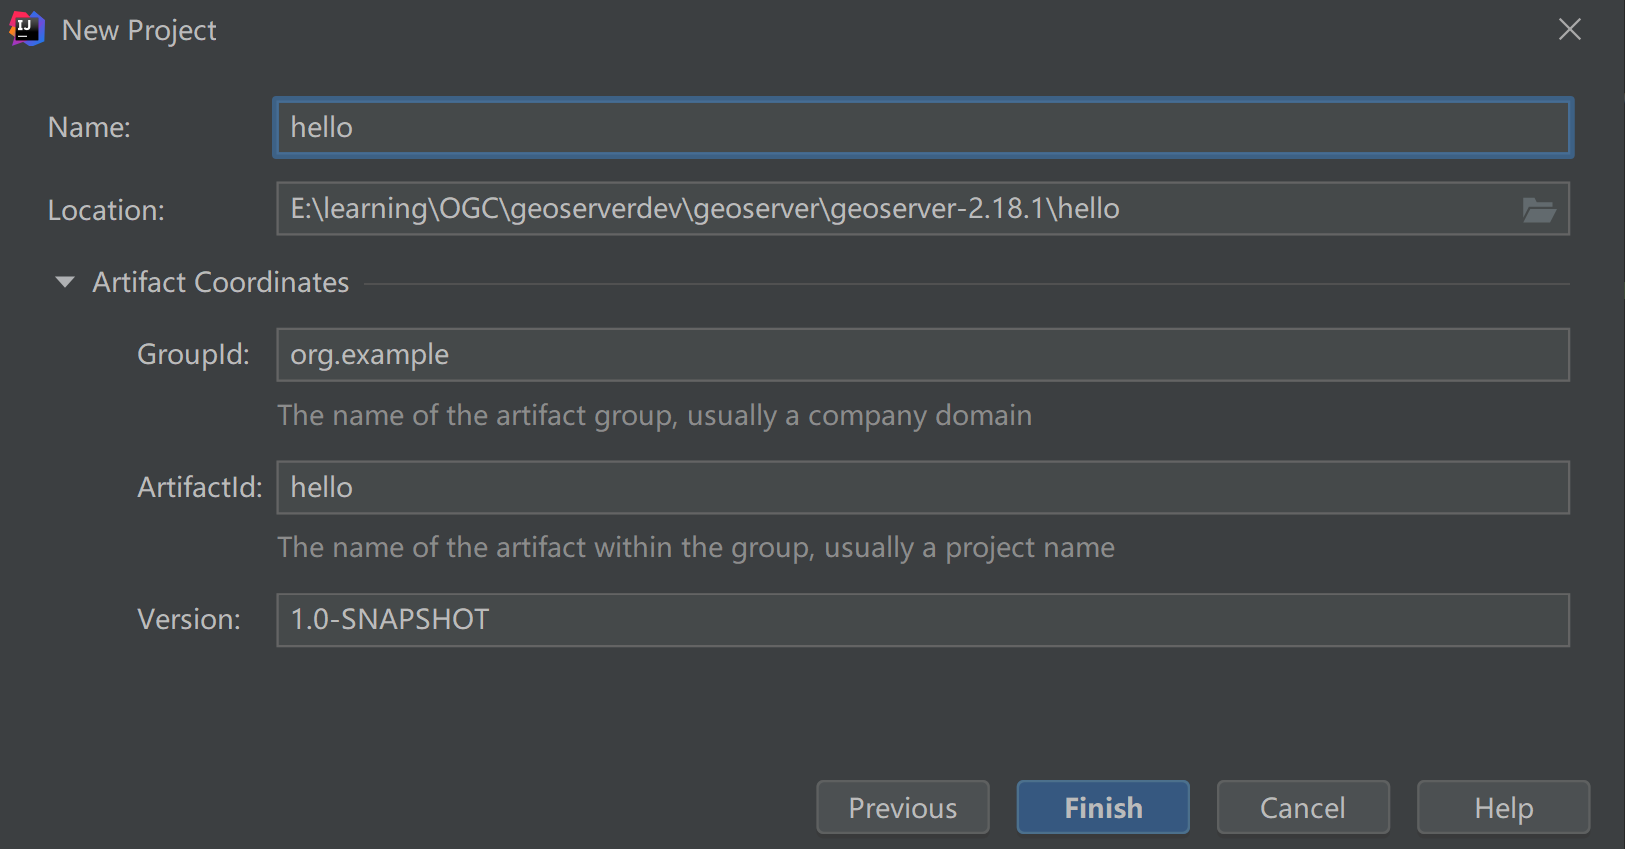
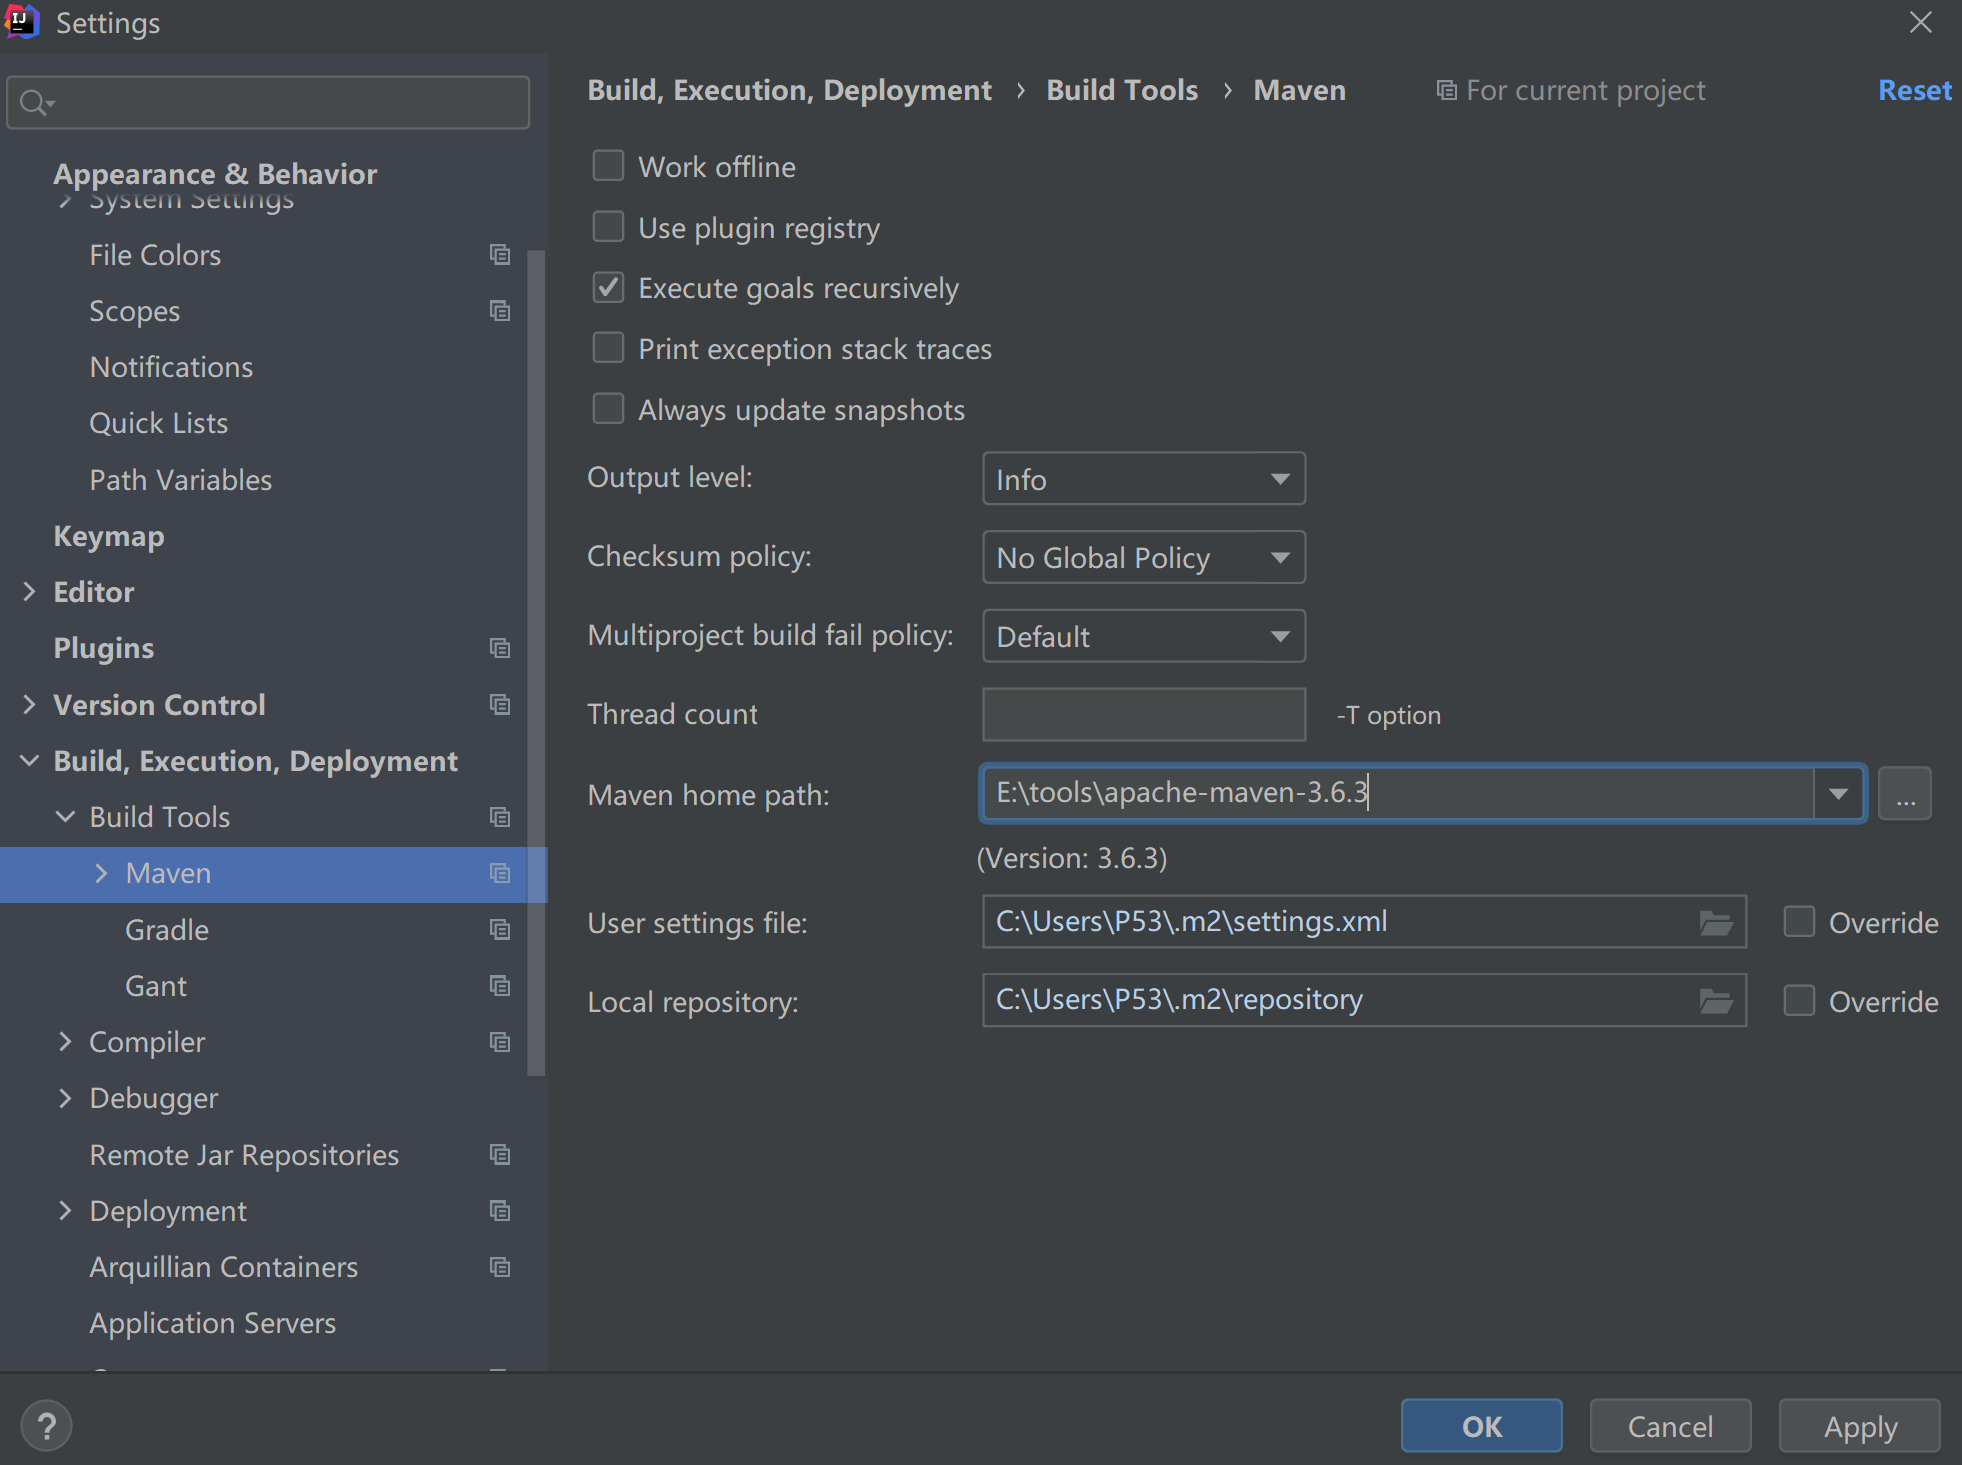
将项目中的Maven指定为本地的安装路径,这样就可以引用之前源码打包的各模块的jar。
在pom.xml文件中指定父级项目为org.geoserver.community、添加依赖以及指定打包方式:
<?xml version="1.0" encoding="UTF-8"?>
<project xmlns="http://maven.apache.org/POM/4.0.0"
         xmlns:xsi="http://www.w3.org/2001/XMLSchema-instance"
         xsi:schemaLocation="http://maven.apache.org/POM/4.0.0 http://maven.apache.org/xsd/maven-4.0.0.xsd">
    <modelVersion>4.0.0</modelVersion>

    <groupId>org.geoserver</groupId>
    <artifactId>hello</artifactId>
    <packaging>jar</packaging>
    <version>1.0</version>

    <properties>
        <maven.compiler.source>8</maven.compiler.source>
        <maven.compiler.target>8</maven.compiler.target>
    </properties>

    <parent>
        <groupId>org.geoserver</groupId>
        <artifactId>community</artifactId>
        <version>2.18.1</version>
    </parent>

    <dependencies>
        <dependency>
            <groupId>org.geoserver</groupId>
            <artifactId>gs-main</artifactId>
            <version>2.18.1</version>
        </dependency>
    </dependencies>
</project>
目录结构
hello/
  + pom.xml
  + src/
    + main/
      + java/
创建插件(plug-in)
A plug-in is a collection of extensions realized as spring beans.
一个插件是通过Spring bean的方式实现的扩展集合。本例创建一个HelloWorld.java:
import java.io.IOException;
import javax.servlet.ServletException;
import javax.servlet.http.HttpServletRequest;
import javax.servlet.http.HttpServletResponse;

public class HelloWorld {


    public HelloWorld() {

        // Do nothing
    }

    public void sayHello(HttpServletRequest request, HttpServletResponse response)
            throws ServletException, IOException {

        response.getOutputStream().write("Hello World".getBytes());
    }
}
该服务相对简单。它提供了一个sayHello方法,接受一个HttpServletRequest和一个HttpServletResponse。这个方法的参数由org.geoserver.ows.Dispatcher自动注入。
创建applicationContext.xml文件,配置bean:
<?xml version="1.0" encoding="UTF-8"?>
<beans xmlns="http://www.springframework.org/schema/beans"
       xmlns:xsi="http://www.w3.org/2001/XMLSchema-instance"
       xsi:schemaLocation="http://www.springframework.org/schema/beans http://www.springframework.org/schema/beans/spring-beans.xsd">

    <!-- 将新建的HelloWorld服务类配置到Spring容器中   -->
    <bean id="helloService" class="HelloWorld"/>

    <!--  在容器中配置一个对应的服务描述类,用于org.geoserver.ows.Dispatcher定位服务  -->
    <bean id="helloService-1.0.0" class="org.geoserver.platform.Service">

        <!-- 服务的id,对应URL请求中的service名称 -->
        <constructor-arg index="0" value="hello"/>

        <!-- 服务对应的处理类 -->
        <constructor-arg index="1" ref="helloService"/>

        <!-- 服务的版本 -->
        <constructor-arg index="2" value="1.0.0"/>

        <!-- 服务的方法列表 -->
        <constructor-arg index="3">
            <list>
                <value>sayHello</value>
            </list>
        </constructor-arg>
    </bean>
</beans>
上面Spring是根据构造器的方式创建org.geoserver.platform.Service的实例bean的,对应的构造方法如下:
 public Service(String id, Object service, Version version, List<String> operations) {

     this(id, null, service, version, operations);
 }
目录结构:
hello/
  + pom.xml
  + src/
    + main/
      + java/
        + HelloWorld.java
        + applicationContext.xml
打包编译
cmd进入项目根目录下,执行mvn install打包项目:
hello>mvn install
[INFO] Scanning for projects...
[INFO]
[INFO] ------------------------< org.geoserver:hello >-------------------------
[INFO] Building hello 1.0
[INFO] --------------------------------[ jar ]---------------------------------
[INFO]
[INFO] --- git-commit-id-plugin:2.1.15:revision (default) @ hello ---
[INFO]
[INFO] --- directory-maven-plugin:0.3.1:highest-basedir (directories) @ hello ---
[INFO] Highest basedir set to: E:\learning\OGC\geoserverdev\geoserver\geoserver-2.18.1\hello
[INFO]
[INFO] --- fmt-maven-plugin:2.4.0:format (default) @ hello ---
[debug] Using AOSP style
[INFO] Processed 1 files (1 reformatted).
[INFO]
[INFO] --- maven-resources-plugin:2.6:resources (default-resources) @ hello ---
[INFO] Using 'UTF-8' encoding to copy filtered resources.
[INFO] Copying 1 resource
[INFO] Copying 0 resource
[INFO]
[INFO] --- maven-compiler-plugin:3.8.0:compile (default-compile) @ hello ---
[INFO] Changes detected - recompiling the module!
[INFO] Compiling 1 source file to E:\learning\OGC\geoserverdev\geoserver\geoserver-2.18.1\hello\target\classes
[INFO]
[INFO] --- maven-resources-plugin:2.6:testResources (default-testResources) @ hello ---
[INFO] Using 'UTF-8' encoding to copy filtered resources.
[INFO] Copying 0 resource
[INFO] skip non existing resourceDirectory E:\learning\OGC\geoserverdev\geoserver\geoserver-2.18.1\hello\src\test\resources
[INFO]
[INFO] --- maven-compiler-plugin:3.8.0:testCompile (default-testCompile) @ hello ---
[INFO] Nothing to compile - all classes are up to date
[INFO]
[INFO] --- maven-surefire-plugin:2.22.2:test (default-test) @ hello ---
[INFO]
[INFO] --- maven-jar-plugin:2.4:jar (default-jar) @ hello ---
[INFO] Building jar: E:\learning\OGC\geoserverdev\geoserver\geoserver-2.18.1\hello\target\hello-1.0.jar
[INFO]
[INFO] --- maven-jar-plugin:2.4:test-jar (default) @ hello ---
[INFO] Building jar: E:\learning\OGC\geoserverdev\geoserver\geoserver-2.18.1\hello\target\hello-1.0-tests.jar
[INFO]
[INFO] --- maven-source-plugin:2.2.1:jar-no-fork (attach-sources) @ hello ---
[INFO] Building jar: E:\learning\OGC\geoserverdev\geoserver\geoserver-2.18.1\hello\target\hello-1.0-sources.jar
[INFO]
[INFO] --- maven-source-plugin:2.2.1:test-jar-no-fork (attach-sources) @ hello ---
[INFO] No sources in project. Archive not created.
[INFO]
[INFO] --- maven-install-plugin:2.4:install (default-install) @ hello ---
[INFO] Installing E:\learning\OGC\geoserverdev\geoserver\geoserver-2.18.1\hello\target\hello-1.0.jar to C:\Users\P53\.m2\repository\org\geoserver\hello\1.0\hello-1.0.jar
[INFO] Installing E:\learning\OGC\geoserverdev\geoserver\geoserver-2.18.1\hello\pom.xml to C:\Users\P53\.m2\repository\org\geoserver\hello\1.0\hello-1.0.pom
[INFO] Installing E:\learning\OGC\geoserverdev\geoserver\geoserver-2.18.1\hello\target\hello-1.0-tests.jar to C:\Users\P53\.m2\repository\org\geoserver\hello\1.0\hello-1.0-tests.jar
[INFO] Installing E:\learning\OGC\geoserverdev\geoserver\geoserver-2.18.1\hello\target\hello-1.0-sources.jar to C:\Users\P53\.m2\repository\org\geoserver\hello\1.0\hello-1.0-sources.jar
[INFO] ------------------------------------------------------------------------
[INFO] BUILD SUCCESS
[INFO] ------------------------------------------------------------------------
[INFO] Total time:  3.689 s
[INFO] Finished at: 2021-04-25T14:20:52+08:00
[INFO] ------------------------------------------------------------------------

部署运行
将打包好的hello.jar拷贝到GeoServer中的webapps\geoserver\WEB-INF\lib 中,重启GeoServer就完成了一个简单的OWS服务扩展。
在浏览器端发送请求验证是否部署成功:
http://localhost:8080/geoserver/ows?request=sayHello&service=hello&version=1.0.0

回到上面开头说的OWS用来定义服务的方式,在applicationContext.xml文件中配置的org.geoserver.platform.Service类中定义服务的描述信息:
- Service:服务的id
- Version:服务的版本
- Requrest:服务操作集合列表中方法名称;
- Request :在applicationContext.xml中根据构造器引用
org.geoserver.platform.Service类的第四个集合参数中的方法名称;
当两个service的id和version都相同时,可以认为这两个service相等。
参考文章
[1] Programming Guide https://docs.geoserver.org/latest/en/developer/programming-guide/index.html
[2] Implementing a simple OWS service https://docs.geoserver.org/latest/en/developer/programming-guide/ows-services/implementing.html
智能推荐
《第一行代码》(第二版)广播的问题及其解决_代码里的广播错误-程序员宅基地
文章浏览阅读2.6k次,点赞5次,收藏13次。1)5.2.1弹出两次已连接或者未连接这是因为你同时打开了流量和WiFi,他就会发出两次广播。2)5.3.1中发送自定义广播问题标准广播未能弹出消息:Intent intent=new Intent("com.example.broadcasttest.MY_BROADCAST");sendBroadcast(intent);上述已经失效了。修改:Intent intent=new Intent("com.example.broadcasttest...._代码里的广播错误
K8s 学习者绝对不能错过的最全知识图谱(内含 58个知识点链接)-程序员宅基地
文章浏览阅读249次。作者 |平名 阿里服务端开发技术专家导读:Kubernetes 作为云原生时代的“操作系统”,熟悉和使用它是每名用户的必备技能。本篇文章概述了容器服务 Kubernet..._k8知识库
TencentOS3.1安装PHP+Nginx+redis测试系统_tencentos-3.1-程序员宅基地
文章浏览阅读923次。分别是etc/pear.conf,etc/php-fpm.conf, etc/php-fpm.d/www.conf,lib/php.ini。php8安装基本一致,因为一个服务期内有2个版本,所以注意修改不同的安装目录和端口号。可以直接使用sbin下的nginx命令启动服务。完成编译安装需要gcc支持,如果没有,使用如下命令安装。安装过程基本一致,下面是安装7.1.33的步骤。执行如下命令,检查已经安装的包和可安装的包。执行如下命令,检查已经安装的包和可安装的包。执行如下命令,检查已经安装的包和可安装的包。_tencentos-3.1
urllib.request.urlopen()基本使用_urllib.request.urlopen(url)-程序员宅基地
文章浏览阅读3.1w次,点赞21次,收藏75次。import urllib.requesturl = 'https://www.python.org'# 方式一response = urllib.request.urlopen(url)print(type(response)) # <class 'http.client.HTTPResponse'># 方式二request = urllib.request.Req..._urllib.request.urlopen(url)
如何用ChatGPT+GEE+ENVI+Python进行高光谱,多光谱成像遥感数据处理?-程序员宅基地
文章浏览阅读1.5k次,点赞12次,收藏15次。如何用ChatGPT+GEE+ENVI+Python进行高光谱,多光谱成像遥感数据处理?
RS485总线常识_rs485 差分走綫間距-程序员宅基地
文章浏览阅读1.2k次。RS485总线常识 2010-10-12 15:56:36| 分类: 知识储备 | 标签:rs485 总线 传输 差分 |字号大中小 订阅RS485总线RS485采用平衡发送和差分接收方式实现通信:发送端将串行口的TTL电平信号转换成差分信号A,B两路输出,经过线缆传输之后在接收端将差分信号还原成TTL电平信号。由于传输线通常使用双绞线,又是差分传输,所_rs485 差分走綫間距
随便推点
移植、制作uboot、Linux(一)_uboot制作-程序员宅基地
文章浏览阅读621次。u-boot、linux烧录_uboot制作
windows下安装git和gitbash安装教程_64-bit git for windows setup.-程序员宅基地
文章浏览阅读1.2w次,点赞10次,收藏44次。windos上git安装,git bash安装_64-bit git for windows setup.
环形链表(算法java)_java 实现环形链表-程序员宅基地
文章浏览阅读196次。环形链表(算法java)的两种解决方法_java 实现环形链表
docker部署Airflow(修改URL-path、更换postgres -->myslq数据库、LDAP登录)_airflow docker-程序员宅基地
文章浏览阅读5.7k次。Airflow什么是 Airflow?Airflow 的架构Airflow 解决哪些问题一、docker-compose 安装airflow(postgres)1、创建启动文件airflow-docker-compose.yml.1.1、添加挂载卷,需要修改airflow-docker-compose.yml的位置2、创建本地配置文件airflow.cfg2.1、如果想修改WEB URL地址,需要修改airflow.cfg中以下两个地方3、之后up -d直接启动即可web访问地址:二、存储数据库更换post_airflow docker
计算机毕业设计springboot高校教务管理系统532k79【附源码+数据库+部署+LW】-程序员宅基地
文章浏览阅读28次。选题背景:随着社会的发展和教育的普及,高校教务管理系统在现代高等教育中扮演着至关重要的角色。传统的手工管理方式已经无法满足高校日益增长的规模和复杂的管理需求。因此,开发一套高效、智能的教务管理系统成为了当今高校管理的迫切需求。选题意义:高校教务管理系统的开发具有重要的意义和价值。首先,它可以提高高校教务管理的效率和准确性。通过自动化处理学生选课、排课、考试安排等繁琐的事务,大大减轻了教务人员的工作负担,提高了工作效率。同时,系统可以实时更新学生信息和课程信息,减少了数据错误和冗余,保证了管理的准确性
javaint接收float_Java Integer转换double,float,int,long,string-程序员宅基地
文章浏览阅读132次。首页>基础教程>常用类>常用 Integer类Java Integer转换double,float,int,long,stringjava中Integer类可以很方便的转换成double,float,int,long,string等类型,都有固定的方法进行转换。方法double doubleValue() //以 double 类型返回该 Integer 的值。flo..._java integet接收float类型的参数