Dagger2教程六之Component的组织方法(原)_daggeractivitycomponent-程序员宅基地
技术标签: Inject Dagger2 Component
上一节我们介绍了 《Dagger2教程五之单例模式》,这一节我们来介绍Component的组织方法。
所谓Component组织方法,也就是我们工程中的Component该如何分布和结合。
对于一款APP来说,一些基础的服务类比如全局Log、图片加载器、网络请求器、缓存器等应该做到全局单例,而对某个Activity或者Fragment来说又有自己的单例或者非单例的对象,那么这种情况下该如何组织我们的注入结构呢?
我们现在知道Component是连接注入类和目标类的桥梁,那么最简单的结构应该是这样的:
1、Application负责创建全局的单例或者非单例注入类的Component对象
2、Activity或Fragment在继承Application提供的Component基础上扩展自己的Component接口
那么具体该如何操作呢?
Dagger2给我们提供两种方法来实现注入继承。
一、使用dependencies属性实现继承注入
如果对比源码看的话, 请将源码分支切换到UseDependencies分支。
1.1、准备ApplicationBean对象
我们创建一个ApplicationBean对象用来作为目标类,准备将其注入到应用中: public class ApplicationBean {
private String name = null;
public ApplicationBean() {
name = "AppBean";
}
public String getAppBeanName() {
return name;
}
}
1.2、准备APP级别的Module对象
然后创建ApplicationModule用来将其注入到目标类,并且我们标记了Singleton准备将其作为单例模式注入: @Module
public class ApplicationModule {
//作为单例模式注入app
@Singleton
@Provides
ApplicationBean privoderAppBean() {
return new ApplicationBean();
}
}
1.3、准备APP级别的Component对象
相应的,我们创建ApplicationComponent用来连接ApplicationModule和Application: @Singleton
@Component(modules = ApplicationModule.class)
public interface ApplicationComponent {
void inject(DaggerApplication application);
//说明将BeanForApplication开放给其他Component使用
ApplicationBean providerAppBean();
}1、由于我们设计要将ApplicationBean作为单例注入,因此ApplicationComponent也需要标记@Singleton标识
2、我们在ApplicationComponent中提供了一个返回值为ApplicationBean对象的方法声明, 它的作用是将该Component中的ApplicationBean对象暴露给其他Component使用,相当于AIDL语言中的方法声明。
1.4、注入Application
我们需要在Application中完成两个任务:1、将ApplicationBean注入到Application内部
2、将ApplicationComponent对象共享给Activity或者其他类
具体实现如下:
        public class DaggerApplication extends Application {
            private ApplicationComponent mAppComponent;
            @Inject
            ApplicationBean mAppBean1;
            @Inject
            ApplicationBean mAppBean2;


            @Override
            public void onCreate() {
                super.onCreate();
                if (mAppComponent == null) {
                    mAppComponent = DaggerApplicationComponent.create();
                }
                mAppComponent.inject(this);
                Log.d("Dagger", "Application mAppBean1:" + mAppBean1);
                Log.d("Dagger", "Application mAppBean2:" + mAppBean2);
            }


            public ApplicationComponent getAppComponent() {
                return mAppComponent;
            }
        }
1.5、准备ActivityBean对象
我们再创建一个Activity的Bean对象用于观察注入情况: public class ActivityBean {
private String name = null;
public ActivityBean() {
}
public String getAppBeanName() {
return name;
}
}
1.6、准备Activity的Module对象
Activity的Module应该提供ActivityBean的注入方式: @Module
public class ActivityModule {
@Provides
ActivityBean providerActivityBean() {
return new ActivityBean();
}
}
1.7、准备Activity的Component对象
我们要在Activity的Component中继承ApplicationComponent,也就是要 让Activity的Component不仅可以从ActivityModule中查找注入类,还要能从ApplicationModule中查找到注入类: @ForActivity
@Component(dependencies = ApplicationComponent.class, modules = ActivityModule.class)
public interface ActivityComponent {
void inject(MainActivity activity);
void inject(MainActivity.OtherClass otherClass);
}1、添加了ForActivity的修饰,而这个ForActivity就是我们自定义的Scope的一种,根据之前我们的介绍, 他的作用和Singleton是一样的,用于限制该Component的使用范围:
        @Scope
        @Retention(RUNTIME)
        public @interface ForActivity {
}2、Component中多了"dependencies = ApplicationComponent.class"的注释,它的作用就是告诉Dagger, 当前Component依赖于ApplicationComponent,在查找注入类的时候不仅要在ActivityModule中查找,还需要去ApplicationComponent中的Module中查找。
3、我们提供了两个inject()方法,作用是要将该Component同时注入到两个对象中,这在之前的介绍中使用过。
1.8、设计Activity对象
我们接下来就要在Activity中同时注入ActivityBean和ApplicationBean对象了,并且ApplicationBean还是全局单例的模式,为了扩展测试,我们在Activity中还创建了一个OtherClass,也将ActivityBean和ApplicationComponent都注入进去进行观察: public class MainActivity extends AppCompatActivity {
@Inject
ApplicationBean applicationBean1;
@Inject
ApplicationBean applicationBean2;
@Inject
ActivityBean activityBean;
@Override
protected void onCreate(@Nullable Bundle savedInstanceState) {
super.onCreate(savedInstanceState);
setContentView(R.layout.activity_main);
DaggerApplication application = (DaggerApplication) getApplication();
ApplicationComponent applicationComponent = application.getAppComponent();
ActivityComponent activityComponent = DaggerActivityComponent.builder().applicationComponent(applicationComponent).build();
activityComponent.inject(this);
Log.d("Dagger", "Activity activityBean:" + activityBean);
Log.d("Dagger", "Activity applicationBean1:" + applicationBean1);
Log.d("Dagger", "Activity applicationBean2:" + applicationBean2);
OtherClass otherClass = new OtherClass();
}
class OtherClass {
@Inject
ApplicationBean applicationBean1;
@Inject
ApplicationBean applicationBean2;
@Inject
ActivityBean activityBean;
public OtherClass() {
DaggerApplication application = (DaggerApplication) getApplication();
ApplicationComponent applicationComponent = application.getAppComponent();
ActivityComponent activityComponent = DaggerActivityComponent.builder().applicationComponent(applicationComponent).build();
activityComponent.inject(this);
Log.d("Dagger", "OtherClass activityBean:" + this.activityBean);
Log.d("Dagger", "OtherClass applicationBean1:" + this.applicationBean1);
Log.d("Dagger", "OtherClass applicationBean2:" + this.applicationBean2);
}
}
}
1.9、结果分析
我们运行之后打印出来的Log如下图: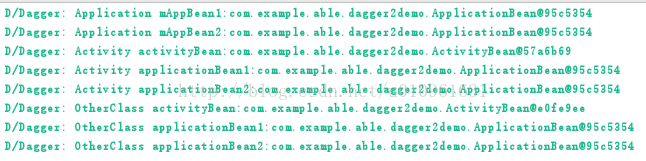
我们来分析Log的表现:
1、Application中注入的mAppBean1和mAppBean2以及Activity中注入的applicationBean1、applicationBean2还有OtherClass中注入的applicationBean1、applicationBean2这六个对象的地址都是95c5354
分析:
1、在Activity和OtherClass中我们可以获取到ApplicationBean对象,说明我们当前的注入方式完成了"Activity从Application继承Component进行注入"的任务
2、我们不仅在APP的全局都获取到了ApplicationBean对象,而且得到的都是单例对象,这说明我们在ApplicationModule中对ApplicationBean进行单例注入的方式在全局都是有效的
2、Activity中的activityBean和OtherClass中的activityBean对象地址不同
分析:
ActivityBean对象在Activity中和OtherClass中分别注入了两次,所以这两次注入是独立的,它们注入的ActivityBean对象是不同的
至此,该注入方式我们就介绍完毕,下面我们来介绍另一种继承的方式。
二、使用Subcomponent的方式进行继承注入
如果对比源码看的话, 请将源码分支切换到UseSubcomponent分支。
2.1、如何注入
该方式和上面的方式区别之处只有三个地方:
1、改造Activity的Component对象
我们需要先来改造Activity的Component对象,也就是ActivityComponent,需要将其改写为如下的方式: @ForActivity
@Subcomponent(modules = ActivityModule.class)
public interface ActivityComponent {
void inject(MainActivity activity);
void inject(MainActivity.OtherClass otherClass);
}1、不再使用@Component而使用@Subcomponent来注释
2、删除了"dependencies = ApplicationComponent.class"语句
2、改造Application的Component对象
然后我们来改造Application的Component对象也就是ApplicationComponent,将其改造成如下方式: @Singleton
@Component(modules = ApplicationModule.class)
public interface ApplicationComponent {
//注入DaggerApplication
void inject(DaggerApplication application);
//说明将BeanForApplication开放给其他Component使用
ApplicationBean providerAppBean();
ActivityComponent activityComponent();
}
3、改造Activity中的注入方式
我们还需要改造Activity和OtherClass中的注入方式,改造成如下方式(Activity和OtherClass的注入方式相同): DaggerApplication application = (DaggerApplication) getApplication();
ApplicationComponent applicationComponent = application.getAppComponent();
applicationComponent.activityComponent().inject(this);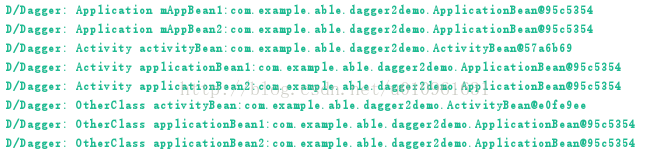
这个结果与dependencies的方式结果是一致的,说明两种注入方式都达到了Component继承的目的。
三、dependencies与Subcomponent注入方式的区别
这两种方式的区别其实在Activity注入时就可以看出来,我们再次贴出它们的对比:dependencies方式:
            DaggerApplication application = (DaggerApplication) getApplication();
            //获取ApplicationComponent对象
            ApplicationComponent applicationComponent = application.getAppComponent();
            //用ActivityComponent对象进行注入
            ActivityComponent activityComponent = DaggerActivityComponent.builder().applicationComponent(applicationComponent).build();
activityComponent.inject(this); DaggerApplication application = (DaggerApplication) getApplication();
ApplicationComponent applicationComponent = application.getAppComponent();
//用ApplicationComponent对象进行注入
applicationComponent.activityComponent().inject(this);从Component的注释上我们也可以看到这个区别:
dependencies方式:
            //ApplicationComponent
            @Component(modules = ApplicationModule.class)
            public interface ApplicationComponent {
                ......
            }


            //ActivityComponent
            @Component(dependencies = ApplicationComponent.class, modules = ActivityModule.class)
            public interface ActivityComponent {
                ......
} //ApplicationComponent
@Component(modules = ApplicationModule.class)
public interface ApplicationComponent {
......
ActivityComponent activityComponent();
}
//ActivityComponent
@Subcomponent(modules = ActivityModule.class)
public interface ActivityComponent {
......
}
四、如何选择两种继承方式
那么该如何选择这两种继承方式呢?在Stackoverflow中就有人提出了这样的问题(http://stackoverflow.com/questions/29587130/dagger-2-subcomponents-vs-component-dependencies),简单理解就是:
dependencies方式让Component之间更加独立,结构更加清晰,也更利于解耦。
所以该如何选择是否已经有了答案呢?
至此,Dagger2系列介绍就全部结束,下课。
我们再次列出本系列所有的总结:
智能推荐
Spring常见面试题总结(超详细回答)_spring面试题-程序员宅基地
文章浏览阅读10w+次,点赞2.2k次,收藏1.4w次。1、Spring是什么?Spring是一个轻量级的IoC和AOP容器框架。是为Java应用程序提供基础性服务的一套框架,目的是用于简化企业应用程序的开发,它使得开发者只需要关心业务需求。常见的配置方式有三种:基于XML的配置、基于注解的配置、基于Java的配置。主要由以下几个模块组成:Spring Core:核心类库,提供IOC服务;Spring Context:提..._spring面试题
maven多模块 统一版本管理 的正确姿势 (CI Friendly Versions) - ${revision}_reports that usage of properties in modules parent-程序员宅基地
文章浏览阅读1.6w次,点赞3次,收藏21次。在使用Maven多模块结构工程时,配置版本是一个比较头疼的事。继承版本,依赖版本,自身版本,都需要单独定义,很是麻烦。版本号变更使用mvn versions:set,有时候也可能导致版本号不一致、不便于统一管理:mvn versions:set但其实Maven已经提供了这种CI版本的管理方式,下面来介绍具体用法。从Maven 3.5.0-beta-1版本开始,就可以使用${revision},${sha1}和${changelist}作为占位符来替换pom文件了。注意:Id..._reports that usage of properties in modules parent definition is prohibited
电子商城实录------项目目录的结构搭建及其说明3_网上购物系统项目目录结构-程序员宅基地
文章浏览阅读313次。结合上几个章节,我开始对《电子商城实录------项目目录的结构搭建及其说明2》中方法优化Framework.class.php代码加入static:<?php//核心启动类class Framework{public static function run(){echo "hello,wrold!";}//初始化方法private static function ..._网上购物系统项目目录结构
HTML5期末大作业 精彩在线影视网站设计——在线影视(1页) HTML+CSS+JavaScript 学生DW网页设计作业成品 web课程设计网页规划与设计 计算机毕设网页设计源码_dw影视网站源码-程序员宅基地
文章浏览阅读516次。HTML5期末大作业 精彩在线影视网站设计——在线影视(1页) HTML+CSS+JavaScript 学生DW网页设计作业成品 web课程设计网页规划与设计 计算机毕设网页设计源码常见网页设计作业题材有 个人、 美食、 公司、 学校、 旅游、 电商、 宠物、 电器、 茶叶、 家居、 酒店、 舞蹈、 动漫、 明星、 服装、 体育、 化妆品、 物流、 环保、 书籍、 婚纱、 军事、 游戏、 节日、 戒烟、 电影、 摄影、 文化、 家乡、 鲜花、 礼品、 汽车、 其他 等网页设计题目, A+水平作业_dw影视网站源码
cv_bridge与opencv版本不一致导致程序编译错误及无法运行程序问题的解决方案(附带ORB_SLAM3案例))_sh_cv_bridge版本-程序员宅基地
文章浏览阅读3.7k次,点赞7次,收藏40次。目录1、问题描述开发环境我的程序配置2、问题造成的后果3、解决方案说明:4、实例,针对ORB_SLAM3问题5、其他参考解决方案6、另一个例程7、其他:修改系统默认链接的cv_bridge版本号,以及查看当前系统链接的cv_bridge版本号与位置与本篇问题相关的一个问题,可参考我之前的一篇博客:cv_bridge与python版本问题导致编译错误error: return-statement with no value, in function retur._sh_cv_bridge版本
web前端-番外-vscode和emmet语法_打div自动生成标签是什么插件-程序员宅基地
文章浏览阅读891次,点赞3次,收藏5次。文章目录vscode常用插件中文插件网页运行标签自动更正Emmet常用语法快速生成html结构快速生成css样式快速格式化代码参考所谓“工欲善其事,必先利其器”,想要快速高效的完成开发,必须要借助一些开发工具,毕竟“搬砖”我们也是专业的!这里推荐一个不仅用于web前端开发也可以用于其他编程语言的“神器”–vscode。vscode优点:跨平台丰富插件支持多种编程语言支持Emmet语法,高效书写代码vscode常用插件安装不表,下面介绍几个web前端开发常用插件中文插件Chinese _打div自动生成标签是什么插件
随便推点
项目笔记(一)_如何做项目笔记图片-程序员宅基地
文章浏览阅读561次。有关于使用matlab进行基础的文件读入输出,字符串处理_如何做项目笔记图片
C/C++编程:long long类型_longlong c-程序员宅基地
文章浏览阅读1.2w次,点赞3次,收藏7次。数据类型long long是C++11中重新定义的,标准规定它最小是64bit在这之前为了提供超过32bit的整数,各个开发环境(编译器)分别定义了各自的64bit整数类型。这会导致代码不兼容现在,C++11直接定义了long long类型我猜许多人应该使用过这个类型,当然在C++11之前,这种尝试会被编译器无情拒绝,自C++11之后就不会在发生这样地情况了。因此我认为:在C++11新特性中,long long一定是最容易被接受的一个。多数程序员看到它时甚至不会意识到这是一个新特性。相应的,C++1_longlong c
关于在 Notion 中使用 Markdown 语法_notion怎么写markdown-程序员宅基地
文章浏览阅读1.4k次。习惯使用的 Markdown 的伙伴们应该知道,当需要加粗字体时,会首先输入。,也就是先键入**,后面紧接着输入需要加粗的文字,最后键入**。但是在 Notion 中,这个就不太行了。同样,行内公式、行内代码高亮、斜体等都是这个规则。,然后在里面填内容。_notion怎么写markdown
flask使用form表单报错:“KeyError: 'A secret key is required to use CSRF.'”_keyerror: 'form-程序员宅基地
文章浏览阅读4.5k次,点赞2次,收藏3次。flask使用form表单报错:“KeyError: ‘A secret key is required to use CSRF.’”报错详情:KeyError: 'A secret key is required to use CSRF.'Traceback (most recent call last)FFile &quot;F:\Projects\flask_env\lib\site-pac..._keyerror: 'form
修改ubuntu ls 显示的目录底色_ubuntu中如何不显示绿色-程序员宅基地
文章浏览阅读884次。绿色底色很烦,看不清文件夹的名字在.bashrc里加一行,LS_COLORS=$LS_COLORS:'ow=1;32:'这样即可取消有些文件夹的绿色底色。其中ow的意思是OTHER_WRITABLE1的意思是粗体,32的意思是绿色前景参考:编码 颜色/动作 0 重新设置属性到缺省设置 1 设置粗体 2 设置一半亮度(模拟彩色显示器的颜色) 4 设置下划线(模拟彩色显示器的颜色) 5 设置闪烁 7 设置反_ubuntu中如何不显示绿色
django-celery-beat的使用-程序员宅基地
文章浏览阅读7.5k次,点赞3次,收藏7次。一、安装与配置使用pip安装包:$ pip install django-celery-beat将django_celery_beat模块添加到INSTALLED_APPSDjango项目中settings.py:#jdango时区配置# 官方用来修复CELERY_ENABLE_UTC=False and USE_TZ = False 时时间比较错误的问题;# 详情见:https://github.com/celery/django-celery-beat/pull/216/file_django-celery-beat