springcloud父子工程的构建和组件的使用-----springcloud全课程总结_spring cloud父项目的明明规则-程序员宅基地
技术标签: springcloud
1.新建父工程


下一步是可选择的用quickstart,但是实际用的是下面的这种方式创建的。

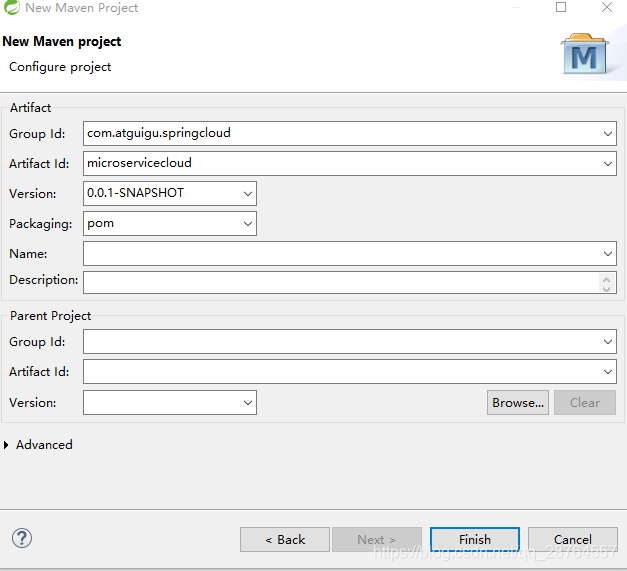
开始这个一定要选pom工程。
粘贴pom的文件:
 gav坐标注意这个坐标是十分重要的。
 常用的
常用的
pom总结:
<project xmlns="http://maven.apache.org/POM/4.0.0" xmlns:xsi="http://www.w3.org/2001/XMLSchema-instance"
xsi:schemaLocation="http://maven.apache.org/POM/4.0.0 http://maven.apache.org/xsd/maven-4.0.0.xsd">
<modelVersion>4.0.0</modelVersion>
<groupId>com.atguigu.springcloud</groupId>
<artifactId>microservicecloud</artifactId>
<version>0.0.1-SNAPSHOT</version>
<packaging>pom</packaging>
<properties>
<project.build.sourceEncoding>UTF-8</project.build.sourceEncoding>
<!--保证编译的是java8版本-->
<maven.compiler.source>1.8</maven.compiler.source>
<maven.compiler.target>1.8</maven.compiler.target>
<junit.version>4.12</junit.version>
<log4j.version>1.2.17</log4j.version>
<lombok.version>1.16.18</lombok.version>
</properties>
<dependencyManagement>
<dependencies>
<!-- springcloud -->
<dependency>
<groupId>org.springframework.cloud</groupId>
<artifactId>spring-cloud-dependencies</artifactId>
<version>Dalston.SR1</version>
<type>pom</type>
<scope>import</scope>
</dependency>
<!-- springboot -->
<dependency>
<groupId>org.springframework.boot</groupId>
<artifactId>spring-boot-dependencies</artifactId>
<version>1.5.9.RELEASE</version>
<type>pom</type>
<scope>import</scope>
</dependency>
<dependency>
<groupId>mysql</groupId>
<artifactId>mysql-connector-java</artifactId>
<version>5.1.46</version>
</dependency>
<dependency>
<groupId>com.alibaba</groupId>
<artifactId>druid</artifactId>
<version>1.0.31</version>
</dependency>
<dependency>
<groupId>org.mybatis.spring.boot</groupId>
<artifactId>mybatis-spring-boot-starter</artifactId>
<version>1.3.0</version>
</dependency>
<dependency>
<groupId>ch.qos.logback</groupId>
<artifactId>logback-core</artifactId>
<version>1.2.3</version>
</dependency>
<dependency>
<groupId>junit</groupId>
<artifactId>junit</artifactId>
<version>${junit.version}</version>
<scope>test</scope>
</dependency>
<!-- 可以引入上面的版本 -->
<dependency>
<groupId>log4j</groupId>
<artifactId>log4j</artifactId>
<version>${log4j.version}</version>
</dependency>
</dependencies>
</dependencyManagement>
<build>
<finalName>microservicecloud</finalName>
<resources>
<resource>
<directory>src/main/resources</directory>
<filtering>true</filtering>
</resource>
</resources>
<plugins>
<plugin>
<groupId>org.apache.maven.plugins</groupId>
<artifactId>maven-resources-plugin</artifactId>
<configuration>
<delimiters>
<delimit>$</delimit>
</delimiters>
</configuration>
</plugin>
</plugins>
</build>
<!-- 新建子工程会自动生成的 -->
<modules>
<module>microservicecloud-api</module>
<module>microservicecloud-provider-dept-8001</module>
<module>microservicecloud-consumer-dept-80</module>
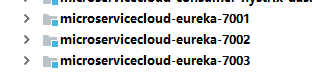
<module>microservicecloud-eureka-7001</module>
<module>microservicecloud-eureka-7002</module>
<module>microservicecloud-eureka-7003</module>
<module>microservicecloud-provider-dept-8002</module>
<module>microservicecloud-provider-dept-8003</module>
<module>microservicecloud-consumer-dept-feign</module>
</modules>
</project>
------------------------------------------------------------------
2.新建第一个子工程


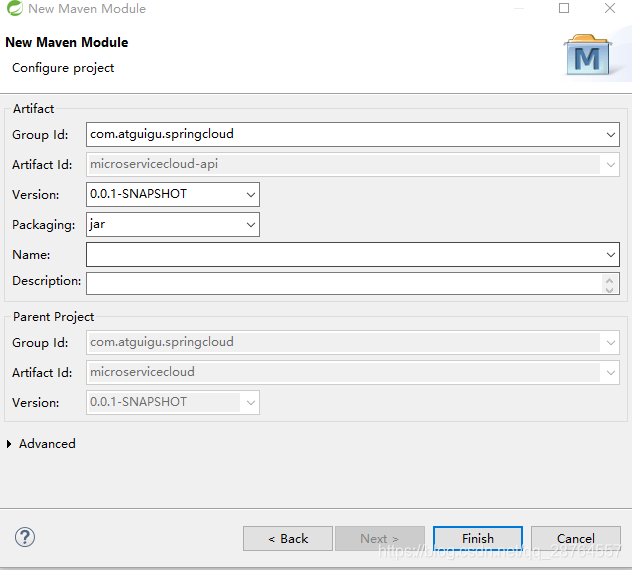
注意观察父工程的pom文件

<project xmlns="http://maven.apache.org/POM/4.0.0" xmlns:xsi="http://www.w3.org/2001/XMLSchema-instance"
         xsi:schemaLocation="http://maven.apache.org/POM/4.0.0 http://maven.apache.org/xsd/maven-4.0.0.xsd">
    <modelVersion>4.0.0</modelVersion>

    <parent><!-- 子类里面显示声明才能有明确的继承表现,无意外就是父类的默认版本否则自己定义 -->
        <groupId>com.atguigu.springcloud</groupId>
        <artifactId>microservicecloud</artifactId>
        <version>0.0.1-SNAPSHOT</version>
    </parent>

    <artifactId>microservicecloud-api</artifactId><!-- 当前Module我自己叫什么名字 -->

    <dependencies><!-- 当前Module需要用到的jar包,按自己需求添加,如果父类已经包含了,可以不用写版本号 -->
        <dependency>
            <groupId>org.projectlombok</groupId>
            <artifactId>lombok</artifactId>
        </dependency>
    </dependencies>
</project>

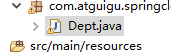
具体建立类。
package com.atguigu.springcloud.entities;

import java.io.Serializable;

import lombok.AllArgsConstructor;
import lombok.Data;
import lombok.Getter;
import lombok.NoArgsConstructor;
import lombok.Setter;
import lombok.experimental.Accessors;


@NoArgsConstructor
//@AllArgsConstructor
@Data
@Accessors(chain=true)
public class Dept implements Serializable// entity --orm--- db_table
{
	private Long 	deptno; // 主键
	private String 	dname; // 部门名称
	private String 	db_source;// 来自那个数据库,因为微服务架构可以一个服务对应一个数据库,同一个信息被存储到不同数据库

	public Dept(String dname)
	{
		super();
		this.dname = dname;
	}


}
注意一点必须序列化。
构建完成Dept公共模块。

重新在本地生成最新的jar包
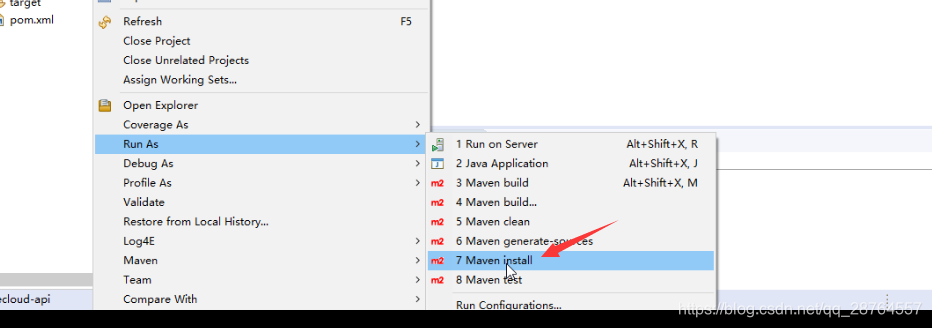
这样就在本地具备了最新的jar包
这样别的模块要想使用的话拿到gav坐标即可,注意这个jar包要保证别的工程可以引用到的。
 <groupId>com.atguigu.springcloud</groupId>
 <artifactId>microservicecloud-api</artifactId>
 <version>0.0.1-SNAPSHOT</version>
---------------------------------17-------以上就是新建api实体类-------------------------
构建微服务的提供者:(这里有完整的mvc单独就是一个springmvc工程)
注意这个微服务的提供者引入了api的包:
<dependency>
			<groupId>com.atguigu.springcloud</groupId>
			<artifactId>microservicecloud-api</artifactId>
			<version>${project.version}</version>
		</dependency>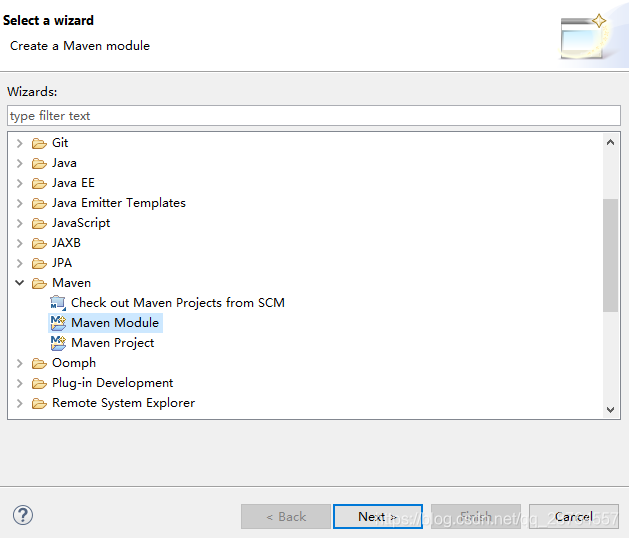

注意下一步也是jar包。

看父工程的变化

逐个说下配置文件的内容。
<!-- 引入自己定义的api通用包,可以使用Dept部门Entity -->
        <dependency>
            <groupId>com.atguigu.springcloud</groupId>
            <artifactId>microservicecloud-api</artifactId>
            <version>${project.version}</version>
        </dependency>
首先这个是之前在本地maven仓库里面的jar,直接引用即可。看下pm工程配置了什么?
<project xmlns="http://maven.apache.org/POM/4.0.0" xmlns:xsi="http://www.w3.org/2001/XMLSchema-instance"
         xsi:schemaLocation="http://maven.apache.org/POM/4.0.0 http://maven.apache.org/xsd/maven-4.0.0.xsd">
    <modelVersion>4.0.0</modelVersion>

    <parent>
        <groupId>com.atguigu.springcloud</groupId>
        <artifactId>microservicecloud</artifactId>
        <version>0.0.1-SNAPSHOT</version>
    </parent>

    <artifactId>microservicecloud-provider-dept-8001</artifactId>

    <dependencies>
        <!-- 引入自己定义的api通用包,可以使用Dept部门Entity -->
        <dependency>
            <groupId>com.atguigu.springcloud</groupId>
            <artifactId>microservicecloud-api</artifactId>
            <version>${project.version}</version>
        </dependency>
        <!-- 测试类 -->
        <dependency>
            <groupId>junit</groupId>
            <artifactId>junit</artifactId>
        </dependency>
        <!-- mysql的连接驱动 -->
        <dependency>
            <groupId>mysql</groupId>
            <artifactId>mysql-connector-java</artifactId>
        </dependency>
        <!-- druid -->
        <dependency>
            <groupId>com.alibaba</groupId>
            <artifactId>druid</artifactId>
        </dependency>
        <!-- 日志-->
        <dependency>
            <groupId>ch.qos.logback</groupId>
            <artifactId>logback-core</artifactId>
        </dependency>
        <dependency>
            <groupId>org.mybatis.spring.boot</groupId>
            <artifactId>mybatis-spring-boot-starter</artifactId>
        </dependency>
        <dependency>
            <groupId>org.springframework.boot</groupId>
            <artifactId>spring-boot-starter-jetty</artifactId>
        </dependency>
        <dependency>
            <groupId>org.springframework.boot</groupId>
            <artifactId>spring-boot-starter-web</artifactId>
        </dependency>
        <dependency>
            <groupId>org.springframework.boot</groupId>
            <artifactId>spring-boot-starter-test</artifactId>
        </dependency>
        <!-- 修改后立即生效,热部署 -->
        <dependency>
            <groupId>org.springframework</groupId>
            <artifactId>springloaded</artifactId>
        </dependency>
        <dependency>
            <groupId>org.springframework.boot</groupId>
            <artifactId>spring-boot-devtools</artifactId>
        </dependency>
    </dependencies>

</project>
yml配置文件的相关安装和编写
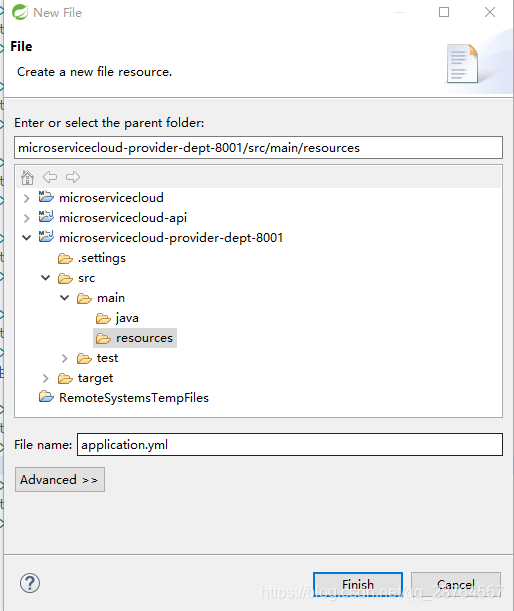
写配置文件
server:
  port: 8001

mybatis:
  config-location: classpath:mybatis/mybatis.cfg.xml        # mybatis配置文件所在路径
  type-aliases-package: com.atguigu.springcloud.entities    # 所有Entity别名类所在包,告诉mybatis,扫描这个包的实体类
  mapper-locations:
  - classpath:mybatis/mapper/**/*.xml                       # mapper映射文件,写sql的

spring:
   application:
    name: microservicecloud-dept                            #微服务的名字
   datasource:
    type: com.alibaba.druid.pool.DruidDataSource            # 当前数据源操作类型
    driver-class-name: org.gjt.mm.mysql.Driver              # mysql驱动包
    url: jdbc:mysql://192.168.244.130:3306/cloudDB01              # 数据库名称
    username: root
    password: 123456
    dbcp2:
      min-idle: 5                                           # 数据库连接池的最小维持连接数
      initial-size: 5                                       # 初始化连接数
      max-total: 5                                          # 最大连接数
      max-wait-millis: 200                                  # 等待连接获取的最大超时时间
mybatis的三个配置一定要清楚的:
1.config-location: classpath:mybatis/mybatis.cfg.xml 这个基本没啥用可以补充些配置比如开启二级缓存。
2.type-aliases-package: com.atguigu.springcloud.entities 扫描这个包的实体类。
3. mapper-locations:
- classpath:mybatis/mapper/**/*.xml mapper映射文件写sql的上一步告诉实体类在哪里了。
1.新建mybatis文件夹和mybatis.cfg.xml,这个在springboot文件中写在yml中了。
 配置mybatis本身。
<?xml version="1.0" encoding="UTF-8" ?>
<!DOCTYPE configuration
  PUBLIC "-//mybatis.org//DTD Config 3.0//EN"
  "http://mybatis.org/dtd/mybatis-3-config.dtd">

<configuration>

	<settings>
		<setting name="cacheEnabled" value="true" /><!-- 二级缓存开启 -->
	</settings>

</configuration>
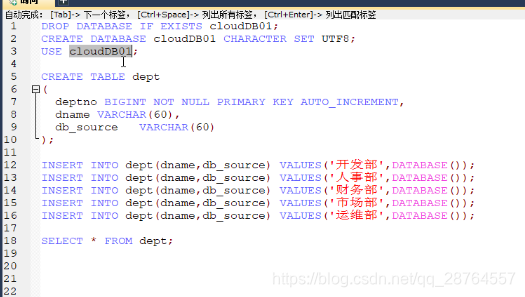
创建数据库

写DAO,注意DAO有@Mapper
package com.atguigu.springcloud.dao;

import java.util.List;

import org.apache.ibatis.annotations.Mapper;

import com.atguigu.springcloud.entities.Dept;

@Mapper//这个不要忘记
public interface DeptDao
{
	public boolean addDept(Dept dept);

	public Dept findById(Long id);

	public List<Dept> findAll();
}
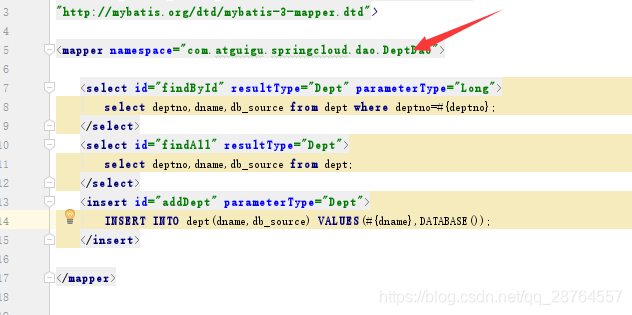
写mapper.xml实现方法

<?xml version="1.0" encoding="UTF-8" ?>
<!DOCTYPE mapper PUBLIC "-//mybatis.org//DTD Mapper 3.0//EN"
"http://mybatis.org/dtd/mybatis-3-mapper.dtd">

<mapper namespace="com.atguigu.springcloud.dao.DeptDao">

	<select id="findById" resultType="Dept" parameterType="Long">
		select deptno,dname,db_source from dept where deptno=#{deptno};
	</select>
	<select id="findAll" resultType="Dept">
		select deptno,dname,db_source from dept;
	</select>
	<insert id="addDept" parameterType="Dept">
		INSERT INTO dept(dname,db_source) VALUES(#{dname},DATABASE());
	</insert>

</mapper>
构建service层的:
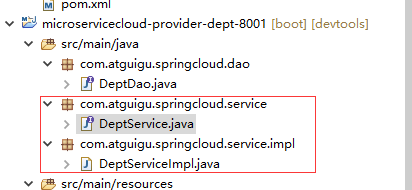
注意在service的实现类里面调用用@service注解
package com.atguigu.springcloud.service;

import java.util.List;

import com.atguigu.springcloud.entities.Dept;

public interface DeptService
{
	public boolean add(Dept dept);

	public Dept get(Long id);

	public List<Dept> list();
}
package com.atguigu.springcloud.service.impl;

import java.util.List;

import org.springframework.beans.factory.annotation.Autowired;
import org.springframework.stereotype.Service;

import com.atguigu.springcloud.dao.DeptDao;
import com.atguigu.springcloud.entities.Dept;
import com.atguigu.springcloud.service.DeptService;

@Service
public class DeptServiceImpl implements DeptService
{
	@Autowired
	private DeptDao dao;

	@Override
	public boolean add(Dept dept)
	{
		return dao.addDept(dept);
	}

	@Override
	public Dept get(Long id)
	{
		return dao.findById(id);
	}

	@Override
	public List<Dept> list()
	{
		return dao.findAll();
	}

}
写controller层
package com.atguigu.springcloud.controller;

import java.util.List;

import org.springframework.beans.factory.annotation.Autowired;
import org.springframework.web.bind.annotation.PathVariable;
import org.springframework.web.bind.annotation.RequestBody;
import org.springframework.web.bind.annotation.RequestMapping;
import org.springframework.web.bind.annotation.RequestMethod;
import org.springframework.web.bind.annotation.RestController;

import com.atguigu.springcloud.entities.Dept;
import com.atguigu.springcloud.service.DeptService;

@RestController
public class DeptController
{
	@Autowired
	private DeptService service;


	@RequestMapping(value = "/dept/add", method = RequestMethod.POST)
	public boolean add(@RequestBody Dept dept)
	{
		return service.add(dept);
	}

	@RequestMapping(value = "/dept/get/{id}", method = RequestMethod.GET)
	public Dept get(@PathVariable("id") Long id)
	{
		return service.get(id);
	}

	@RequestMapping(value = "/dept/list", method = RequestMethod.GET)
	public List<Dept> list()
	{
		return service.list();
	}


}
几点注意下:
1.前后端分离的架构@restController 这个是十分重要的
2.细粒度化的@PostMapping @GetMapping
3.参数的注解@PathVariable @RequestBody 注意这个注解的用法
最后:主启动类
 目录结构
目录结构
package com.atguigu.springcloud;

import org.springframework.boot.SpringApplication;
import org.springframework.boot.autoconfigure.SpringBootApplication;

@SpringBootApplication
public class DeptProvider8001_App
{
	public static void main(String[] args)
	{
		SpringApplication.run(DeptProvider8001_App.class, args);
	}
}
启动。

访问:
 localhost:8001/dept/list
总结:mybatis的路径三要素 配置文件 .xml 实体类
------------------------------18-------服务的提供者和api实体类-----------此处主要写了普通的mvc--------------
构建微服务的消费者


<project xmlns="http://maven.apache.org/POM/4.0.0" xmlns:xsi="http://www.w3.org/2001/XMLSchema-instance"
         xsi:schemaLocation="http://maven.apache.org/POM/4.0.0 http://maven.apache.org/xsd/maven-4.0.0.xsd">
    <modelVersion>4.0.0</modelVersion>

    <parent>
        <groupId>com.atguigu.springcloud</groupId>
        <artifactId>microservicecloud</artifactId>
        <version>0.0.1-SNAPSHOT</version>
    </parent>

    <artifactId>microservicecloud-consumer-dept-80</artifactId>
    <description>部门微服务消费者</description>

    <dependencies>
        <dependency><!-- 自己定义的api -->
            <groupId>com.atguigu.springcloud</groupId>
            <artifactId>microservicecloud-api</artifactId>
            <version>${project.version}</version>
        </dependency>
        <dependency>
            <groupId>org.springframework.boot</groupId>
            <artifactId>spring-boot-starter-web</artifactId>
        </dependency>
        <!-- 修改后立即生效,热部署 -->
        <dependency>
            <groupId>org.springframework</groupId>
            <artifactId>springloaded</artifactId>
        </dependency>
        <dependency>
            <groupId>org.springframework.boot</groupId>
            <artifactId>spring-boot-devtools</artifactId>
        </dependency>
    </dependencies>


</project>
yaml文件
server:
  port: 80
新建配置类。
package com.atguigu.springcloud.cfgbeans;


import org.springframework.context.annotation.Bean;
import org.springframework.context.annotation.Configuration;
import org.springframework.web.client.RestTemplate;


@Configuration
public class ConfigBean //boot -->spring   applicationContext.xml --- @Configuration配置   ConfigBean = applicationContext.xml
{
	@Bean
	public RestTemplate getRestTemplate()
	{
		return new RestTemplate();
	}
}

//@Bean
//public UserServcie getUserServcie()
//{
//	return new UserServcieImpl();
//}
//applicationContext.xml == ConfigBean(@Configuration)
//<bean id="userServcie" class="com.atguigu.tmall.UserServiceImpl">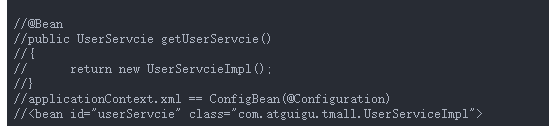
写controller此时有新的东西了。消费者没有service层。

官网

写controller。
package com.atguigu.springcloud.controller;

import java.util.List;

import org.springframework.beans.factory.annotation.Autowired;
import org.springframework.web.bind.annotation.PathVariable;
import org.springframework.web.bind.annotation.RequestMapping;
import org.springframework.web.bind.annotation.RestController;
import org.springframework.web.client.RestTemplate;
//这个过程并没有但是可以调用说明的是在本地的jar包里面了
import com.atguigu.springcloud.entities.Dept;

@RestController
public class DeptController_Consumer
{

	private static final String REST_URL_PREFIX = "http://localhost:8001";
	//private static final String REST_URL_PREFIX = "http://MICROSERVICECLOUD-DEPT";
	/**
	 * 使用 使用restTemplate访问restful接口非常的简单粗暴无脑。 (url, requestMap,
	 * ResponseBean.class)这三个参数分别代表 REST请求地址
	 * 请求参数
	 * HTTP响应转换被转换成的对象类型。
	 */
	@Autowired
	private RestTemplate restTemplate;

	@RequestMapping(value = "/consumer/dept/add")
	public boolean add(Dept dept)
	{
		return restTemplate.postForObject(REST_URL_PREFIX + "/dept/add", dept, Boolean.class);
	}

	@RequestMapping(value = "/consumer/dept/get/{id}")
	public Dept get(@PathVariable("id") Long id)
	{
		int a = 5;
		return restTemplate.getForObject(REST_URL_PREFIX + "/dept/get/" + id, Dept.class);
	}

	//这个注解就是消除泛型的警告,想处理就处理不处理就算了
	@SuppressWarnings("unchecked")
	@RequestMapping(value = "/consumer/dept/list")
	public List<Dept> list()
	{
		return restTemplate.getForObject(REST_URL_PREFIX + "/dept/list", List.class);
	}

}
主启动类
package com.atguigu.springcloud;

import org.springframework.boot.SpringApplication;
import org.springframework.boot.autoconfigure.SpringBootApplication;


@SpringBootApplication
public class DeptConsumer80_App
{
	public static void main(String[] args)
	{
		SpringApplication.run(DeptConsumer80_App.class, args);
	}
}
启动,查询
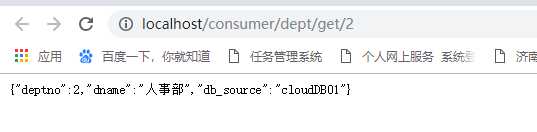
localhost/consumer/dept/get/2
localhost/consumer/dept/list

localhost/consumer/dept/add?dname=AI


--------------------上eureka--------------目前搭建了基础的框架,在这个框架的基础上实现微服务--------------19-------=========开始微服务的内容
核心是服务的注册与发现

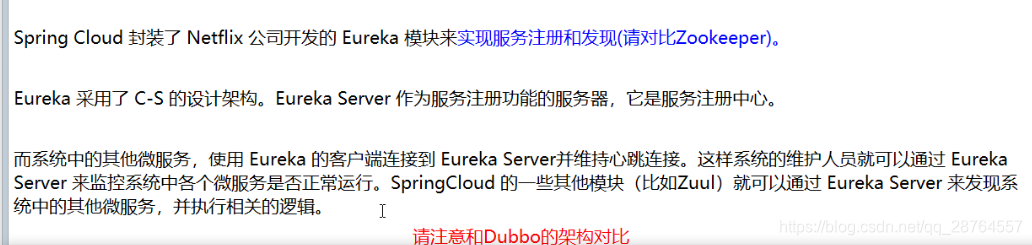
Eureka原理:https://blog.csdn.net/qwe86314/article/details/94552801


注意这两个组件是十分重要的,一定要注意是客户端和服务端。

客户端默认是轮询的负载均衡算法,应用启动会向服务端发心跳包,多次未收到就会删除(服务的实例)

---------------------------------------------------------20-------------------------------------------------
eureka分为服务端和客户端
构建Eureka的服务中心,服务端的构建十分简单,主要是在yml文件中配置好参数。
pom文件
引入新的组件都是先在pom加上坐标+然后EnableXXX

第一步:
<project xmlns="http://maven.apache.org/POM/4.0.0" xmlns:xsi="http://www.w3.org/2001/XMLSchema-instance"
         xsi:schemaLocation="http://maven.apache.org/POM/4.0.0 http://maven.apache.org/xsd/maven-4.0.0.xsd">
    <modelVersion>4.0.0</modelVersion>

    <parent>
        <groupId>com.atguigu.springcloud</groupId>
        <artifactId>microservicecloud</artifactId>
        <version>0.0.1-SNAPSHOT</version>
    </parent>

    <artifactId>microservicecloud-eureka-7001</artifactId>

    <dependencies>
        <!--告诉springboot它是eureka-server服务端 -->
        <dependency>
            <groupId>org.springframework.cloud</groupId>
            <artifactId>spring-cloud-starter-eureka-server</artifactId>
        </dependency>
        <!-- 修改后立即生效,热部署 -->
        <dependency>
            <groupId>org.springframework</groupId>
            <artifactId>springloaded</artifactId>
        </dependency>
        <dependency>
            <groupId>org.springframework.boot</groupId>
            <artifactId>spring-boot-devtools</artifactId>
        </dependency>
    </dependencies>

</project>
第二步:
yml文件

hostname就是IP地址。
server:
  port: 7001

eureka:
  instance:
   # hostname: localhost            #eureka服务端的实例名称
     hostname: eureka7001.com       #ip地址 注意这个是ip地址
  client:
    register-with-eureka: false     #false表示不向注册中心注册自己。否则启动自动注册的。
    fetch-registry: false           #false表示自己端就是注册中心,我的职责就是维护服务实例,并不需要去检索服务,并没有把自己写在入驻花名册里面,我自己就是甲方。
    service-url:
    # defaultZone: http://${eureka.instance.hostname}:${server.port}/eureka/
    #设置与Eureka Server交互的地址查询服务和注册服务都需要依赖这个地址(单机),就是物业的银行卡号让你去转账。
     defaultZone: http://eureka7002.com:7002/eureka/,http://eureka7003.com:7003/eureka/
微服务之间是互相交互的现成一个集群。
第三步:
开始要这么做。
package com.atguigu.springcloud;

import org.springframework.boot.SpringApplication;
import org.springframework.boot.autoconfigure.SpringBootApplication;
import org.springframework.cloud.netflix.eureka.server.EnableEurekaServer;

@SpringBootApplication
@EnableEurekaServer // EurekaServer服务器端启动类,接受其它微服务注册进来
public class EurekaServer7001_App
{
	public static void main(String[] args)
	{
		SpringApplication.run(EurekaServer7001_App.class, args);
	}
}
三步 pom yml @
启动测试:http://eureka7001.com:7001/
----------------------------------------引入Eureka的服务端---------------21----------------------------------
第一步:配置文件
服务的提供者,8001要入驻进7001的注册中心
首先是pom文件的修改,在7001中可知:
<!--告诉springboot它是eureka-server服务端 -->
        <dependency>
            <groupId>org.springframework.cloud</groupId>
            <artifactId>spring-cloud-starter-eureka-server</artifactId>
        </dependency>
说明是eureka的服务端。则在8001中则在pom中表明是eureka的client端,新增
  <!-- 将微服务provider侧注册进eureka -->
        <dependency>
            <groupId>org.springframework.cloud</groupId>
            <artifactId>spring-cloud-starter-eureka</artifactId>
        </dependency>
        <dependency>
            <groupId>org.springframework.cloud</groupId>
            <artifactId>spring-cloud-starter-config</artifactId>
        </dependency>
8001的yml
第二步:注解
先这么配置。
8001的著启动类要配置@EnableEurekaClient
package com.atguigu.springcloud;

import org.springframework.boot.SpringApplication;
import org.springframework.boot.autoconfigure.SpringBootApplication;
import org.springframework.cloud.client.discovery.EnableDiscoveryClient;
import org.springframework.cloud.netflix.eureka.EnableEurekaClient;

@SpringBootApplication
@EnableEurekaClient //本服务启动后会自动注册进eureka服务中
public class DeptProvider8001_App
{
	public static void main(String[] args)
	{
		SpringApplication.run(DeptProvider8001_App.class, args);
	}
}
服务端和客户端的对比

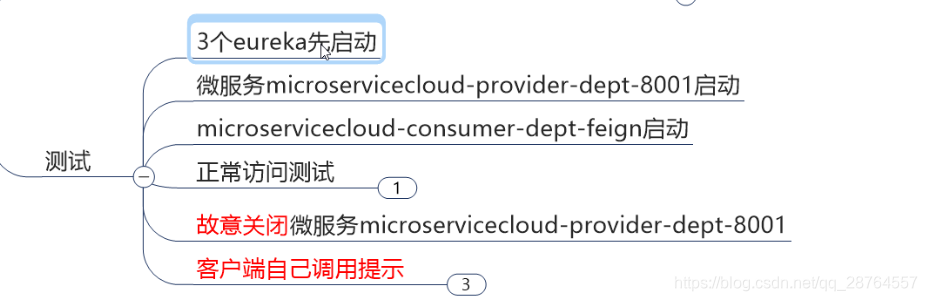
测试。。。。。。
客户端注册到eureka经过以下几个步骤
1.pom
2.yml
3.@注解 保证启动注册进去
--------------------------------------------------------------------------------------------------------------------------------------22

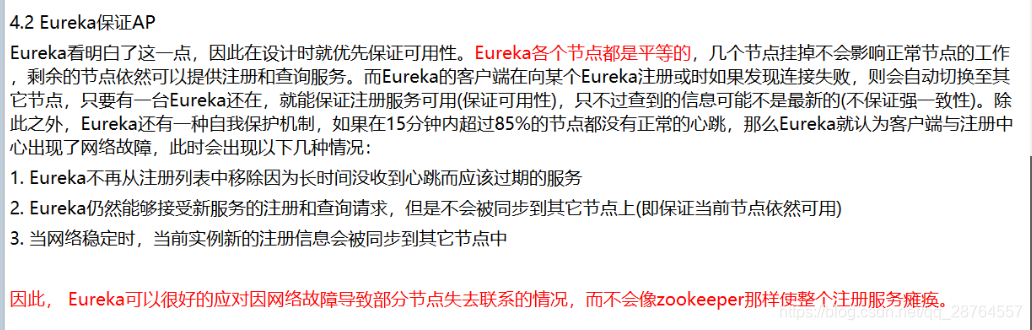
红色的字体是因为erueka的自我保护。


eureka的小细节的修改问题。
修改8001的yml文件
新加

改动的地方:
---服务的提供者作为Eureka的客户端入住到Eureak--------------23------------访问信息的ip提示-----------24-------------------
为服务info的详细信息添加,监控信息的完善,豪猪的熔断监控也是这样的。
8001的pom添加
1.8001添加,服务的提供者
<!-- actuator监控信息完善 -->
        <dependency>
            <groupId>org.springframework.boot</groupId>
            <artifactId>spring-boot-starter-actuator</artifactId>
        </dependency>
2.父工程添加build的构建信息
  <build>
        #父工程的名字
        <finalName>microservicecloud</finalName>
        #可以访问所有的父工程下面的resources文件下的信息
        <resources>
            <resource>
                <directory>src/main/resources</directory>
                <filtering>true</filtering>
            </resource>
        </resources>
        <plugins>
            <plugin>
                //负责解析和解读的
                <groupId>org.apache.maven.plugins</groupId>
                <artifactId>maven-resources-plugin</artifactId>
                <configuration>
                    <delimiters>
                        //以$开头和结尾的都可以读取在reources路径下的
                        <delimit>$</delimit>
                    </delimiters>
                </configuration>
            </plugin>
        </plugins>
    </build>
3.回到8001的yml
info:
  app.name: atguigu-microservicecloud
  company.name: www.atguigu.com
  build.artifactId: $project.artifactId$
  build.version: $project.version$
----------------------------------------监控信息的完善---------------------------------------------------------25----------
第二步:
8001中的DeptController中加入:
@Autowired
private DiscoveryClient client;
@RequestMapping(value = "/dept/discovery", method = RequestMethod.GET)
public Object discovery()
{
//盘点eureka有多少个微服务
List<String> list = client.getServices();//盘点eurka有哪些微服务
System.out.println("**********" + list);
List<ServiceInstance> srvList = client.getInstances("MICROSERVICECLOUD-DEPT");
for (ServiceInstance element : srvList) {
System.out.println(element.getServiceId() + "\t" + element.getHost() + "\t" + element.getPort() + "\t"
+ element.getUri());
}
return this.client;
}第一步:主启动类
@EnableDiscoveryClient //服务发现访问:localhost:8001/dept/discovery
消费者就是80工程的DeptController_consumer:
@RequestMapping(value = "/consumer/dept/discovery")
public Object discovery()
{
		return restTemplate.getForObject(REST_URL_PREFIX + "/dept/discovery",Object.class);
}访问:![]()
服务发现,不重要。
服发现:就是服务的消费端可以取到Eureka的所有服务,找到额定的服务。

-----------------------------------------------------------------------------------------------------------------27-------------
集群配置,联调
集群是eureka集群,eureka的三个服务端。
步骤:
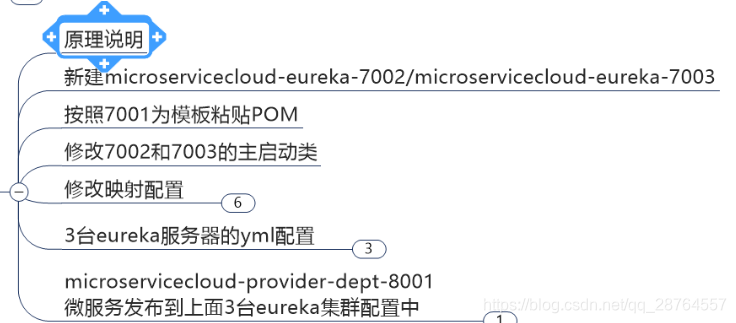
新建工程:
1.新建7002 7003
2.pom拷贝
3.需改主启动类 加@EnableEurekaServer // EurekaServer服务器端启动类,接受其它微服务注册进来
4.修改yml文件

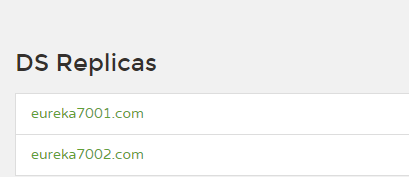
127.0.0.1 eureka7001.com
127.0.0.1 eureka7002.com
127.0.0.1 eureka7003.com
yml原则就是7001上有7002和7003 7002上有7001和7003 7003上有7001和7002 服务是互相注册的
7001
server:
  port: 7001

eureka:
  instance:
   # hostname: localhost     #eureka服务端的实例名称
     hostname: eureka7001.com
  client:
    register-with-eureka: false     #false表示不向注册中心注册自己。
    fetch-registry: false           #false表示自己端就是注册中心,我的职责就是维护服务实例,并不需要去检索服务,并没有把自己写在入驻花名册里面
    service-url:
    # defaultZone: http://${eureka.instance.hostname}:${server.port}/eureka/
    #设置与Eureka Server交互的地址查询服务和注册服务都需要依赖这个地址(单机),就是物业的银行卡号让你去转账
     defaultZone: http://eureka7002.com:7002/eureka/,http://eureka7003.com:7003/eureka/
7002
server:
  port: 7002

eureka:
  instance:
   # hostname: localhost     #eureka服务端的实例名称
     hostname: eureka7002.com
  client:
    register-with-eureka: false     #false表示不向注册中心注册自己。
    fetch-registry: false           #false表示自己端就是注册中心,我的职责就是维护服务实例,并不需要去检索服务,并没有把自己写在入驻花名册里面
    service-url:
    # defaultZone: http://${eureka.instance.hostname}:${server.port}/eureka/
    #设置与Eureka Server交互的地址查询服务和注册服务都需要依赖这个地址(单机),就是物业的银行卡号让你去转账
     defaultZone: http://eureka7001.com:7001/eureka/,http://eureka7003.com:7003/eureka/
7003
server:
  port: 7003

eureka:
  instance:
   # hostname: localhost     #eureka服务端的实例名称
     hostname: eureka7003.com
  client:
    register-with-eureka: false     #false表示不向注册中心注册自己。
    fetch-registry: false           #false表示自己端就是注册中心,我的职责就是维护服务实例,并不需要去检索服务,并没有把自己写在入驻花名册里面
    service-url:
    # defaultZone: http://${eureka.instance.hostname}:${server.port}/eureka/
    #设置与Eureka Server交互的地址查询服务和注册服务都需要依赖这个地址(单机),就是物业的银行卡号让你去转账
     defaultZone: http://eureka7002.com:7002/eureka/,http://eureka7001.com:7001/eureka/
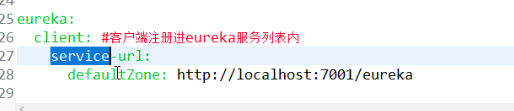
3.8001的修改就是服务的提供者,注册到三个服务端。
eureka:
  client: #客户端注册进eureka服务列表内
    service-url:
      # defaultZone: http://localhost:7001/eureka   //这个是8001要入驻的地址就是入驻到eureka的服务器
      defaultZone: http://eureka7001.com:7001/eureka/,http://eureka7002.com:7002/eureka/,http://eureka7003.com:7003/eureka/
  instance:
    instance-id: microservicecloud-dept8001
    prefer-ip-address: true     #访问路径可以显示IP地址
完整的8001的yml
server:
port: 8001
mybatis:
config-location: classpath:mybatis/mybatis.cfg.xml # mybatis配置文件所在路径
type-aliases-package: com.atguigu.springcloud.entities # 所有Entity别名类所在包,告诉mybatis,扫描这个包的实体类
mapper-locations:
- classpath:mybatis/mapper/**/*.xml # mapper映射文件,写sql的
spring:
application:
name: microservicecloud-dept #微服务的名字 很重要 这个是服务名 以后消费者就是按照这个服务名找到服务
datasource:
type: com.alibaba.druid.pool.DruidDataSource # 当前数据源操作类型
driver-class-name: org.gjt.mm.mysql.Driver # mysql驱动包
url: jdbc:mysql://192.168.244.130:3306/cloudDB01 # 数据库名称
username: root
password: 123456
dbcp2:
min-idle: 5 # 数据库连接池的最小维持连接数
initial-size: 5 # 初始化连接数
max-total: 5 # 最大连接数
max-wait-millis: 200 # 等待连接获取的最大超时时间
eureka:
client: #客户端注册进eureka服务列表内
service-url:
# defaultZone: http://localhost:7001/eureka //这个是8001要入驻的地址就是入驻到eureka的服务器
defaultZone: http://eureka7001.com:7001/eureka/,http://eureka7002.com:7002/eureka/,http://eureka7003.com:7003/eureka/
instance:
instance-id: microservicecloud-dept8001
prefer-ip-address: true #访问路径可以显示IP地址
info:
app.name: atguigu-microservicecloud
company.name: www.atguigu.com
build.artifactId: $project.artifactId$
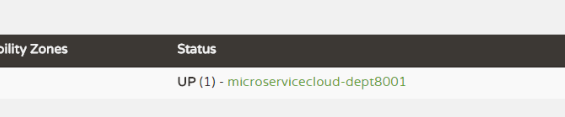
build.version: $project.version$测试:
访问:

注册的微服务

-------------28------------------------------起三个集群---服务的提供者就是Eureka的客户端入驻到Eureka---------
eureka与zookeeper的区别
CAP

eureak是AP zookeeper是CP


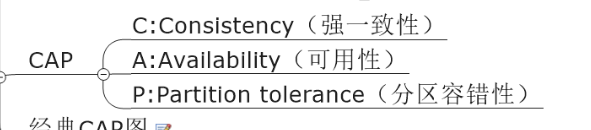
任何一个分布式系统无法全部满足

淘宝 京东只能是ap 不能是cp
双十一当天是ap保证网站可用

---------------------------------------------------------------29----------------------------------------------------------------
转开课吧。
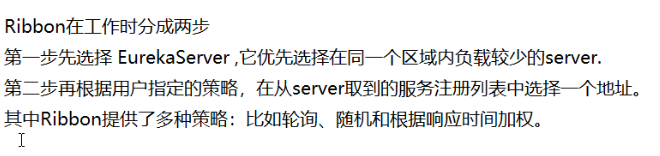
上Ribbon
Ribbon负载均衡很重要
面试题 负载均衡ngins ribbon 和 fegin区别
Ribbon就是客户端的负载均衡

配置文件中列出LoadBalance的所有的机器。


如何在github上找源码
https://github.com/Netflix/ribbon/wiki/Getting-Started
 这个很重要的。
----------------------------------30------------------------------------
上ribbon----客户端就是服务的消费者。
三步:
1.gav
2.@EnableXXXXX 在ConfigBean上添加的 在主启动类添加@EnableEurekaClient
3.写业务
明确是在客户端就是在服务的消费者上。
在80的consumer上:
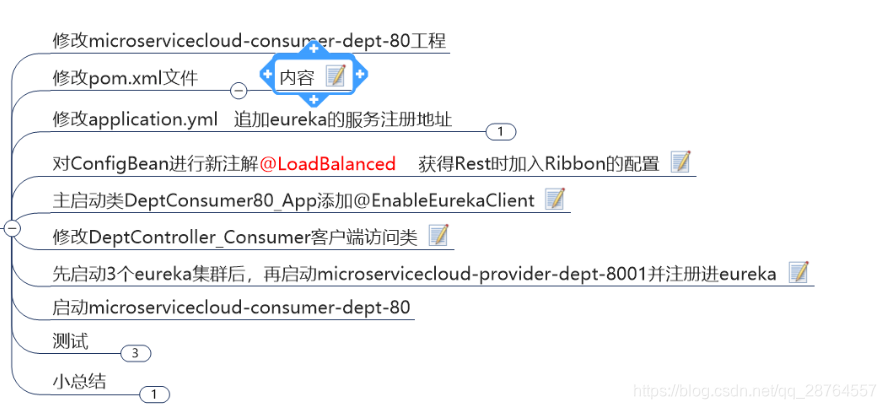
1.pom新增:
<!-- Ribbon相关 -->
        <dependency>
            <!-- 为什么加eureka是因为去注册中心访问服务的实例,上ribbon必须上eureka -->
            <groupId>org.springframework.cloud</groupId>
            <artifactId>spring-cloud-starter-eureka</artifactId>
        </dependency>
        <dependency>
            <groupId>org.springframework.cloud</groupId>
            <artifactId>spring-cloud-starter-ribbon</artifactId>
        </dependency>
        <dependency>
            <groupId>org.springframework.cloud</groupId>
            <artifactId>spring-cloud-starter-config</artifactId>
        </dependency>
2.修改yml追加eureka的注册地址
这句话的意思是告诉80不要直接去找8001,去通过eureka去找,有了这句话80就可以听过服务名字去访问了。
eureka:
  client:
    register-with-eureka: false  //不注册自己只是服务的消费者
    service-url:
      defaultZone: http://eureka7001.com:7001/eureka/,http://eureka7002.com:7002/eureka/,http://eureka7003.com:7003/eureka/
3.开启负载均衡

package com.atguigu.springcloud.cfgbeans;


import org.springframework.cloud.client.loadbalancer.LoadBalanced;
import org.springframework.context.annotation.Bean;
import org.springframework.context.annotation.Configuration;
import org.springframework.web.client.RestTemplate;


@Configuration
public class ConfigBean //boot -->spring   applicationContext.xml --- @Configuration配置   ConfigBean = applicationContext.xml
{
	@Bean
	@LoadBalanced//Spring Cloud Ribbon是基于Netflix Ribbon实现的一套客户端       负载均衡的工具。
	public RestTemplate getRestTemplate()
	{
		return new RestTemplate();
	}

	/*@Bean
	public IRule myRule()
	{
		return new RoundRobinRule();
		//return new RandomRule();//达到的目的,用我们重新选择的随机算法替代默认的轮询。
		//return new RetryRule();
	}*/
}

//@Bean
//public UserServcie getUserServcie()
//{
//	return new UserServcieImpl();
//}
//applicationContext.xml == ConfigBean(@Configuration)
//<bean id="userServcie" class="com.atguigu.tmall.UserServiceImpl">
完成真正的通过微服务的名字通过eureka找到并访问。
4.主启动类添加@EnableEurekaClient
package com.atguigu.springcloud;

import org.springframework.boot.SpringApplication;
import org.springframework.boot.autoconfigure.SpringBootApplication;
import org.springframework.cloud.netflix.eureka.EnableEurekaClient;


@SpringBootApplication
@EnableEurekaClient
public class DeptConsumer80_App
{
	public static void main(String[] args)
	{
		SpringApplication.run(DeptConsumer80_App.class, args);
	}
}
5.修改客户端的访问类

修改controller:
用来是这样的:

package com.atguigu.springcloud.controller;

import java.util.List;

import org.springframework.beans.factory.annotation.Autowired;
import org.springframework.web.bind.annotation.PathVariable;
import org.springframework.web.bind.annotation.RequestMapping;
import org.springframework.web.bind.annotation.RestController;
import org.springframework.web.client.RestTemplate;
//这个过程并没有但是可以调用说明的是在本地的jar包里面了
import com.atguigu.springcloud.entities.Dept;

@RestController
public class DeptController_Consumer
{

	//private static final String REST_URL_PREFIX = "http://localhost:8001";
	private static final String REST_URL_PREFIX = "http://MICROSERVICECLOUD-DEPT";
	/**
	 * 使用 使用restTemplate访问restful接口非常的简单粗暴无脑。 (url, requestMap,
	 * ResponseBean.class)这三个参数分别代表 REST请求地址
	 * 请求参数
	 * HTTP响应转换被转换成的对象类型。
	 */
	@Autowired
	private RestTemplate restTemplate;

	@RequestMapping(value = "/consumer/dept/add")
	public boolean add(Dept dept)
	{
	  return restTemplate.postForObject(REST_URL_PREFIX + "/dept/add", dept, Boolean.class);
	}

	@RequestMapping(value = "/consumer/dept/get/{id}")
	public Dept get(@PathVariable("id") Long id)
	{
	 int a = 5;
	 return restTemplate.getForObject(REST_URL_PREFIX + "/dept/get/" + id, Dept.class);
	}

	//这个注解就是消除泛型的警告,想处理就处理不处理就算了
	@SuppressWarnings("unchecked")
	@RequestMapping(value = "/consumer/dept/list")
	public List<Dept> list()
	{
		return restTemplate.getForObject(REST_URL_PREFIX + "/dept/list", List.class);
	}

}
访问:
http://localhost/consumer/dept/list

理解:
private static final String REST_URL_PREFIX = "http://MICROSERVICECLOUD-DEPT";这句话的意思就是80去eureka找这个名字的微服务去访问,这个名字的微服务在7001 7002 7003都注册了

注意只用在Ribbon和Eureka整合后才可以。
//private static final String REST_URL_PREFIX = "http://localhost:8001";
private static final String REST_URL_PREFIX = "http://MICROSERVICECLOUD-DEPT";
目前为止只是换了访问的方式。

不整合是不好使的,即使是feign也是整合的Ribbon。
-------------------31----------

进入负载均衡编程,负载均衡就是客户端按照某种规则访问服务端8001 8002 8003:
理解一个知识点多个eureka只是为了down机器的,服务端才是集群。目前我们有一个eurekaServer的集群,但是不要当集群去理解,理解服务的提供者为集群本身。

新建8002 8003微服务的提供者

新建数据库:
jdbc:mysql://192.168.244.130:3306/cloudDB02
jdbc:mysql://192.168.244.130:3306/cloudDB03
修改yml的数据库地址 端口 还有这个
eureka:
  client: #客户端注册进eureka服务列表内
    service-url:
      # defaultZone: http://localhost:7001/eureka   //这个是8001要入驻的地址就是入驻到eureka的服务器
      defaultZone: http://eureka7001.com:7001/eureka/,http://eureka7002.com:7002/eureka/,http://eureka7003.com:7003/eureka/
  instance:
    instance-id: microservicecloud-dept8003
注意新建两个服务的提供者服务之后有一个名字是绝对不能动的:
spring:
   application:
    name: microservicecloud-dept  //这个是微服务的名字 8001 8002 8003是微服务的三个实例
启动测试:
先测试下三个服务的提供者是否能访问
http://localhost:8001/dept/list
http://localhost:8002/dept/list
http://localhost:8003/dept/list
测试:
consumer访问的负载均衡:
localhost/consumer/dept/list


------------------------------------------32--------------------------------------------

---------------------------------------------------------------------------------------------------------------------------32


https://github.com/Netflix/ribbon/wiki/Getting-Started
看ribbon的源码IRule类
/*
*
* Copyright 2013 Netflix, Inc.
*
* Licensed under the Apache License, Version 2.0 (the "License");
* you may not use this file except in compliance with the License.
* You may obtain a copy of the License at
*
* http://www.apache.org/licenses/LICENSE-2.0
*
* Unless required by applicable law or agreed to in writing, software
* distributed under the License is distributed on an "AS IS" BASIS,
* WITHOUT WARRANTIES OR CONDITIONS OF ANY KIND, either express or implied.
* See the License for the specific language governing permissions and
* limitations under the License.
*
*/
package com.netflix.loadbalancer;

/**
 * Interface that defines a "Rule" for a LoadBalancer. A Rule can be thought of
 * as a Strategy for loadbalacing. Well known loadbalancing strategies include
 * Round Robin, Response Time based etc.
 *
 * @author stonse
 *
 */
public interface IRule{
    /*
     * choose one alive server from lb.allServers or
     * lb.upServers according to key
     *
     * @return choosen Server object. NULL is returned if none
     *  server is available
     */

    public Server choose(Object key);

    public void setLoadBalancer(ILoadBalancer lb);

    public ILoadBalancer getLoadBalancer();
}
只要实现接口就能实现。
例如:ILoadBalancer
/*
*
* Copyright 2013 Netflix, Inc.
*
* Licensed under the Apache License, Version 2.0 (the "License");
* you may not use this file except in compliance with the License.
* You may obtain a copy of the License at
*
* http://www.apache.org/licenses/LICENSE-2.0
*
* Unless required by applicable law or agreed to in writing, software
* distributed under the License is distributed on an "AS IS" BASIS,
* WITHOUT WARRANTIES OR CONDITIONS OF ANY KIND, either express or implied.
* See the License for the specific language governing permissions and
* limitations under the License.
*
*/
package com.netflix.loadbalancer;

import java.util.List;

/**
 * Interface that defines the operations for a software loadbalancer. A typical
 * loadbalancer minimally need a set of servers to loadbalance for, a method to
 * mark a particular server to be out of rotation and a call that will choose a
 * server from the existing list of server.
 *
 * @author stonse
 *
 */
public interface ILoadBalancer {

	/**
	 * Initial list of servers.
	 * This API also serves to add additional ones at a later time
	 * The same logical server (host:port) could essentially be added multiple times
	 * (helpful in cases where you want to give more "weightage" perhaps ..)
	 *
	 * @param newServers new servers to add
	 */
	public void addServers(List<Server> newServers);

	/**
	 * Choose a server from load balancer.
	 *
	 * @param key An object that the load balancer may use to determine which server to return. null if
	 *         the load balancer does not use this parameter.
	 * @return server chosen
	 */
	public Server chooseServer(Object key);

	/**
	 * To be called by the clients of the load balancer to notify that a Server is down
	 * else, the LB will think its still Alive until the next Ping cycle - potentially
	 * (assuming that the LB Impl does a ping)
	 *
	 * @param server Server to mark as down
	 */
	public void markServerDown(Server server);

	/**
	 * @deprecated 2016-01-20 This method is deprecated in favor of the
	 * cleaner {@link #getReachableServers} (equivalent to availableOnly=true)
	 * and {@link #getAllServers} API (equivalent to availableOnly=false).
	 *
	 * Get the current list of servers.
	 *
	 * @param availableOnly if true, only live and available servers should be returned
	 */
	@Deprecated
	public List<Server> getServerList(boolean availableOnly);

	/**
	 * @return Only the servers that are up and reachable.
     */
    public List<Server> getReachableServers();

    /**
     * @return All known servers, both reachable and unreachable.
     */
	public List<Server> getAllServers();
}
抽象的AbstractLoadBalancer
/*
*
* Copyright 2013 Netflix, Inc.
*
* Licensed under the Apache License, Version 2.0 (the "License");
* you may not use this file except in compliance with the License.
* You may obtain a copy of the License at
*
* http://www.apache.org/licenses/LICENSE-2.0
*
* Unless required by applicable law or agreed to in writing, software
* distributed under the License is distributed on an "AS IS" BASIS,
* WITHOUT WARRANTIES OR CONDITIONS OF ANY KIND, either express or implied.
* See the License for the specific language governing permissions and
* limitations under the License.
*
*/
package com.netflix.loadbalancer;

import java.util.List;

/**
 * AbstractLoadBalancer contains features required for most loadbalancing
 * implementations.
 *
 * An anatomy of a typical LoadBalancer consists of 1. A List of Servers (nodes)
 * that are potentially bucketed based on a specific criteria. 2. A Class that
 * defines and implements a LoadBalacing Strategy via <code>IRule</code> 3. A
 * Class that defines and implements a mechanism to determine the
 * suitability/availability of the nodes/servers in the List.
 *
 *
 * @author stonse
 *
 */
public abstract class AbstractLoadBalancer implements ILoadBalancer {

    public enum ServerGroup{
        ALL,
        STATUS_UP,
        STATUS_NOT_UP
    }

    /**
     * delegate to {@link #chooseServer(Object)} with parameter null.
     */
    public Server chooseServer() {
    	return chooseServer(null);
    }


    /**
     * List of servers that this Loadbalancer knows about
     *
     * @param serverGroup Servers grouped by status, e.g., {@link ServerGroup#STATUS_UP}
     */
    public abstract List<Server> getServerList(ServerGroup serverGroup);

    /**
     * Obtain LoadBalancer related Statistics
     */
    public abstract LoadBalancerStats getLoadBalancerStats();
}
找到这个继承的类。
/*
 *
 * Copyright 2013 Netflix, Inc.
 *
 * Licensed under the Apache License, Version 2.0 (the "License");
 * you may not use this file except in compliance with the License.
 * You may obtain a copy of the License at
 *
 * http://www.apache.org/licenses/LICENSE-2.0
 *
 * Unless required by applicable law or agreed to in writing, software
 * distributed under the License is distributed on an "AS IS" BASIS,
 * WITHOUT WARRANTIES OR CONDITIONS OF ANY KIND, either express or implied.
 * See the License for the specific language governing permissions and
 * limitations under the License.
 *
 */
package com.netflix.loadbalancer;

import com.netflix.client.config.IClientConfig;
import org.slf4j.Logger;
import org.slf4j.LoggerFactory;

import java.util.List;
import java.util.concurrent.atomic.AtomicInteger;

/**
 * The most well known and basic load balancing strategy, i.e. Round Robin Rule.
 *
 * @author stonse
 * @author Nikos Michalakis <[email protected]>
 *
 */
public class RoundRobinRule extends AbstractLoadBalancerRule {

    private AtomicInteger nextServerCyclicCounter;
    private static final boolean AVAILABLE_ONLY_SERVERS = true;
    private static final boolean ALL_SERVERS = false;

    private static Logger log = LoggerFactory.getLogger(RoundRobinRule.class);

    public RoundRobinRule() {
        nextServerCyclicCounter = new AtomicInteger(0);
    }

    public RoundRobinRule(ILoadBalancer lb) {
        this();
        setLoadBalancer(lb);
    }

    public Server choose(ILoadBalancer lb, Object key) {
        if (lb == null) {
            log.warn("no load balancer");
            return null;
        }

        Server server = null;
        int count = 0;
        while (server == null && count++ < 10) {
            List<Server> reachableServers = lb.getReachableServers();
            List<Server> allServers = lb.getAllServers();
            int upCount = reachableServers.size();
            int serverCount = allServers.size();

            if ((upCount == 0) || (serverCount == 0)) {
                log.warn("No up servers available from load balancer: " + lb);
                return null;
            }

            int nextServerIndex = incrementAndGetModulo(serverCount);
            server = allServers.get(nextServerIndex);

            if (server == null) {
                /* Transient. */
                Thread.yield();
                continue;
            }

            if (server.isAlive() && (server.isReadyToServe())) {
                return (server);
            }

            // Next.
            server = null;
        }

        if (count >= 10) {
            log.warn("No available alive servers after 10 tries from load balancer: "
                    + lb);
        }
        return server;
    }

    /**
     * Inspired by the implementation of {@link AtomicInteger#incrementAndGet()}.
     *
     * @param modulo The modulo to bound the value of the counter.
     * @return The next value.
     */
    private int incrementAndGetModulo(int modulo) {
        for (;;) {
            int current = nextServerCyclicCounter.get();
            int next = (current + 1) % modulo;
            if (nextServerCyclicCounter.compareAndSet(current, next))
                return next;
        }
    }

    @Override
    public Server choose(Object key) {
        return choose(getLoadBalancer(), key);
    }
}
这个是轮询的我们用随机的算法更改下,轮询的修改只要向容器里面抛出一个bean就可以了,组件自动去调用:
在80的ConfigBean加
package com.atguigu.springcloud.cfgbeans;
import org.springframework.cloud.client.loadbalancer.LoadBalanced;
import org.springframework.context.annotation.Bean;
import org.springframework.context.annotation.Configuration;
import org.springframework.web.client.RestTemplate;
import com.netflix.loadbalancer.IRule;
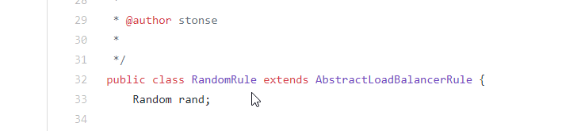
import com.netflix.loadbalancer.RandomRule;
import com.netflix.loadbalancer.RetryRule;
import com.netflix.loadbalancer.RoundRobinRule;
@Configuration
public class ConfigBean //boot -->spring applicationContext.xml --- @Configuration配置 ConfigBean = applicationContext.xml
{
@Bean
@LoadBalanced//Spring Cloud Ribbon是基于Netflix Ribbon实现的一套客户端 负载均衡的工具。
public RestTemplate getRestTemplate()
{
return new RestTemplate();
}
@Bean
public IRule myRule()
{
//return new RoundRobinRule();
return new RandomRule();//达到的目的,用我们重新选择的随机算法替代默认的轮询。
//return new RetryRule();
}
}
//@Bean
//public UserServcie getUserServcie()
//{
// return new UserServcieImpl();
//}
//applicationContext.xml == ConfigBean(@Configuration)
//<bean id="userServcie" class="com.atguigu.tmall.UserServiceImpl">测试:localhost/consumer/dept/list
其他的规则RetryRuler
@Bean
	public IRule myRule()
	{
		//return new RoundRobinRule();
		//return new RandomRule();//达到的目的,用我们重新选择的随机算法替代默认的轮询。
		return new RetryRule();
	}
2按照轮询访问几次之后没法访问了就不去访问了。
------------------------------33-------------------------------------------
Ribbon的自定义
在git上拿源码:

加入这个注解,就是不再用Ribbon出厂默认的了:

修改步骤:1.在80的主启动类添加,就是自己定义IRule:
package com.atguigu.springcloud;

import com.atguigu.myrule.MySelfRule;
import org.springframework.boot.SpringApplication;
import org.springframework.boot.autoconfigure.SpringBootApplication;
import org.springframework.cloud.netflix.eureka.EnableEurekaClient;
import org.springframework.cloud.netflix.ribbon.RibbonClient;


@SpringBootApplication
@EnableEurekaClient
//在启动该微服务的时候就能去加载我们的自定义Ribbon配置类,从而使配置生效 指明是哪个服务的负载均衡
@RibbonClient(name="MICROSERVICECLOUD-DEPT",configuration=MySelfRule.class)
//@RibbonClient(name="MICROSERVICECLOUD-DEPT",configuration=MySelfRule.class)
public class DeptConsumer80_App
{
	public static void main(String[] args)
	{
		SpringApplication.run(DeptConsumer80_App.class, args);
	}
}
解释:只要能实现IRule接口的就符合负载均衡的规范的。
注意XXXRuler的配置细节,意思就是不能和主启动类在一起:
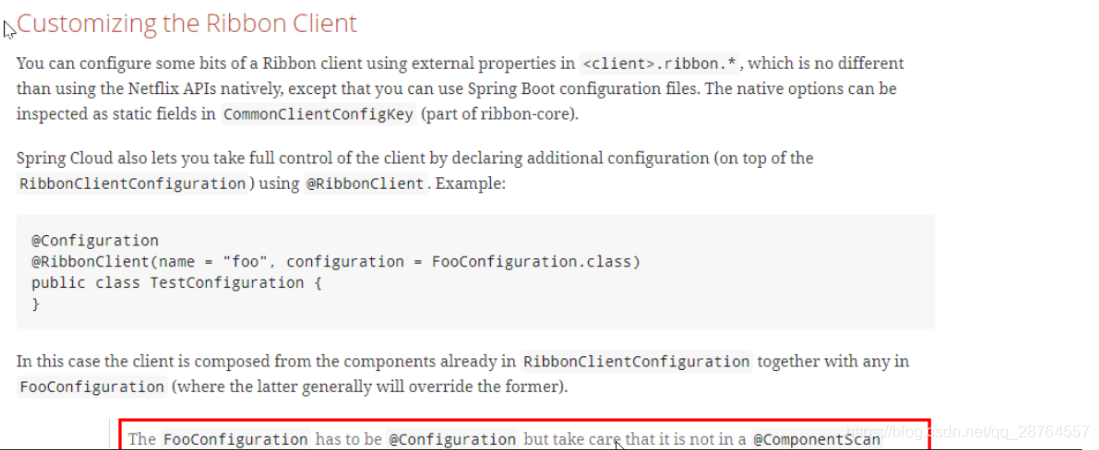


2.在80上新建包和类

package com.atguigu.myrule;

import com.netflix.loadbalancer.IRule;
import com.netflix.loadbalancer.RandomRule;
import com.netflix.loadbalancer.RoundRobinRule;

import org.springframework.context.annotation.Bean;
import org.springframework.context.annotation.Configuration;

@Configuration
public class MySelfRule
{
	@Bean
	public IRule myRule()
	{
		//return new RandomRule();// Ribbon默认是轮询,我自定义为随机
		//return new RoundRobinRule();// Ribbon默认是轮询,我自定义为随机
		return new RandomRule_ZY();// 我自定义为每台机器5次
	}
}
-------------------------------------------------------------------------------------------------------------------------------------34------------------------
自定义负载均衡算法:
package com.atguigu.myrule;

import com.netflix.client.config.IClientConfig;
import com.netflix.loadbalancer.AbstractLoadBalancerRule;
import com.netflix.loadbalancer.ILoadBalancer;
import com.netflix.loadbalancer.Server;

import java.util.List;

public class RandomRule_ZY extends AbstractLoadBalancerRule
{

	// total = 0 // 当total==5以后,我们指针才能往下走,
	// index = 0 // 当前对外提供服务的服务器地址,
	// total需要重新置为零,但是已经达到过一个5次,我们的index = 1
	// 分析:我们5次,但是微服务只有8001 8002 8003 三台,OK?
	//


	private int total = 0; 			// 总共被调用的次数,目前要求每台被调用5次
	private int currentIndex = 0;	// 当前提供服务的机器号

	public Server choose(ILoadBalancer lb, Object key)
	{
		if (lb == null) {
			return null;
		}
		Server server = null;

		while (server == null) {
			if (Thread.interrupted()) {
				return null;
			}
			List<Server> upList = lb.getReachableServers();
			List<Server> allList = lb.getAllServers();

			int serverCount = allList.size();
			if (serverCount == 0) {
				/*
				 * No servers. End regardless of pass, because subsequent passes only get more
				 * restrictive.
				 */
				return null;
			}

//			int index = rand.nextInt(serverCount);// java.util.Random().nextInt(3);
//			server = upList.get(index);


//			private int total = 0; 			// 总共被调用的次数,目前要求每台被调用5次
//			private int currentIndex = 0;	// 当前提供服务的机器号
            if(total < 5)
            {
	            server = upList.get(currentIndex);
	            total++;
            }else {
	            total = 0;
	            currentIndex++;
	            if(currentIndex >= upList.size())
	            {
	              currentIndex = 0;
	            }
            }


			if (server == null) {
				/*
				 * The only time this should happen is if the server list were somehow trimmed.
				 * This is a transient condition. Retry after yielding.
				 */
				Thread.yield();
				continue;
			}

			if (server.isAlive()) {
				return (server);
			}

			// Shouldn't actually happen.. but must be transient or a bug.
			server = null;
			Thread.yield();
		}

		return server;

	}

	@Override
	public Server choose(Object key)
	{
		return choose(getLoadBalancer(), key);
	}

	@Override
	public void initWithNiwsConfig(IClientConfig clientConfig)
	{
		// TODO Auto-generated method stub

	}

}
新的需求
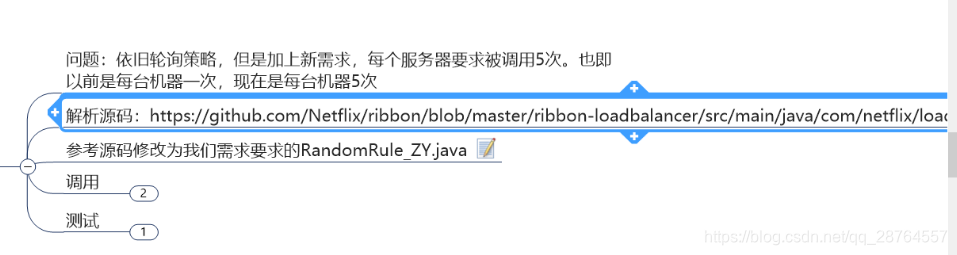
修改MySelfRule
package com.atguigu.myrule;

import com.netflix.loadbalancer.IRule;
import com.netflix.loadbalancer.RandomRule;
import com.netflix.loadbalancer.RoundRobinRule;

import org.springframework.context.annotation.Bean;
import org.springframework.context.annotation.Configuration;

@Configuration
public class MySelfRule
{
	@Bean
	public IRule myRule()
	{
		//return new RandomRule();// Ribbon默认是轮询,我自定义为随机
		//return new RoundRobinRule();// Ribbon默认是轮询,我自定义为随机

		return new RandomRule_ZY();// 我自定义为每台机器5次
	}
}
package com.atguigu.myrule;

import com.netflix.client.config.IClientConfig;
import com.netflix.loadbalancer.AbstractLoadBalancerRule;
import com.netflix.loadbalancer.ILoadBalancer;
import com.netflix.loadbalancer.Server;

import java.util.List;

public class RandomRule_ZY extends AbstractLoadBalancerRule
{

	// total = 0 // 当total==5以后,我们指针才能往下走,
	// index = 0 // 当前对外提供服务的服务器地址,
	// total需要重新置为零,但是已经达到过一个5次,我们的index = 1
	// 分析:我们5次,但是微服务只有8001 8002 8003 三台,OK?
	//


	private int total = 0; 			// 总共被调用的次数,目前要求每台被调用5次
	private int currentIndex = 0;	// 当前提供服务的机器号

	public Server choose(ILoadBalancer lb, Object key)
	{
		if (lb == null) {
			return null;
		}
		Server server = null;

		while (server == null) {
			if (Thread.interrupted()) {
				return null;
			}
			List<Server> upList = lb.getReachableServers();
			List<Server> allList = lb.getAllServers();

			int serverCount = allList.size();
			if (serverCount == 0) {
				/*
				 * No servers. End regardless of pass, because subsequent passes only get more
				 * restrictive.
				 */
				return null;
			}

//			int index = rand.nextInt(serverCount);// java.util.Random().nextInt(3);
//			server = upList.get(index);


//			private int total = 0; 			// 总共被调用的次数,目前要求每台被调用5次
//			private int currentIndex = 0;	// 当前提供服务的机器号
            if(total < 5)
            {
	            server = upList.get(currentIndex);
	            total++;
            }else {
	            total = 0;
	            currentIndex++;
	            if(currentIndex >= upList.size())
	            {
	              currentIndex = 0;
	            }
            }


			if (server == null) {
				/*
				 * The only time this should happen is if the server list were somehow trimmed.
				 * This is a transient condition. Retry after yielding.
				 */
				Thread.yield();
				continue;
			}

			if (server.isAlive()) {
				return (server);
			}

			// Shouldn't actually happen.. but must be transient or a bug.
			server = null;
			Thread.yield();
		}

		return server;

	}

	@Override
	public Server choose(Object key)
	{
		return choose(getLoadBalancer(), key);
	}

	@Override
	public void initWithNiwsConfig(IClientConfig clientConfig)
	{
		// TODO Auto-generated method stub

	}

}
注意看下主启动类
package com.atguigu.springcloud;

import org.springframework.boot.SpringApplication;
import org.springframework.boot.autoconfigure.SpringBootApplication;
import org.springframework.cloud.netflix.eureka.EnableEurekaClient;
import org.springframework.cloud.netflix.ribbon.RibbonClient;

import com.atguigu.myrule.MySelfRule;


@SpringBootApplication
@EnableEurekaClient
@RibbonClient(name="MICROSERVICECLOUD-DEPT",configuration=MySelfRule.class)//不加就是默认的
public class DeptConsumer80_App
{
	public static void main(String[] args)
	{
		SpringApplication.run(DeptConsumer80_App.class, args);
	}
}
小总结:ribbon要加eureka因为要去eureka上面指定是哪个微服务的负载均衡。
-----------------------35-------------------自定义负载均衡---------
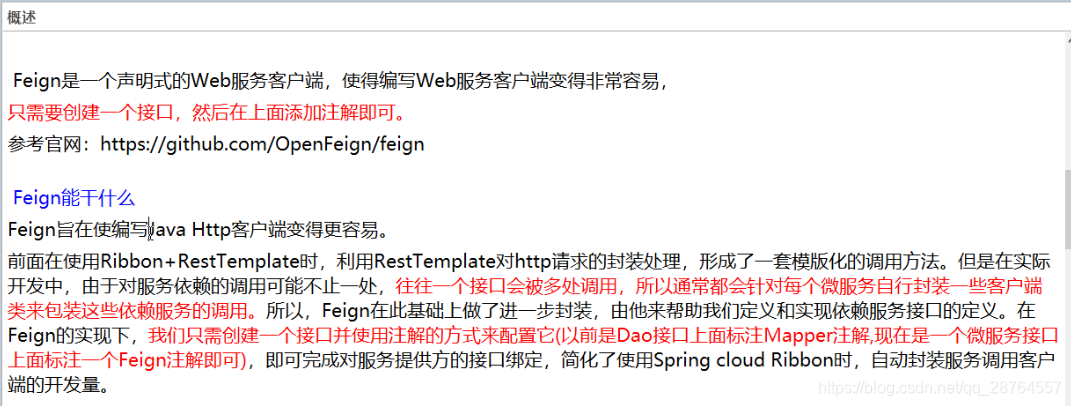
Feign
官网:
也是负载均衡的。
用Feign只需要创建接口和注解即可。

还是组件的三大步 pom @ yml


接口api上有 接口的注解

类似于Dao。
接口加注解其实是在xml对应的:
---------------------------------------------------------------------------36-------------
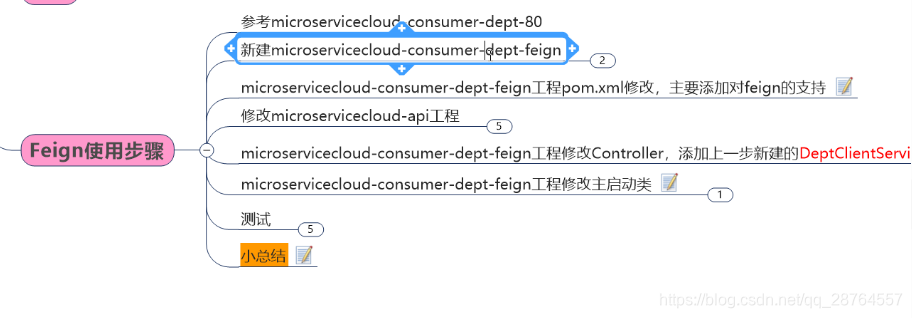
feign也是在客户端,创建一个带feign的客户端。

拷贝80的代码 pom和类
修改pom。
首先拷贝80的。
<project xmlns="http://maven.apache.org/POM/4.0.0" xmlns:xsi="http://www.w3.org/2001/XMLSchema-instance" xsi:schemaLocation="http://maven.apache.org/POM/4.0.0 http://maven.apache.org/xsd/maven-4.0.0.xsd">
  <modelVersion>4.0.0</modelVersion>
  <parent>
    <groupId>com.atguigu.springcloud</groupId>
    <artifactId>microservicecloud</artifactId>
    <version>0.0.1-SNAPSHOT</version>
  </parent>
  <artifactId>microservicecloud-consumer-dept-feign</artifactId>
<dependencies>
        <dependency><!-- 自己定义的api -->
            <groupId>com.atguigu.springcloud</groupId>
            <artifactId>microservicecloud-api</artifactId>
            <version>${project.version}</version>
        </dependency>
        <!-- Ribbon相关 -->
        <dependency>
            <groupId>org.springframework.cloud</groupId>
            <artifactId>spring-cloud-starter-eureka</artifactId>
        </dependency>
         <dependency>
            <groupId>org.springframework.cloud</groupId>
            <artifactId>spring-cloud-starter-ribbon</artifactId>
        </dependency>
        <dependency>
            <groupId>org.springframework.cloud</groupId>
            <artifactId>spring-cloud-starter-config</artifactId>
        </dependency>
        <dependency>
            <groupId>org.springframework.boot</groupId>
            <artifactId>spring-boot-starter-web</artifactId>
        </dependency>
         <dependency>
            <groupId>org.springframework.cloud</groupId>
            <artifactId>spring-cloud-starter-feign</artifactId>
        </dependency>
        <!-- 修改后立即生效,热部署 -->
        <dependency>
            <groupId>org.springframework</groupId>
            <artifactId>springloaded</artifactId>
        </dependency>
        <dependency>
            <groupId>org.springframework.boot</groupId>
            <artifactId>spring-boot-devtools</artifactId>
        </dependency>
    </dependencies>

</project>
已经加入feign的pom坐标
        <dependency>
            <groupId>org.springframework.cloud</groupId>
            <artifactId>spring-cloud-starter-feign</artifactId>
        </dependency>
修改主启动类改名字
package com.atguigu.springcloud;

import org.springframework.boot.SpringApplication;
import org.springframework.boot.autoconfigure.SpringBootApplication;
import org.springframework.cloud.netflix.eureka.EnableEurekaClient;


@SpringBootApplication
@EnableEurekaClient
public class DeptConsumer80_Feign_App
{
	public static void main(String[] args)
	{
		SpringApplication.run(DeptConsumer80_Feign_App.class, args);
	}
}
--------------------------修改api-------------
修改api工程,通用的公共的接口,放在api中。
1.修改api的pom文件,在api上加feign。
<project xmlns="http://maven.apache.org/POM/4.0.0" xmlns:xsi="http://www.w3.org/2001/XMLSchema-instance"
         xsi:schemaLocation="http://maven.apache.org/POM/4.0.0 http://maven.apache.org/xsd/maven-4.0.0.xsd">
    <modelVersion>4.0.0</modelVersion>

    <parent><!-- 子类里面显示声明才能有明确的继承表现,无意外就是父类的默认版本否则自己定义 -->
        <groupId>com.atguigu.springcloud</groupId>
        <artifactId>microservicecloud</artifactId>
        <version>0.0.1-SNAPSHOT</version>
    </parent>

    <artifactId>microservicecloud-api</artifactId><!-- 当前Module我自己叫什么名字 -->

    <dependencies><!-- 当前Module需要用到的jar包,按自己需求添加,如果父类已经包含了,可以不用写版本号 -->
        <dependency>
            <groupId>org.projectlombok</groupId>
            <artifactId>lombok</artifactId>
        </dependency>
          <dependency>
            <groupId>org.springframework.cloud</groupId>
            <artifactId>spring-cloud-starter-feign</artifactId>
        </dependency>
    </dependencies>
</project>
2.新建DeptClientService接口并新增注解@FeignClient
package com.atguigu.springcloud.service;

import com.atguigu.springcloud.entities.Dept;
import org.springframework.cloud.netflix.feign.FeignClient;
import org.springframework.web.bind.annotation.PathVariable;
import org.springframework.web.bind.annotation.RequestMapping;
import org.springframework.web.bind.annotation.RequestMethod;

import java.util.List;


/**
 *
 * @Description: 修改microservicecloud-api工程,根据已经有的DeptClientService接口

新建

一个实现了FallbackFactory接口的类DeptClientServiceFallbackFactory
 * @author zzyy
 * @date 2018年4月21日
 */
@FeignClient(value = "MICROSERVICECLOUD-DEPT")//指定去哪个微服务找并和里面的服务的方法匹配
public interface DeptClientService
{
	@RequestMapping(value = "/dept/get/{id}", method = RequestMethod.GET)
	public Dept get(@PathVariable("id") long id);

	@RequestMapping(value = "/dept/list", method = RequestMethod.GET)
	public List<Dept> list();

	@RequestMapping(value = "/dept/add", method = RequestMethod.POST)
	public boolean add(Dept dept);
}

这句话的意思是对MICROSERVICECLOUD-DEPT微服务进行feign编程
完成
---------------------------------------------------
接下来回到feign工程,添加service。
package com.atguigu.springcloud.controller;

import java.util.List;

import org.springframework.beans.factory.annotation.Autowired;
import org.springframework.web.bind.annotation.PathVariable;
import org.springframework.web.bind.annotation.RequestMapping;
import org.springframework.web.bind.annotation.RestController;

import com.atguigu.springcloud.entities.Dept;
import com.atguigu.springcloud.service.DeptClientService;

@RestController
public class DeptController_Consumer
{
        //调用api的service
	@Autowired
	private DeptClientService service;

	@RequestMapping(value = "/consumer/dept/get/{id}")
	public Dept get(@PathVariable("id") Long id)
	{
		return this.service.get(id);
	}

	@RequestMapping(value = "/consumer/dept/list")
	public List<Dept> list()
	{
		return this.service.list();
	}

	@RequestMapping(value = "/consumer/dept/add")
	public Object add(Dept dept)
	{
		return this.service.add(dept);
	}
}
feign修改主启动类
package com.atguigu.springcloud;

import org.springframework.boot.SpringApplication;
import org.springframework.boot.autoconfigure.SpringBootApplication;
import org.springframework.cloud.netflix.eureka.EnableEurekaClient;
import org.springframework.cloud.netflix.feign.EnableFeignClients;
import org.springframework.context.annotation.ComponentScan;


@SpringBootApplication
@EnableEurekaClient
@EnableFeignClients(basePackages= {"com.atguigu.springcloud"})
@ComponentScan("com.atguigu.springcloud")
public class DeptConsumer80_Feign_App
{
	public static void main(String[] args)
	{
		SpringApplication.run(DeptConsumer80_Feign_App.class, args);
	}
}

访问:
1.定义服务
2.绑定接口
3.写接口已经声明的方法
测试:
localhost/consumer/dept/list

--------------------------------------------Feign-----------------------------37--------------
熔断机制


层层递推会产生雪崩。


---------------------38------------------------
上服务熔断器,熔断是在服务端的,因为是服务端的报错:
Hystris引入
1.maven坐标
2.@Enable

新建子工程:


1.pom
拷贝8001的。
<dependencies>
		<!-- hystrix -->
		<dependency>
			<groupId>org.springframework.cloud</groupId>
			<artifactId>spring-cloud-starter-hystrix</artifactId>
		</dependency>
		<!-- 将微服务provider侧注册进eureka -->
		<dependency>
			<groupId>org.springframework.cloud</groupId>
			<artifactId>spring-cloud-starter-eureka</artifactId>
		</dependency>
		<!-- 引入自己定义的api通用包,可以使用Dept部门Entity -->
		<dependency>
			<groupId>com.atguigu.springcloud</groupId>
			<artifactId>microservicecloud-api</artifactId>
			<version>${project.version}</version>
		</dependency>
		<dependency>
			<groupId>org.springframework.cloud</groupId>
			<artifactId>spring-cloud-starter-config</artifactId>
		</dependency>
		<!-- actuator监控信息完善 -->
		<dependency>
			<groupId>org.springframework.boot</groupId>
			<artifactId>spring-boot-starter-actuator</artifactId>
		</dependency>
		<dependency>
			<groupId>junit</groupId>
			<artifactId>junit</artifactId>
		</dependency>
		<dependency>
			<groupId>mysql</groupId>
			<artifactId>mysql-connector-java</artifactId>
		</dependency>
		<dependency>
			<groupId>com.alibaba</groupId>
			<artifactId>druid</artifactId>
		</dependency>
		<dependency>
			<groupId>ch.qos.logback</groupId>
			<artifactId>logback-core</artifactId>
		</dependency>
		<dependency>
			<groupId>org.mybatis.spring.boot</groupId>
			<artifactId>mybatis-spring-boot-starter</artifactId>
		</dependency>
		<dependency>
			<groupId>org.springframework.boot</groupId>
			<artifactId>spring-boot-starter-jetty</artifactId>
		</dependency>
		<dependency>
			<groupId>org.springframework.boot</groupId>
			<artifactId>spring-boot-starter-web</artifactId>
		</dependency>
		<dependency>
			<groupId>org.springframework.boot</groupId>
			<artifactId>spring-boot-starter-test</artifactId>
		</dependency>
		<!-- 修改后立即生效,热部署 -->
		<dependency>
			<groupId>org.springframework</groupId>
			<artifactId>springloaded</artifactId>
		</dependency>
		<dependency>
			<groupId>org.springframework.boot</groupId>
			<artifactId>spring-boot-devtools</artifactId>
		</dependency>
	</dependencies>

</project>
加入hystrix
<!-- hystrix -->
		<dependency>
			<groupId>org.springframework.cloud</groupId>
			<artifactId>spring-cloud-starter-hystrix</artifactId>
		</dependency>
2.yml修改:
和8001的区别:
eureka:
  client: #客户端注册进eureka服务列表内
    service-url:
      defaultZone: http://eureka7001.com:7001/eureka/,http://eureka7002.com:7002/eureka/,http://eureka7003.com:7003/eureka/
  instance:
    instance-id: microservicecloud-dept8001-hystrix   #自定义hystrix相关的服务名称信息
    prefer-ip-address: true     #访问路径可以显示IP地址
表明是带熔断器的服务。
3.主配置类
package com.atguigu.springcloud;

import org.springframework.boot.SpringApplication;
import org.springframework.boot.autoconfigure.SpringBootApplication;
import org.springframework.cloud.client.circuitbreaker.EnableCircuitBreaker;
import org.springframework.cloud.client.discovery.EnableDiscoveryClient;
import org.springframework.cloud.netflix.eureka.EnableEurekaClient;

@SpringBootApplication
@EnableEurekaClient //本服务启动后会自动注册进eureka服务中
@EnableDiscoveryClient //服务发现
@EnableCircuitBreaker//对hystrixR熔断机制的支持
public class DeptProvider8001_Hystrix_App
{
	public static void main(String[] args)
	{
		SpringApplication.run(DeptProvider8001_Hystrix_App.class, args);
	}
}
4.回到controller

package com.atguigu.springcloud.controller;

import org.springframework.beans.factory.annotation.Autowired;
import org.springframework.web.bind.annotation.PathVariable;
import org.springframework.web.bind.annotation.RequestMapping;
import org.springframework.web.bind.annotation.RequestMethod;
import org.springframework.web.bind.annotation.RestController;

import com.atguigu.springcloud.entities.Dept;
import com.atguigu.springcloud.service.DeptService;
import com.netflix.hystrix.contrib.javanica.annotation.HystrixCommand;

@RestController
public class DeptController
{
	@Autowired
	private DeptService service = null;

	@RequestMapping(value = "/dept/get/{id}", method = RequestMethod.GET)
	//一旦调用服务方法失败并抛出了错误信息后,会自动调用@HystrixCommand标注好的fallbackMethod调用类中的指定方法
	@HystrixCommand(fallbackMethod = "processHystrix_Get")
	public Dept get(@PathVariable("id") Long id)
	{

		Dept dept = this.service.get(id);

		if (null == dept) {
			throw new RuntimeException("该ID:" + id + "没有没有对应的信息");
		}

		return dept;
	}

	public Dept processHystrix_Get(@PathVariable("id") Long id)
	{
		return new Dept().setDeptno(id).setDname("该ID:" + id + "没有没有对应的信息,null--@HystrixCommand")
				.setDb_source("no this database in MySQL");
	}
}
解释:

测试:
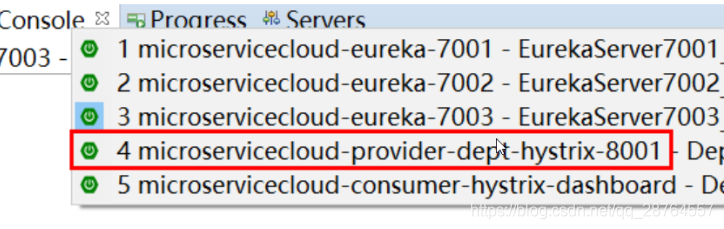
http://eureka7001.com:7001/ 查看带熔断的服务
起三个7001和熔断的8001
起消费者:

-------------39-------------------

开发流程

解释图谱:

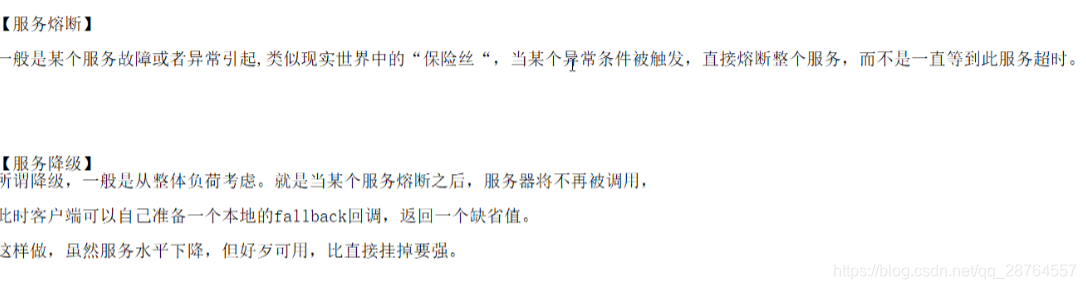
服务降级的意思就是现在A的访问量急剧飙升,此时借调C的几个程序员去合力搞A,这就是服务的降级,但是要告诉找C的老客户我们服务是降级的,他们就去A或者B跑了。

我们的项目就是关掉一个微服务而不是服务熔断的只是RuntimeException。
服务的降级是在客户端完成的与服务端没有关系
1.上一讲讲的会有一个问题就是服务的膨胀,而且带熔断的8001整体服务挂了就没了。
2.aop编程,前置通知,后置通知,异常通知,不要耦合。
此时的方法是我们让其在接口绑定,就是在api这个过程上绑定的。
注意这个api是公共的接口,我们使用的时候不要弄混。
package com.atguigu.springcloud.service;

import com.atguigu.springcloud.entities.Dept;
import feign.hystrix.FallbackFactory;
import org.springframework.stereotype.Component;

import java.util.List;

@Component // 不要忘记添加,不要忘记添加
public class DeptClientServiceFallbackFactory implements FallbackFactory<DeptClientService>
{
	@Override
	public DeptClientService create(Throwable throwable)
	{
		return new DeptClientService() {
			@Override
			public Dept get(long id)
			{
				return new Dept().setDeptno(id).setDname("该ID:" + id + "没有没有对应的信息,Consumer客户端提供的降级信息,此刻服务Provider已经关闭")
						.setDb_source("no this database in MySQL");
			}

			@Override
			public List<Dept> list()
			{
				return null;
			}

			@Override
			public boolean add(Dept dept)
			{
				return false;
			}
		};
	}
}

模拟场景忍痛将某个微服务关掉,有其他的客户访问的时候会怎么样。
package com.atguigu.springcloud.service;

import com.atguigu.springcloud.entities.Dept;
import org.springframework.cloud.netflix.feign.FeignClient;
import org.springframework.web.bind.annotation.PathVariable;
import org.springframework.web.bind.annotation.RequestMapping;
import org.springframework.web.bind.annotation.RequestMethod;

import java.util.List;


/**
 *
 * @Description: 修改microservicecloud-api工程,根据已经有的DeptClientService接口
         新建一个实现了FallbackFactory接口的类DeptClientServiceFallbackFactory
 * @author zzyy
 * @date 2018年4月21日
 */
@FeignClient(value = "MICROSERVICECLOUD-DEPT",fallbackFactory=DeptClientServiceFallbackFactory.class)
public interface DeptClientService
{
    @RequestMapping(value = "/dept/get/{id}", method = RequestMethod.GET)
    public Dept get(@PathVariable("id") long id);

    @RequestMapping(value = "/dept/list", method = RequestMethod.GET)
    public List<Dept> list();

    @RequestMapping(value = "/dept/add", method = RequestMethod.POST)
    public boolean add(Dept dept);
}
这个意思是DeptClientService出了问题统一去DeptClientServiceFallbackFactory
回到feign工程
加入这么一句话
feign:
  hystrix:
    enabled: true
验证。
访问:localhost/consumer/dept/get/1
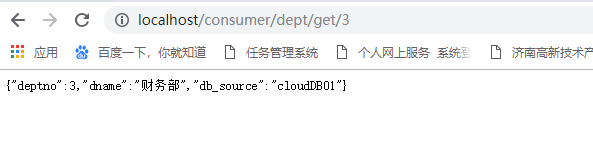
关闭8001


就不会反复调用了。
-------------------服务降级-----------------------------------------------40---------------------------------
假设10万个用户,超时。

 、
、
---
aop---切面 服务降级。
服务提供者业务逻辑不用带很多东西。
好处:主业务和熔断结构 避免方法膨胀。


-------熔断降级小总结------------------------------41--------------------------

脑图:


1.pom新增坐标
<!-- hystrix和 hystrix-dashboard相关 -->
		<dependency>
			<groupId>org.springframework.cloud</groupId>
			<artifactId>spring-cloud-starter-hystrix</artifactId>
		</dependency>
		<dependency>
			<groupId>org.springframework.cloud</groupId>
			<artifactId>spring-cloud-starter-hystrix-dashboard</artifactId>
		</dependency>
全的pom
<project xmlns="http://maven.apache.org/POM/4.0.0" xmlns:xsi="http://www.w3.org/2001/XMLSchema-instance" xsi:schemaLocation="http://maven.apache.org/POM/4.0.0 http://maven.apache.org/xsd/maven-4.0.0.xsd">
  <modelVersion>4.0.0</modelVersion>
  <parent>
    <groupId>com.atguigu.springcloud</groupId>
    <artifactId>microservicecloud</artifactId>
    <version>0.0.1-SNAPSHOT</version>
  </parent>
  <artifactId>microservicecloud-consumer-hystrix-dashboard</artifactId>

<dependencies>
		<!-- 自己定义的api -->
		<dependency>
			<groupId>com.atguigu.springcloud</groupId>
			<artifactId>microservicecloud-api</artifactId>
			<version>${project.version}</version>
		</dependency>
		<dependency>
			<groupId>org.springframework.boot</groupId>
			<artifactId>spring-boot-starter-web</artifactId>
		</dependency>
		<!-- 修改后立即生效,热部署 -->
		<dependency>
			<groupId>org.springframework</groupId>
			<artifactId>springloaded</artifactId>
		</dependency>
		<dependency>
			<groupId>org.springframework.boot</groupId>
			<artifactId>spring-boot-devtools</artifactId>
		</dependency>
		<!-- Ribbon相关 -->
		<dependency>
			<groupId>org.springframework.cloud</groupId>
			<artifactId>spring-cloud-starter-eureka</artifactId>
		</dependency>
		<dependency>
			<groupId>org.springframework.cloud</groupId>
			<artifactId>spring-cloud-starter-ribbon</artifactId>
		</dependency>
		<dependency>
			<groupId>org.springframework.cloud</groupId>
			<artifactId>spring-cloud-starter-config</artifactId>
		</dependency>
		<!-- feign相关 -->
		<dependency>
			<groupId>org.springframework.cloud</groupId>
			<artifactId>spring-cloud-starter-feign</artifactId>
		</dependency>
		<!-- hystrix和 hystrix-dashboard相关 -->
		<dependency>
			<groupId>org.springframework.cloud</groupId>
			<artifactId>spring-cloud-starter-hystrix</artifactId>
		</dependency>
		<dependency>
			<groupId>org.springframework.cloud</groupId>
			<artifactId>spring-cloud-starter-hystrix-dashboard</artifactId>
		</dependency>
	</dependencies>
</project>
2.yml
server:
  port: 9001
3.主启动类
package com.atguigu.springcloud;

import org.springframework.boot.SpringApplication;
import org.springframework.boot.autoconfigure.SpringBootApplication;
import org.springframework.cloud.netflix.hystrix.dashboard.EnableHystrixDashboard;

@SpringBootApplication
@EnableHystrixDashboard
public class DeptConsumer_DashBoard_App
{
	public static void main(String[] args)
	{
		SpringApplication.run(DeptConsumer_DashBoard_App.class, args);
	}
}
4.检查带熔断的8001的监控信息是否完善
     <!-- actuator监控信息完善 -->
        <dependency>
            <groupId>org.springframework.boot</groupId>
            <artifactId>spring-boot-starter-actuator</artifactId>
        </dependency>
5.启动

----------豪猪hystrixDashboard--------------42-------------------------
启动三个eureka集群。
启动这个
![]()
总的:
测试:
localhost:8001/dept/get/1
http://localhost:8001/hystrix.stream
一直在走说明在做测试。
图形化的展示:

目前是9001在监控带熔断的8001

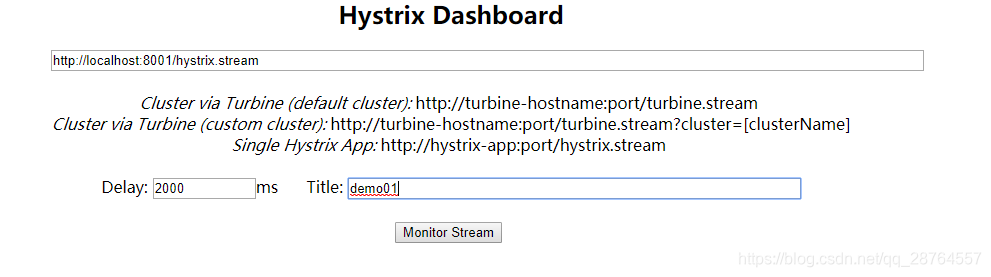
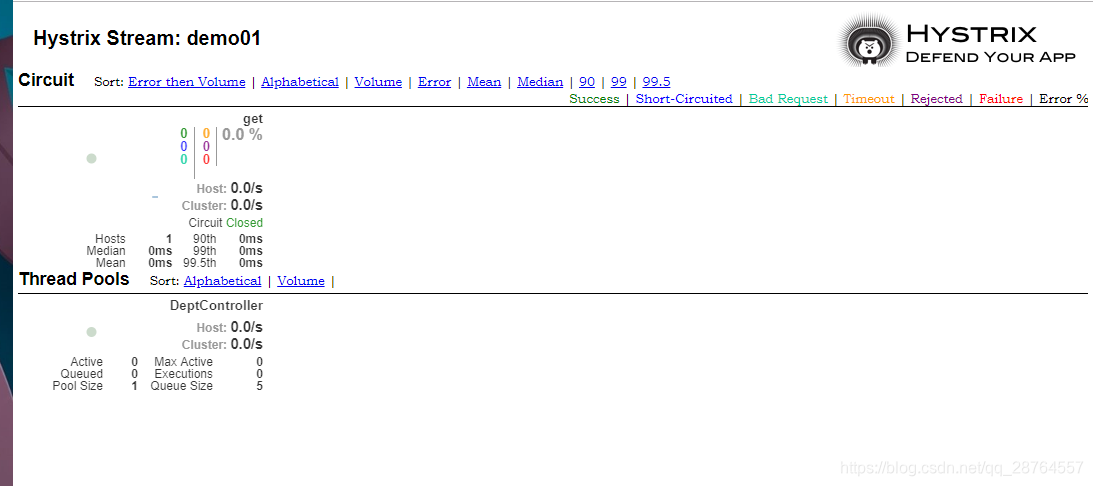

如何看参数:


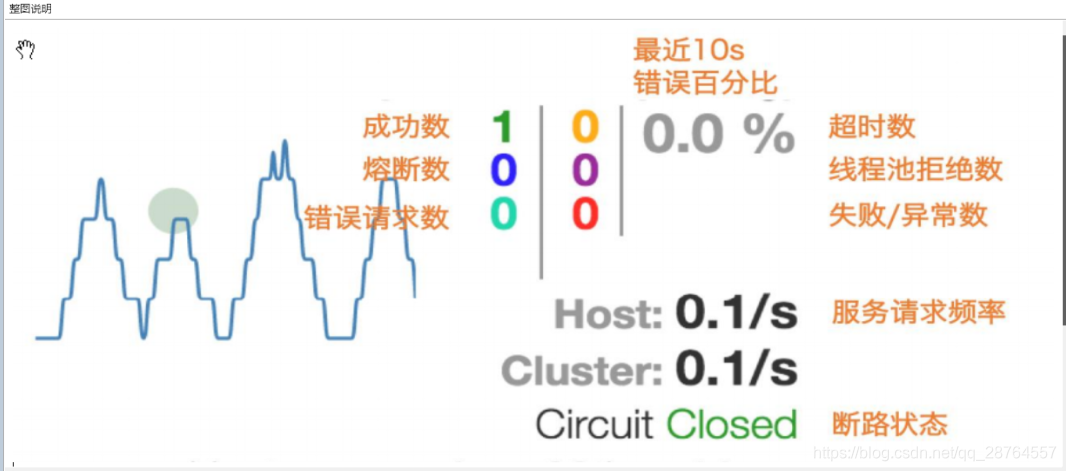

-----------查看和使用------------------------------------43---
=============================================zuul===============================================
zuul
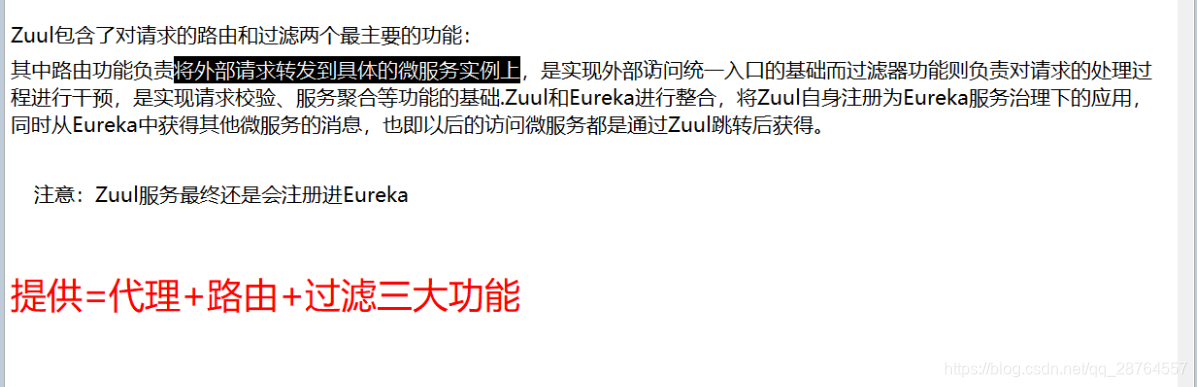
--------------------------------------------------------------------------------44--------------------------------------------------------------------------------
官网


1.pom
        <!-- zuul路由网关 -->
		<dependency>
			<groupId>org.springframework.cloud</groupId>
			<artifactId>spring-cloud-starter-zuul</artifactId>
		</dependency>
		<dependency>
			<groupId>org.springframework.cloud</groupId>
			<artifactId>spring-cloud-starter-eureka</artifactId>
		</dependency>
要搞到eureka上面因为也是在eureka上处理的。
完整的pom
<project xmlns="http://maven.apache.org/POM/4.0.0" xmlns:xsi="http://www.w3.org/2001/XMLSchema-instance"
	xsi:schemaLocation="http://maven.apache.org/POM/4.0.0 http://maven.apache.org/xsd/maven-4.0.0.xsd">
	<modelVersion>4.0.0</modelVersion>

	<parent>
		<groupId>com.atguigu.springcloud</groupId>
		<artifactId>microservicecloud</artifactId>
		<version>0.0.1-SNAPSHOT</version>
	</parent>

	<artifactId>microservicecloud-zuul-gateway-9527</artifactId>

	<dependencies>
		<!-- zuul路由网关 -->
		<dependency>
			<groupId>org.springframework.cloud</groupId>
			<artifactId>spring-cloud-starter-zuul</artifactId>
		</dependency>
		<dependency>
			<groupId>org.springframework.cloud</groupId>
			<artifactId>spring-cloud-starter-eureka</artifactId>
		</dependency>
		<!-- actuator监控 -->
		<dependency>
			<groupId>org.springframework.boot</groupId>
			<artifactId>spring-boot-starter-actuator</artifactId>
		</dependency>
		<!-- hystrix容错 -->
		<dependency>
			<groupId>org.springframework.cloud</groupId>
			<artifactId>spring-cloud-starter-hystrix</artifactId>
		</dependency>
		<dependency>
			<groupId>org.springframework.cloud</groupId>
			<artifactId>spring-cloud-starter-config</artifactId>
		</dependency>
		<!-- 日常标配 -->
		<dependency>
			<groupId>com.atguigu.springcloud</groupId>
			<artifactId>microservicecloud-api</artifactId>
			<version>${project.version}</version>
		</dependency>
		<dependency>
			<groupId>org.springframework.boot</groupId>
			<artifactId>spring-boot-starter-jetty</artifactId>
		</dependency>
		<dependency>
			<groupId>org.springframework.boot</groupId>
			<artifactId>spring-boot-starter-web</artifactId>
		</dependency>
		<dependency>
			<groupId>org.springframework.boot</groupId>
			<artifactId>spring-boot-starter-test</artifactId>
		</dependency>
		<!-- 热部署插件 -->
		<dependency>
			<groupId>org.springframework</groupId>
			<artifactId>springloaded</artifactId>
		</dependency>
		<dependency>
			<groupId>org.springframework.boot</groupId>
			<artifactId>spring-boot-devtools</artifactId>
		</dependency>
	</dependencies>

</project>
2.yml
server:
  port: 9527

spring:
  application:
    name: microservicecloud-zuul-gateway

eureka:
  client:
    service-url:
      defaultZone: http://eureka7001.com:7001/eureka,http://eureka7002.com:7002/eureka,http://eureka7003.com:7003/eureka
  instance:
    instance-id: gateway-9527.com
    prefer-ip-address: true


zuul:
#   ignored-services: microservicecloud-dept
  prefix: /atguigu
  ignored-services: "*"
  routes:
    mydept.serviceId: microservicecloud-dept
    mydept.path: /mydept/**

info:
  app.name: atguigu-microcloud
  company.name: www.atguigu.com
  build.artifactId: $project.artifactId$
  build.version: $project.version$
改host映射文件。

10.18.1.42	inspur
127.0.0.1 eureka7001.com
127.0.0.1 eureka7002.com
127.0.0.1 eureka7003.com
127.0.0.1 myzuul.com

127.0.0.1 xxlssoserver.com
127.0.0.1 xxlssoclient1.com
127.0.0.1 xxlssoclient2.com
3.主启动类:
package com.atguigu.springcloud;

import org.springframework.boot.SpringApplication;
import org.springframework.boot.autoconfigure.SpringBootApplication;
import org.springframework.cloud.netflix.zuul.EnableZuulProxy;

@SpringBootApplication
@EnableZuulProxy   //启动proxy是代理
public class Zuul_9527_StartSpringCloudApp
{
	public static void main(String[] args)
	{
		SpringApplication.run(Zuul_9527_StartSpringCloudApp.class, args);
	}
}
4.启动

zuul是注册到eureka上的
5.测试

不启用zuul:http://localhost:8001/dept/get/2
zuul不隐藏服务。配置ignore就不可以访问了:http://myzuul.com:9527/atguigu/microservicecloud-dept/dept/get/1

启用zuul:http://myzuul.com:9527/atguigu/mydept/dept/get/1
启用zuul要通过zuul去集群找到已经注册到集群得服务,再根据服务请求。
蓝色是zuul在eureka找到的微服务。
----------------------------------------------------------45--------------------------------------------
映射规则:

before的时候是路由zuul找到microservicecloud-dept然后访问方法。
改yml则可知是真名是诸葛亮mydept.serviceId,字mydept.path。
此时就可以了。
修改的东西
zuul:
  routes:
    mydept.serviceId: microservicecloud-dept
    mydept.path: /mydept/**
myzuul.com:9527/mydept/dept/get/1
这个就是隐藏了微服务的服务名。

接下来就是单入口单出口的设定。
ignored-services: microservicecloud-dept有一个问题目前是很多的微服务要批量处理:
ignored-services: "*"还有一个参数:
设置统一的公共的前缀:

zuul:
#使这个服务无效
#   ignored-services: microservicecloud-dept
  prefix: /atguigu
  ignored-services: "*"
  routes:
    mydept.serviceId: microservicecloud-dept
    mydept.path: /mydept/**
myzuul.com:9527/atguigu/mydept/dept/get/1

------------------------------------------------------路由访问的映射规则-------------------------------------------------------------46


Config Server分布式配置中心
远程的github库下载到本地,Config Server和外界的github沟通。


-------------------------------------------------------------------------------------47-------------------------------------------------------------------------------


1.在github新建一个名为microservicecloud-config的repository

2.根据上一步获得的ssh协议地址
[email protected]:FandyWw/microservicecloud-config.git
3.在本地硬盘新建一个git仓库并克隆
$ git clone [email protected]:FandyWw/microservicecloud-config.git
$ git status

4.在文件夹下新建配置

5.编写yml将yml推送到git上,格式必须是utf-8

spring:
  profiles:
    active:
    - dev
---
spring:
   profiles: dev  #开发环境
   application:
       name: microservicecloud-config-atguigu-dev
---
spring:
   profiles: test #测试环境
   application:
       name: microservicecloud-config-atguigu-test
6.推送到git上
$ git add .
$ git commit -m "init file"
$ git push origin master
7.新建model

8.修改yml内容
server:
  port: 3344

spring:
  application:
    name:  microservicecloud-config   //这个是微服务独有的服务名
  cloud:
    config:
      server:
        git:
          uri: [email protected]:FandyWw/microservicecloud-config.git #GitHub上面的git仓库名字
uri就是启动去git上获取application.yml
9.修改pom.xml的内容
<project xmlns="http://maven.apache.org/POM/4.0.0" xmlns:xsi="http://www.w3.org/2001/XMLSchema-instance" xsi:schemaLocation="http://maven.apache.org/POM/4.0.0 http://maven.apache.org/xsd/maven-4.0.0.xsd">
  <modelVersion>4.0.0</modelVersion>
  <parent>
    <groupId>com.atguigu.springcloud</groupId>
    <artifactId>microservicecloud</artifactId>
    <version>0.0.1-SNAPSHOT</version>
  </parent>
  <artifactId>microservicecloud-config-3344</artifactId>

  <dependencies>
		<!-- springCloud Config 这个说明3344是config的大管家-->
		<dependency>
			<groupId>org.springframework.cloud</groupId>
			<artifactId>spring-cloud-config-server</artifactId>
		</dependency>
		<!-- 避免Config的Git插件报错:org/eclipse/jgit/api/TransportConfigCallback -->
		<dependency>
			<groupId>org.eclipse.jgit</groupId>
			<artifactId>org.eclipse.jgit</artifactId>
			<version>4.10.0.201712302008-r</version>
		</dependency>
		<!-- 图形化监控 -->
		<dependency>
			<groupId>org.springframework.boot</groupId>
			<artifactId>spring-boot-starter-actuator</artifactId>
		</dependency>
		<!-- 熔断 -->
		<dependency>
			<groupId>org.springframework.cloud</groupId>
			<artifactId>spring-cloud-starter-hystrix</artifactId>
		</dependency>
		<dependency>
			<groupId>org.springframework.cloud</groupId>
			<artifactId>spring-cloud-starter-eureka</artifactId>
		</dependency>
		<dependency>
			<groupId>org.springframework.cloud</groupId>
			<artifactId>spring-cloud-starter-config</artifactId>
		</dependency>
		<dependency>
			<groupId>org.springframework.boot</groupId>
			<artifactId>spring-boot-starter-jetty</artifactId>
		</dependency>
		<dependency>
			<groupId>org.springframework.boot</groupId>
			<artifactId>spring-boot-starter-web</artifactId>
		</dependency>
		<dependency>
			<groupId>org.springframework.boot</groupId>
			<artifactId>spring-boot-starter-test</artifactId>
		</dependency>
		<!-- 热部署插件 -->
		<dependency>
			<groupId>org.springframework</groupId>
			<artifactId>springloaded</artifactId>
		</dependency>
		<dependency>
			<groupId>org.springframework.boot</groupId>
			<artifactId>spring-boot-devtools</artifactId>
		</dependency>
	</dependencies>

</project>
10.主配置类
package com.atguigu.springcloud;

import org.springframework.boot.SpringApplication;
import org.springframework.boot.autoconfigure.SpringBootApplication;
import org.springframework.cloud.config.server.EnableConfigServer;

@SpringBootApplication
@EnableConfigServer
public class Config_3344_StartSpringCloudApp
{
	public static void main(String[] args)
	{
		SpringApplication.run(Config_3344_StartSpringCloudApp.class, args);
	}
}
11.windows下修改host文件增加映射
10.18.1.42	inspur
127.0.0.1 eureka7001.com
127.0.0.1 eureka7002.com
127.0.0.1 eureka7003.com
127.0.0.1 myzuul.com
127.0.0.1 config-3344.com

127.0.0.1 xxlssoserver.com
127.0.0.1 xxlssoclient1.com
127.0.0.1 xxlssoclient2.com
12.测试

注意有问题
1.密钥https://blog.csdn.net/weixin_39112840/article/details/87869132
2.格式的错误https://blog.csdn.net/zdyueguanyun/article/details/79215972
访问:
config-3344.com:3344/application-dev.yml
总结:这个服务可以在github上获取信息。
--------------------------------------------------------------------48-----------------------------------------------------------------------------------
前提:打通了
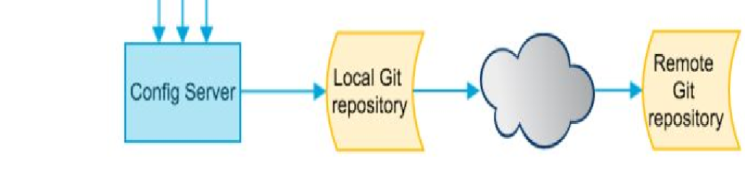
这个通道之后可知:

编辑一个yml名字为:
microservicecloud-config-client.yml
spring:
  profiles:
    active:
    - dev
---
server:
   port: 8201
spring:
    profiles: dev  #开发环境
     application:
       name: microservicecloud-config-client
eureka:
  client:
    service-url:
     defaultZone: http://eureka-dev.com:7001/eureka/
---
server:
   port: 8202
spring:
    profiles:  test   #测试环境
     application:
       name: microservicecloud-config-client
eureka:
  client:
    service-url:
defaultZone: http://eureka-dev.com:7001/eureka/遇到问题:https://segmentfault.com/q/1010000008066749
如果一切顺利则可知:
启动我们的3344的server读取GitHub上的yml文件解析:
输入网址看能否解析这个文件:
http://config-3344.com:3344/microservicecloud-config-client-dev.yml
全解析成功。
新建model:

流程:

1.pom注意加了什么?
<!-- SpringCloud Config客户端 -->
<dependency>
	<groupId>org.springframework.cloud</groupId>
	<artifactId>spring-cloud-starter-config</artifactId>
</dependency>
全部内容。
2.yml文件
bootstrap.yml
spring:
  cloud:
    config:
      name: microservicecloud-config-client #需要从github上读取的资源名称,注意没有yml后缀名
      profile: test   #本次访问的配置项
      label: master
      uri: http://config-3344.com:3344  #本微服务启动后先去找3344号服务,通过SpringCloudConfig获取GitHub的服务地址
注意读取的是yml的资源但是没有.yml
classload类装载器,是优先级最高的

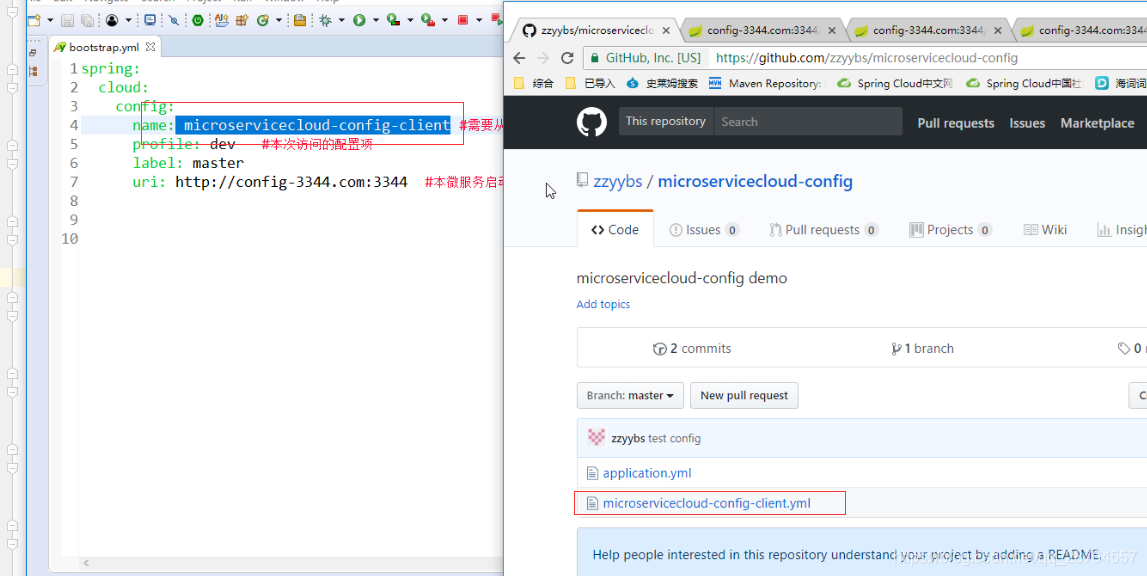

3.建yml
spring:
  application:
    name: microservicecloud-config-client
4.文件的映射

5.
10.18.1.42	inspur
127.0.0.1 eureka7001.com
127.0.0.1 eureka7002.com
127.0.0.1 eureka7003.com
127.0.0.1 myzuul.com
127.0.0.1 config-3344.com
127.0.0.1 client-config.com

127.0.0.1 xxlssoserver.com
127.0.0.1 xxlssoclient1.com
127.0.0.1 xxlssoclient2.com
6.在3355上创建类
package com.atguigu.springcloud.rest;

import org.springframework.beans.factory.annotation.Value;
import org.springframework.web.bind.annotation.RequestMapping;
import org.springframework.web.bind.annotation.RestController;

@RestController
public class ConfigClientRest
{

	@Value("${spring.application.name}")
	private String applicationName;

	@Value("${eureka.client.service-url.defaultZone}")
	private String eurekaServers;

	@Value("${server.port}")
	private String port;

	@RequestMapping("/config")
	public String getConfig()
	{
		String str = "applicationName: " + applicationName + "\t eurekaServers:" + eurekaServers + "\t port: " + port;
		System.out.println("******str: " + str);
		return "applicationName: " + applicationName + "\t eurekaServers:" + eurekaServers + "\t port: " + port;
	}
}
测试:


client-config.com:8202/config

spring:
  profiles:
    active:
    - dev
---
server:
   port: 8201
spring:
    profiles: dev  #开发环境
    application:
       name: microservicecloud-config-client
eureka:
  client:
    service-url:
     defaultZone: http://eureka-dev.com:7001/eureka/
---
server:
   port: 8202
spring:
    profiles:  test   #测试环境
    application:
       name: microservicecloud-config-client
eureka:
  client:
    service-url:
     defaultZone: http://eureka-dev.com:7001/eureka/
-------------------------------------------------------------------49-------------------------------------------------------------------------------------
springcloud的配置实战:


新建yml

spring:
  profiles:
    active:
    - dev


---
server:
  port: 7001

spring:
  profiles: dev
  application:
    name: microservicecloud-config-eureka-client

eureka:
  instance:
    hostname: eureka7001.com
  client:
    register-with-eureka: false
    fetch-registry: false
    service-url:
      defaultZone: http://eureka7001.com/eureka/
---
server:
  port: 7002

spring:
  profiles: test
  application:
    name: microservicecloud-config-eureka-client

eureka:
  instance:
    hostname: eureka7002.com
  client:
    register-with-eureka: false
    fetch-registry: false
    service-url:
      defaultZone: http://eureka7002.com/eureka/
更新到github
再新增一个文件
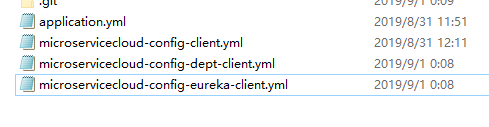
文件:
spring:
  profiles:
    active:
    - dev
---
server:
  port: 8001

mybatis:
  config-location: classpath:mybatis/mybatis.cfg.xml        # mybatis配置文件所在路径
  type-aliases-package: com.atguigu.springcloud.entities    # 所有Entity别名类所在包,告诉mybatis,扫描这个包的实体类
  mapper-locations:
  - classpath:mybatis/mapper/**/*.xml                       # mapper映射文件,写sql的

spring:
   profiles: test
   application:
    name: microservicecloud-config-dept-client                            #微服务的名字 很重要  这个是服务名 以后消费者就是按照这个服务名找到服务
   datasource:
    type: com.alibaba.druid.pool.DruidDataSource            # 当前数据源操作类型
    driver-class-name: org.gjt.mm.mysql.Driver              # mysql驱动包
    url: jdbc:mysql://192.168.244.130:3306/cloudDB01              # 数据库名称
    username: root
    password: 123456
    dbcp2:
      min-idle: 5                                           # 数据库连接池的最小维持连接数
      initial-size: 5                                       # 初始化连接数
      max-total: 5                                          # 最大连接数
      max-wait-millis: 200                                  # 等待连接获取的最大超时时间

eureka:
  client: #客户端注册进eureka服务列表内
    service-url:
      # defaultZone: http://localhost:7001/eureka   //这个是8001要入驻的地址就是入驻到eureka的服务器
      defaultZone: http://eureka7001.com:7001/eureka/,http://eureka7002.com:7002/eureka/,http://eureka7003.com:7003/eureka/
  instance:
    instance-id: microservicecloud-dept8001
    prefer-ip-address: true     #访问路径可以显示IP地址

info:
  app.name: atguigu-microservicecloud
  company.name: www.atguigu.com
  build.artifactId: $project.artifactId$
  build.version: $project.version$
---
server:
  port: 8001

mybatis:
  config-location: classpath:mybatis/mybatis.cfg.xml        # mybatis配置文件所在路径
  type-aliases-package: com.atguigu.springcloud.entities    # 所有Entity别名类所在包,告诉mybatis,扫描这个包的实体类
  mapper-locations:
  - classpath:mybatis/mapper/**/*.xml                       # mapper映射文件,写sql的

spring:
   profiles: dev
   application:
    name: microservicecloud-config-dept-client                             #微服务的名字 很重要  这个是服务名 以后消费者就是按照这个服务名找到服务
   datasource:
    type: com.alibaba.druid.pool.DruidDataSource            # 当前数据源操作类型
    driver-class-name: org.gjt.mm.mysql.Driver              # mysql驱动包
    url: jdbc:mysql://192.168.244.130:3306/cloudDB02              # 数据库名称
    username: root
    password: 123456
    dbcp2:
      min-idle: 5                                           # 数据库连接池的最小维持连接数
      initial-size: 5                                       # 初始化连接数
      max-total: 5                                          # 最大连接数
      max-wait-millis: 200                                  # 等待连接获取的最大超时时间

eureka:
  client: #客户端注册进eureka服务列表内
    service-url:
      # defaultZone: http://localhost:7001/eureka   //这个是8001要入驻的地址就是入驻到eureka的服务器
      defaultZone: http://eureka7001.com:7001/eureka/,http://eureka7002.com:7002/eureka/,http://eureka7003.com:7003/eureka/
  instance:
    instance-id: microservicecloud-dept8001
    prefer-ip-address: true     #访问路径可以显示IP地址

info:
  app.name: atguigu-microservicecloud
  company.name: www.atguigu.com
  build.artifactId: $project.artifactId$
  build.version: $project.version$
这个区别就是test环境是数据库2 dev是数据库1
步骤:


1.pom
<project xmlns="http://maven.apache.org/POM/4.0.0" xmlns:xsi="http://www.w3.org/2001/XMLSchema-instance" xsi:schemaLocation="http://maven.apache.org/POM/4.0.0 http://maven.apache.org/xsd/maven-4.0.0.xsd">
  <modelVersion>4.0.0</modelVersion>
  <parent>
    <groupId>com.atguigu.springcloud</groupId>
    <artifactId>microservicecloud</artifactId>
    <version>0.0.1-SNAPSHOT</version>
  </parent>
  <artifactId>microservicecloud-config-eureka-client-7001</artifactId>

  <dependencies>
		<!-- SpringCloudConfig配置 -->
		<dependency>
			<groupId>org.springframework.cloud</groupId>
			<artifactId>spring-cloud-starter-config</artifactId>
		</dependency>
		<dependency>
			<groupId>org.springframework.cloud</groupId>
			<artifactId>spring-cloud-starter-eureka-server</artifactId>
		</dependency>
		<!-- 热部署插件 -->
		<dependency>
			<groupId>org.springframework</groupId>
			<artifactId>springloaded</artifactId>
		</dependency>
		<dependency>
			<groupId>org.springframework.boot</groupId>
			<artifactId>spring-boot-devtools</artifactId>
		</dependency>
	</dependencies>
</project>
2.其他的基本的东西在7001上拷贝 主启动类等。
3.yml文件
spring:
  cloud:
    config:
      name: microservicecloud-config-eureka-client     #需要从github上读取的资源名称,注意没有yml后缀名
      profile: dev
      label: master
      uri: http://config-3344.com:3344      #SpringCloudConfig获取的服务地址
spring:
  application:
    name: microservicecloud-config-eureka-client
4.启动测试:


总结:主要就是引入了bootstrap进行github的读取 pom加入config-client在3344读取
-----------------------------------
配置版本的8001 可以切换数据库的

1.新建一个config版本的8001
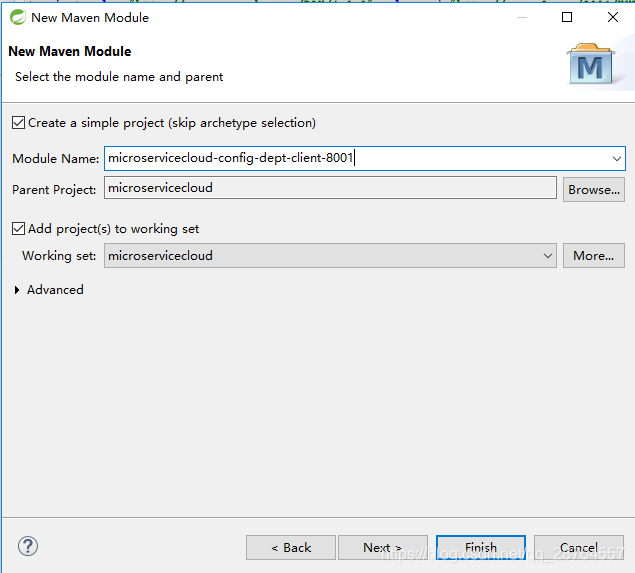
2.拷贝pom
<project xmlns="http://maven.apache.org/POM/4.0.0" xmlns:xsi="http://www.w3.org/2001/XMLSchema-instance" xsi:schemaLocation="http://maven.apache.org/POM/4.0.0 http://maven.apache.org/xsd/maven-4.0.0.xsd">
  <modelVersion>4.0.0</modelVersion>
  <parent>
    <groupId>com.atguigu.springcloud</groupId>
    <artifactId>microservicecloud</artifactId>
    <version>0.0.1-SNAPSHOT</version>
  </parent>
  <artifactId>microservicecloud-config-dept-client-8001</artifactId>

  	<dependencies>
		<!-- SpringCloudConfig配置 -->
		<dependency>
			<groupId>org.springframework.cloud</groupId>
			<artifactId>spring-cloud-starter-config</artifactId>
		</dependency>
		<dependency>
			<groupId>org.springframework.boot</groupId>
			<artifactId>spring-boot-starter-actuator</artifactId>
		</dependency>
		<dependency>
			<groupId>org.springframework.cloud</groupId>
			<artifactId>spring-cloud-starter-eureka</artifactId>
		</dependency>
		<dependency>
			<groupId>com.atguigu.springcloud</groupId>
			<artifactId>microservicecloud-api</artifactId>
			<version>${project.version}</version>
		</dependency>
		<dependency>
			<groupId>junit</groupId>
			<artifactId>junit</artifactId>
		</dependency>
		<dependency>
			<groupId>mysql</groupId>
			<artifactId>mysql-connector-java</artifactId>
		</dependency>
		<dependency>
			<groupId>com.alibaba</groupId>
			<artifactId>druid</artifactId>
		</dependency>
		<dependency>
			<groupId>ch.qos.logback</groupId>
			<artifactId>logback-core</artifactId>
		</dependency>
		<dependency>
			<groupId>org.mybatis.spring.boot</groupId>
			<artifactId>mybatis-spring-boot-starter</artifactId>
		</dependency>
		<dependency>
			<groupId>org.springframework.boot</groupId>
			<artifactId>spring-boot-starter-jetty</artifactId>
		</dependency>
		<dependency>
			<groupId>org.springframework.boot</groupId>
			<artifactId>spring-boot-starter-web</artifactId>
		</dependency>
		<dependency>
			<groupId>org.springframework.boot</groupId>
			<artifactId>spring-boot-starter-test</artifactId>
		</dependency>
		<dependency>
			<groupId>org.springframework</groupId>
			<artifactId>springloaded</artifactId>
		</dependency>
		<dependency>
			<groupId>org.springframework.boot</groupId>
			<artifactId>spring-boot-devtools</artifactId>
		</dependency>
	</dependencies>
</project>
3.一些类
在8001上拷贝
4.yml
spring:
  cloud:
    config:
      name: microservicecloud-config-dept-client #需要从github上读取的资源名称,注意没有yml后缀名
      #profile配置是什么就取什么配置dev or test
      profile: dev
      #profile: test
      label: master
      uri: http://config-3344.com:3344  #SpringCloudConfig获取的服务地址
spring:
  application:
    name: microservicecloud-config-dept-client
5.测试:
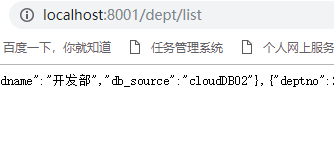
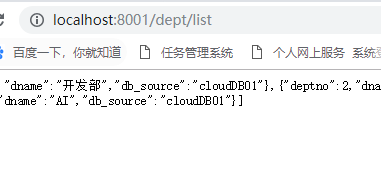
正规的玩法:
在github上改的配置。
-------------------------------------------------------------------50-------------------------------------------------------------------------------------
最后附上代码地址和数据库建表语句:
-- auto-generated definition
create table dept
(
  deptno    bigint auto_increment
    primary key,
  dname     varchar(60) null,
  db_source varchar(60) null
);
数据库:
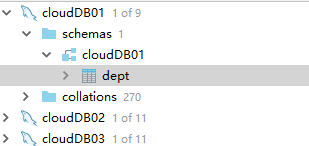
github地址:
https://github.com/FandyWw/springcloud-last


智能推荐
JWT(Json Web Token)实现无状态登录_无状态token登录-程序员宅基地
文章浏览阅读685次。1.1.什么是有状态?有状态服务,即服务端需要记录每次会话的客户端信息,从而识别客户端身份,根据用户身份进行请求的处理,典型的设计如tomcat中的session。例如登录:用户登录后,我们把登录者的信息保存在服务端session中,并且给用户一个cookie值,记录对应的session。然后下次请求,用户携带cookie值来,我们就能识别到对应session,从而找到用户的信息。缺点是什么?服务端保存大量数据,增加服务端压力 服务端保存用户状态,无法进行水平扩展 客户端请求依赖服务.._无状态token登录
SDUT OJ逆置正整数-程序员宅基地
文章浏览阅读293次。SDUT OnlineJudge#include<iostream>using namespace std;int main(){int a,b,c,d;cin>>a;b=a%10;c=a/10%10;d=a/100%10;int key[3];key[0]=b;key[1]=c;key[2]=d;for(int i = 0;i<3;i++){ if(key[i]!=0) { cout<<key[i.
年终奖盲区_年终奖盲区表-程序员宅基地
文章浏览阅读2.2k次。年终奖采用的平均每月的收入来评定缴税级数的,速算扣除数也按照月份计算出来,但是最终减去的也是一个月的速算扣除数。为什么这么做呢,这样的收的税更多啊,年终也是一个月的收入,凭什么减去12*速算扣除数了?这个霸道(不要脸)的说法,我们只能合理避免的这些跨级的区域了,那具体是那些区域呢?可以参考下面的表格:年终奖一列标红的一对便是盲区的上下线,发放年终奖的数额一定一定要避免这个区域,不然公司多花了钱..._年终奖盲区表
matlab 提取struct结构体中某个字段所有变量的值_matlab读取struct类型数据中的值-程序员宅基地
文章浏览阅读7.5k次,点赞5次,收藏19次。matlab结构体struct字段变量值提取_matlab读取struct类型数据中的值
Android fragment的用法_android reader fragment-程序员宅基地
文章浏览阅读4.8k次。1,什么情况下使用fragment通常用来作为一个activity的用户界面的一部分例如, 一个新闻应用可以在屏幕左侧使用一个fragment来展示一个文章的列表,然后在屏幕右侧使用另一个fragment来展示一篇文章 – 2个fragment并排显示在相同的一个activity中,并且每一个fragment拥有它自己的一套生命周期回调方法,并且处理它们自己的用户输_android reader fragment
FFT of waveIn audio signals-程序员宅基地
文章浏览阅读2.8k次。FFT of waveIn audio signalsBy Aqiruse An article on using the Fast Fourier Transform on audio signals. IntroductionThe Fast Fourier Transform (FFT) allows users to view the spectrum content of _fft of wavein audio signals
随便推点
Awesome Mac:收集的非常全面好用的Mac应用程序、软件以及工具_awesomemac-程序员宅基地
文章浏览阅读5.9k次。https://jaywcjlove.github.io/awesome-mac/ 这个仓库主要是收集非常好用的Mac应用程序、软件以及工具,主要面向开发者和设计师。有这个想法是因为我最近发了一篇较为火爆的涨粉儿微信公众号文章《工具武装的前端开发工程师》,于是建了这么一个仓库,持续更新作为补充,搜集更多好用的软件工具。请Star、Pull Request或者使劲搓它 issu_awesomemac
java前端技术---jquery基础详解_简介java中jquery技术-程序员宅基地
文章浏览阅读616次。一.jquery简介 jQuery是一个快速的,简洁的javaScript库,使用户能更方便地处理HTML documents、events、实现动画效果,并且方便地为网站提供AJAX交互 jQuery 的功能概括1、html 的元素选取2、html的元素操作3、html dom遍历和修改4、js特效和动画效果5、css操作6、html事件操作7、ajax_简介java中jquery技术
Ant Design Table换滚动条的样式_ant design ::-webkit-scrollbar-corner-程序员宅基地
文章浏览阅读1.6w次,点赞5次,收藏19次。我修改的是表格的固定列滚动而产生的滚动条引用Table的组件的css文件中加入下面的样式:.ant-table-body{ &amp;::-webkit-scrollbar { height: 5px; } &amp;::-webkit-scrollbar-thumb { border-radius: 5px; -webkit-box..._ant design ::-webkit-scrollbar-corner
javaWeb毕设分享 健身俱乐部会员管理系统【源码+论文】-程序员宅基地
文章浏览阅读269次。基于JSP的健身俱乐部会员管理系统项目分享:见文末!
论文开题报告怎么写?_开题报告研究难点-程序员宅基地
文章浏览阅读1.8k次,点赞2次,收藏15次。同学们,是不是又到了一年一度写开题报告的时候呀?是不是还在为不知道论文的开题报告怎么写而苦恼?Take it easy!我带着倾尽我所有开题报告写作经验总结出来的最强保姆级开题报告解说来啦,一定让你脱胎换骨,顺利拿下开题报告这个高塔,你确定还不赶快点赞收藏学起来吗?_开题报告研究难点
原生JS 与 VUE获取父级、子级、兄弟节点的方法 及一些DOM对象的获取_获取子节点的路径 vue-程序员宅基地
文章浏览阅读6k次,点赞4次,收藏17次。原生先获取对象var a = document.getElementById("dom");vue先添加ref <div class="" ref="divBox">获取对象let a = this.$refs.divBox获取父、子、兄弟节点方法var b = a.childNodes; 获取a的全部子节点 var c = a.parentNode; 获取a的父节点var d = a.nextSbiling; 获取a的下一个兄弟节点 var e = a.previ_获取子节点的路径 vue