React-基础语法学习-程序员宅基地
1、教程:井字棋游戏
本教程将引导你逐步实现一个简单的井字棋游戏,并且不需要你对 React 有任何了解。在此过程中你会学习到一些编写 React 程序的基本知识,完全理解它们可以让你对 React 有比较深入的理解。
1.1、教程分成以下几个部分:
配置是一些准备工作。
概览介绍了 React 的 基础知识:组件、props 和 state。
完成游戏介绍了 React 开发中 最常用的技术。
添加时间旅行可以让你更深入地了解 React 的独特优势。
1.2、实现的是什么程序?
本教程将使用 React 实现一个交互式的井字棋游戏。你可以在下面预览最终成果:
App.js
import { useState } from 'react';

function Square({ value, onSquareClick }) {
  return (
    <button className="square" onClick={onSquareClick}>
      {value}
    </button>
  );
}

function Board({ xIsNext, squares, onPlay }) {
  function handleClick(i) {
    if (calculateWinner(squares) || squares[i]) {
      return;
    }
    const nextSquares = squares.slice();
    if (xIsNext) {
      nextSquares[i] = 'X';
    } else {
      nextSquares[i] = 'O';
    }
    onPlay(nextSquares);
  }

  const winner = calculateWinner(squares);
  let status;
  if (winner) {
    status = 'Winner: ' + winner;
  } else {
    status = 'Next player: ' + (xIsNext ? 'X' : 'O');
  }

  return (
    <>
      <div className="status">{status}</div>
      <div className="board-row">
        <Square value={squares[0]} onSquareClick={() => handleClick(0)} />
        <Square value={squares[1]} onSquareClick={() => handleClick(1)} />
        <Square value={squares[2]} onSquareClick={() => handleClick(2)} />
      </div>
      <div className="board-row">
        <Square value={squares[3]} onSquareClick={() => handleClick(3)} />
        <Square value={squares[4]} onSquareClick={() => handleClick(4)} />
        <Square value={squares[5]} onSquareClick={() => handleClick(5)} />
      </div>
      <div className="board-row">
        <Square value={squares[6]} onSquareClick={() => handleClick(6)} />
        <Square value={squares[7]} onSquareClick={() => handleClick(7)} />
        <Square value={squares[8]} onSquareClick={() => handleClick(8)} />
      </div>
    </>
  );
}

export default function Game() {
  const [history, setHistory] = useState([Array(9).fill(null)]);
  const [currentMove, setCurrentMove] = useState(0);
  const xIsNext = currentMove % 2 === 0;
  const currentSquares = history[currentMove];

  function handlePlay(nextSquares) {
    const nextHistory = [...history.slice(0, currentMove + 1), nextSquares];
    setHistory(nextHistory);
    setCurrentMove(nextHistory.length - 1);
  }

  function jumpTo(nextMove) {
    setCurrentMove(nextMove);
  }

  const moves = history.map((squares, move) => {
    let description;
    if (move > 0) {
      description = 'Go to move #' + move;
    } else {
      description = 'Go to game start';
    }
    return (
      <li key={move}>
        <button onClick={() => jumpTo(move)}>{description}</button>
      </li>
    );
  });

  return (
    <div className="game">
      <div className="game-board">
        <Board xIsNext={xIsNext} squares={currentSquares} onPlay={handlePlay} />
      </div>
      <div className="game-info">
        <ol>{moves}</ol>
      </div>
    </div>
  );
}

function calculateWinner(squares) {
  const lines = [
    [0, 1, 2],
    [3, 4, 5],
    [6, 7, 8],
    [0, 3, 6],
    [1, 4, 7],
    [2, 5, 8],
    [0, 4, 8],
    [2, 4, 6],
  ];
  for (let i = 0; i < lines.length; i++) {
    const [a, b, c] = lines[i];
    if (squares[a] && squares[a] === squares[b] && squares[a] === squares[c]) {
      return squares[a];
    }
  }
  return null;
}
如果你还不是很明白上面的代码,不用担心!本教程的目的就是帮你理解 React 及其语法。
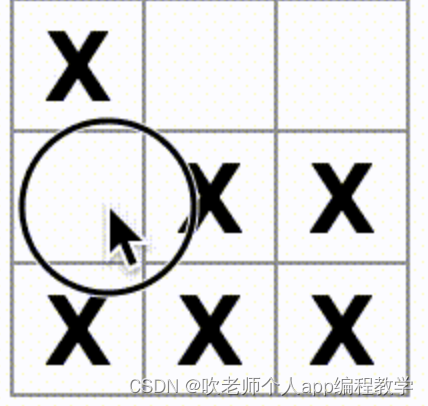
我们建议你在继续本教程之前,先看看上面的井字棋游戏。我们会注意到的一项功能是,棋盘右侧有一个编号列表,它记录了游戏中落子的历史,并随着游戏的进行而更新。
体验完游戏以后,继续阅读本教程吧!我们将从一个更简单的模板开始。下一步将介绍相关配置,以便于你着手实现这个游戏。
export default function Square() {
  return <button className="square">X</button>;
}

注意
如果你想要使用本地开发环境来学习这个教程,需要按照下面的流程进行:
安装 Node.js
在之前打开的 CodeSandbox 选项卡中,按左上角的按钮打开菜单,然后选择 Download Sandbox,将代码压缩包下载到本地。下载链接https://codesandbox.io/p/sandbox/react-dev-q2z497?file=%2Fsrc%2FApp.js%3A19%2C13&utm_medium=sandpack
将压缩包解压,打开终端并使用
cd命令切换到你解压后的目录。使用
npm install安装依赖。运行
npm start启动本地服务器,按照提示在浏览器中查看运行效果。
1.3、概览
完成配置以后,我们先来大致了解一下 React 吧!看一下刚刚的代码 ,在 CodeSandbox 中,你将看到三个主要的部分:
Files 部分列出了一些文件:
App.js、index.js、styles.css和public文件夹。code editor 部分可以看到你所选中文件的源码。
browser 部分可以预览代码的实时结果。
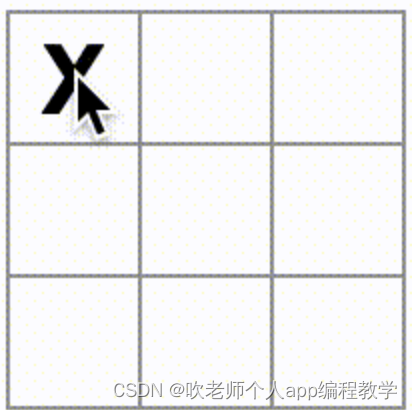
App.js 文件里面的内容应该是这样的:
export default function Square() {
  return <button className="square">X</button>;
}
browser 部分应该会像下面这样在方块里面显示一个 X:
现在,让我们仔细研究一下这些文件吧。
1.4、App.js
App.js 的代码创建了一个 组件。在 React 中,组件是一段可重用代码,它通常作为 UI 界面的一部分。组件用于渲染、管理和更新应用中的 UI 元素。让我们逐行查看这段代码,看看发生了什么:
export default function Square() {
  return <button className="square">X</button>;
}
第一行定义了一个名为 Square 的函数。JavaScript 的 export 关键字使此函数可以在此文件之外访问。default 关键字表明它是文件中的主要函数。
export default function Square() {
  return <button className="square">X</button>;
}
第二行返回一个按钮。JavaScript 的 return 关键字意味着后面的内容都作为值返回给函数的调用者。<button> 是一个 JSX 元素。JSX 元素是 JavaScript 代码和 HTML 标签的组合,用于描述要显示的内容。className="square" 是一个 button 属性,它决定 CSS 如何设置按钮的样式。X 是按钮内显示的文本,</button> 闭合 JSX 元素以表示不应将任何后续内容放置在按钮内。
1.5、styles.css
单击 CodeSandbox 中的 styles.css 文件。该文件定义了 React 应用的样式。前两个 CSS 选择器(* 和 body)定义了应用大部分的样式,而 .square 选择器定义了 className 属性设置为 square 的组件的样式。这与 App.js 文件中的 Square 组件中的按钮是相匹配的。
1.6、index.js
单击 CodeSandbox 中的 index.js 的文件。在本教程中我们不会编辑此文件,但它是 App.js 文件中创建的组件与 Web 浏览器之间的桥梁。
import React, { StrictMode } from "react";
import { createRoot } from "react-dom/client";
import "./styles.css";

import App from "./App";

const root = createRoot(document.getElementById("root"));
root.render(
  <StrictMode>
    <App />
  </StrictMode>
);
第 1-5 行将所有必要的部分组合在一起:
React
React 与 Web 浏览器对话的库(React DOM)
组件的样式
App.js里面创建的组件
其他文件将它们组合在一起,并将最终成果注入 public 文件夹里面的 index.html 中。
1.7、构建棋盘
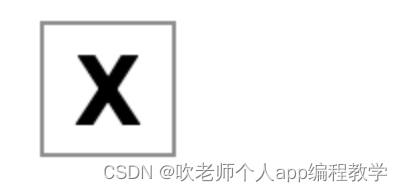
让我们回到 App.js。接下来我们将专注于这个文件。目前棋盘只有一个方块,但你需要九个!如果你只是想着复制粘贴来制作两个像这样的方块:
export default function Square() {
  return <button className="square">X</button><button className="square">X</button>;
}
你将会得到如下错误:
/src/App.js: Adjacent JSX elements must be wrapped in an enclosing tag. Did you want a JSX Fragment <>...</>?
React 组件必须返回单个 JSX 元素,不能像两个按钮那样返回多个相邻的 JSX 元素。要解决此问题,可以使用 Fragment(<> 与 </>)包裹多个相邻的 JSX 元素,如下所示:
export default function Square() {
  return (
    <>
      <button className="square">X</button>
      <button className="square">X</button>
    </>
  );
}
现在你应该可以看见:
非常棒!现在你只需要通过复制粘贴来添加九个方块,然后……

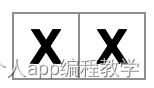
但事与愿违的是这些方块并没有排列成网格,而是都在一条线上。要解决此问题,需要使用 div 将方块分到每一行中并添加一些 CSS 样式。当你这样做的时候,需要给每个方块一个数字,以确保你知道每个方块的位置。
App.js 文件中,Square 组件看起来像这样:
export default function Square() {
  return (
    <>
      <div className="board-row">
        <button className="square">1</button>
        <button className="square">2</button>
        <button className="square">3</button>
      </div>
      <div className="board-row">
        <button className="square">4</button>
        <button className="square">5</button>
        <button className="square">6</button>
      </div>
      <div className="board-row">
        <button className="square">7</button>
        <button className="square">8</button>
        <button className="square">9</button>
      </div>
    </>
  );
}
借助 styles.css 中定义的 board-row 样式,我们将组件分到每一行的 div 中。最终完成了井字棋棋盘:

但是现在有个问题,名为 Square 的组件实际上不再是方块了。让我们通过将名称更改为 Board 来解决这个问题:
export default function Board() {
  //...
}
此时你的代码应如下所示:App.js
export default function Board() {
  return (
    <>
      <div className="board-row">
        <button className="square">1</button>
        <button className="square">2</button>
        <button className="square">3</button>
      </div>
      <div className="board-row">
        <button className="square">4</button>
        <button className="square">5</button>
        <button className="square">6</button>
      </div>
      <div className="board-row">
        <button className="square">7</button>
        <button className="square">8</button>
        <button className="square">9</button>
      </div>
    </>
  );
}

1.8、通过 props 传递数据
接下来,当用户单击方块时,我们要将方块的值从空更改为“X”。根据目前构建的棋盘,你需要复制并粘贴九次更新方块的代码(每个方块都需要一次)!但是,React 的组件架构可以创建可重用的组件,以避免混乱、重复的代码。
首先,要将定义第一个方块(<button className="square">1</button>)的这行代码从 Board 组件复制到新的 Square 组件中:
function Square() {
  return <button className="square">1</button>;
}

export default function Board() {
  // ...
}
然后,更新 Board 组件并使用 JSX 语法渲染 Square 组件:
// ...
export default function Board() {
  return (
    <>
      <div className="board-row">
        <Square />
        <Square />
        <Square />
      </div>
      <div className="board-row">
        <Square />
        <Square />
        <Square />
      </div>
      <div className="board-row">
        <Square />
        <Square />
        <Square />
      </div>
    </>
  );
}
需要注意的是,这并不像 div,这些你自己的组件如 Board 和 Square,必须以大写字母开头。让我们来看一看效果:
哦不!你失去了你以前有正确编号的方块。现在每个方块都写着“1”。要解决此问题,需要使用 props 将每个方块应有的值从父组件(Board)传递到其子组件(Square)。更新 Square 组件,读取从 Board 传递的 value props:
function Square({ value }) 表示可以向 Square 组件传递一个名为 value 的 props。现在你如果想要显示对应的 value 而不是 1,可以试一下像下面这样:
function Square({ value }) {
  return <button className="square">value</button>;
}
糟糕!这还不是你想要的:

我们需要从组件中渲染名为 value 的 JavaScript 变量,而不是“value”这个词。要从 JSX“转义到 JavaScript”,你需要使用大括号。在 JSX 中的 value 周围添加大括号,如下所示:
function Square({ value }) {
  return <button className="square">{value}</button>;
}
现在,你应该会看到一个空的棋盘了:

这是因为 Board 组件还没有将 value props 传递给它渲染的每个 Square 组件。要修复这个问题,需要向 Board 组件里面的每个 Square 组件添加 value props:
export default function Board() {
  return (
    <>
      <div className="board-row">
        <Square value="1" />
        <Square value="2" />
        <Square value="3" />
      </div>
      <div className="board-row">
        <Square value="4" />
        <Square value="5" />
        <Square value="6" />
      </div>
      <div className="board-row">
        <Square value="7" />
        <Square value="8" />
        <Square value="9" />
      </div>
    </>
  );
}
现在你应该能再次看到数字网格:
App.js:
function Square({ value }) {
  return <button className="square">{value}</button>;
}

export default function Board() {
  return (
    <>
      <div className="board-row">
        <Square value="1" />
        <Square value="2" />
        <Square value="3" />
      </div>
      <div className="board-row">
        <Square value="4" />
        <Square value="5" />
        <Square value="6" />
      </div>
      <div className="board-row">
        <Square value="7" />
        <Square value="8" />
        <Square value="9" />
      </div>
    </>
  );
}
1.9、创建一个具有交互性的组件
当你单击它的时候,Square 组件需要显示“X”。在 Square 内部声明一个名为 handleClick 的函数。然后,将 onClick 添加到由 Square 返回的 JSX 元素的 button 的 props 中:
function Square({ value }) {
  function handleClick() {
    console.log('clicked!');
  }

  return (
    <button className="square"  onClick={handleClick} >
      {value}
    </button>
  );
}
如果现在单击一个方块,你应该会看到一条日志,上面写着 "clicked!"。在 CodeSandbox 中 Browser 部分底部的 Console 选项卡中。多次单击方块将再次记录 "clicked!"。具有相同消息的重复控制台日志不会在控制台中重复创建。而你会在第一次 "clicked!" 旁边看到一个递增的计数器。
下一步,我们希望 Square 组件能够“记住”它被单击过,并用“X”填充它。为了“记住”一些东西,组件使用 state。
React 提供了一个名为 useState 的特殊函数,可以从组件中调用它来让它“记住”一些东西。让我们将 Square 的当前值存储在 state 中,并在单击 Square 时更改它。
在文件的顶部导入 useState。从 Square 组件中移除 value props。在调用 useState 的 Square 的开头添加一个新行。让它返回一个名为 value 的 state 变量:
import { useState } from 'react';

function Square() {
  const [value, setValue] = useState(null);

  function handleClick() {
    //...
value 存储值,而 setValue 是可用于更改值的函数。传递给 useState 的 null 用作这个 state 变量的初始值,因此此处 value 的值开始时等于 null。
由于 Square 组件不再接受 props,我们从 Board 组件创建的所有九个 Square 组件中删除 value props:
// ...
export default function Board() {
  return (
    <>
      <div className="board-row">
        <Square />
        <Square />
        <Square />
      </div>
      <div className="board-row">
        <Square />
        <Square />
        <Square />
      </div>
      <div className="board-row">
        <Square />
        <Square />
        <Square />
      </div>
    </>
  );
}
现在将更改 Square 以在单击时显示“X”。不再使用 console.log("clicked!"); 而使用 setValue('X'); 的事件处理程序。现在你的 Square 组件看起来像这样:
function Square() {
  const [value, setValue] = useState(null);

  function handleClick() {
    setValue('X');
  }

  return (
    <button className="square"  onClick={handleClick} >
      {value}
    </button>
  );
}
通过从 onClick 处理程序调用此 set 函数,你告诉 React 在单击其 <button> 时要重新渲染该 Square。更新后,方块的值将为“X”,因此会在棋盘上看到“X”。点击任意方块,“X”应该出现:
每个 Square 都有自己的 state:存储在每个 Square 中的 value 完全独立于其他的 Square。当你在组件中调用 set 函数时,React 也会自动更新内部的子组件。
完成上述更改后,代码将如下所示:
import { useState } from 'react';

function Square() {
  const [value, setValue] = useState(null);

  function handleClick() {
    setValue('X');
  }

  return (
    <button
      className="square" onClick={handleClick} >
      {value}
    </button>
  );
}

export default function Board() {
  return (
    <>
      <div className="board-row">
        <Square />
        <Square />
        <Square />
      </div>
      <div className="board-row">
        <Square />
        <Square />
        <Square />
      </div>
      <div className="board-row">
        <Square />
        <Square />
        <Square />
      </div>
    </>
  );
}
1.10、完成这个游戏
至此,你已经拥有井字棋游戏的所有基本构建块。要玩完整的游戏,你现在需要在棋盘上交替放置“X”和“O”,并且你需要一种确定获胜者的方法。
1.11、状态提升
目前,每个 Square 组件都维护着游戏 state 的一部分。要检查井字棋游戏中的赢家,Board 需要以某种方式知道 9 个 Square 组件中每个组件的 state。
你会如何处理?起初,你可能会猜测 Board 需要向每个 Square“询问”Square 的 state。尽管这种方法在 React 中在技术上是可行的,但我们不鼓励这样做,因为代码变得难以理解、容易出现错误并且难以重构。相反,最好的方法是将游戏的 state 存储在 Board 父组件中,而不是每个 Square 中。Board 组件可以通过传递一个 props 来告诉每个 Square 显示什么,就像你将数字传递给每个 Square 时所做的那样。
要从多个子组件收集数据,或让两个子组件相互通信,请改为在其父组件中声明共享 state。父组件可以通过 props 将该 state 传回给子组件。这使子组件彼此同步并与其父组件保持同步。
重构 React 组件时,将状态提升到父组件中很常见。
让我们借此机会尝试一下。编辑 Board 组件,使其声明一个名为 squares 的 state 变量,该变量默认为对应于 9 个方块的 9 个空值数组:
export default function Board() {
  const [squares, setSquares] = useState(Array(9).fill(null));
  return (
    // ...
  );
}
Array(9).fill(null) 创建了一个包含九个元素的数组,并将它们中的每一个都设置为 null。包裹它的 useState() 声明了一个初始设置为该数组的 squares state 变量。数组中的每个元素对应于一个 square 的值。当你稍后填写棋盘时,squares 数组将如下所示:
['O', null, 'X', 'X', 'X', 'O', 'O', null, null]
现在你的 Board 组件需要将 value props 向下传递给它渲染的每个 Square:
export default function Board() {
  const [squares, setSquares] = useState(Array(9).fill(null));
  return (
    <>
      <div className="board-row">
        <Square value={squares[0]} />
        <Square value={squares[1]} />
        <Square value={squares[2]} />
      </div>
      <div className="board-row">
        <Square value={squares[3]} />
        <Square value={squares[4]} />
        <Square value={squares[5]} />
      </div>
      <div className="board-row">
        <Square value={squares[6]} />
        <Square value={squares[7]} />
        <Square value={squares[8]} />
      </div>
    </>
  );
}
接下来,你将编辑 Square 组件,以从 Board 组件接收 value props。这将需要删除 Square 组件自己的 value state 和按钮的 onClick props:
function Square({value}) {
  return <button className="square">{value}</button>;
}
此时你应该看到一个空的井字棋棋盘:
你的代码应该是这样的:
App.js
import { useState } from 'react';

function Square({ value }) {
  return <button className="square">{value}</button>;
}

export default function Board() {
  const [squares, setSquares] = useState(Array(9).fill(null));
  return (
    <>
      <div className="board-row">
        <Square value={squares[0]} />
        <Square value={squares[1]} />
        <Square value={squares[2]} />
      </div>
      <div className="board-row">
        <Square value={squares[3]} />
        <Square value={squares[4]} />
        <Square value={squares[5]} />
      </div>
      <div className="board-row">
        <Square value={squares[6]} />
        <Square value={squares[7]} />
        <Square value={squares[8]} />
      </div>
    </>
  );
}
现在,每个 Square 都会收到一个 value props,对于空方块,该 props 将是 'X'、'O' 或 null。
接下来,你需要更改单击 Square 时发生的情况。Board 组件现在维护已经填充过的方块。你需要为 Square 创建一种更新 Board state 的方法。由于 state 对于定义它的组件是私有的,因此你不能直接从 Square 更新 Board 的 state。
你将从 Board 组件向下传递一个函数到 Square 组件,然后让 Square 在单击方块时调用该函数。我们将从单击 Square 组件时将调用的函数开始。调用该函数 onSquareClick:
function Square({ value }) {
  return (
    <button className="square" onClick={onSquareClick}>
      {value}
    </button>
  );
}
接下来,将 onSquareClick 函数添加到 Square 组件的 props 中:
function Square({ value, onSquareClick }) {
  return (
    <button className="square" onClick={onSquareClick}>
      {value}
    </button>
  );
}
现在,你将把 onSquareClick props 连接到 Board 组件中的一个函数,命名为 handleClick。要将 onSquareClick 连接到 handleClick,需要将一个函数传递给第一个 Square 组件的 onSquareClick props:
export default function Board() {
  const [squares, setSquares] = useState(Array(9).fill(null));

  return (
    <>
      <div className="board-row">
        <Square value={squares[0]} onSquareClick={handleClick} />
        //...
  );
}
最后,你将在 Board 组件内定义 handleClick 函数来更新并保存棋盘 state 的 squares 数组:
export default function Board() {
  const [squares, setSquares] = useState(Array(9).fill(null));

  function handleClick() {
    const nextSquares = squares.slice();
    nextSquares[0] = "X";
    setSquares(nextSquares);
  }

  return (
    // ...
  )
}
handleClick 函数使用 JavaScript 数组的 slice() 方法创建 squares 数组(nextSquares)的副本。然后,handleClick 更新 nextSquares 数组,将 X 添加到第一个([0] 索引)方块。
调用 setSquares 函数让 React 知道组件的 state 已经改变。这将触发使用 squares state 的组件(Board)及其子组件(构成棋盘的 Square 组件)的重新渲染。
JavaScript 支持闭包,这意味着内部函数(例如 handleClick)可以访问外部函数(例如 Board)中定义的变量和函数。handleClick 函数可以读取 squares state 并调用 setSquares 方法,因为它们都是在 Board 函数内部定义的。
现在你可以将 X 添加到棋盘上……但只能添加到左上角的方块。你的 handleClick 函数被硬编码为更新左上角方块( 0)的索引。让我们更新 handleClick 以便能够更新任何方块。将参数 i 添加到 handleClick 函数,该函数采用要更新的 square 索引:
export default function Board() {
  const [squares, setSquares] = useState(Array(9).fill(null));

  function handleClick(i) {
    const nextSquares = squares.slice();
    nextSquares[i] = "X";
    setSquares(nextSquares);
  }

  return (
    // ...
  )
}
接下来,你需要将 i 传递给 handleClick。你可以尝试像这样在 JSX 中直接将 square 的 onSquareClick props 设置为 handleClick(0),但这是行不通的:
<Square value={squares[0]} onSquareClick={handleClick(0)} />
为什么会是这样呢?handleClick(0) 调用将成为渲染 Board 组件的一部分。因为 handleClick(0) 通过调用 setSquares 改变了棋盘组件的 state,所以你的整个棋盘组件将再次重新渲染。但这再次运行了 handleClick(0),导致无限循环:

为什么这个问题没有早点发生?
当你传递 onSquareClick={handleClick} 时,你将 handleClick 函数作为 props 向下传递。你不是在调用它!但是现在你立即调用了该函数——注意 handleClick(0) 中的括号——这就是它运行得太早的原因。你不想在用户点击之前调用 handleClick!
你可以通过创建调用 handleClick(0) 的函数(如 handleFirstSquareClick)、调用 handleClick(1) 的函数(如 handleSecondSquareClick)等来修复。你可以将这些函数作为 onSquareClick={handleFirstSquareClick} 之类的 props 传递(而不是调用)。这将解决无限循环的问题。
但是,定义九个不同的函数并为每个函数命名过于冗余。让我们这样做:
export default function Board() {
  // ...
  return (
    <>
      <div className="board-row">
        <Square value={squares[0]} onSquareClick={() => handleClick(0)}
    />
        // ...
  );
}
注意新的 () => 语法。这里,() => handleClick(0) 是一个箭头函数,它是定义函数的一种较短的方式。单击方块时,=>“箭头”之后的代码将运行,调用 handleClick(0)。
现在你需要更新其他八个方块以从你传递的箭头函数中调用 handleClick。确保 handleClick 的每次调用的参数对应于正确的 square 索引:
export default function Board() {
  // ...
  return (
    <>
      <div className="board-row">
        <Square value={squares[0]} onSquareClick={() => handleClick(0)} />
        <Square value={squares[1]} onSquareClick={() => handleClick(1)} />
        <Square value={squares[2]} onSquareClick={() => handleClick(2)} />
      </div>
      <div className="board-row">
        <Square value={squares[3]} onSquareClick={() => handleClick(3)} />
        <Square value={squares[4]} onSquareClick={() => handleClick(4)} />
        <Square value={squares[5]} onSquareClick={() => handleClick(5)} />
      </div>
      <div className="board-row">
        <Square value={squares[6]} onSquareClick={() => handleClick(6)} />
        <Square value={squares[7]} onSquareClick={() => handleClick(7)} />
        <Square value={squares[8]} onSquareClick={() => handleClick(8)} />
      </div>
    </>
  );
};
现在你可以再次通过单击将 X 添加到棋盘的方块上:

但是这次所有的 state 管理都由 Board 组件处理!你的代码应该是这样的:
import { useState } from 'react';

function Square({ value, onSquareClick }) {
  return (
    <button className="square" onClick={onSquareClick}>
      {value}
    </button>
  );
}

export default function Board() {
  const [squares, setSquares] = useState(Array(9).fill(null));

  function handleClick(i) {
    const nextSquares = squares.slice();
    nextSquares[i] = 'X';
    setSquares(nextSquares);
  }

  return (
    <>
      <div className="board-row">
        <Square value={squares[0]} onSquareClick={() => handleClick(0)} />
        <Square value={squares[1]} onSquareClick={() => handleClick(1)} />
        <Square value={squares[2]} onSquareClick={() => handleClick(2)} />
      </div>
      <div className="board-row">
        <Square value={squares[3]} onSquareClick={() => handleClick(3)} />
        <Square value={squares[4]} onSquareClick={() => handleClick(4)} />
        <Square value={squares[5]} onSquareClick={() => handleClick(5)} />
      </div>
      <div className="board-row">
        <Square value={squares[6]} onSquareClick={() => handleClick(6)} />
        <Square value={squares[7]} onSquareClick={() => handleClick(7)} />
        <Square value={squares[8]} onSquareClick={() => handleClick(8)} />
      </div>
    </>
  );
}
现在,我们在 Board 组件中处理 state, Board 父组件将 props 传递给 Square 子组件,以便它们可以正确显示。单击 Square 时, Square 子组件现在要求 Board 父组件更新棋盘的 state。当 Board 的 state 改变时,Board 组件和每个子 Square 都会自动重新渲染。保存 Board 组件中所有方块的 state 将使得它可以确定未来的赢家。
让我们回顾一下当用户单击你的棋盘左上角的方块以向其添加 X 时会发生什么:
1) 单击左上角的方块运行
button从Square接收到的onClickprops 的函数。Square组件从Board通过onSquareClickprops 接收到该函数。Board组件直接在 JSX 中定义了该函数。它使用参数0调用handleClick。
2) handleClick使用参数(0)将squares数组的第一个元素从null更新为X。
3) Board组件的squaresstate 已更新,因此Board及其所有子组件都将重新渲染。这会导致索引为0的Square组件的valueprops 从null更改为X。
最后,用户看到左上角的方块在单击后从空变为 X。
DOM <button> 元素的 onClick props 对 React 有特殊意义,因为它是一个内置组件。对于像 Square 这样的自定义组件,命名由你决定。你可以给 Square 的 onSquareClick props 或 Board 的 handleClick 函数起任何名字,代码还是可以运行的。在 React 中,通常使用 onSomething 命名代表事件的 props,使用 handleSomething 命名处理这些事件的函数。
1.12、为什么不变性很重要
请注意在 handleClick 中,你调用了 .slice() 来创建 squares 数组的副本而不是修改现有数组。为了解释原因,我们需要讨论不变性以及为什么学习不变性很重要。
通常有两种更改数据的方法。第一种方法是通过直接更改数据的值来改变数据。第二种方法是使用具有所需变化的新副本替换数据。如果你改变 squares 数组,它会是这样的:
const squares = [null, null, null, null, null, null, null, null, null];
squares[0] = 'X';
// Now `squares` is ["X", null, null, null, null, null, null, null, null];
如果你在不改变 squares 数组的情况下更改数据,它会是这样的:
const squares = [null, null, null, null, null, null, null, null, null];
const nextSquares = ['X', null, null, null, null, null, null, null, null];
// Now `squares` is unchanged, but `nextSquares` first element is 'X' rather than `null`
结果是一样的,但通过不直接改变(改变底层数据),你可以获得几个好处。
不变性使复杂的功能更容易实现。在本教程的后面,你将实现一个“时间旅行”功能,让你回顾游戏的历史并“跳回”到过去的动作。此功能并非特定于游戏——撤消和重做某些操作的能力是应用程序的常见要求。避免数据直接突变可以让你保持以前版本的数据完好无损,并在以后重用它们。
不变性还有另一个好处。默认情况下,当父组件的 state 发生变化时,所有子组件都会自动重新渲染。这甚至包括未受变化影响的子组件。尽管重新渲染本身不会引起用户注意(你不应该主动尝试避免它!),但出于性能原因,你可能希望跳过重新渲染显然不受其影响的数据的一部分。不变性使得组件比较其数据是否已更改的成本非常低。
1.13、交替落子
现在是时候修复这个井字棋游戏的一个主要缺陷了:棋盘上无法标记“O”。
默认情况下,你会将第一步设置为“X”。让我们通过向 Board 组件添加另一个 state 来跟踪这一点:
export default function Board() {
  const [xIsNext, setXIsNext] = useState(true);
  const [squares, setSquares] = useState(Array(9).fill(null));

  function handleClick(i) {
    const nextSquares = squares.slice();
    if (xIsNext) {
      nextSquares[i] = "X";
    } else {
      nextSquares[i] = "O";
    }
    setSquares(nextSquares);
    setXIsNext(!xIsNext);
  }

  return (
    //...
  );
}
现在,当你点击不同的方块时,它们会在 X 和 O 之间交替,这是它们应该做的!但是等等,有一个问题。尝试多次点击同一个方块:
X 被 O 覆盖!虽然这会给游戏带来非常有趣的变化,但我们现在将坚持原来的规则。
当你用 X 或 O 标记方块时,你没有检查该方块是否已经具有 X 或 O 值。你可以通过提早返回来解决此问题。我们将检查方块是否已经有 X 或 O。如果方块已经填满,你将尽早在 handleClick 函数中 return——在它尝试更新棋盘 state 之前。
function handleClick(i) {
  if (squares[i]) {
    return;
  }
  const nextSquares = squares.slice();
  //...
}
现在你只能将 X 或 O 添加到空方块中!此时你的代码应该如下所示:
App.js
import { useState } from 'react';

function Square({value, onSquareClick}) {
  return (
    <button className="square" onClick={onSquareClick}>
      {value}
    </button>
  );
}

export default function Board() {
  const [xIsNext, setXIsNext] = useState(true);
  const [squares, setSquares] = useState(Array(9).fill(null));

  function handleClick(i) {
    if (squares[i]) {
      return;
    }
    const nextSquares = squares.slice();
    if (xIsNext) {
      nextSquares[i] = 'X';
    } else {
      nextSquares[i] = 'O';
    }
    setSquares(nextSquares);
    setXIsNext(!xIsNext);
  }

  return (
    <>
      <div className="board-row">
        <Square value={squares[0]} onSquareClick={() => handleClick(0)} />
        <Square value={squares[1]} onSquareClick={() => handleClick(1)} />
        <Square value={squares[2]} onSquareClick={() => handleClick(2)} />
      </div>
      <div className="board-row">
        <Square value={squares[3]} onSquareClick={() => handleClick(3)} />
        <Square value={squares[4]} onSquareClick={() => handleClick(4)} />
        <Square value={squares[5]} onSquareClick={() => handleClick(5)} />
      </div>
      <div className="board-row">
        <Square value={squares[6]} onSquareClick={() => handleClick(6)} />
        <Square value={squares[7]} onSquareClick={() => handleClick(7)} />
        <Square value={squares[8]} onSquareClick={() => handleClick(8)} />
      </div>
    </>
  );
}
1.14、宣布获胜者
现在你可以轮流对战了,接下来我们应该显示游戏何时获胜。为此,你将添加一个名为 calculateWinner 的辅助函数,它接受 9 个方块的数组,检查获胜者并根据需要返回 'X'、'O' 或 null。不要太担心 calculateWinner 函数;它不是 React 才会有的:
export default function Board() {
  //...
}

function calculateWinner(squares) {
  const lines = [
    [0, 1, 2],
    [3, 4, 5],
    [6, 7, 8],
    [0, 3, 6],
    [1, 4, 7],
    [2, 5, 8],
    [0, 4, 8],
    [2, 4, 6]
  ];
  for (let i = 0; i < lines.length; i++) {
    const [a, b, c] = lines[i];
    if (squares[a] && squares[a] === squares[b] && squares[a] === squares[c]) {
      return squares[a];
    }
  }
  return null;
}
在 Board 之前还是之后定义 calculateWinner 并不重要。让我们把它放在最后,这样你就不必在每次编辑组件时都滚动过去。
你将在 Board 组件的 handleClick 函数中调用 calculateWinner(squares) 来检查玩家是否获胜。你可以在检查用户是否单击了已经具有 X 或 O 的方块的同时执行此检查。在这两种情况下,我们都希望尽早返回:
function handleClick(i) {
  if (squares[i] || calculateWinner(squares)) {
    return;
  }
  const nextSquares = squares.slice();
  //...
}
为了让玩家知道游戏何时结束,你可以显示“获胜者:X”或“获胜者:O”等文字。为此,你需要将 status 部分添加到 Board 组件。如果游戏结束,将显示获胜者,如果游戏正在进行,你将显示下一轮将会是哪个玩家:
export default function Board() {
  // ...
  const winner = calculateWinner(squares);
  let status;
  if (winner) {
    status = "Winner: " + winner;
  } else {
    status = "Next player: " + (xIsNext ? "X" : "O");
  }

  return (
    <>
      <div className="status">{status}</div>
      <div className="board-row">
        // ...
  )
}
恭喜!你现在有一个可以运行的井字棋游戏。你也学习了 React 的基础知识。所以你是这里真正的赢家。代码应该如下所示:
App.js
import { useState } from 'react';

function Square({value, onSquareClick}) {
  return (
    <button className="square" onClick={onSquareClick}>
      {value}
    </button>
  );
}

export default function Board() {
  const [xIsNext, setXIsNext] = useState(true);
  const [squares, setSquares] = useState(Array(9).fill(null));

  function handleClick(i) {
    if (calculateWinner(squares) || squares[i]) {
      return;
    }
    const nextSquares = squares.slice();
    if (xIsNext) {
      nextSquares[i] = 'X';
    } else {
      nextSquares[i] = 'O';
    }
    setSquares(nextSquares);
    setXIsNext(!xIsNext);
  }

  const winner = calculateWinner(squares);
  let status;
  if (winner) {
    status = 'Winner: ' + winner;
  } else {
    status = 'Next player: ' + (xIsNext ? 'X' : 'O');
  }

  return (
    <>
      <div className="status">{status}</div>
      <div className="board-row">
        <Square value={squares[0]} onSquareClick={() => handleClick(0)} />
        <Square value={squares[1]} onSquareClick={() => handleClick(1)} />
        <Square value={squares[2]} onSquareClick={() => handleClick(2)} />
      </div>
      <div className="board-row">
        <Square value={squares[3]} onSquareClick={() => handleClick(3)} />
        <Square value={squares[4]} onSquareClick={() => handleClick(4)} />
        <Square value={squares[5]} onSquareClick={() => handleClick(5)} />
      </div>
      <div className="board-row">
        <Square value={squares[6]} onSquareClick={() => handleClick(6)} />
        <Square value={squares[7]} onSquareClick={() => handleClick(7)} />
        <Square value={squares[8]} onSquareClick={() => handleClick(8)} />
      </div>
    </>
  );
}

function calculateWinner(squares) {
  const lines = [
    [0, 1, 2],
    [3, 4, 5],
    [6, 7, 8],
    [0, 3, 6],
    [1, 4, 7],
    [2, 5, 8],
    [0, 4, 8],
    [2, 4, 6],
  ];
  for (let i = 0; i < lines.length; i++) {
    const [a, b, c] = lines[i];
    if (squares[a] && squares[a] === squares[b] && squares[a] === squares[c]) {
      return squares[a];
    }
  }
  return null;
}
1.15、添加时间旅行
作为最后的练习,让我们能够“回到”到游戏中之前的动作。
1.16、存储落子历史
如果你改变了 squares 数组,实现时间旅行将非常困难。
但是,你在每次落子后都使用 slice() 创建 squares 数组的新副本,并将其视为不可变的。这将允许你存储 squares 数组的每个过去的版本,并在已经发生的轮次之间“来回”。
把过去的 squares 数组存储在另一个名为 history 的数组中,把它存储为一个新的 state 变量。history 数组表示所有棋盘的 state,从第一步到最后一步,其形状如下:
[
  // Before first move
  [null, null, null, null, null, null, null, null, null],
  // After first move
  [null, null, null, null, 'X', null, null, null, null],
  // After second move
  [null, null, null, null, 'X', null, null, null, 'O'],
  // ...
]
1.17、再一次“状态提升”
你现在将编写一个名为 Game 的新顶级组件来显示过去的着法列表。这就是放置包含整个游戏历史的 history state 的地方。
将 history state 放入 Game 组件将使你可以从其 Board 子组件中删除 squares state。就像你将 state 从 Square 组件“提升”到 Board 组件一样,你现在将把它从 Board 提升到顶层 Game 组件。这使 Game 组件可以完全控制 Board 的数据,并使它让 Board 渲染来自 history 的之前的回合。
首先,添加一个带有 export default 的 Game 组件。让它渲染 Board 组件和一些标签:
function Board() {
  // ...
}

export default function Game() {
  return (
    <div className="game">
      <div className="game-board">
        <Board />
      </div>
      <div className="game-info">
        <ol>{/*TODO*/}</ol>
      </div>
    </div>
  );
}
请注意,你要删除 function Board() {
声明之前的 export default 关键字,并将它们添加到 function Game() {
声明之前。这会告诉你的 index.js 文件使用 Game 组件而不是你的 Board 组件作为顶层组件。Game 组件返回的额外 div 正在为你稍后添加到棋盘的游戏信息腾出空间。
向 Game 组件添加一些 state 以跟踪下一个玩家和落子历史:
export default function Game() {
  const [xIsNext, setXIsNext] = useState(true);
  const [history, setHistory] = useState([Array(9).fill(null)]);
  // ...
请注意,[Array(9).fill(null)] 是一个包含单个元素的数组,它本身是一个包含 9 个 null 的数组。
要渲染当前落子的方块,你需要从 history 中读取最后一个 squares 数组。你不需要 useState——你已经有足够的信息可以在渲染过程中计算它:
export default function Game() {
  const [xIsNext, setXIsNext] = useState(true);
  const [history, setHistory] = useState([Array(9).fill(null)]);
  const currentSquares = history[history.length - 1];
  // ...
接下来,在 Game 组件中创建一个 handlePlay 函数,Board 组件将调用该函数来更新游戏。将 xIsNext、currentSquares 和 handlePlay 作为 props 传递给 Board 组件:
export default function Game() {
  const [xIsNext, setXIsNext] = useState(true);
  const [history, setHistory] = useState([Array(9).fill(null)]);
  const currentSquares = history[history.length - 1];

  function handlePlay(nextSquares) {
    // TODO
  }

  return (
    <div className="game">
      <div className="game-board">
        <Board xIsNext={xIsNext} squares={currentSquares} onPlay={handlePlay} />
        //...
  )
}
让 Board 组件完全由它接收到的 props 控制。更改 Board 组件以采用三个 props:xIsNext、squares和一个新的 onPlay 函数,当玩家落子时,Board 可以使用更新的 square 数组调用该函数。接下来,删除调用 useState 的 Board 函数的前两行:
function Board({ xIsNext, squares, onPlay }) {
  function handleClick(i) {
    //...
  }
  // ...
}
现在,将 Board 组件里面的 handleClick 中的 setSquares 和 setXIsNext 调用替换为对新 onPlay 函数的一次调用,这样 Game 组件就可以在用户单击方块时更新 Board:
function Board({ xIsNext, squares, onPlay }) {
  function handleClick(i) {
    if (calculateWinner(squares) || squares[i]) {
      return;
    }
    const nextSquares = squares.slice();
    if (xIsNext) {
      nextSquares[i] = "X";
    } else {
      nextSquares[i] = "O";
    }
    onPlay(nextSquares);
  }
  //...
}
Board 组件完全由 Game 组件传递给它的 props 控制。你需要在 Game 组件中实现 handlePlay 函数才能使游戏重新运行。
handlePlay 被调用应该做什么?请记住,Board 以前使用更新后的数组调用 setSquares;现在它将更新后的 squares 数组传递给 onPlay。
handlePlay 函数需要更新 Game 的 state 以触发重新渲染,但是你没有可以再调用的 setSquares 函数——你现在正在使用 history state 变量来存储这些信息。你需要追加更新后的 squares 数组来更新 history 作为新的历史入口。你还需要切换 xIsNext,就像 Board 过去所做的那样:
export default function Game() {
  //...
  function handlePlay(nextSquares) {
    setHistory([...history, nextSquares]);
    setXIsNext(!xIsNext);
  }
  //...
}在这里,[...history, nextSquares] 创建了一个新数组,其中包含 history 中的所有元素,后跟 nextSquares。(你可以将 ...history 展开语法理解为“枚举 history 中的所有元素”。)
例如,如果 history 是 [[null,null,null], ["X",null,null]],nextSquares 是 ["X",null,"O"],那么新的 [...history, nextSquares] 数组就是 [[null,null,null], ["X",null,null], ["X",null,"O"]]。
此时,你已将 state 移至 Game 组件中,并且 UI 应该完全正常工作,就像重构之前一样。这是此时代码的样子:
import { useState } from 'react';

function Square({ value, onSquareClick }) {
  return (
    <button className="square" onClick={onSquareClick}>
      {value}
    </button>
  );
}

function Board({ xIsNext, squares, onPlay }) {
  function handleClick(i) {
    if (calculateWinner(squares) || squares[i]) {
      return;
    }
    const nextSquares = squares.slice();
    if (xIsNext) {
      nextSquares[i] = 'X';
    } else {
      nextSquares[i] = 'O';
    }
    onPlay(nextSquares);
  }

  const winner = calculateWinner(squares);
  let status;
  if (winner) {
    status = 'Winner: ' + winner;
  } else {
    status = 'Next player: ' + (xIsNext ? 'X' : 'O');
  }

  return (
    <>
      <div className="status">{status}</div>
      <div className="board-row">
        <Square value={squares[0]} onSquareClick={() => handleClick(0)} />
        <Square value={squares[1]} onSquareClick={() => handleClick(1)} />
        <Square value={squares[2]} onSquareClick={() => handleClick(2)} />
      </div>
      <div className="board-row">
        <Square value={squares[3]} onSquareClick={() => handleClick(3)} />
        <Square value={squares[4]} onSquareClick={() => handleClick(4)} />
        <Square value={squares[5]} onSquareClick={() => handleClick(5)} />
      </div>
      <div className="board-row">
        <Square value={squares[6]} onSquareClick={() => handleClick(6)} />
        <Square value={squares[7]} onSquareClick={() => handleClick(7)} />
        <Square value={squares[8]} onSquareClick={() => handleClick(8)} />
      </div>
    </>
  );
}

export default function Game() {
  const [xIsNext, setXIsNext] = useState(true);
  const [history, setHistory] = useState([Array(9).fill(null)]);
  const currentSquares = history[history.length - 1];

  function handlePlay(nextSquares) {
    setHistory([...history, nextSquares]);
    setXIsNext(!xIsNext);
  }

  return (
    <div className="game">
      <div className="game-board">
        <Board xIsNext={xIsNext} squares={currentSquares} onPlay={handlePlay} />
      </div>
      <div className="game-info">
        <ol>{/*TODO*/}</ol>
      </div>
    </div>
  );
}

function calculateWinner(squares) {
  const lines = [
    [0, 1, 2],
    [3, 4, 5],
    [6, 7, 8],
    [0, 3, 6],
    [1, 4, 7],
    [2, 5, 8],
    [0, 4, 8],
    [2, 4, 6],
  ];
  for (let i = 0; i < lines.length; i++) {
    const [a, b, c] = lines[i];
    if (squares[a] && squares[a] === squares[b] && squares[a] === squares[c]) {
      return squares[a];
    }
  }
  return null;
}
1.18、显示过去的落子
由于你正在记录井字棋游戏的历史,因此你现在可以向玩家显示过去的动作列表。
像 <button> 这样的 React 元素是常规的 JavaScript 对象;你可以在你的应用程序中传递它们。要在 React 中渲染多个项目,你可以使用 React 元素数组。
你已经有一组 state 为 history 的数组,所以现在你需要将其转换为一组 React 元素。在 JavaScript 中,要将一个数组转换为另一个数组,可以使用数组的map方法。
[1, 2, 3].map((x) => x * 2) // [2, 4, 6]
你将使用 map 将你的 history 动作转换为代表屏幕上按钮的 React 元素,并显示一个按钮列表以“跳转”到过去的动作。让我们在 Game 组件中用 map 代替 history:
export default function Game() {
  const [xIsNext, setXIsNext] = useState(true);
  const [history, setHistory] = useState([Array(9).fill(null)]);
  const currentSquares = history[history.length - 1];

  function handlePlay(nextSquares) {
    setHistory([...history, nextSquares]);
    setXIsNext(!xIsNext);
  }

  function jumpTo(nextMove) {
    // TODO
  }

  const moves = history.map((squares, move) => {
    let description;
    if (move > 0) {
      description = 'Go to move #' + move;
    } else {
      description = 'Go to game start';
    }
    return (
      <li>
        <button onClick={() => jumpTo(move)}>{description}</button>
      </li>
    );
  });

  return (
    <div className="game">
      <div className="game-board">
        <Board xIsNext={xIsNext} squares={currentSquares} onPlay={handlePlay} />
      </div>
      <div className="game-info">
        <ol>{moves}</ol>
      </div>
    </div>
  );
}
你可以在下面看到你的代码应该是什么样子。请注意,你应该会在开发者工具控制台中看到一条错误消息:

你将在下一节中修复此错误。
App.js
import { useState } from 'react';

function Square({ value, onSquareClick }) {
  return (
    <button className="square" onClick={onSquareClick}>
      {value}
    </button>
  );
}

function Board({ xIsNext, squares, onPlay }) {
  function handleClick(i) {
    if (calculateWinner(squares) || squares[i]) {
      return;
    }
    const nextSquares = squares.slice();
    if (xIsNext) {
      nextSquares[i] = 'X';
    } else {
      nextSquares[i] = 'O';
    }
    onPlay(nextSquares);
  }

  const winner = calculateWinner(squares);
  let status;
  if (winner) {
    status = 'Winner: ' + winner;
  } else {
    status = 'Next player: ' + (xIsNext ? 'X' : 'O');
  }

  return (
    <>
      <div className="status">{status}</div>
      <div className="board-row">
        <Square value={squares[0]} onSquareClick={() => handleClick(0)} />
        <Square value={squares[1]} onSquareClick={() => handleClick(1)} />
        <Square value={squares[2]} onSquareClick={() => handleClick(2)} />
      </div>
      <div className="board-row">
        <Square value={squares[3]} onSquareClick={() => handleClick(3)} />
        <Square value={squares[4]} onSquareClick={() => handleClick(4)} />
        <Square value={squares[5]} onSquareClick={() => handleClick(5)} />
      </div>
      <div className="board-row">
        <Square value={squares[6]} onSquareClick={() => handleClick(6)} />
        <Square value={squares[7]} onSquareClick={() => handleClick(7)} />
        <Square value={squares[8]} onSquareClick={() => handleClick(8)} />
      </div>
    </>
  );
}

export default function Game() {
  const [xIsNext, setXIsNext] = useState(true);
  const [history, setHistory] = useState([Array(9).fill(null)]);
  const currentSquares = history[history.length - 1];

  function handlePlay(nextSquares) {
    setHistory([...history, nextSquares]);
    setXIsNext(!xIsNext);
  }

  function jumpTo(nextMove) {
    // TODO
  }

  const moves = history.map((squares, move) => {
    let description;
    if (move > 0) {
      description = 'Go to move #' + move;
    } else {
      description = 'Go to game start';
    }
    return (
      <li>
        <button onClick={() => jumpTo(move)}>{description}</button>
      </li>
    );
  });

  return (
    <div className="game">
      <div className="game-board">
        <Board xIsNext={xIsNext} squares={currentSquares} onPlay={handlePlay} />
      </div>
      <div className="game-info">
        <ol>{moves}</ol>
      </div>
    </div>
  );
}

function calculateWinner(squares) {
  const lines = [
    [0, 1, 2],
    [3, 4, 5],
    [6, 7, 8],
    [0, 3, 6],
    [1, 4, 7],
    [2, 5, 8],
    [0, 4, 8],
    [2, 4, 6],
  ];
  for (let i = 0; i < lines.length; i++) {
    const [a, b, c] = lines[i];
    if (squares[a] && squares[a] === squares[b] && squares[a] === squares[c]) {
      return squares[a];
    }
  }
  return null;
}
当你在传递给 map 的函数中遍历 history 数组时,squares 参数遍历 history 的每个元素,move 参数遍历每个数组索引:0 、1、2……(在大多数情况下,你需要数组元素,但要渲染落子列表,你只需要索引。)
对于井字棋游戏历史中的每一步,你创建一个列表项 <li>,其中包含一个按钮 <button>。该按钮有一个 onClick 处理程序,它调用一个名为 jumpTo 的函数(你尚未实现)。
现在,你应该会看到游戏中发生的动作列表和开发人员工具控制台中的错误。让我们讨论一下“关键”错误的含义。
1.19、选择 key
当你渲染一个列表时,React 会存储一些关于每个渲染列表项的信息。当你更新一个列表时,React 需要确定发生了什么变化。你可以添加、删除、重新排列或更新列表的项目。想象一下从
<li>Alexa: 7 tasks left</li>
<li>Ben: 5 tasks left</li>
到
<li>Ben: 9 tasks left</li>
<li>Claudia: 8 tasks left</li>
<li>Alexa: 5 tasks left</li>
除了更新的计数之外,阅读本文的人可能会说你交换了 Alexa 和 Ben 的顺序,并在 Alexa 和 Ben 之间插入了 Claudia。然而,React 是一个计算机程序,不知道你的意图,因此你需要为每个列表项指定一个 key 属性,以将每个列表项与其兄弟项区分开来。如果你的数据来自数据库,Alexa、Ben 和 Claudia 的数据库 ID 可以用作 key:
<li key={user.id}>
  {user.name}: {user.taskCount} tasks left
</li>
重新渲染列表时,React 获取每个列表项的 key 并搜索前一个列表的项以查找匹配的 key。如果当前列表有一个之前不存在的 key,React 会创建一个组件。如果当前列表缺少前一个列表中存在的 key,React 会销毁前一个组件。如果两个 key 匹配,则落子相应的组件。
key 告诉 React 每个组件的身份,这使得 React 可以在重新渲染时保持 state。如果组件的 key 发生变化,组件将被销毁,新 state 将重新创建。
key 是 React 中一个特殊的保留属性。创建元素时,React 提取 key 属性并将 key 直接存储在返回的元素上。尽管 key 看起来像是作为 props 传递的,但 React 会自动使用 key 来决定要更新哪些组件。组件无法询问其父组件指定的 key。
1.20、 强烈建议你在构建动态列表时分配适当的 key
如果你没有合适的 key,你可能需要考虑重组你的数据,以便你这样做。
如果没有指定 key,React 会报错,默认使用数组索引作为 key。在尝试重新排序列表项或插入/删除列表项时,使用数组索引作为 key 是有问题的。显式传递 key={i} 可以消除错误,但与数组索引有相同的问题,在大多数情况下不推荐使用。
key 不需要是全局唯一的;它们只需要在组件及其同级组件之间是唯一的。
1.21、实现时间旅行
在井字棋游戏的历史中,过去的每一步都有一个唯一的 ID 与之相关联:它是动作的序号。落子永远不会被重新排序、删除或从中间插入,因此使用落子的索引作为 key 是安全的。
在 Game 函数中,你可以将 key 添加为 <li key={move}>,如果你重新加载渲染的游戏,React 的“key”错误应该会消失:
const moves = history.map((squares, move) => {
  //...
  return (
    <li key={move}>
      <button onClick={() => jumpTo(move)}>{description}</button>
    </li>
  );
});
import { useState } from 'react';
function Square({ value, onSquareClick }) {
return (
<button className="square" onClick={onSquareClick}>
{value}
</button>
);
}
function Board({ xIsNext, squares, onPlay }) {
function handleClick(i) {
if (calculateWinner(squares) || squares[i]) {
return;
}
const nextSquares = squares.slice();
if (xIsNext) {
nextSquares[i] = 'X';
} else {
nextSquares[i] = 'O';
}
onPlay(nextSquares);
}
const winner = calculateWinner(squares);
let status;
if (winner) {
status = 'Winner: ' + winner;
} else {
status = 'Next player: ' + (xIsNext ? 'X' : 'O');
}
return (
<>
<div className="status">{status}</div>
<div className="board-row">
<Square value={squares[0]} onSquareClick={() => handleClick(0)} />
<Square value={squares[1]} onSquareClick={() => handleClick(1)} />
<Square value={squares[2]} onSquareClick={() => handleClick(2)} />
</div>
<div className="board-row">
<Square value={squares[3]} onSquareClick={() => handleClick(3)} />
<Square value={squares[4]} onSquareClick={() => handleClick(4)} />
<Square value={squares[5]} onSquareClick={() => handleClick(5)} />
</div>
<div className="board-row">
<Square value={squares[6]} onSquareClick={() => handleClick(6)} />
<Square value={squares[7]} onSquareClick={() => handleClick(7)} />
<Square value={squares[8]} onSquareClick={() => handleClick(8)} />
</div>
</>
);
}
export default function Game() {
const [xIsNext, setXIsNext] = useState(true);
const [history, setHistory] = useState([Array(9).fill(null)]);
const currentSquares = history[history.length - 1];
function handlePlay(nextSquares) {
setHistory([...history, nextSquares]);
setXIsNext(!xIsNext);
}
function jumpTo(nextMove) {
// TODO
}
const moves = history.map((squares, move) => {
let description;
if (move > 0) {
description = 'Go to move #' + move;
} else {
description = 'Go to game start';
}
return (
<li key={move}>
<button onClick={() => jumpTo(move)}>{description}</button>
</li>
);
});
return (
<div className="game">
<div className="game-board">
<Board xIsNext={xIsNext} squares={currentSquares} onPlay={handlePlay} />
</div>
<div className="game-info">
<ol>{moves}</ol>
</div>
</div>
);
}
function calculateWinner(squares) {
const lines = [
[0, 1, 2],
[3, 4, 5],
[6, 7, 8],
[0, 3, 6],
[1, 4, 7],
[2, 5, 8],
[0, 4, 8],
[2, 4, 6],
];
for (let i = 0; i < lines.length; i++) {
const [a, b, c] = lines[i];
if (squares[a] && squares[a] === squares[b] && squares[a] === squares[c]) {
return squares[a];
}
}
return null;
}
在你可以实现 jumpTo 之前,你需要 Game 组件来跟踪用户当前正在查看的步骤。为此,定义一个名为 currentMove 的新 state 变量,默认为 0:
export default function Game() {
  const [xIsNext, setXIsNext] = useState(true);
  const [history, setHistory] = useState([Array(9).fill(null)]);
  const [currentMove, setCurrentMove] = useState(0);
  const currentSquares = history[history.length - 1];
  //...
}
接下来,更新 Game 中的 jumpTo 函数来更新 currentMove。如果你将 currentMove 更改为偶数,你还将设置 xIsNext 为 true。
export default function Game() {
  // ...
  function jumpTo(nextMove) {
    setCurrentMove(nextMove);
    setXIsNext(nextMove % 2 === 0);
  }
  //...
}
你现在将对 Game 的 handlePlay 函数进行两处更改,该函数在你单击方块时调用。
如果你“回到过去”然后从那一点开始采取新的行动,你只想保持那一点的历史。不是在 history 中的所有项目(... 扩展语法)之后添加 nextSquares,而是在 history.slice(0, currentMove + 1) 中的所有项目之后添加它,这样你就只保留旧历史的那部分。
每次落子时,你都需要更新 currentMove 以指向最新的历史条目。
function handlePlay(nextSquares) {
  const nextHistory = [...history.slice(0, currentMove + 1), nextSquares];
  setHistory(nextHistory);
  setCurrentMove(nextHistory.length - 1);
  setXIsNext(!xIsNext);
}
最后,你将修改 Game 组件以渲染当前选定的着法,而不是始终渲染最后的着法:
export default function Game() {
  const [xIsNext, setXIsNext] = useState(true);
  const [history, setHistory] = useState([Array(9).fill(null)]);
  const [currentMove, setCurrentMove] = useState(0);
  const currentSquares = history[currentMove];

  // ...
}
如果你点击游戏历史中的任何一步,井字棋棋盘应立即更新以显示该步骤发生后棋盘的样子。
App.js
import { useState } from 'react';

function Square({value, onSquareClick}) {
  return (
    <button className="square" onClick={onSquareClick}>
      {value}
    </button>
  );
}

function Board({ xIsNext, squares, onPlay }) {
  function handleClick(i) {
    if (calculateWinner(squares) || squares[i]) {
      return;
    }
    const nextSquares = squares.slice();
    if (xIsNext) {
      nextSquares[i] = 'X';
    } else {
      nextSquares[i] = 'O';
    }
    onPlay(nextSquares);
  }

  const winner = calculateWinner(squares);
  let status;
  if (winner) {
    status = 'Winner: ' + winner;
  } else {
    status = 'Next player: ' + (xIsNext ? 'X' : 'O');
  }

  return (
    <>
      <div className="status">{status}</div>
      <div className="board-row">
        <Square value={squares[0]} onSquareClick={() => handleClick(0)} />
        <Square value={squares[1]} onSquareClick={() => handleClick(1)} />
        <Square value={squares[2]} onSquareClick={() => handleClick(2)} />
      </div>
      <div className="board-row">
        <Square value={squares[3]} onSquareClick={() => handleClick(3)} />
        <Square value={squares[4]} onSquareClick={() => handleClick(4)} />
        <Square value={squares[5]} onSquareClick={() => handleClick(5)} />
      </div>
      <div className="board-row">
        <Square value={squares[6]} onSquareClick={() => handleClick(6)} />
        <Square value={squares[7]} onSquareClick={() => handleClick(7)} />
        <Square value={squares[8]} onSquareClick={() => handleClick(8)} />
      </div>
    </>
  );
}

export default function Game() {
  const [xIsNext, setXIsNext] = useState(true);
  const [history, setHistory] = useState([Array(9).fill(null)]);
  const [currentMove, setCurrentMove] = useState(0);
  const currentSquares = history[currentMove];

  function handlePlay(nextSquares) {
    const nextHistory = [...history.slice(0, currentMove + 1), nextSquares];
    setHistory(nextHistory);
    setCurrentMove(nextHistory.length - 1);
    setXIsNext(!xIsNext);
  }

  function jumpTo(nextMove) {
    setCurrentMove(nextMove);
    setXIsNext(nextMove % 2 === 0);
  }

  const moves = history.map((squares, move) => {
    let description;
    if (move > 0) {
      description = 'Go to move #' + move;
    } else {
      description = 'Go to game start';
    }
    return (
      <li key={move}>
        <button onClick={() => jumpTo(move)}>{description}</button>
      </li>
    );
  });

  return (
    <div className="game">
      <div className="game-board">
        <Board xIsNext={xIsNext} squares={currentSquares} onPlay={handlePlay} />
      </div>
      <div className="game-info">
        <ol>{moves}</ol>
      </div>
    </div>
  );
}

function calculateWinner(squares) {
  const lines = [
    [0, 1, 2],
    [3, 4, 5],
    [6, 7, 8],
    [0, 3, 6],
    [1, 4, 7],
    [2, 5, 8],
    [0, 4, 8],
    [2, 4, 6],
  ];
  for (let i = 0; i < lines.length; i++) {
    const [a, b, c] = lines[i];
    if (squares[a] && squares[a] === squares[b] && squares[a] === squares[c]) {
      return squares[a];
    }
  }
  return null;
}
1.22、最后清理
如果仔细查看代码,你可能会注意到当 currentMove 为偶数时为 xIsNext === true,而当 currentMove 为奇数时为 xIsNext === false。换句话说,如果你知道 currentMove 的值,那么你总能算出 xIsNext 应该是什么。
你没有理由将这两者都存储在 state 中。事实上,总是尽量避免冗余的 state。简化你在 state 中存储的内容可以减少错误并使你的代码更易于理解。更改 Game 使其不将 xIsNext 存储为单独的 state 变量,而是根据 currentMove 计算出来:
export default function Game() {
  const [history, setHistory] = useState([Array(9).fill(null)]);
  const [currentMove, setCurrentMove] = useState(0);
  const xIsNext = currentMove % 2 === 0;
  const currentSquares = history[currentMove];

  function handlePlay(nextSquares) {
    const nextHistory = [...history.slice(0, currentMove + 1), nextSquares];
    setHistory(nextHistory);
    setCurrentMove(nextHistory.length - 1);
  }

  function jumpTo(nextMove) {
    setCurrentMove(nextMove);
  }
  // ...
}
你不再需要 xIsNext state 声明或对 setXIsNext 的调用。现在,xIsNext 不可能与 currentMove 不同步,即使你的代码写错了。
1.23、收尾
祝贺!你已经创建了一个井字棋游戏,你实现了:
你现在可以玩的井字棋游戏
玩家在赢的时候有提示
随着游戏的进行存储游戏的历史
允许玩家回顾游戏的历史并查看棋盘的以前的版本
干得好!我们希望你现在觉得你对 React 的工作原理有了很好的了解。
在这里对照一下最终的结果吧:
import { useState } from 'react';

function Square({ value, onSquareClick }) {
  return (
    <button className="square" onClick={onSquareClick}>
      {value}
    </button>
  );
}

function Board({ xIsNext, squares, onPlay }) {
  function handleClick(i) {
    if (calculateWinner(squares) || squares[i]) {
      return;
    }
    const nextSquares = squares.slice();
    if (xIsNext) {
      nextSquares[i] = 'X';
    } else {
      nextSquares[i] = 'O';
    }
    onPlay(nextSquares);
  }

  const winner = calculateWinner(squares);
  let status;
  if (winner) {
    status = 'Winner: ' + winner;
  } else {
    status = 'Next player: ' + (xIsNext ? 'X' : 'O');
  }

  return (
    <>
      <div className="status">{status}</div>
      <div className="board-row">
        <Square value={squares[0]} onSquareClick={() => handleClick(0)} />
        <Square value={squares[1]} onSquareClick={() => handleClick(1)} />
        <Square value={squares[2]} onSquareClick={() => handleClick(2)} />
      </div>
      <div className="board-row">
        <Square value={squares[3]} onSquareClick={() => handleClick(3)} />
        <Square value={squares[4]} onSquareClick={() => handleClick(4)} />
        <Square value={squares[5]} onSquareClick={() => handleClick(5)} />
      </div>
      <div className="board-row">
        <Square value={squares[6]} onSquareClick={() => handleClick(6)} />
        <Square value={squares[7]} onSquareClick={() => handleClick(7)} />
        <Square value={squares[8]} onSquareClick={() => handleClick(8)} />
      </div>
    </>
  );
}

export default function Game() {
  const [history, setHistory] = useState([Array(9).fill(null)]);
  const [currentMove, setCurrentMove] = useState(0);
  const xIsNext = currentMove % 2 === 0;
  const currentSquares = history[currentMove];

  function handlePlay(nextSquares) {
    const nextHistory = [...history.slice(0, currentMove + 1), nextSquares];
    setHistory(nextHistory);
    setCurrentMove(nextHistory.length - 1);
  }

  function jumpTo(nextMove) {
    setCurrentMove(nextMove);
  }

  const moves = history.map((squares, move) => {
    let description;
    if (move > 0) {
      description = 'Go to move #' + move;
    } else {
      description = 'Go to game start';
    }
    return (
      <li key={move}>
        <button onClick={() => jumpTo(move)}>{description}</button>
      </li>
    );
  });

  return (
    <div className="game">
      <div className="game-board">
        <Board xIsNext={xIsNext} squares={currentSquares} onPlay={handlePlay} />
      </div>
      <div className="game-info">
        <ol>{moves}</ol>
      </div>
    </div>
  );
}

function calculateWinner(squares) {
  const lines = [
    [0, 1, 2],
    [3, 4, 5],
    [6, 7, 8],
    [0, 3, 6],
    [1, 4, 7],
    [2, 5, 8],
    [0, 4, 8],
    [2, 4, 6],
  ];
  for (let i = 0; i < lines.length; i++) {
    const [a, b, c] = lines[i];
    if (squares[a] && squares[a] === squares[b] && squares[a] === squares[c]) {
      return squares[a];
    }
  }
  return null;
}
如果你有额外的时间或想练习新的 React 技能,这里有一些你可以改进井字棋游戏的想法,按难度递增的顺序列出:
仅针对当前着手,显示“You are at move #…”而不是按钮。
重写
Board以使用两个循环来制作方块而不是对它们进行硬编码。添加一个切换按钮,使可以按升序或降序对落子的步数进行排序。
当有人获胜时,突出显示致使获胜的三个方块(当没有人获胜时,显示一条关于结果为平局的消息)。
在“落子”的历史列表中以 (row, col) 格式显示每步的位置。
在本教程中,你已经接触到了 React 概念,包括元素、组件、props 和 state。现在你已经了解了这些概念在构建游戏时是如何工作的,请查看React 哲学,以了解这些 React 概念在构建应用的 UI 时是如何工作的。
2、React 哲学
React 可以改变你对可见设计和应用构建的思考。当你使用 React 构建用户界面时,你首先会把它分解成一个个 组件,然后,你需要把这些组件连接在一起,使数据流经它们。在本教程中,我们将引导你使用 React 构建一个可搜索的产品数据表。
2.1、从原型开始
想象一下,你早已从设计者那儿得到了一个 JSON API 和原型。JSON API 返回如下的数据:
[
  { category: "Fruits", price: "$1", stocked: true, name: "Apple" },
  { category: "Fruits", price: "$1", stocked: true, name: "Dragonfruit" },
  { category: "Fruits", price: "$2", stocked: false, name: "Passionfruit" },
  { category: "Vegetables", price: "$2", stocked: true, name: "Spinach" },
  { category: "Vegetables", price: "$4", stocked: false, name: "Pumpkin" },
  { category: "Vegetables", price: "$1", stocked: true, name: "Peas" }
]
原型看起来像是这样:

仅需跟随下面的五步,即可使用 React 来实现 UI。
2.2、步骤一:将 UI 拆解为组件层级结构
一开始,在绘制原型中的每个组件和子组件周围绘制盒子并命名它们。如果你与设计师一起工作,他们可能早已在其设计工具中对这些组件进行了命名。检查一下它们! 取决于你的使用背景,可以考虑通过不同的方式将设计分割为组件:
程序设计——使用同样的技术决定你是否应该创建一个新的函数或者对象。这一技术即 单一功能,也就是说,一个组件理想情况下应仅做一件事情。但随着功能的持续增长,它应该被分解为更小的子组件。
CSS——思考你将把类选择器用于何处。(然而,组件并没有那么细的粒度。)
设计——思考你将如何组织布局的层级。
如果你的 JSON 结构非常棒,经常会发现其映射到 UI 中的组件结构是一件自然而然的事情。那是因为 UI 和原型常拥有相同的信息结构—即,相同的形状。将你的 UI 分割到组件,每个组件匹配到原型中的每个部分。
以下展示了五个组件:
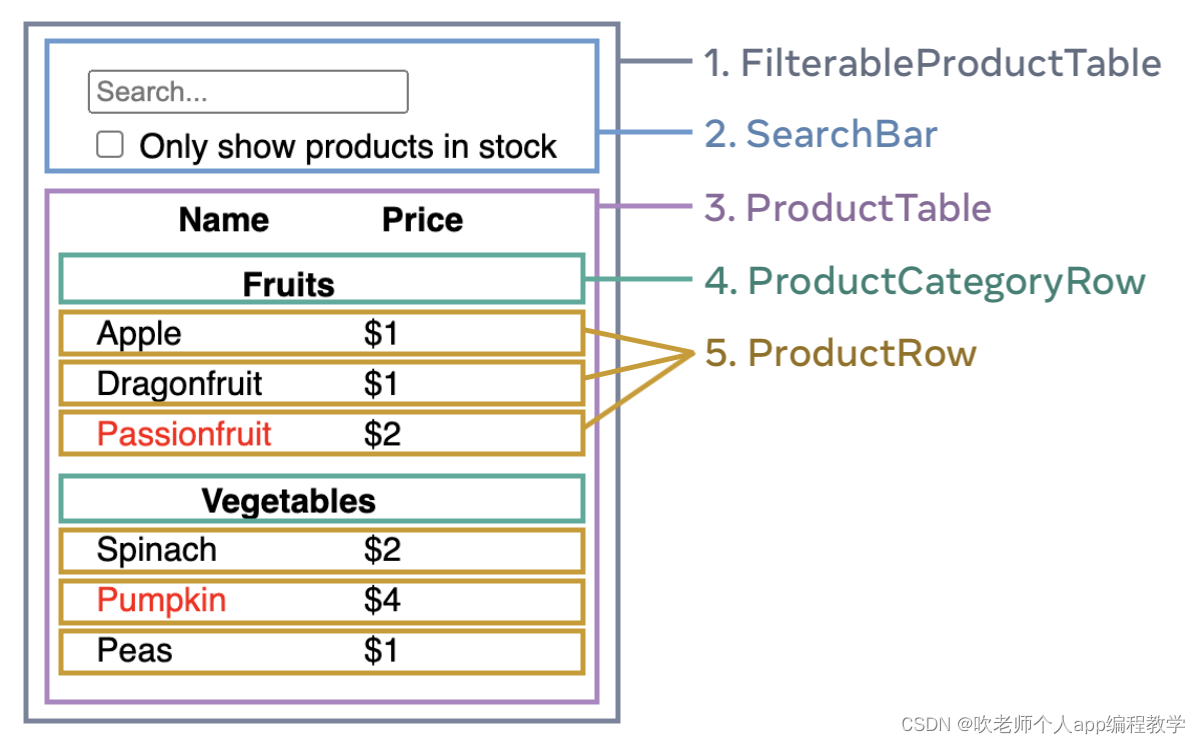
FilterableProductTable(灰色)包含完整的应用。
SearchBar(蓝色)获取用户输入。
ProductTable(淡紫色)根据用户输入,展示和过滤清单。
ProductCategoryRow(绿色)展示每个类别的表头。
ProductRow(黄色)展示每个产品的行。
看向 ProductTable(淡紫色),可以看到表头(包含 “Name” 和 “Price” 标签)并不是独立的组件。这是个人喜好的问题,你可以采取任何一种方式继续。在这个例子中,它是作为 ProductTable 的一部分,因为它展现在 ProductTable 列表之中。然而,如果这个表头变得复杂(举个例子,如果添加排序),创建独立的 ProductTableHeader 组件就变得有意义了。
现在你已经在原型中辨别了组件,并将它们转化为了层级结构。在原型中,组件可以展示在其它组件之中,在层级结构中如同其孩子一般:
FilterableProductTableSearchBarProductTableProductCategoryRowProductRow
2.3、步骤二:使用 React 构建一个静态版本
现在你已经拥有了你自己的组件层级结构,是时候实现你的应用程序了。最直接的办法是根据你的数据模型,构建一个不带任何交互的 UI 渲染代码版本…经常是先构建一个静态版本比较简单,然后再一个个添加交互。构建一个静态版本需要写大量的代码,并不需要什么思考; 但添加交互需要大量的思考,却不需要大量的代码。
构建应用程序的静态版本来渲染你的数据模型,将构建组件并复用其它的组件,然后使用props进行传递数据。Props 是从父组件向子组件传递数据的一种方式。如果你对 state章节很熟悉,不要在静态版本中使用 state 进行构建。state 只是为交互提供的保留功能,即数据会随着时间变化。因为这是一个静态应用程序,所以并不需要。
你既可以通过从层次结构更高层组件(如 FilterableProductTable)开始“自上而下”构建,也可以通过从更低层级组件(如 ProductRow)“自下而上”进行构建。在简单的例子中,自上而下构建通常更简单;而在大型项目中,自下而上构建更简单。
function ProductCategoryRow({ category }) {
  return (
    <tr>
      <th colSpan="2">
        {category}
      </th>
    </tr>
  );
}

function ProductRow({ product }) {
  const name = product.stocked ? product.name :
    <span style={
   { color: 'red' }}>
      {product.name}
    </span>;

  return (
    <tr>
      <td>{name}</td>
      <td>{product.price}</td>
    </tr>
  );
}

function ProductTable({ products }) {
  const rows = [];
  let lastCategory = null;

  products.forEach((product) => {
    if (product.category !== lastCategory) {
      rows.push(
        <ProductCategoryRow
          category={product.category}
          key={product.category} />
      );
    }
    rows.push(
      <ProductRow
        product={product}
        key={product.name} />
    );
    lastCategory = product.category;
  });

  return (
    <table>
      <thead>
        <tr>
          <th>Name</th>
          <th>Price</th>
        </tr>
      </thead>
      <tbody>{rows}</tbody>
    </table>
  );
}

function SearchBar() {
  return (
    <form>
      <input type="text" placeholder="Search..." />
      <label>
        <input type="checkbox" />
        {' '}
        Only show products in stock
      </label>
    </form>
  );
}

function FilterableProductTable({ products }) {
  return (
    <div>
      <SearchBar />
      <ProductTable products={products} />
    </div>
  );
}

const PRODUCTS = [
  {category: "Fruits", price: "$1", stocked: true, name: "Apple"},
  {category: "Fruits", price: "$1", stocked: true, name: "Dragonfruit"},
  {category: "Fruits", price: "$2", stocked: false, name: "Passionfruit"},
  {category: "Vegetables", price: "$2", stocked: true, name: "Spinach"},
  {category: "Vegetables", price: "$4", stocked: false, name: "Pumpkin"},
  {category: "Vegetables", price: "$1", stocked: true, name: "Peas"}
];

export default function App() {
  return <FilterableProductTable products={PRODUCTS} />;
}
如果你无法理解这段代码,请先阅读快速入门章节!
在构建你的组件之后,即拥有一个渲染数据模型的可复用组件库。因为这是一个静态应用程序,组件仅返回 JSX。最顶层组件(FilterableProductTable)将接收你的数据模型作为其 prop。这被称之为单向数据流,因为数据从树的顶层组件传递到下面的组件。
在这部分中,你不需要使用任何 state,这是下一步的内容!
2.4、步骤三:找出 UI 精简且完整的 state 表示
为了使 UI 可交互,你需要用户更改潜在的数据结构。你将可以使用 state 进行实现。
考虑将 state 作为应用程序需要记住改变数据的最小集合。计算出你应用程序需要的绝对精简 state 表示,按需计算其它一切。举个例子,如果你正在构建一个购物列表,你可将他们在 state 中存储为数组。如果你同时想展示列表中物品数量,不需要将其另存为一个新的 state。取而代之,可以通过读取你数组的长度来实现。
现在考虑示例应用程序中的每一条数据:
产品原始列表
搜索用户键入的文本
复选框的值
过滤后的产品列表
其中哪些是 state 呢?标记出那些不是的:
- 随着时间推移 保持不变?如此,便不是 state。
- 通过 props 从父组件传递?如此,便不是 state。
- 是否可以基于已存在于组件中的 state 或者 props 进行计算?如此,它肯定不是state!
剩下的可能是 state。
让我们再次一条条验证它们:
- 原始列表中的产品 被作为 props 传递,所以不是 state。
- 搜索文本似乎应该是 state,因为它会随着时间的推移而变化,并且无法从任何东西中计算出来。
- 复选框的值似乎是 state,因为它会随着时间的推移而变化,并且无法从任何东西中计算出来。
- 过滤后列表中的产品 不是 state,因为可以通过被原始列表中的产品,根据搜索框文本和复选框的值进行计算。
这就意味着只有搜索文本和复选框的值是 state!非常好!
2.5、步骤四:验证 state 应该被放置在哪里
在验证你应用程序中的最小 state 数据之后,你需要验证哪个组件是通过改变 state 实现可响应的,或者 拥有 这个 state。记住:React 使用单向数据流,通过组件层级结构从父组件传递数据至子组件。要搞清楚哪个组件拥有哪个 state。如果你是第一次阅读此章节,可能会很有挑战,但可以通过下面的步骤搞定它!
为你应用程序中的每一个 state:
- 验证每一个基于特定 state 渲染的组件。
- 寻找它们最近并且共同的父组件——在层级结构中,一个凌驾于它们所有组件之上的组件。
- 决定 state 应该被放置于哪里:
- 通常情况下,你可以直接放置 state 于它们共同的父组件。
- 你也可以将 state 放置于它们父组件上层的组件。
- 如果你找不到一个有意义拥有这个 state 的地方,单独创建一个新的组件去管理这个 state,并将它添加到它们父组件上层的某个地方。
在之前的步骤中,你已在应用程序中创建了两个 state:输入框文本和复选框的值。在这个例子中,它们总在一起展示,将其视为一个 state 非常简单。
现在为这个 state 贯彻我们的策略:
- 验证使用 state 的组件:
ProductTable需要基于 state (搜索文本和复选框值) 过滤产品列表。SearchBar需要展示 state (搜索文本和复选框值)。
- 寻找它们的父组件:它们的第一个共同父组件为
FilterableProductTable。 - 决定 state 放置的地方:我们将放置过滤文本和勾选 state 的值于
FilterableProductTable。
所以 state 将被放置在 FilterableProductTable。
用 useState() Hook 为组件添加 state。Hook 可以“钩住”组件的 渲染周期。在 FilterableProductTable 的顶部添加两个 state 变量,用于指定你应用程序的初始 state:
function FilterableProductTable({ products }) {
  const [filterText, setFilterText] = useState('');
const [inStockOnly, setInStockOnly] = useState(false);然后,filterText 和 inStockOnly 作为 props 传递至 ProductTable 和 SearchBar:
<div>
  <SearchBar
    filterText={filterText}
    inStockOnly={inStockOnly} />
  <ProductTable
    products={products}
    filterText={filterText}
    inStockOnly={inStockOnly} />
</div>
你可以查看你应用程序的表现。在下面的沙盒代码中,通过修改 useState('') 为 useState('fruit') 以编辑 filterText 的初始值,你将会发现搜索输入框和表格发生更新:
import { useState } from 'react';

function FilterableProductTable({ products }) {
  const [filterText, setFilterText] = useState('');
  const [inStockOnly, setInStockOnly] = useState(false);

  return (
    <div>
      <SearchBar
        filterText={filterText}
        inStockOnly={inStockOnly} />
      <ProductTable
        products={products}
        filterText={filterText}
        inStockOnly={inStockOnly} />
    </div>
  );
}

function ProductCategoryRow({ category }) {
  return (
    <tr>
      <th colSpan="2">
        {category}
      </th>
    </tr>
  );
}

function ProductRow({ product }) {
  const name = product.stocked ? product.name :
    <span style={
   { color: 'red' }}>
      {product.name}
    </span>;

  return (
    <tr>
      <td>{name}</td>
      <td>{product.price}</td>
    </tr>
  );
}

function ProductTable({ products, filterText, inStockOnly }) {
  const rows = [];
  let lastCategory = null;

  products.forEach((product) => {
    if (
      product.name.toLowerCase().indexOf(
        filterText.toLowerCase()
      ) === -1
    ) {
      return;
    }
    if (inStockOnly && !product.stocked) {
      return;
    }
    if (product.category !== lastCategory) {
      rows.push(
        <ProductCategoryRow
          category={product.category}
          key={product.category} />
      );
    }
    rows.push(
      <ProductRow
        product={product}
        key={product.name} />
    );
    lastCategory = product.category;
  });

  return (
    <table>
      <thead>
        <tr>
          <th>Name</th>
          <th>Price</th>
        </tr>
      </thead>
      <tbody>{rows}</tbody>
    </table>
  );
}

function SearchBar({ filterText, inStockOnly }) {
  return (
    <form>
      <input
        type="text"
        value={filterText}
        placeholder="Search..."/>
      <label>
        <input
          type="checkbox"
          checked={inStockOnly} />
        {' '}
        Only show products in stock
      </label>
    </form>
  );
}

const PRODUCTS = [
  {category: "Fruits", price: "$1", stocked: true, name: "Apple"},
  {category: "Fruits", price: "$1", stocked: true, name: "Dragonfruit"},
  {category: "Fruits", price: "$2", stocked: false, name: "Passionfruit"},
  {category: "Vegetables", price: "$2", stocked: true, name: "Spinach"},
  {category: "Vegetables", price: "$4", stocked: false, name: "Pumpkin"},
  {category: "Vegetables", price: "$1", stocked: true, name: "Peas"}
];

export default function App() {
  return <FilterableProductTable products={PRODUCTS} />;
}
注意,编辑表单还不能正常工作,在上面的 sandbox 中,有一个控制台的报错,解释了原因:

在上面的沙盒中,ProductTable 和 SearchBar 读取 filterText 和 inStockOnly props 以渲染表格、输入,以及复选框。举个例子,这里展示了 SearchBar 如何填充输入的值:
function SearchBar({ filterText, inStockOnly }) {
  return (
    <form>
      <input
        type="text"
        value={filterText}
        placeholder="Search..."/>
然而,你还没有添加任何代码来响应用户的动作,如输入文案,这将是你应做的最后一步。
2.6、步骤五:添加反向数据流
目前你的应用程序可以带着 props 和 state 随着层级结构进行正确渲染。但是根据用户的输入改变 state,需要通过其它的方式支持数据流:深层结构的表单组件需要在 FilterableProductTable 中更新 state。
React 使数据流显式展示,是与双向数据绑定相比,需要更多的输入。如果你尝试在上述的例子中输入或者勾选复选框,发现 React 忽视了你的输入。这点是有意为之的。通过 <input value={filterText} />,已经设置了 input 的 value 属性,使之恒等于从 FilterableProductTable 传递的 filterText state。只要 filterText state 不设置,(输入框的)输入就不会改变。
当用户更改表单输入时,state 将更新以反映这些更改。state 由 FilterableProductTable 所拥有,所以只有它可以调用 setFilterText 和 setInStockOnly。使 SearchBar 更新 FilterableProductTable 的 state,需要将这些函数传递到 SearchBar:
function FilterableProductTable({ products }) {
  const [filterText, setFilterText] = useState('');
  const [inStockOnly, setInStockOnly] = useState(false);

  return (
    <div>
      <SearchBar
        filterText={filterText}
        inStockOnly={inStockOnly}
        onFilterTextChange={setFilterText}
        onInStockOnlyChange={setInStockOnly} />
在 SearchBar 中,添加一个 onChange 事件处理器,使用其设置父组件的 state:
function SearchBar({
  filterText,
  inStockOnly,
  onFilterTextChange,
  onInStockOnlyChange
}) {
  return (
    <form>
      <input
        type="text"
        value={filterText}
        placeholder="搜索"
        onChange={(e) => onFilterTextChange(e.target.value)}
      />
      <label>
        <input
          type="checkbox"
          checked={inStockOnly}
          onChange={(e) => onInStockOnlyChange(e.target.checked)}
现在应用程序可以完整工作了!
import { useState } from 'react';

function FilterableProductTable({ products }) {
  const [filterText, setFilterText] = useState('');
  const [inStockOnly, setInStockOnly] = useState(false);

  return (
    <div>
      <SearchBar
        filterText={filterText}
        inStockOnly={inStockOnly}
        onFilterTextChange={setFilterText}
        onInStockOnlyChange={setInStockOnly} />
      <ProductTable
        products={products}
        filterText={filterText}
        inStockOnly={inStockOnly} />
    </div>
  );
}

function ProductCategoryRow({ category }) {
  return (
    <tr>
      <th colSpan="2">
        {category}
      </th>
    </tr>
  );
}

function ProductRow({ product }) {
  const name = product.stocked ? product.name :
    <span style={
   { color: 'red' }}>
      {product.name}
    </span>;

  return (
    <tr>
      <td>{name}</td>
      <td>{product.price}</td>
    </tr>
  );
}

function ProductTable({ products, filterText, inStockOnly }) {
  const rows = [];
  let lastCategory = null;

  products.forEach((product) => {
    if (
      product.name.toLowerCase().indexOf(
        filterText.toLowerCase()
      ) === -1
    ) {
      return;
    }
    if (inStockOnly && !product.stocked) {
      return;
    }
    if (product.category !== lastCategory) {
      rows.push(
        <ProductCategoryRow
          category={product.category}
          key={product.category} />
      );
    }
    rows.push(
      <ProductRow
        product={product}
        key={product.name} />
    );
    lastCategory = product.category;
  });

  return (
    <table>
      <thead>
        <tr>
          <th>Name</th>
          <th>Price</th>
        </tr>
      </thead>
      <tbody>{rows}</tbody>
    </table>
  );
}

function SearchBar({
  filterText,
  inStockOnly,
  onFilterTextChange,
  onInStockOnlyChange
}) {
  return (
    <form>
      <input
        type="text"
        value={filterText} placeholder="Search..."
        onChange={(e) => onFilterTextChange(e.target.value)} />
      <label>
        <input
          type="checkbox"
          checked={inStockOnly}
          onChange={(e) => onInStockOnlyChange(e.target.checked)} />
        {' '}
        Only show products in stock
      </label>
    </form>
  );
}

const PRODUCTS = [
  {category: "Fruits", price: "$1", stocked: true, name: "Apple"},
  {category: "Fruits", price: "$1", stocked: true, name: "Dragonfruit"},
  {category: "Fruits", price: "$2", stocked: false, name: "Passionfruit"},
  {category: "Vegetables", price: "$2", stocked: true, name: "Spinach"},
  {category: "Vegetables", price: "$4", stocked: false, name: "Pumpkin"},
  {category: "Vegetables", price: "$1", stocked: true, name: "Peas"}
];

export default function App() {
  return <FilterableProductTable products={PRODUCTS} />;
}
你可以在添加交互这一章节,学习到所有处理事件和更新 state 的内容。
2.7、下一节,我该做什么?
本章只是一个概述,旨在告诉你如何使用 React 如何进行思考构建组件和应用程序。你可以即刻开始一个React项目, 或者在本教程中深入了解语法
智能推荐
Django数据警务技术专业系统 -计算机毕设 附源码64192-程序员宅基地
文章浏览阅读85次。登录模块:登录模块是进入系统的入口,所有用户必须登录后才能访问系统。登录需要输入用户名和密码、验证。登录成功后,会通过数据库获取用户的权限,并跳转至用户的主页面。管理员人员管理模块:管理员管理包括:管理员的及用户添加,修改和删除操作。添加管理员时,先判断用户添加的管理员是否是admin,如果不是则添加成功。修改删除同样。模块管理对课题信息、类型管理、学生选题、任务书信息、开题报告、毕业论文、分类管理、成绩信息、公告信息、教师信息等信息等进行维护操作。
Java将HTML导出为PDF-程序员宅基地
文章浏览阅读487次。大纲内容:配置对应jar 编写HTML模板 编写导出PDF工具类 业务中调用PDF工具类背景市场上Java导出word、execl较多,比如POI等。反而Java导出PDF实现开源的少之又少。为..._java html导出pdf
自定义videoview实现全屏播放_videoview全屏-程序员宅基地
文章浏览阅读4.1k次,点赞5次,收藏2次。最近的项目中需要横屏播放视频的功能,本来是想通过设置videoview宽高的方式来实现,不过后来发现效果不佳,遂决定自定义一个videoview来解决这个问题。代码如下:自定义view:package com.sac.widget;import android.R.integer;import android.content.Context;import android.uti_videoview全屏
Unexpected token o in JSON at position 1,调用JSON.parse()方法将字符串转换成json格式报异常,微信小程序_微信小程序 wxs 怎么判断字符串是否是json格式-程序员宅基地
文章浏览阅读5.8k次。问题: 在微信小程序中定义一个变量 var result,让这个变量调用JSON.parse()方法将字符串转换成json格式时,报Unexpected token o in JSON at position 1异常。源代码片段:// 获取某个变量var result = wx.getStorageSync('result ');// 直接调用JSON.parse(r..._微信小程序 wxs 怎么判断字符串是否是json格式
Nginx配置gzip压缩,提高网站访问速度_nginx 图片压缩-程序员宅基地
文章浏览阅读1.3k次。Nginx配置gzip压缩,提高网站访问速度_nginx 图片压缩
linux gbk putty 乱码,三个设置解决Putty登陆Linux同时支持GBK与UTF-8编码乱码的问题...-程序员宅基地
文章浏览阅读286次。三个设置解决Putty登陆Linux同时支持GBK与UTF-8编码乱码的问题UTF8的环境设置为putty的设置:1.Windows->Appearance->font setting->Fixedsys(这个字体好看,选其它中文字体也可以)2.Windows->translation->font->UTF-8,登陆上去linux后系统的设置:(如果你系统默认的..._putty不支持gbk
随便推点
ANSIBLE 中文学习_ansible 中文学习手册-程序员宅基地
文章浏览阅读168次。http://www.ansible.com.cn/ ansible 中文手册_ansible 中文学习手册
用DAC播放WAV文件_wav转dac-程序员宅基地
文章浏览阅读5.3k次,点赞7次,收藏41次。前言:目前基于智能门锁的开发,需要用到语音,但是由于如果用语音IC的话,声音内容就不方便调整更改,所以我们打算用单片机的DAC功能直接读取WAV文件,再用功放IC放大来实现智能语音。步骤一:用朗读女获取WAV文件有时候无法勾选WAV文件,可能是由于没有下载发音人语音导致的。步骤二:wav文件转PCM文件。WAV:wav是一种无损的音频文件格式,WAV符合 PIFF(Reso..._wav转dac
java 表格刷新_java中的表格要怎么自动刷新?-程序员宅基地
文章浏览阅读989次。你的位置:问答吧-> JAVA-> 问题详情java中的表格要怎么自动刷新?我现在是把显示列表写在了一个按钮事件上,而点了这个按钮以后表格没有自动刷新,要把滚动条拉一下才行。而且还有一个更严重的问题是,比如我原本读取了5条记录,后来输入了条件以后只查到一条记录,这样的情况下前面这条记录可以被覆盖,但后面原本查询..._java excel表格如何刷新
数据关键词招聘职位爬虫-程序员宅基地
文章浏览阅读161次。1 # -*- coding:utf-8 -*- 2 # Author:Sure Feng 3 4 from selenium import webdriver 5 from lxml import etree 6 import time 7 import json 8 import openpyxl 9 10 class LaGou..._爬虫岗位关键词
DOTA-Acrylamide DOTA-丙烯酰胺 DOTA-ACA-程序员宅基地
文章浏览阅读317次,点赞8次,收藏7次。DOTA-AcrylamideDOTA(多胺环亚胺)是一种常用的放射性标记化合物,被广泛应用于核医学、放射免疫分析、放射性标记等领域。然而,DOTA在合成过程中可能会产生一种有毒的副产物——丙烯酰胺(Acrylamide)。丙烯酰胺是一种已知的神经毒性和致癌物质,对人体健康具有潜在的危害。在合成DOTA的过程中,通常使用丙烯酰胺作为起始原料,经过一系列的化学反应得到最终产物。然而,由于这些化学反应不完全,导致在合成过程中会产生一定量的丙烯酰胺残留。保存:本品应密封避光,储存于阴凉,干燥,通风处。
微服务跨数据库联合查询_微服务架构下,解决数据库跨库查询的一些思路-程序员宅基地
文章浏览阅读2.2k次。加关注,不迷路! 前言在服务做微服务改造后,原先单库join查询已经不能满足要求,每个拆分的微服务对应一个数据库实例,而且部署在不同的服务器上,那么解决“跨库查询”就势在必行了。 以笔者实战经历来看,以下几个思路仅供参考: 表字段冗余想必大家已经很熟悉,几乎每天都会打交道,不用多讲。需要指出的是冗余字段不能太多,建议控制在2-4个左右。否则会出现数据更新不一致问题,一旦冗余字段有改..._微服务 跨库搜索